NewZed
-
Posts
6700 -
Joined
-
Last visited
-
Days Won
72
Content Type
Profiles
Forums
Blogs
Events
Gallery
Downloads
Store
Everything posted by NewZed
-
Bought a 74 260z not running
NewZed replied to 260ruztmachine's topic in S30 Series - 240z, 260z, 280z
5 years is a long time. You didn't mention anything about using new gas or cleaning out the old in your first post. Old gas does not burn like new gas, plus old gas in the carbs can cause problems, gumming things up over time and as it evaporates away. -
Bought a 74 260z not running
NewZed replied to 260ruztmachine's topic in S30 Series - 240z, 260z, 280z
A new puzzle...When was the last time the car ran? 74 with a 5 speed. So the transmission is not original. Is the motor? Is it still carbs or EFI now? The 74s have an electric fuel pump and a mechanical one, I believe. You should check them. This might help with your electrical problems - There is a contact cleaner called Deoxit DN5 that you can get from Guitar Center or on-line. It will help you diagnose electrical problems before you take things apart, plus it is a really good cleaner to use if you do take things apart. I have had a light stalk switch that did not give any lights at all, fixed just by applying Deoxit. It seems too easy but it works, quite often. -
Don't forget to tell what car and motor you're talking about while you're editing.
-
How do I remove this bolt? It aint budging.
NewZed replied to icapture's topic in Brakes, Wheels, Suspension and Chassis
If you're just cutting the springs, you're probably better off not removing the spindle pin. It will cost you time for sure, and probably some extra money. -
Now I'm confused. What is the Idle Air Control Valve on a 280Z engine? I can't find any reference to it in the FSM or elsewhere. I'm here to learn. Thanks. Thread moved to Parts Wanted.
-
Your ad is in "Cars Wanted". Maybe it should be in "Parts Wanted". Ball joints and gaskets are usually bought new from a parts supplier. You can't want used? Right? And 280s don't have an Idle Air Control Valve. Maybe you mean Air Regulator, the device that controls idle air supply when the engine is cold. Just trying to help...
-
I do most of my easy driving at 1800 - 2200 rpm myself. Motor just likes it there and that's where the speed limits and gearing seem to match up. Here is some good info from classiczcar, different problem, but pertinent to your situation. http://www.classiczcars.com/forums/showthread.php?p=325461#post325461 Post #7.
-
This link might help you out - http://www.xenons130.com/reference.html. There is another unzip utility called winrar out there if you don't have winzip. The Engine Fuel section is worth studying. There is some unusual stuff used to make these engines work, especially if you grew up on old American cars.
-
You mean fuel pressure gauge, right? Your car has a regulator already (at least it came with one and should still be there), mounted on the fuel rail. The Airtex pump is commonly recommended as an after market replacement, I believe, because it will fit in the same spot as the old one, with some modifications and can handle the pressure and volume necessary for the engine. I have one on my 76 and it works fine. One downside though, based on how I understand things, is that the original pump had a pressure relief valve that relieved pressure at the pump if line pressure got over about 43 - 64 psi. I don't think the Airtex has that so it could feasibly pressurize your lines to 95 psi if the return line got clogged. It would be worth measuring fuel pressure with a gauge and checking your return line and regulator if it is very high. I would be interested to know if you get a very high pressure reading since I have the same pump and have wondered what would happen if the return line got pinched or clogged. There are also several other reasons for your car to run rich, too many to take a guess, many due to temperature sensors and corroded connections. You could probably learn a lot just by searching the word "rich". It's a fairly common problem.
-
Thanks for the input on the car in the video. The comments at the Liveleak video site ruined it for me though, so I edited the link out. Still looked like an interesting car though.
-
So he's using low gears to break the tires loose, then power-braking and beating on it to keep them spinning. I thought maybe it was typical of a turbo motor, perhaps. I don't know much about the various L-series Z flavors yet. The comments imply that it was happening in Saudi Arabia or Iran. Don't read them if you're easily offended. They do have that oil money to blow over there and they seem to have a fascination with drifting so maybe they build motors just for tire-spinning...
-
Seems to have some good power. My 76 Z won't do that. Edit - Decided to pull this video after thinking about the comments AT the video site (Liveleak), not here. Thanks for the input.
-
That drawing is from the Factory Service Manual. The one in the downloadable file from xenons30 looks a little bit more legible. Plus the tramming procedure is included. It's in the Body section. You can download it for free. http://www.xenons30.com/reference.html
-
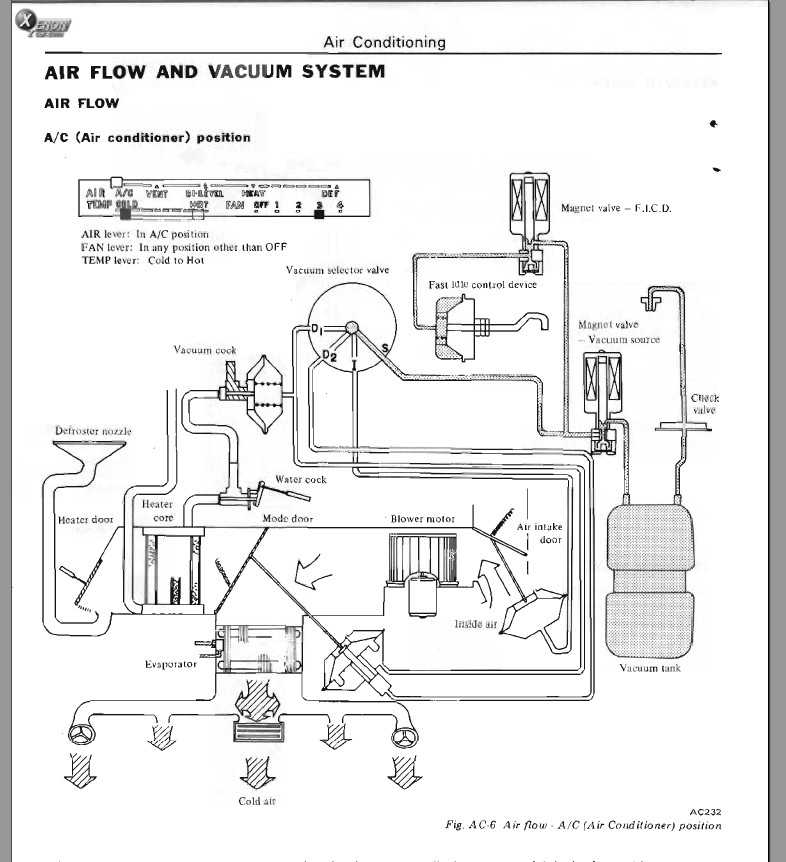
It's a vacuum tank to accumulate vacuum (if that's even possible) for actuating the various valves, both water and air, for your heater and AC if you have it. Air Conditioning refers to both heating and cooling. Too much free time...

-
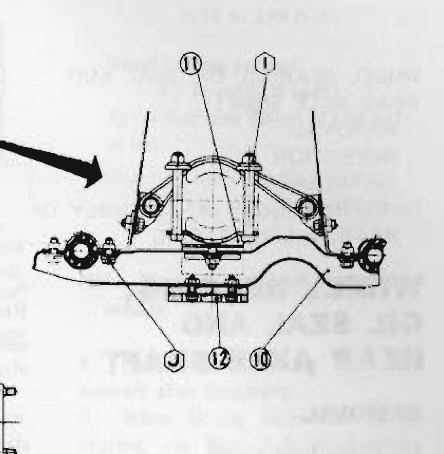
Shadesh's pictures are right. The bolts go in from the bottom. Here's an FSM picture. The transmission mount nut is the same. Take it to Ace Hardware or a similar store and ask them to match it. All you need is thread pitch and diameter, the outer dimensions can be different.
-
I don't think the key should stay in the Start position. It's spring loaded, so that's not right. If the key was on Start, even though it shouldn't be, and your starter didn't turn, that's not right either. Plus smoke from wiring is never good, it means you burned some insulation. Replacing burned wires is never fun, because the shorted wire, no matter what it runs, will usually take out several others, and melt the rest together. You're asking for more future smoke, and serious aggravation, if you don't dig a little deeper.
-
New Pilot Bearing, Clutch, Pressure Plate, and Throw Out Bearing
NewZed replied to jacob80's topic in Drivetrain
I put a new "stock" clutch and pressure plate behind a 76 motor with a 78 transmission, but did not have the flywheel refinished because it looked "okay" and I wanted to save a few dollars. I cleaned the metal surfaces with Brakleen before assembly. It works fine, but it chatters a little, sometimes (when it's cold), at low rpm engagement. I think this might be because the clutch disc is seeing two friction surfaces with different characteristics, a shiny smooth one and a freshly machined one. It's not a huge deal, but can be irritating. The T/C rod comment is about the tension/compression rod in your video (connects to the bottom of the transverse link aka control arm) with the red round bushing on the end. Poly in the back of the rod can (according to some, big discussion topic, search T/C rod poly bushings here and at classiczcar) cause the threaded rod end to fatigue over time and break off. Re your throwout bearing - I haven't tried it but you could probably eyeball the pressure plate spring - clutch fork contact point, after you install the transmission, before you fit the rubber dust boot on over the fork, using your eye or a mirror if you can't get your head up there. If the throwout bearing doesn't move when you wiggle the fork, it's jammed up against the springs. You could also measure distances from the back of the motor to the contact points while it's out. Pressure plate to back of motor vs. throwout surface of fork-mounted bearing to front of trans. -
You should probably go to this web link first - http://www.oregon.gov/ODOT/DMV/vehicle/damage.shtml - and read all of it, then follow the link to "Reconstructed Vehicle Procedures.". Then look at the current title for the car, and look closely at the insurance company paperwork, and decide what you can do with it. If it fits the last description, "junked", you might never get it titled. I think that "salvage" might mean "junk" in Oregon. "Totaled" cars can be issued a "recontructed" title. If it is just totaled and needs a reconstructed title, it doesn't look too hard to do in Oregon. I have a parts car with an OR title that says Totaled and Reconstructed right on the title. Edit - follow the links and you'll find out how much it will cost also. And that looks like a 77 or later so it will have to pass DEQ before you can get a new title. Looks like some work.
-
New Pilot Bearing, Clutch, Pressure Plate, and Throw Out Bearing
NewZed replied to jacob80's topic in Drivetrain
The FSM, for 1976 anyway, says to support the engine at the oil pan when removing the transmission, using a block of wood to distribute the load. I did as directed when replacing my tranny and there were no signs of oil pan damage afterward - leakage, dents or other. On classiczcars.com I saw someone using a piece of 4x4 or 4x6 wedged between the valve cover and firewall to hold the back of the motor up. Have no idea if it will damage anything. It looked easy and convenient though. -
The 78s have two in-line green fusible links mounted to the back of the metal housing that other fusible links are attached to the side of. Right in front of the battery. Looking down at the two fusible link housings from the passenger side, the other two EFI green fusible links should be just to your left. A large (4 or 6 gauge?) red wire comes out of the harness, splits in to the two green link wires at a snap-in connection mounted on the housing which then connects to two heavy gauge white wires that go directly to the battery positive. On my parts car, the two white wires recombine back to one white before the + terminal, but it looks like a PO may have done that. But the mounting position and wiring into the harness look original. I was going to take a picture but my camera battery is dead. Let me know if you don't find them and I will send a picture later. Fun, fun, fun...
-
You might already know this and it doesn't look like you have messed with the oil pressure sender, but the 78s used an oil pressure switch to power the fuel pump after the engine is started, not the AFM switch. No oil pressure, no fuel. I think the the AFMs might still have the switch but it is not used, they last used it in 77. According to the FSMs. The diagram is on page EF-7 in the 78 FSM. Also, I couldn't tell from your description if you had disconnected the starter and turned the key to Start to see if the fuel pump runs. I think that Start bypasses the oil pressure sender to allow the engine to start, then uses the oil pressure switch to keep it running on On. It's easier to hear the pump, check fuel pressure, etc. without the engine cranking.
-
Going poly, am I missing something here?
NewZed replied to Kris.Is.Awesome's topic in Brakes, Wheels, Suspension and Chassis
The T/C rod nuts and bolts are much easier to get in (Post #11) with the car on the ground (laden suspension) also. They are easy to reach from the side with the wheel turned. I have done it both ways, on the ground is like buttah... -
I have a 78 parts car in the garage. Not modified as far as I can tell, it's all original. It has AFM part#A31-604-000 and the motor runs fine. I also have a 76 driver, also original, that has AFM part#A31-060-001.
-
I had the same problem on my car when I got it. I hosed down the internals of the dimmer/turn signal switch with contact cleaner (Deoxit DN5) while I was trying to figure out how to get it apart and it started working. I never did take it apart and it's been working correctly since. That was 5 months ago.
-
I had a similar problem with my car. Here is a wordy description - That thing you're pointing at that "might need a vacuum line" is the dashpot. It does not need a vacuum line, it is just open to atmosphere. It is designed to hold the idle up when downshifting or lifting the throttle, for emissions purposes mainly, as described in the Emissions section of the FSM. The dashpot can get stuck or sticky. Mine needed adjustment due to wear (76 car). The plunger had dropped down and was hanging up below the pad it sits on, holding the throttle open and giving a high idle. It took a while to figure out. I had to lift it up to the limit of play in the mounting bracket to get the plunger back on the pad. Work the throttle from the engine bay with the engine off and you'll see how it works, and if it is close to hanging up or not. Some people just remove it but I have found that the car shifts smoother (for casual cruising) with it on and adjusted. I adjusted mine for driveability, not according to the FSM procedure. You may also have a light throttle spring, or one broken (as I did also), allowing the throttle to hang. There are two springs pulling the throttle closed, one around the throttle body shaft and one underneath it connected to the linkage. The one underneath on mine had rusted and broken. It is difficult to get to, and hard to see, so the previous owner had stuck one on the linkage on top, which did not work well. I put an Ace Hardware spring in the proper spot. You might have to try a few different strengths and lengths to get one you like. There are also lots of joints in the linkage that can dry up and stick.