Search the Community
Showing results for tags 'lowered'.
Found 4 results
-
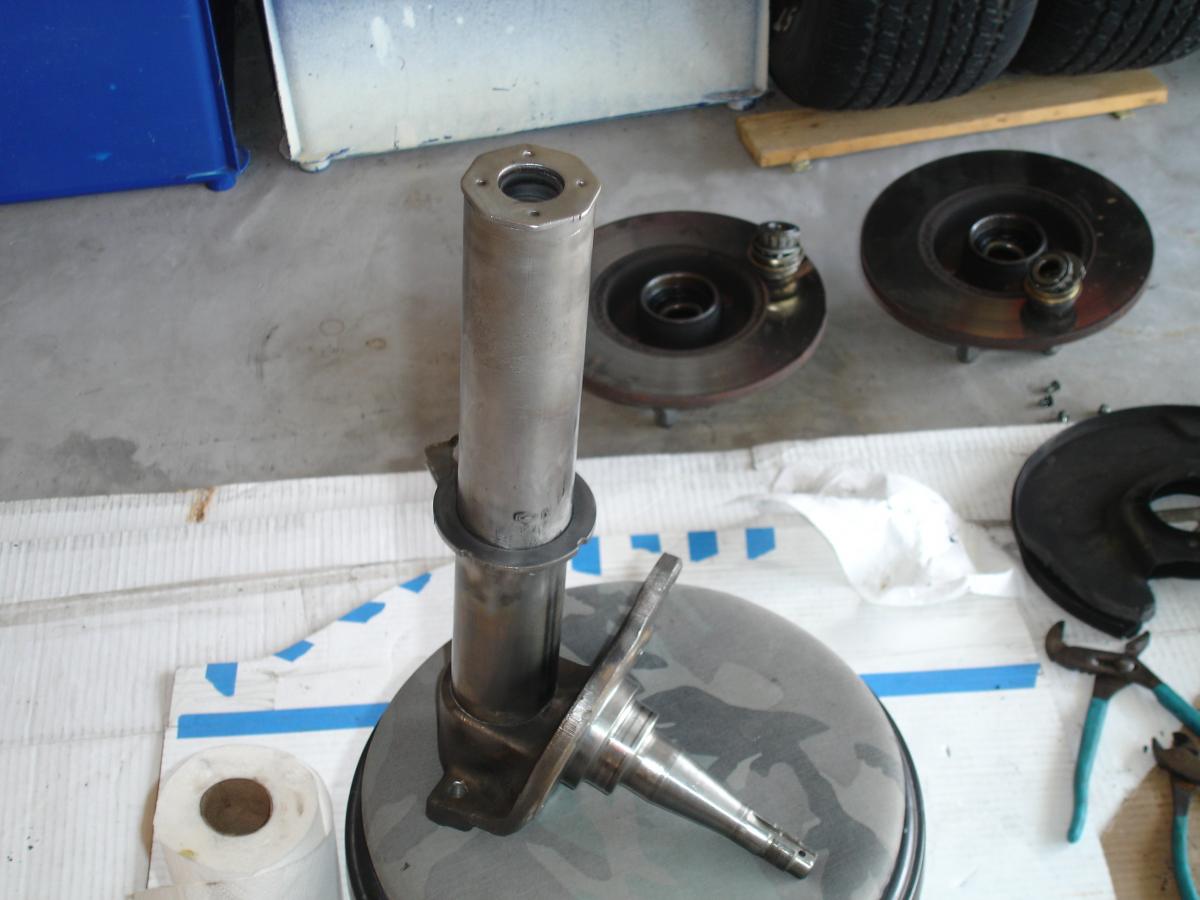
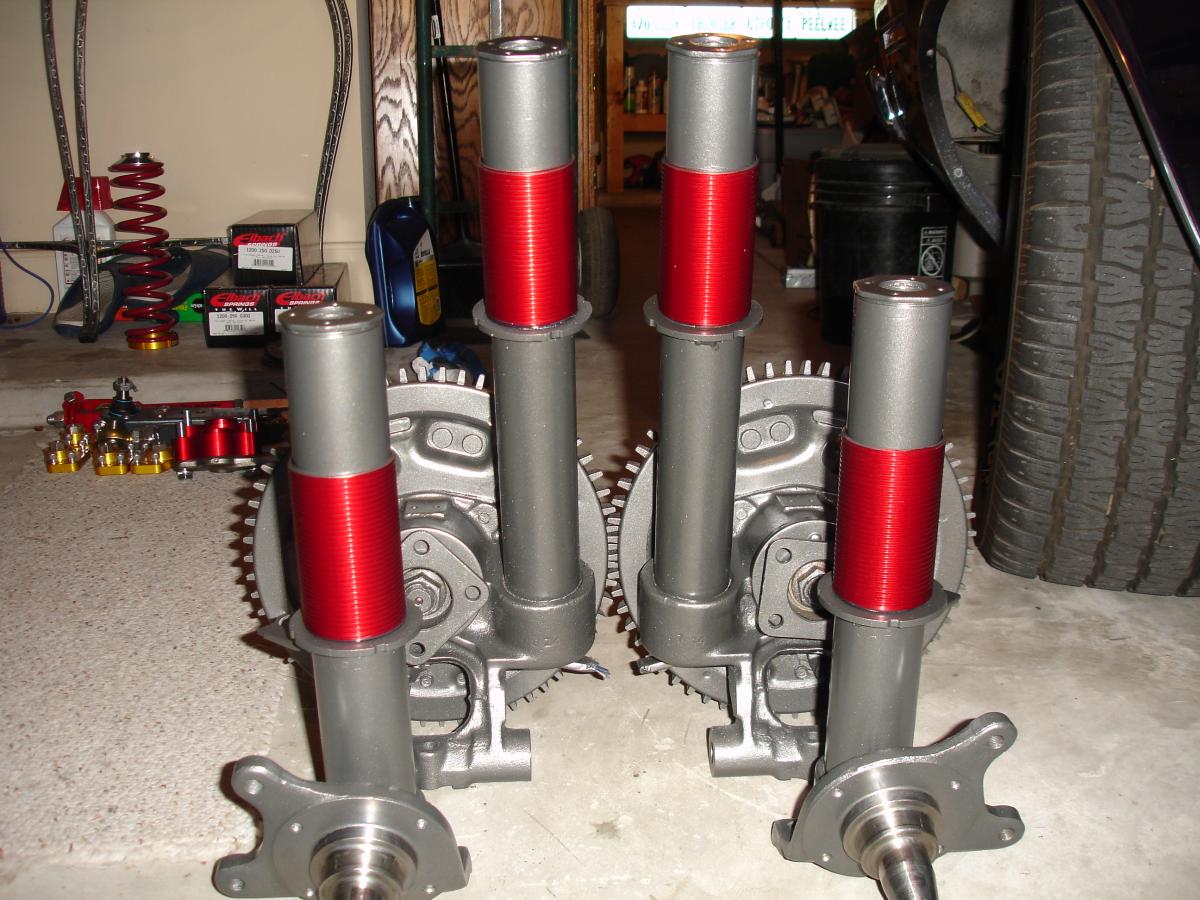
 I have FINALLY finished just about everything for my coilover conversion in my 1978 280z with Stance coilovers. I also have TTT control arms. I am at the point of dialing-in the ride height. Stance gave me four 6" threaded sleeves. I had them welded right to the hubs in the front and 3" above the hubs in the back. I was hoping to maintain stock height or maybe 1" lower than stock. Well after getting everything on and lowering the car, it looks like the front was lowered around 1" and the back was lowered around 2". I would like to crank the rear up another inch. The problem is, the threaded sleeve is currently only on by about 5 threads in both front/rear. I am afraid to crank it up in the back because I feel like the coilover will sheer off if I go any higher with so few threads holding. So my questions are... How many threads are "safe" when screwing the sleeve into the coilover? I have not done anything with alignment, track width, etc. Will any of these affect my ride height? What are my options for raising the car if I can't unthread the sleeves anymore? Can I use a top-plate spacer or something?
 -
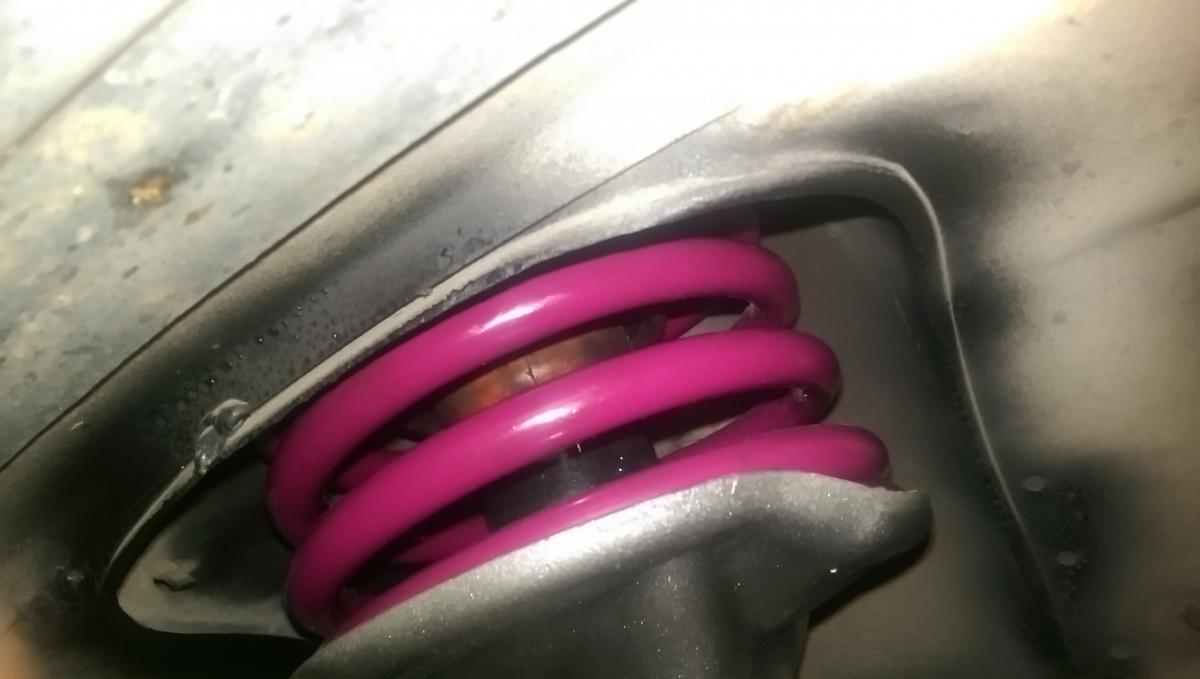
 I just installed a set of Vogtland springs, and they lowered the car an even 2". Its a little lower than i would have liked, but its alright. But i am concerned about the amount of travel it took away from the suspension. It looks like there is only about an inch left of travel before bottoming out. Is this normal?
-
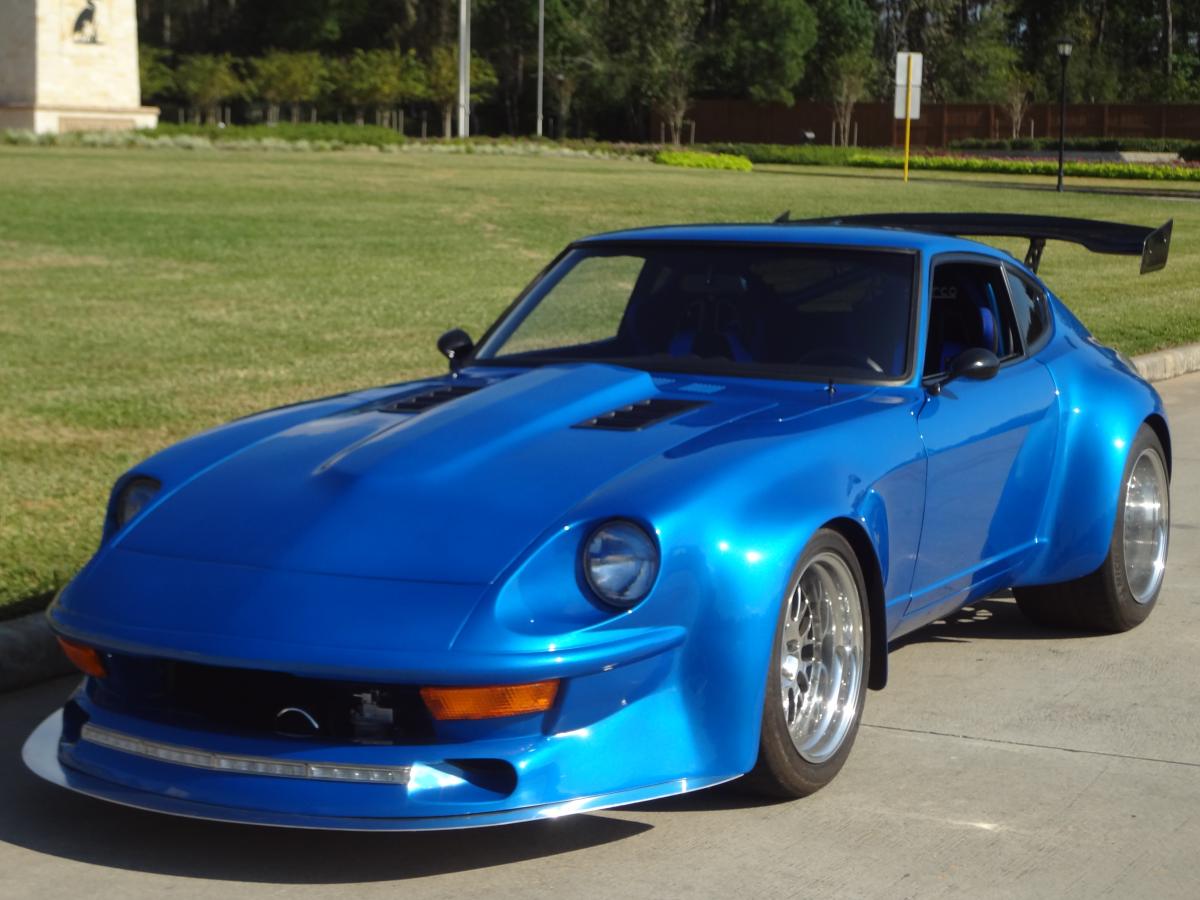
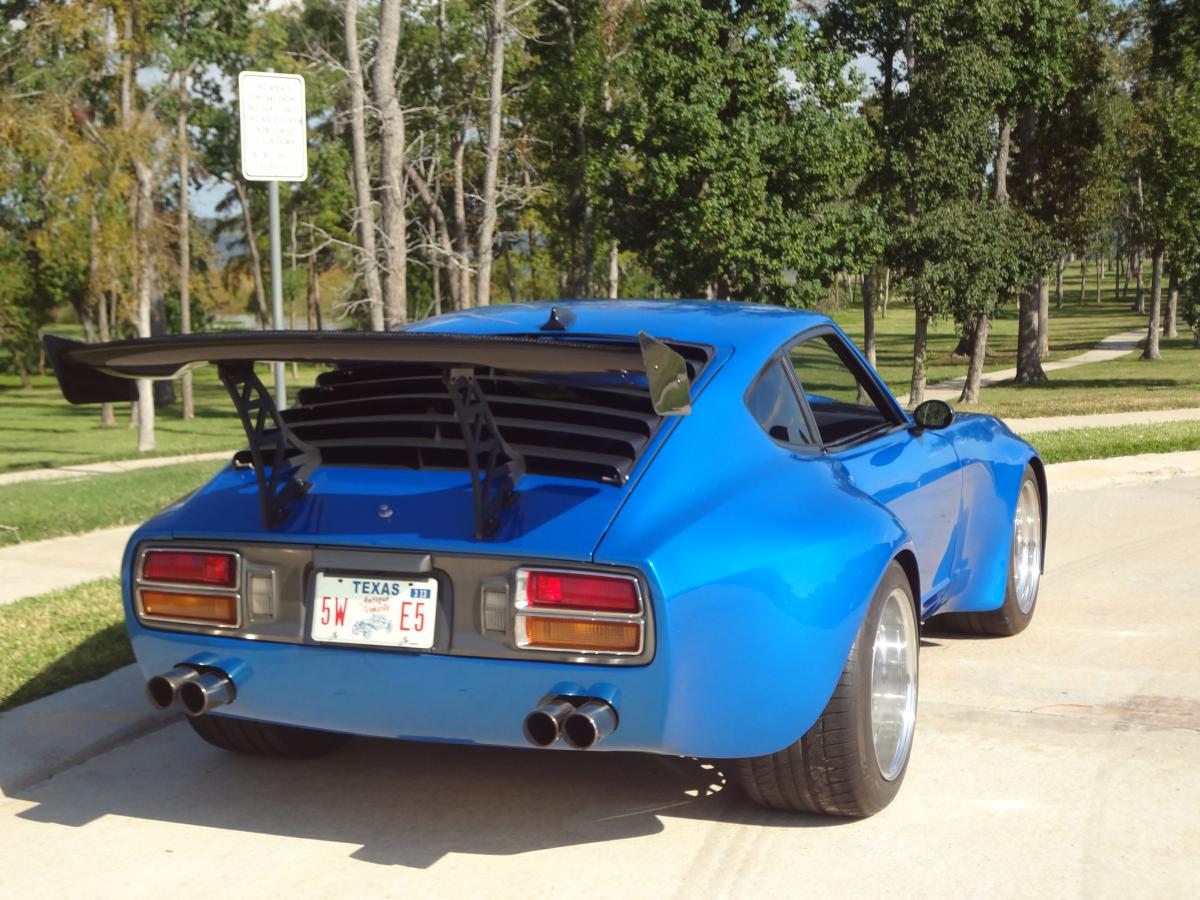
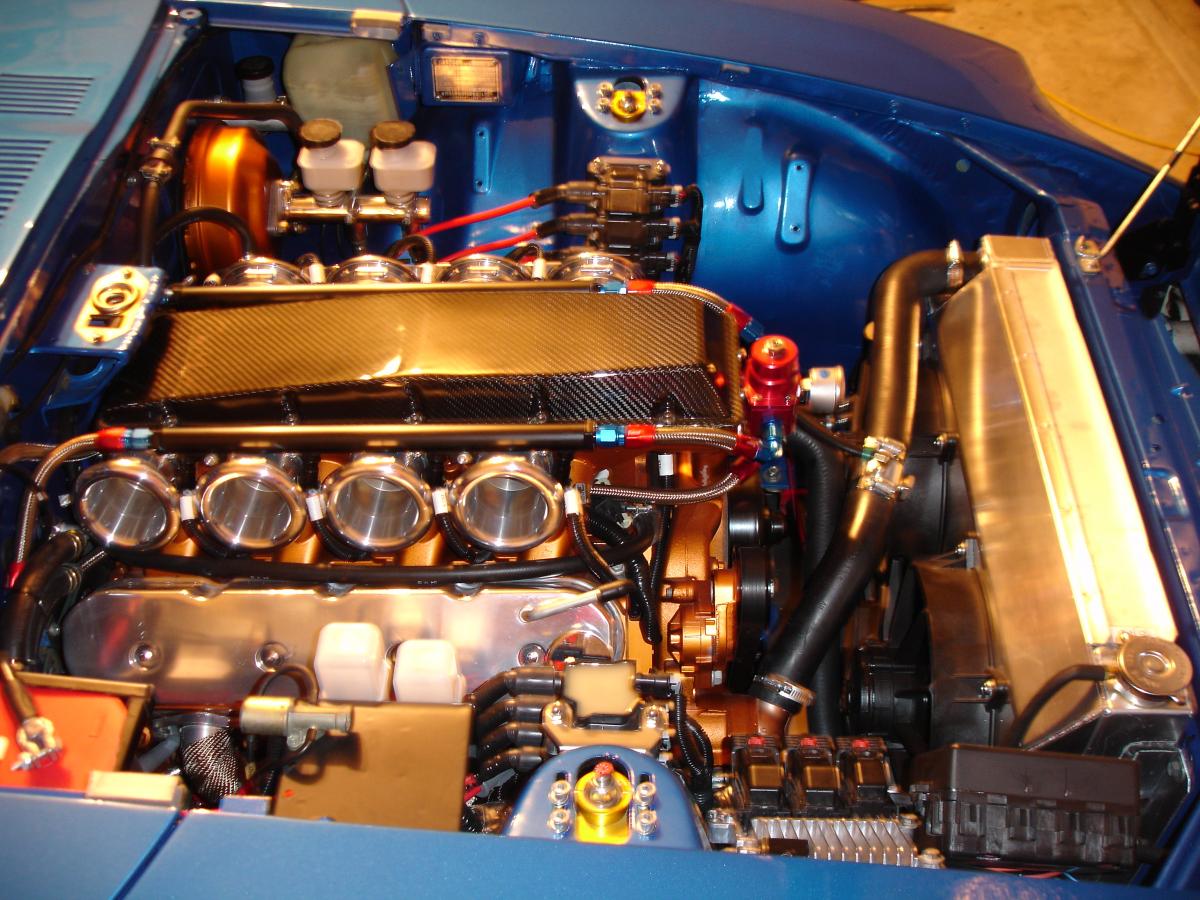
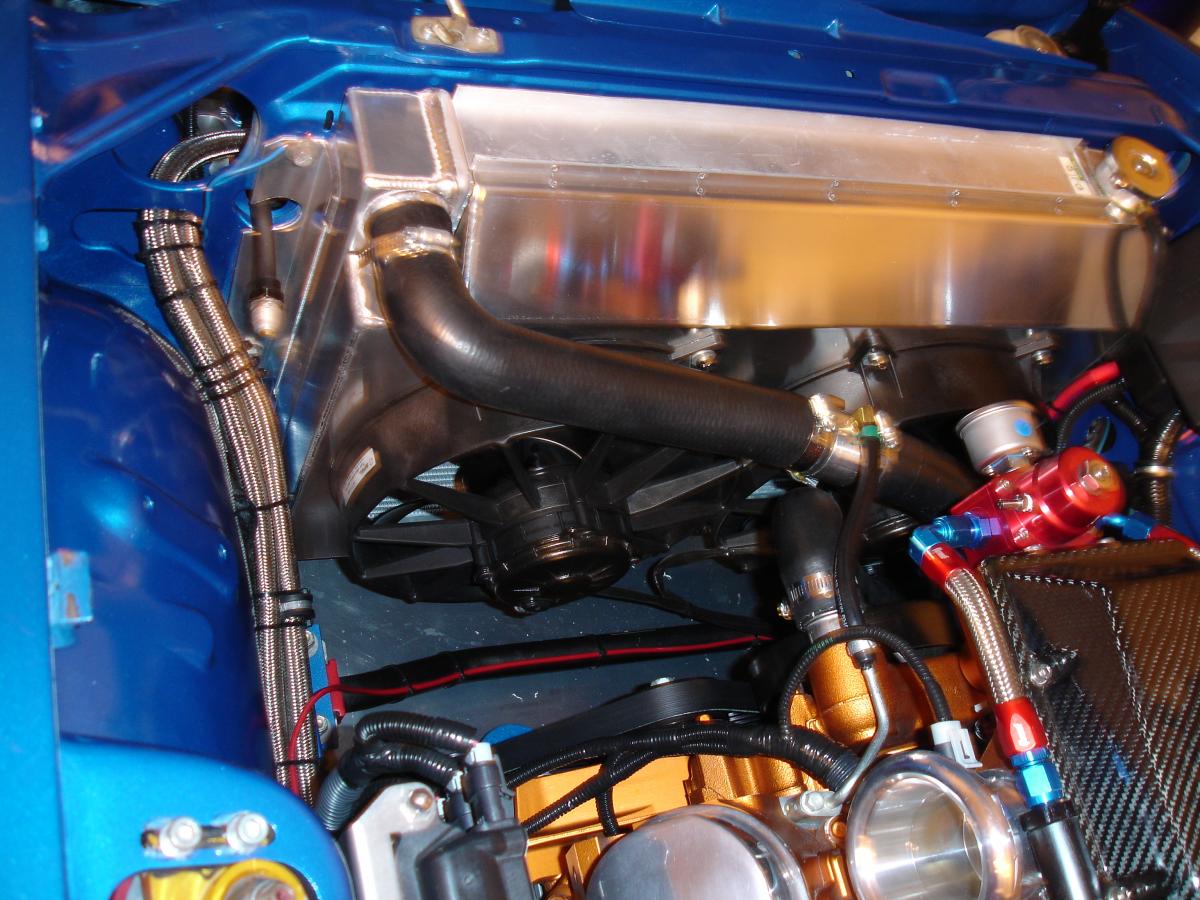
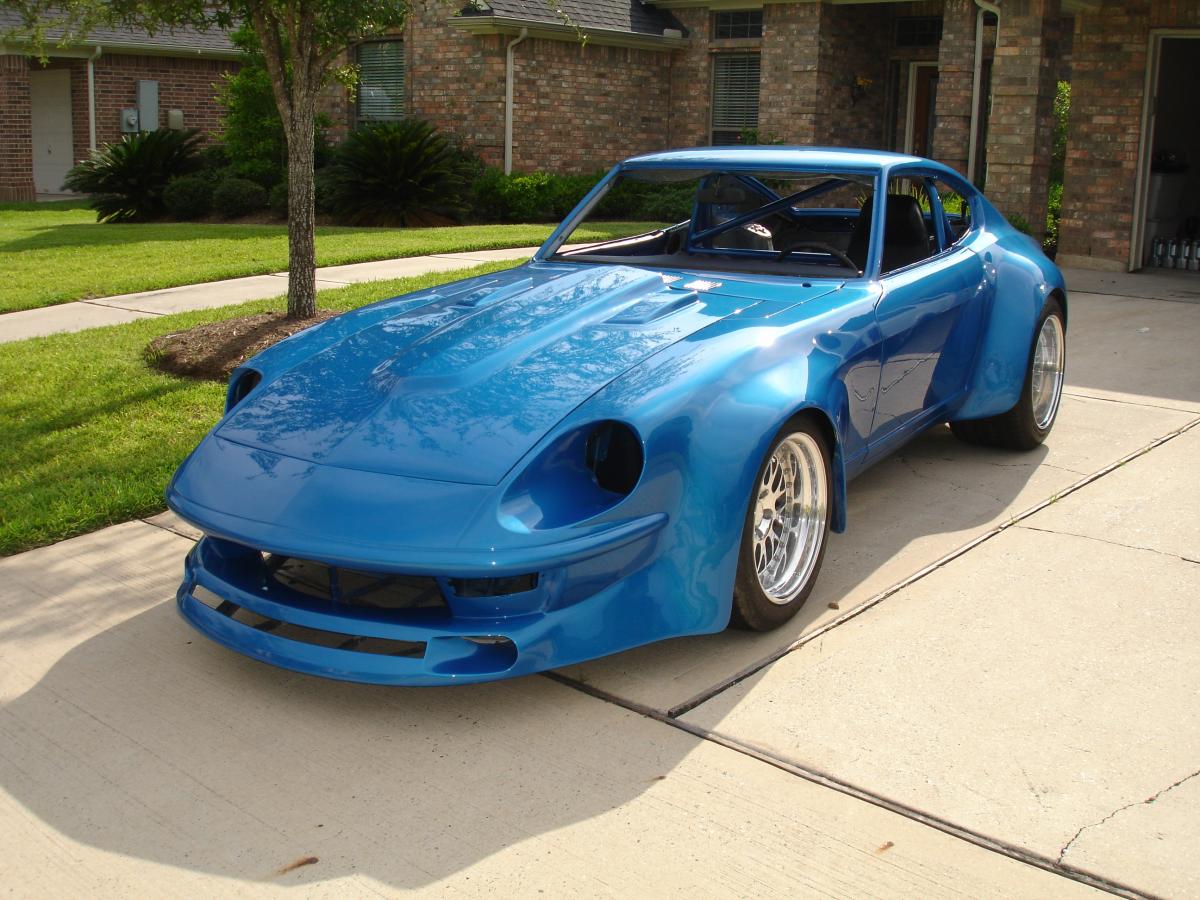
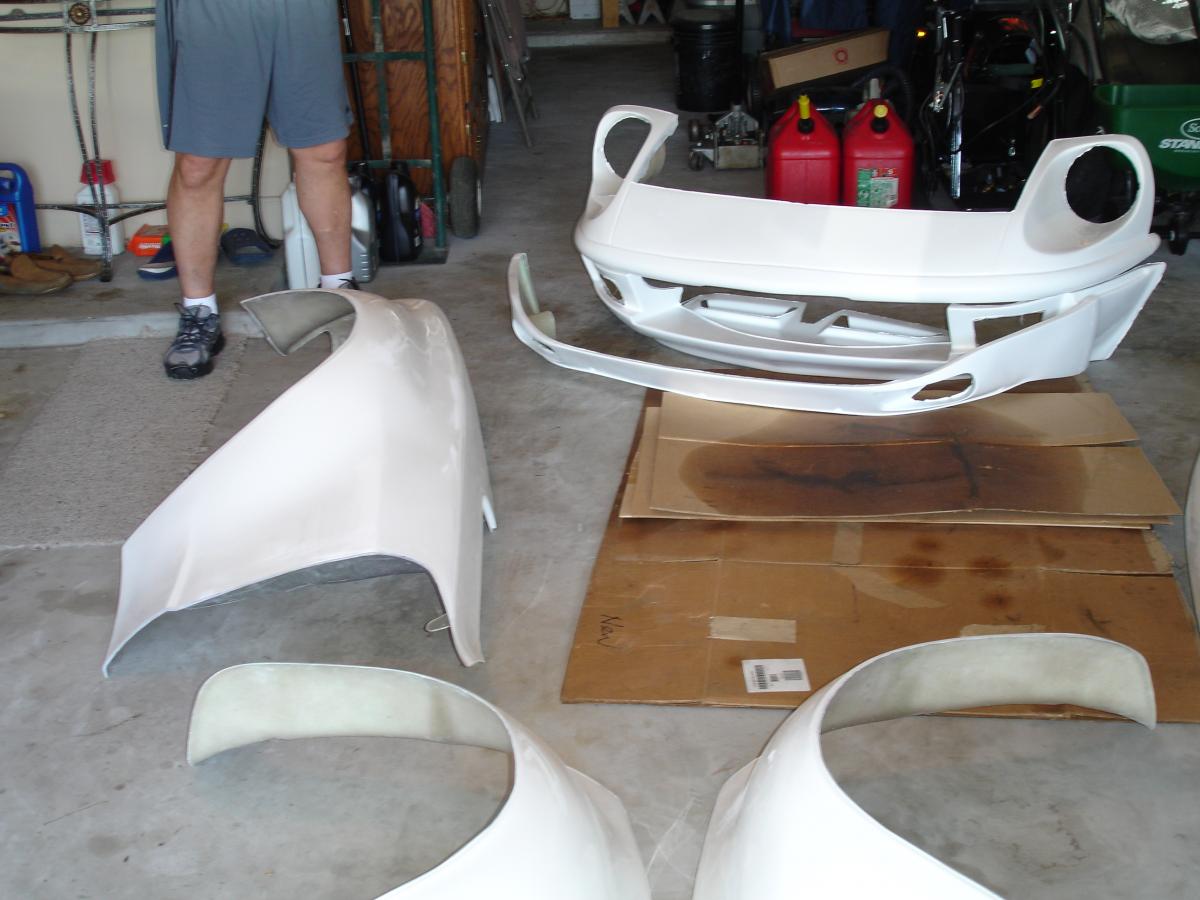
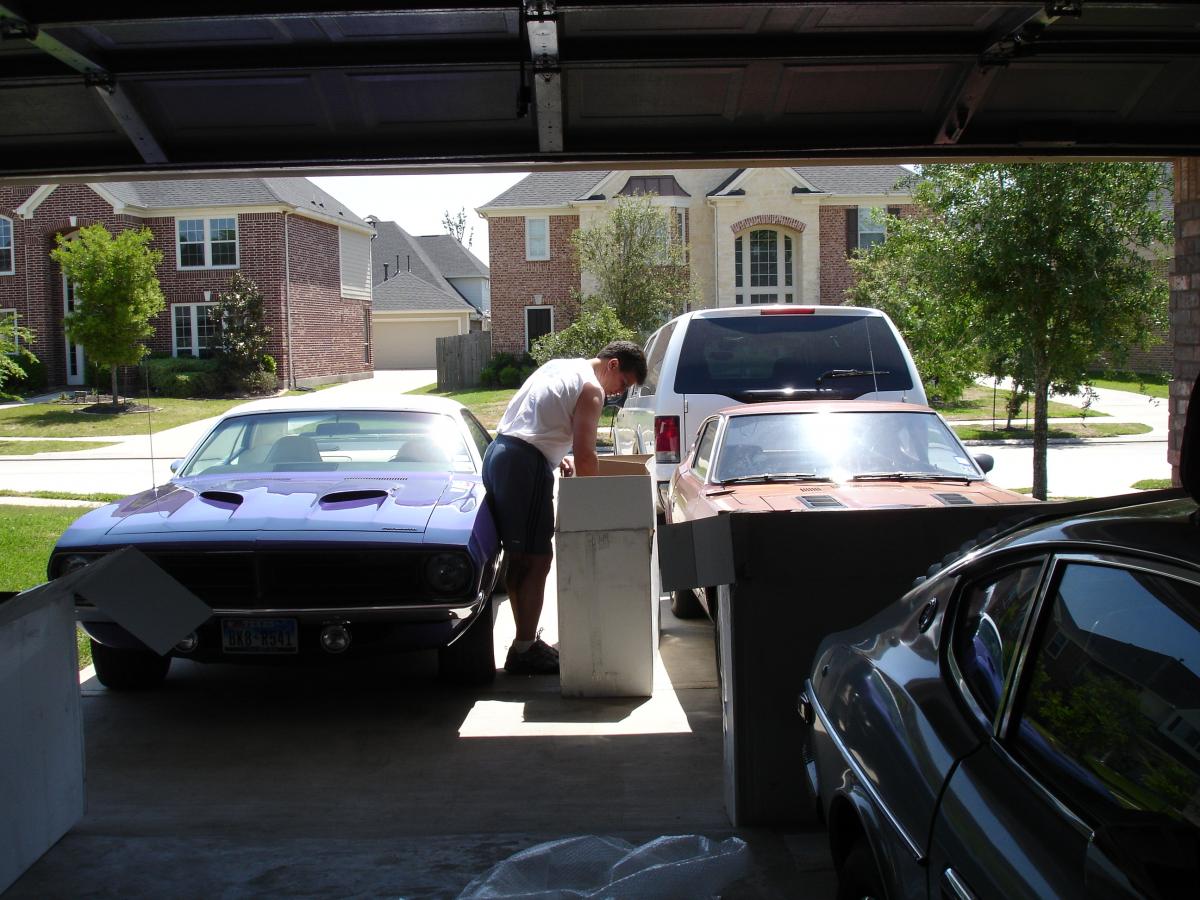
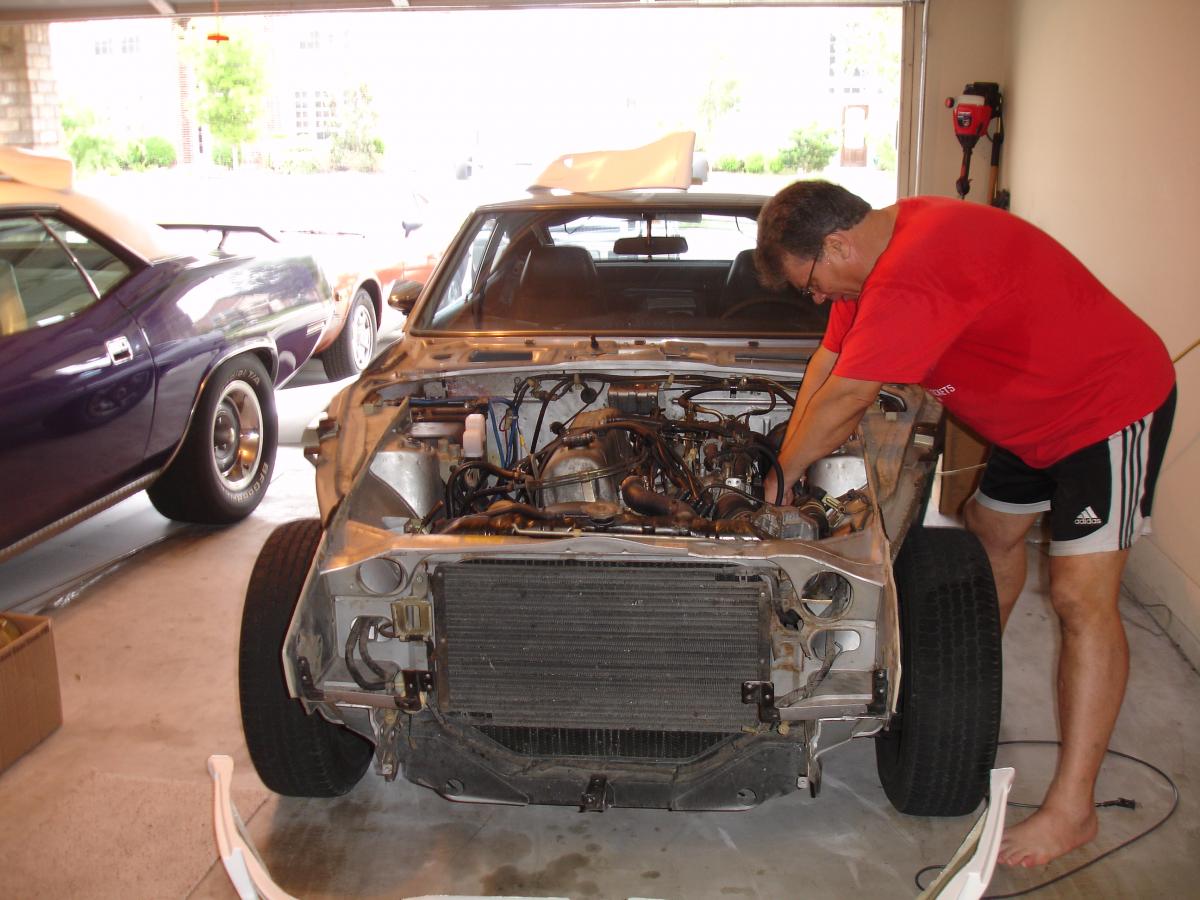
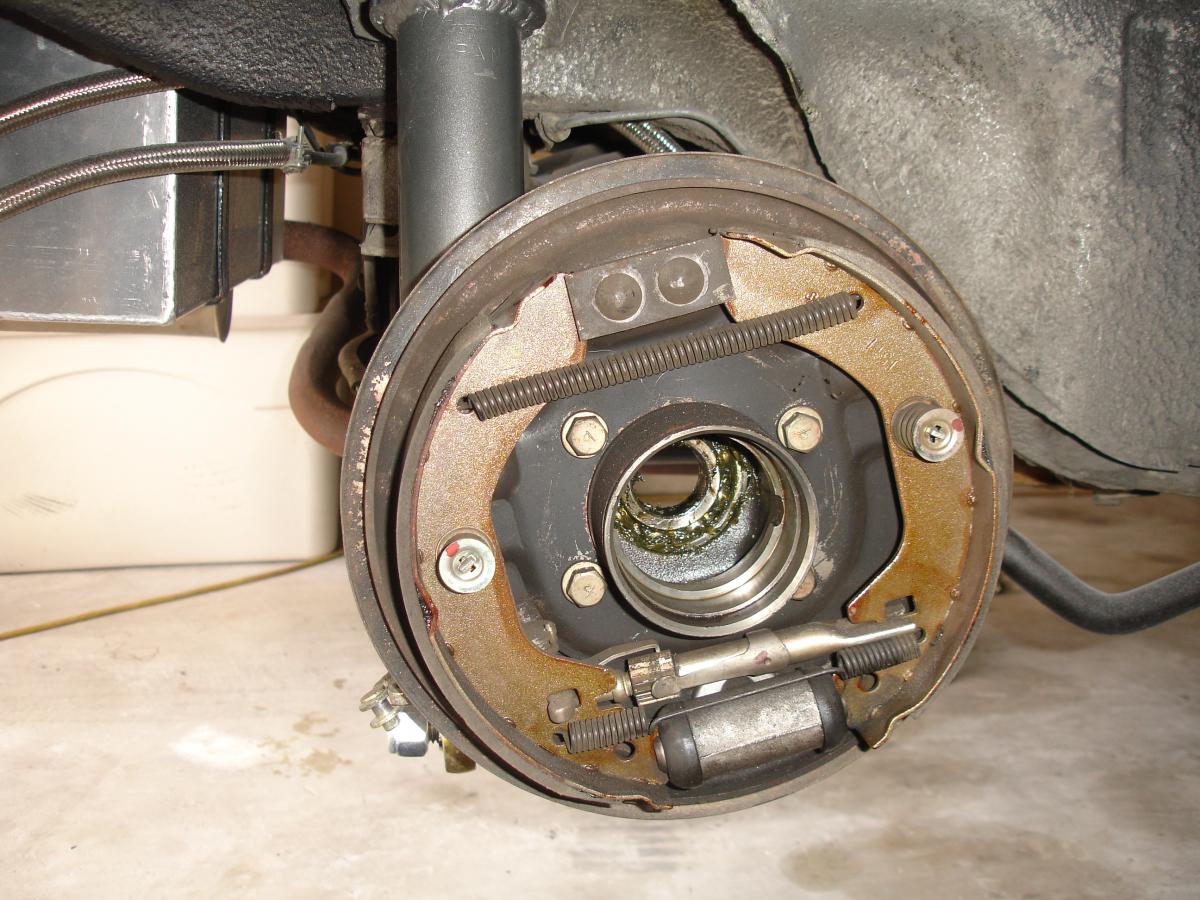
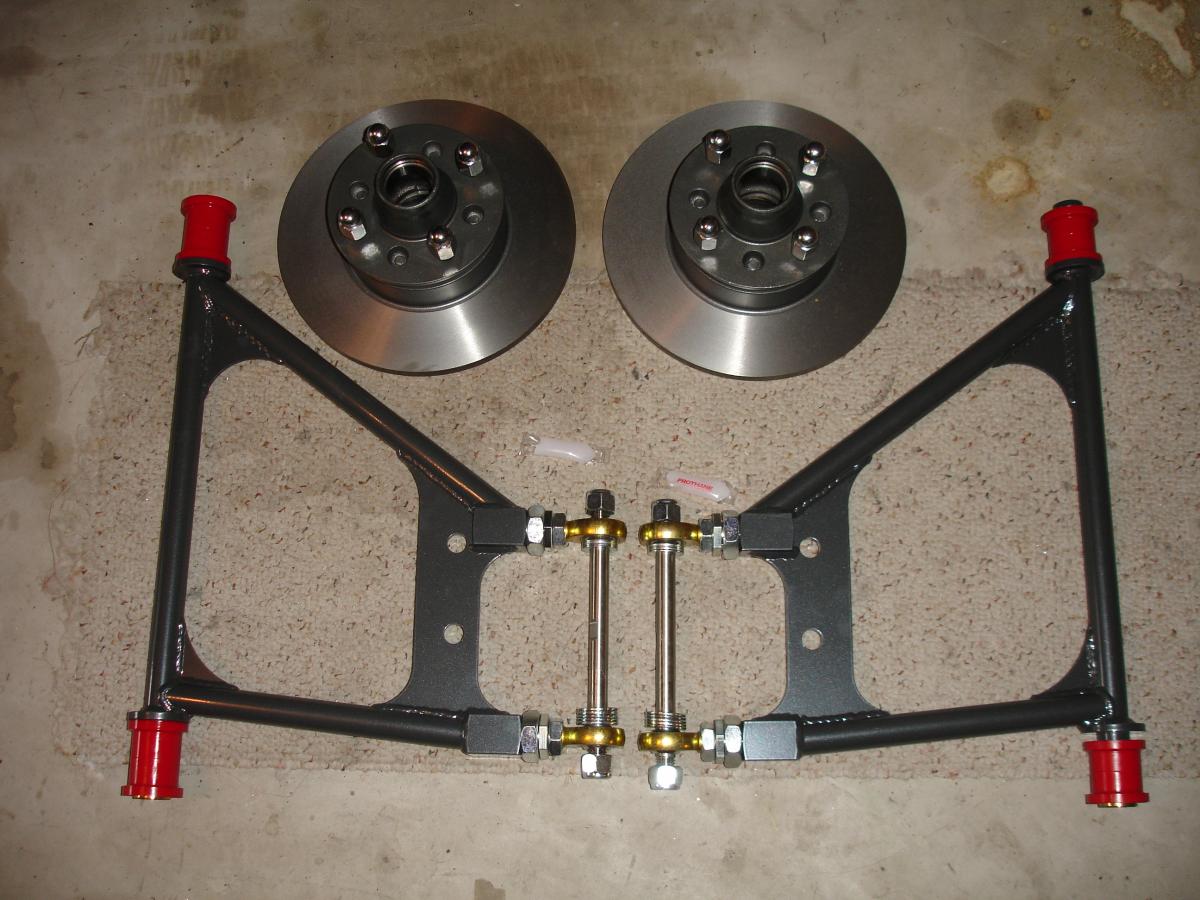
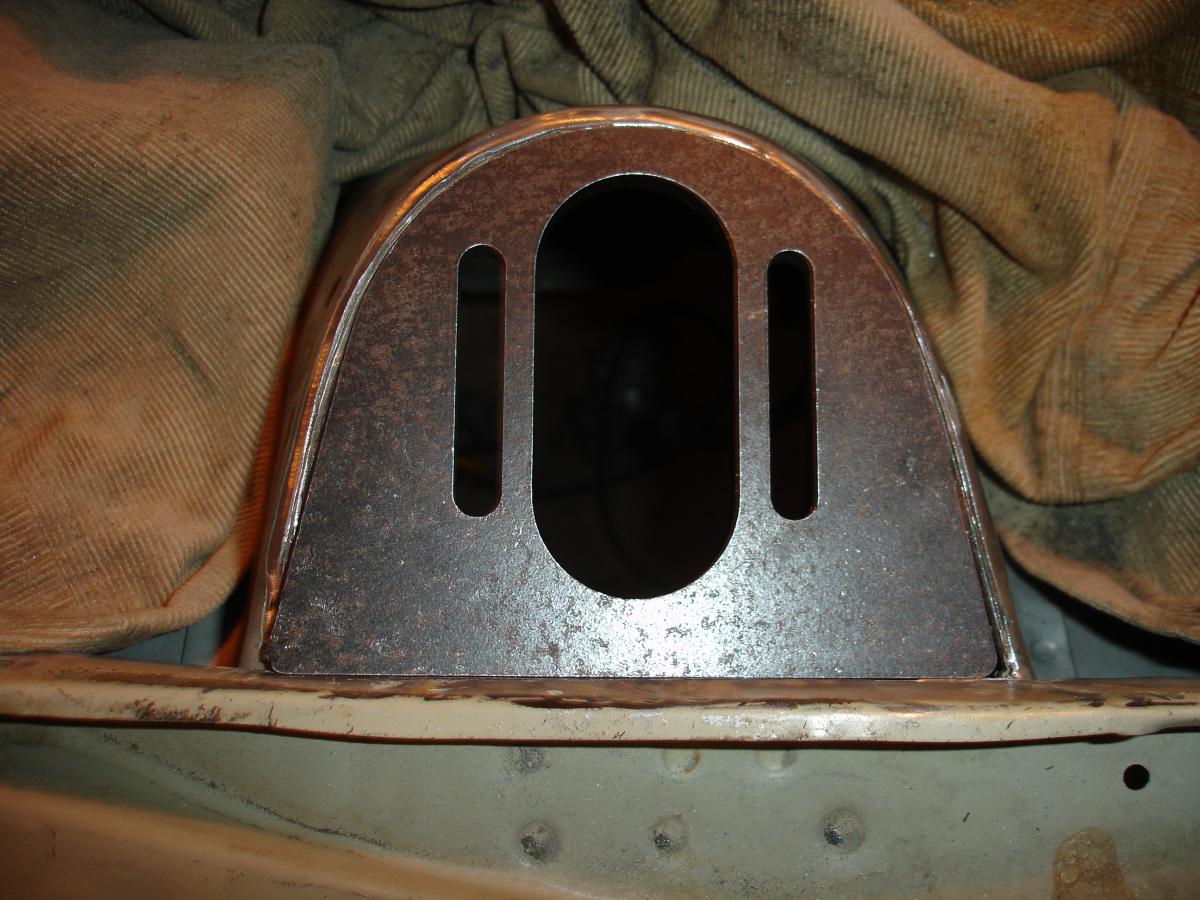
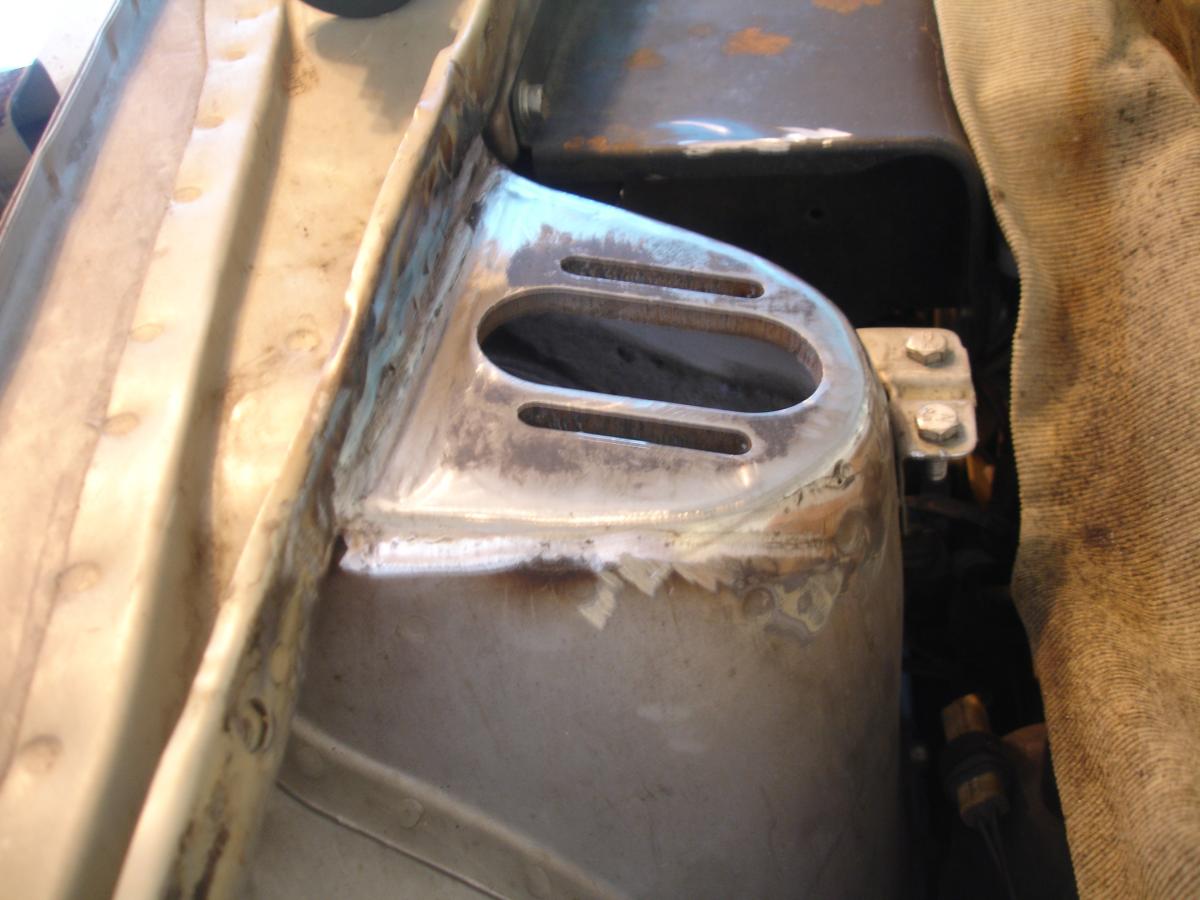
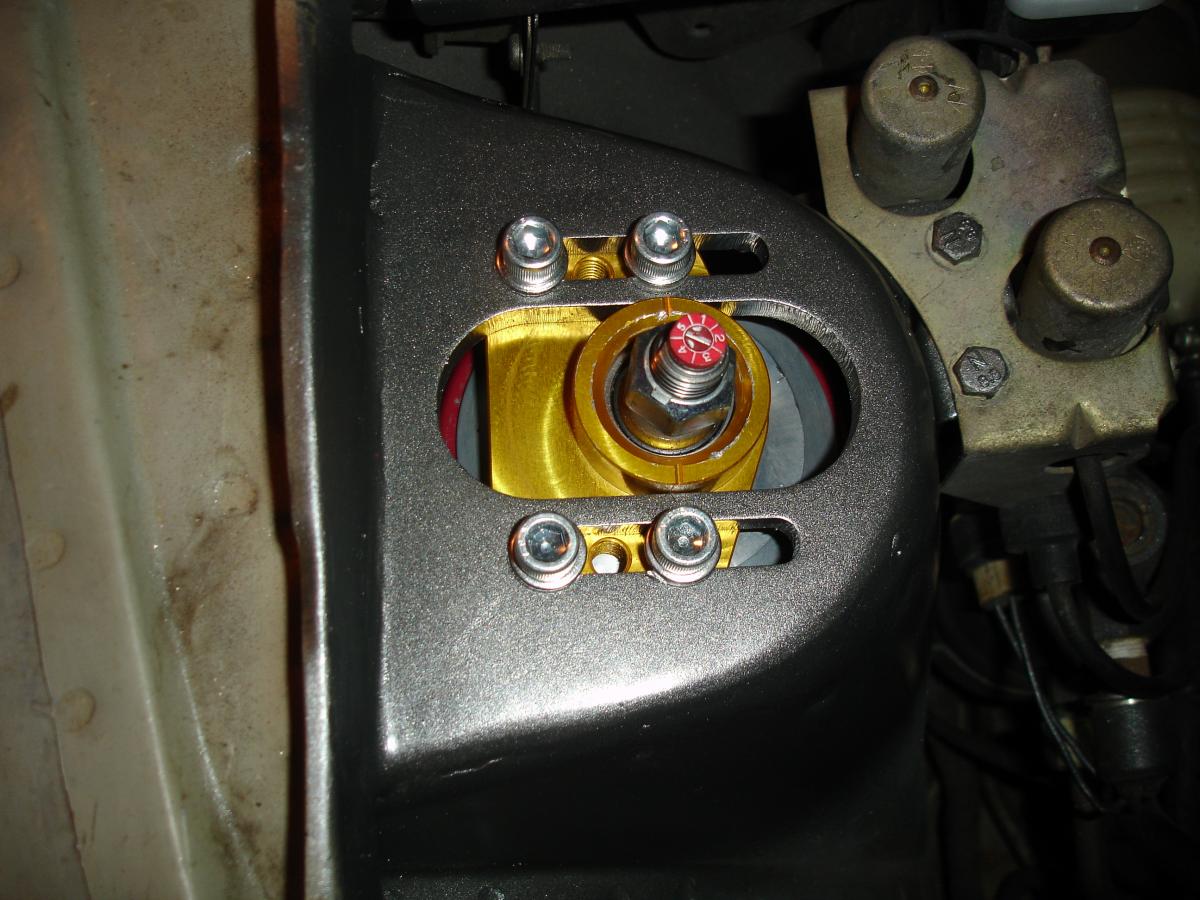
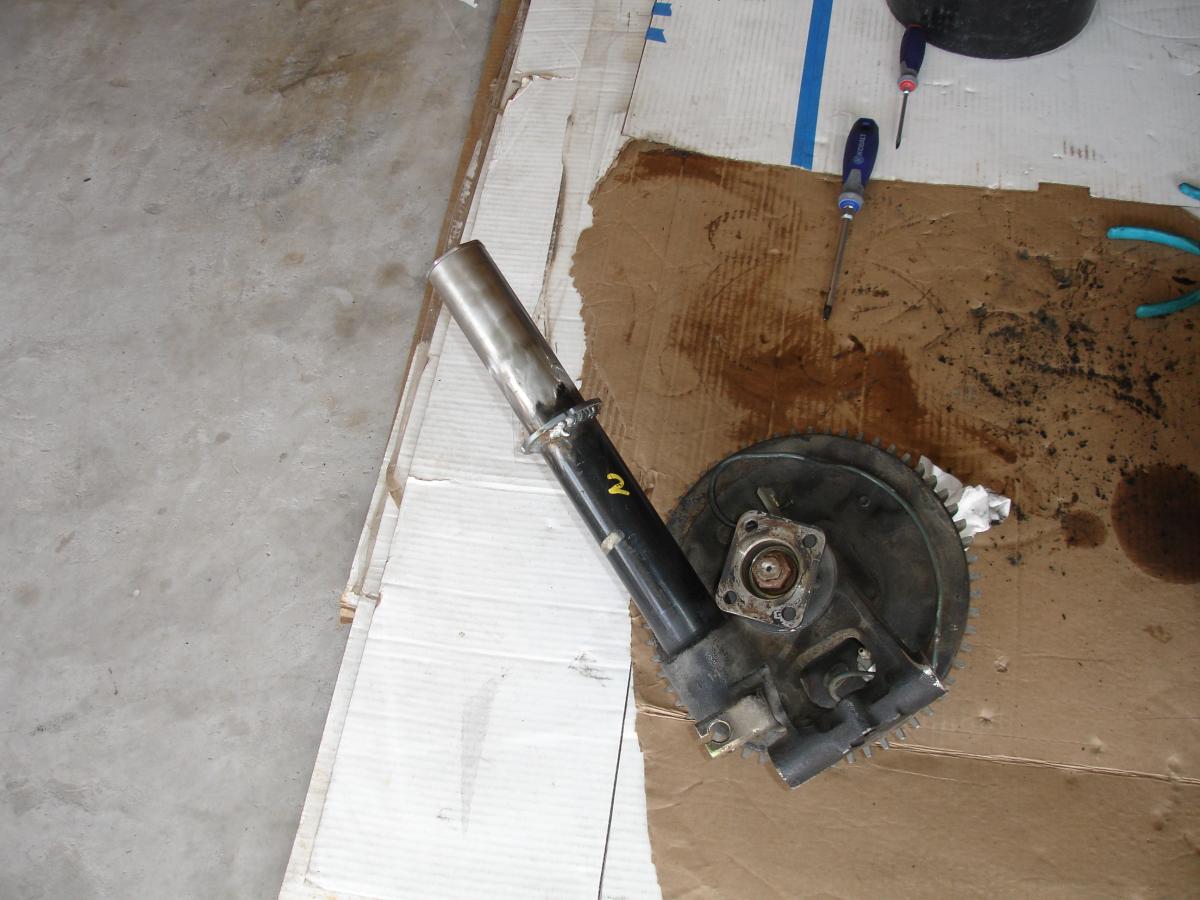
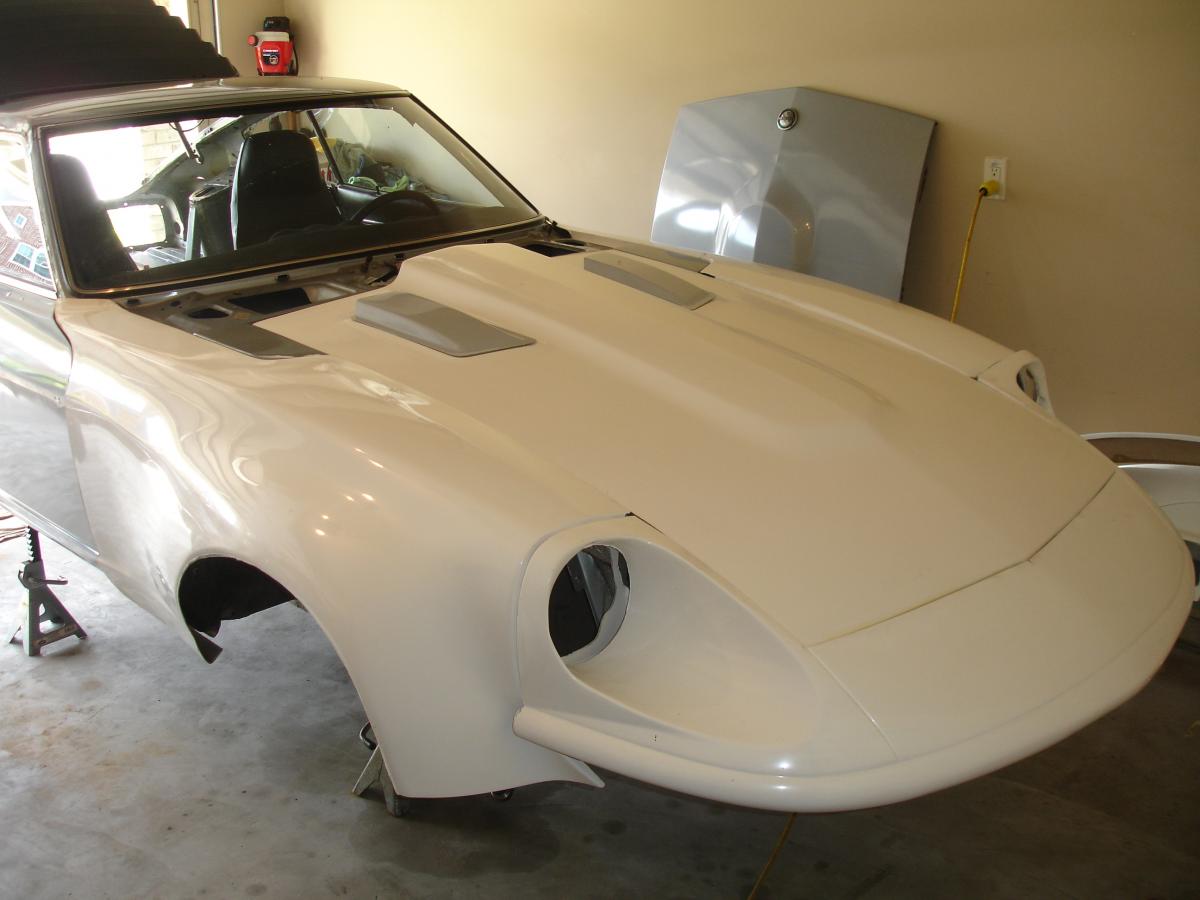
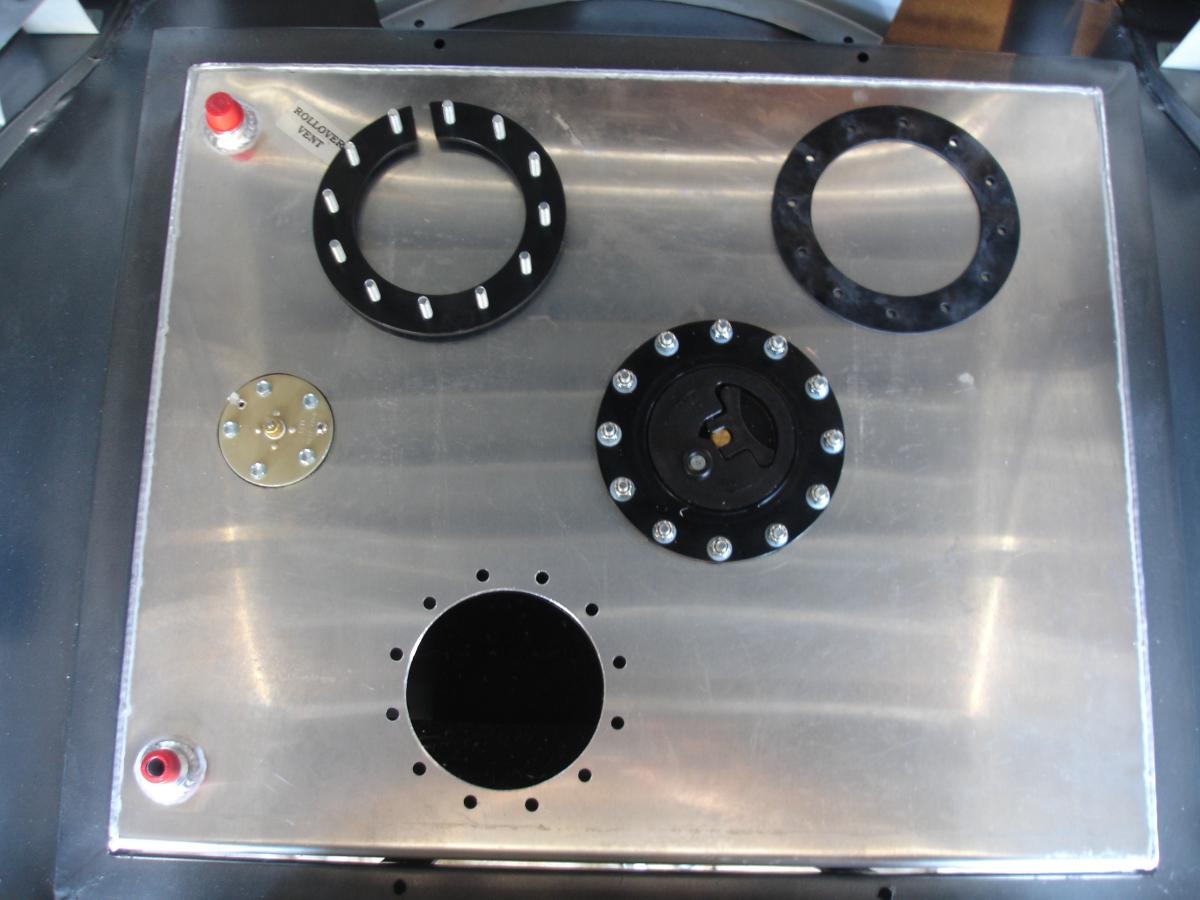
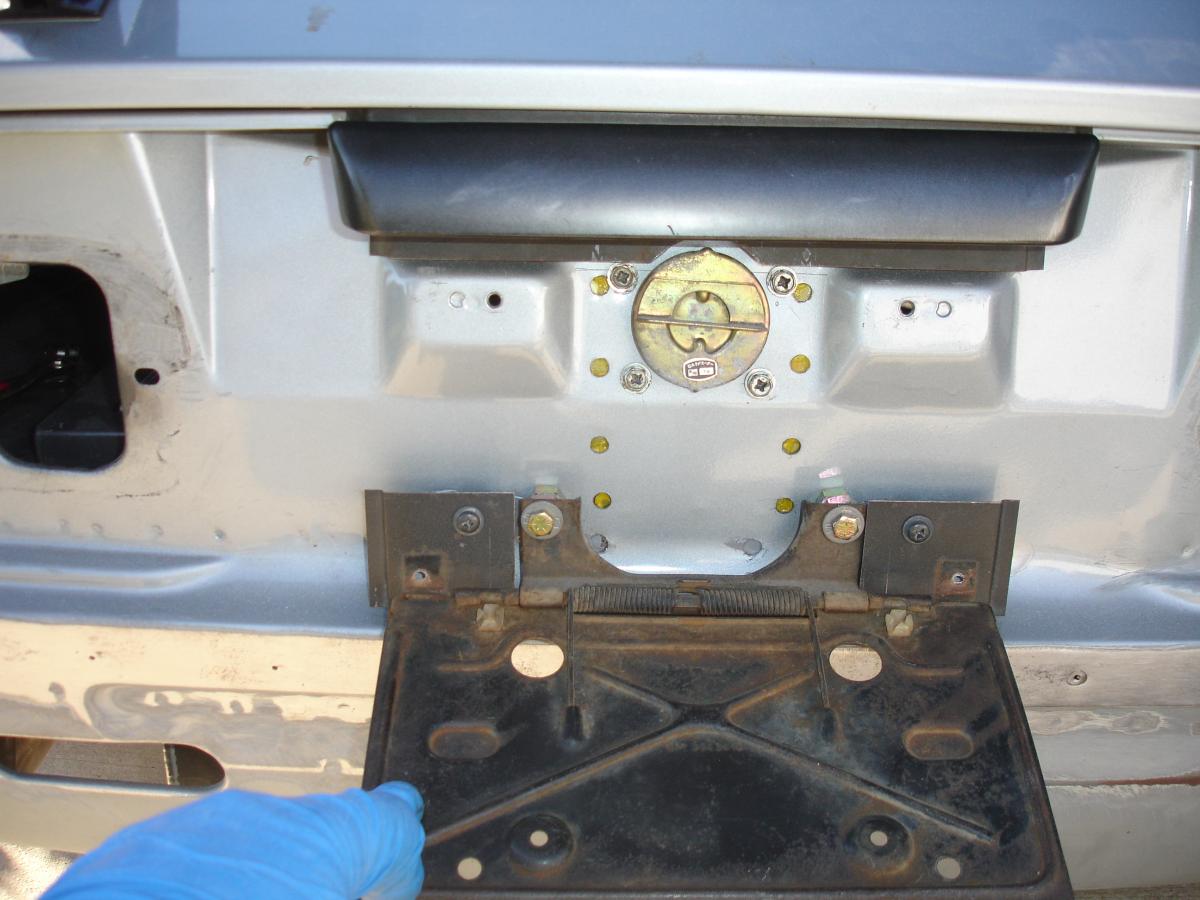
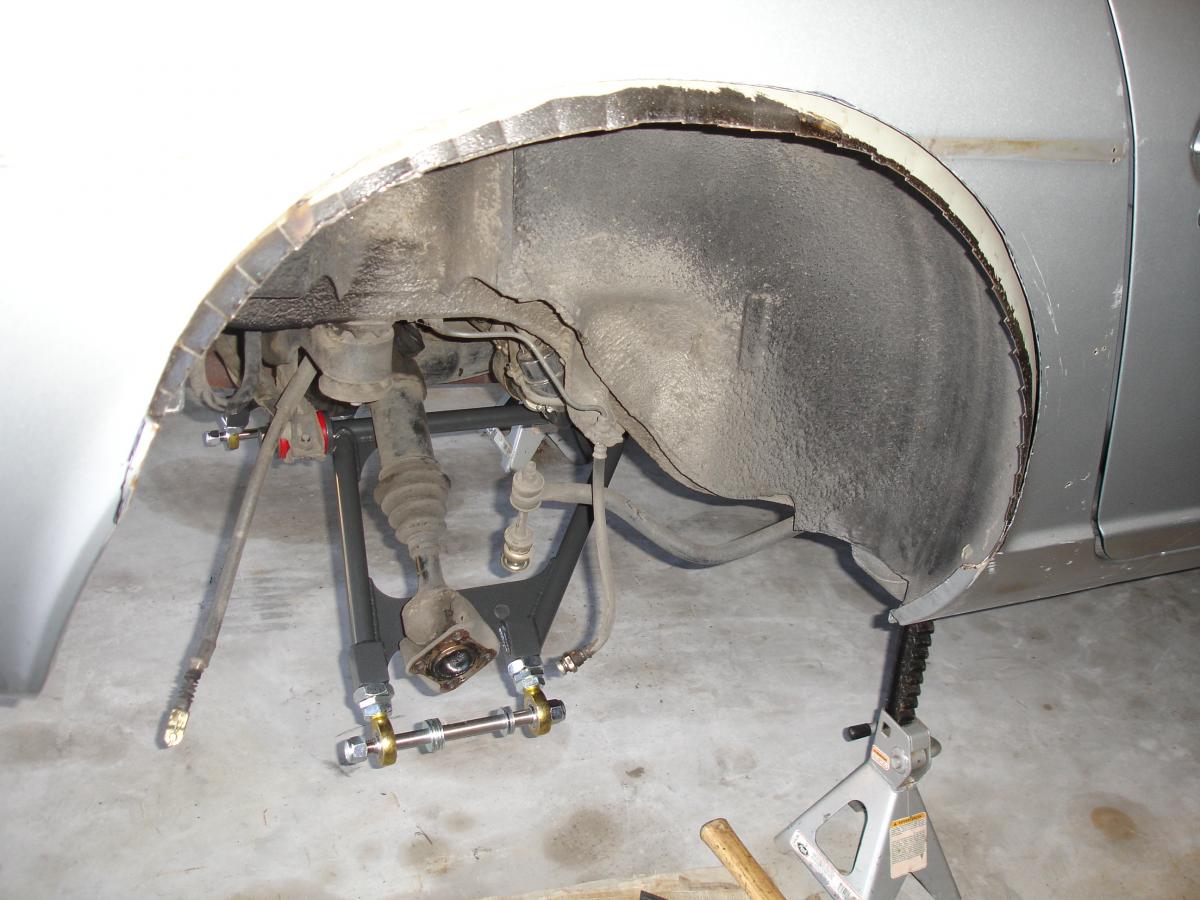
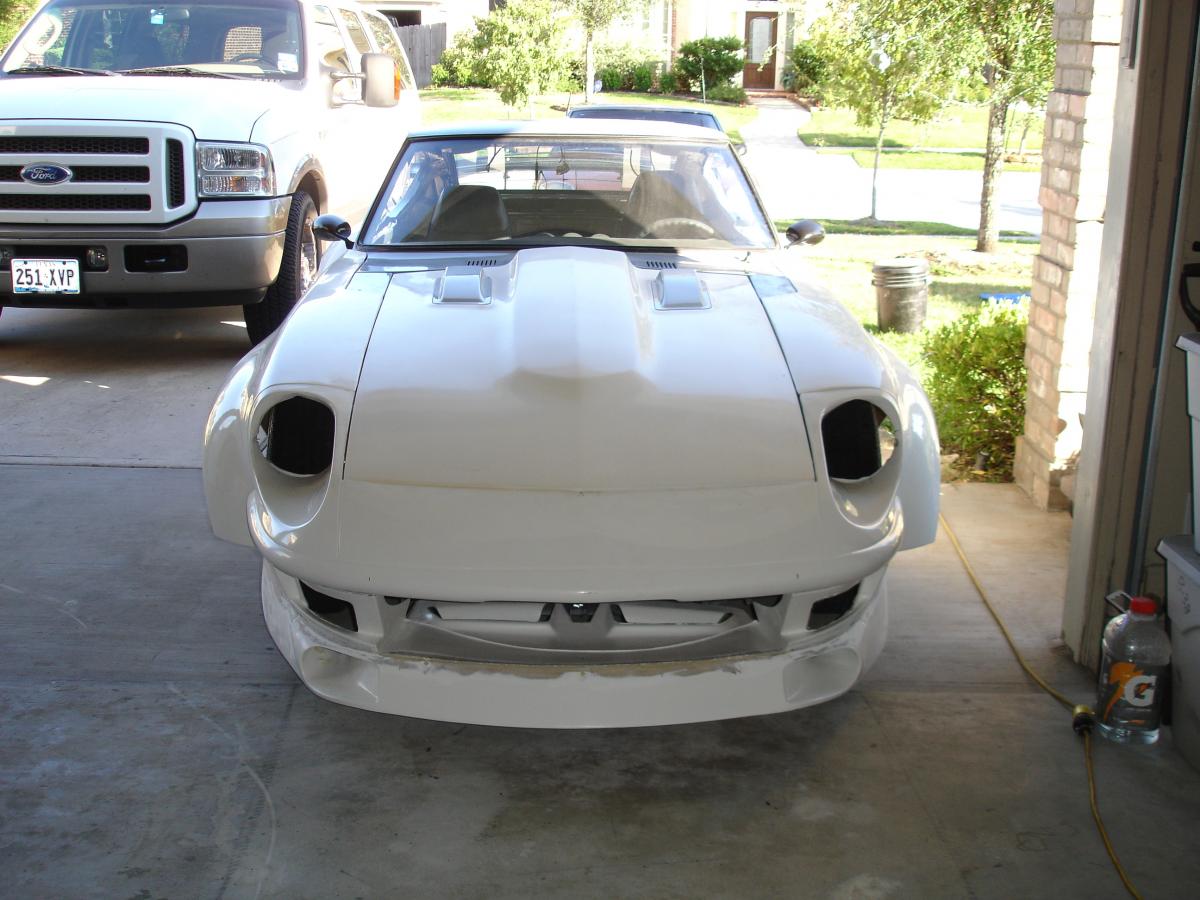
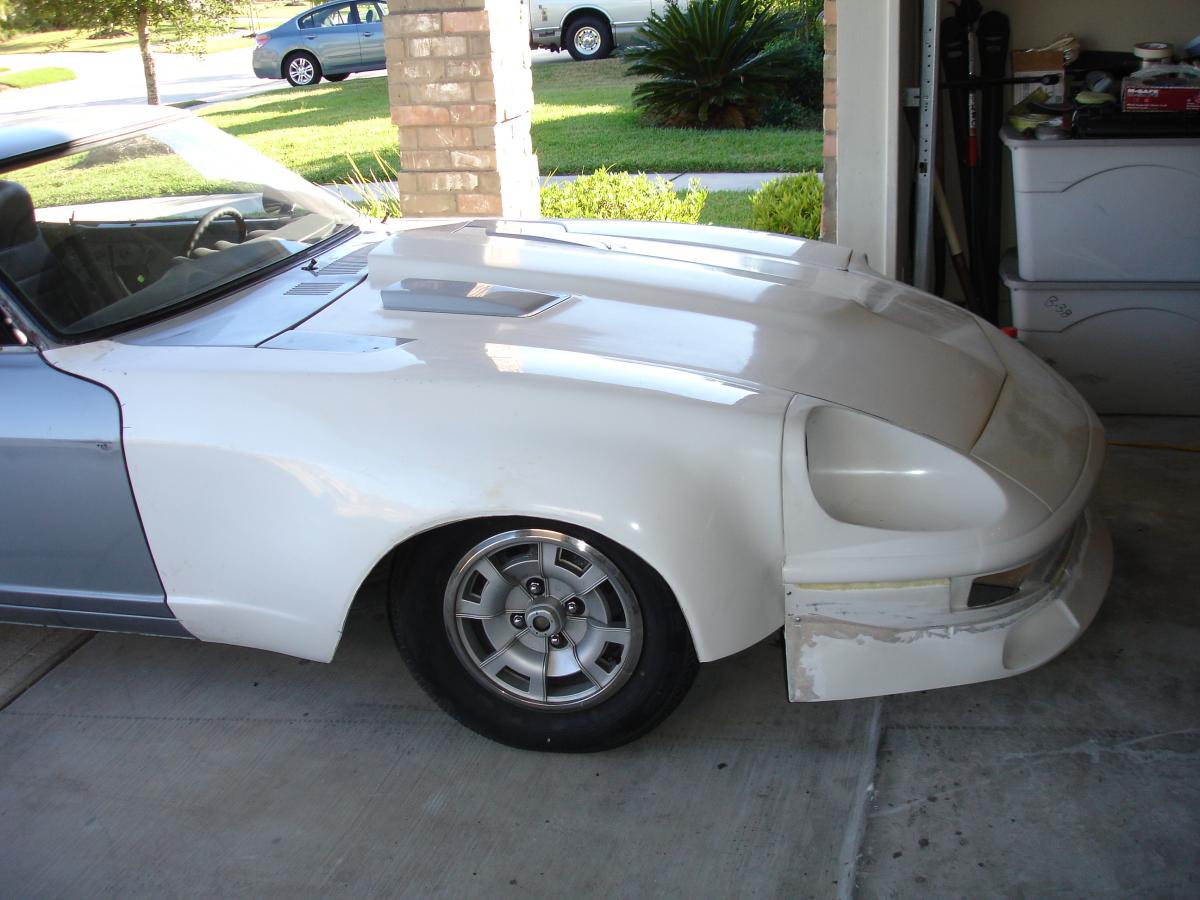
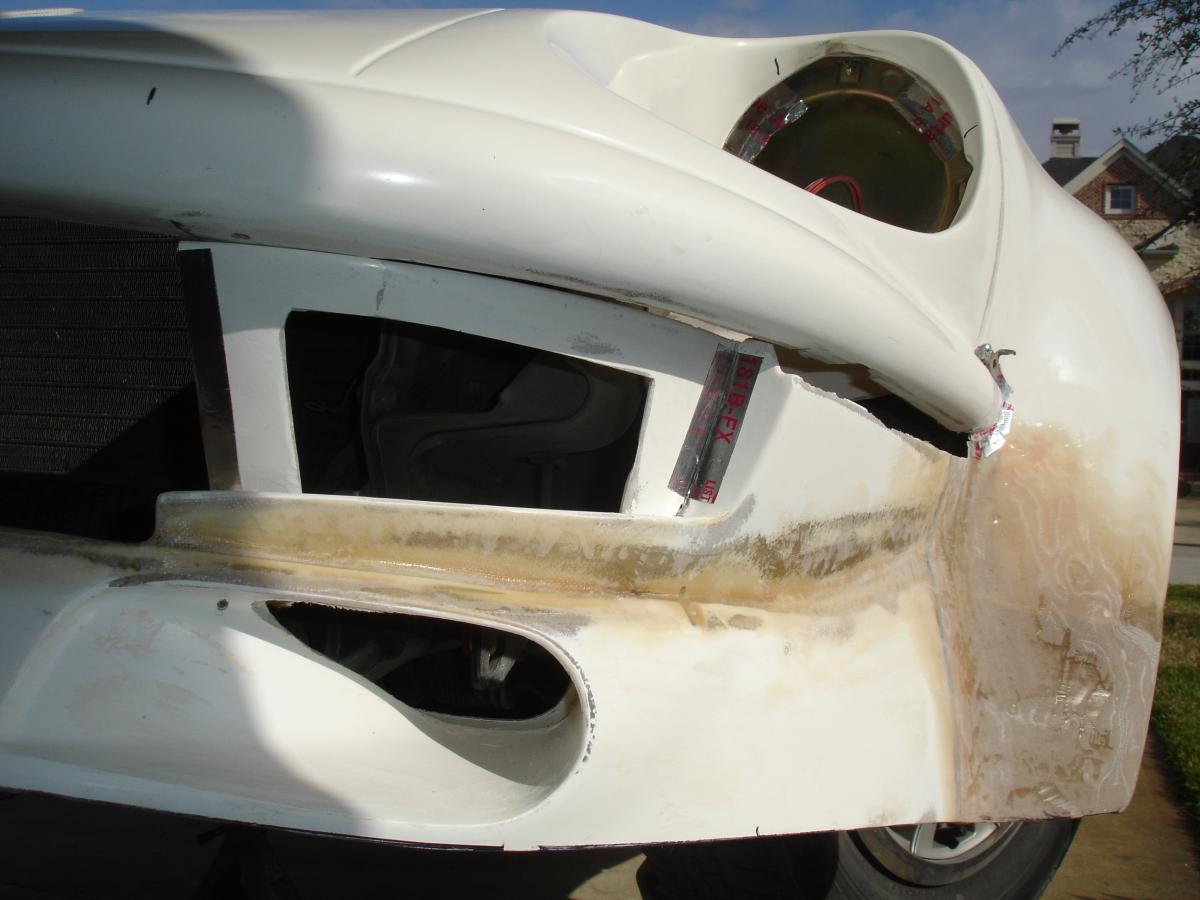
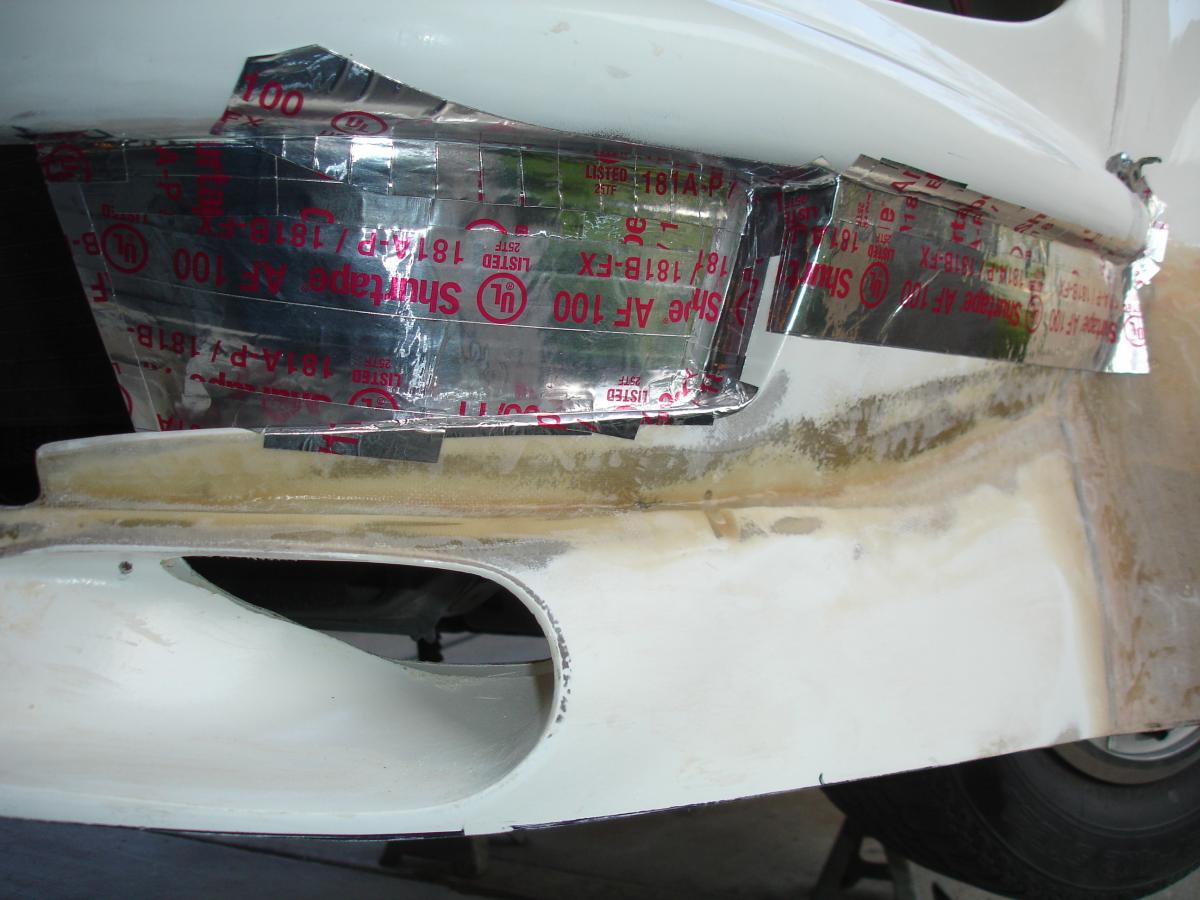
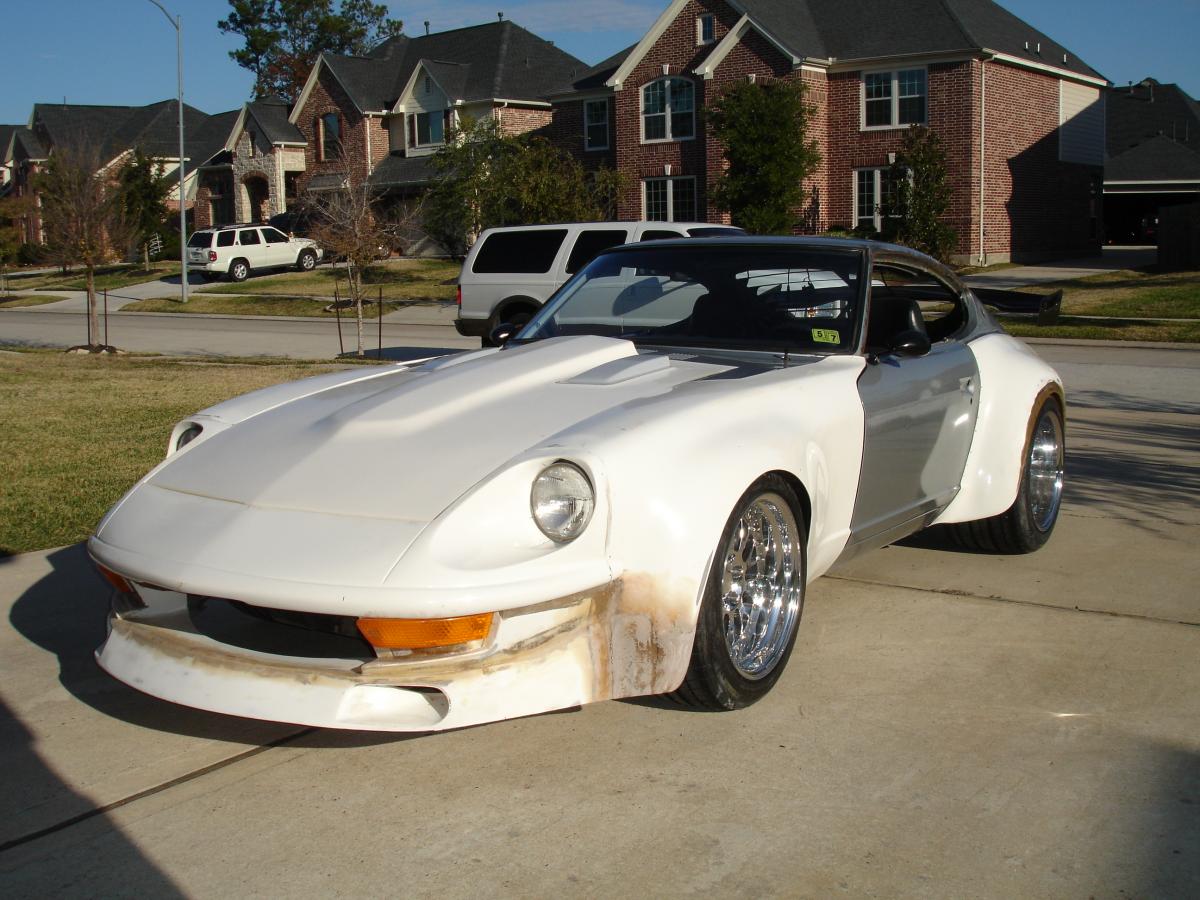
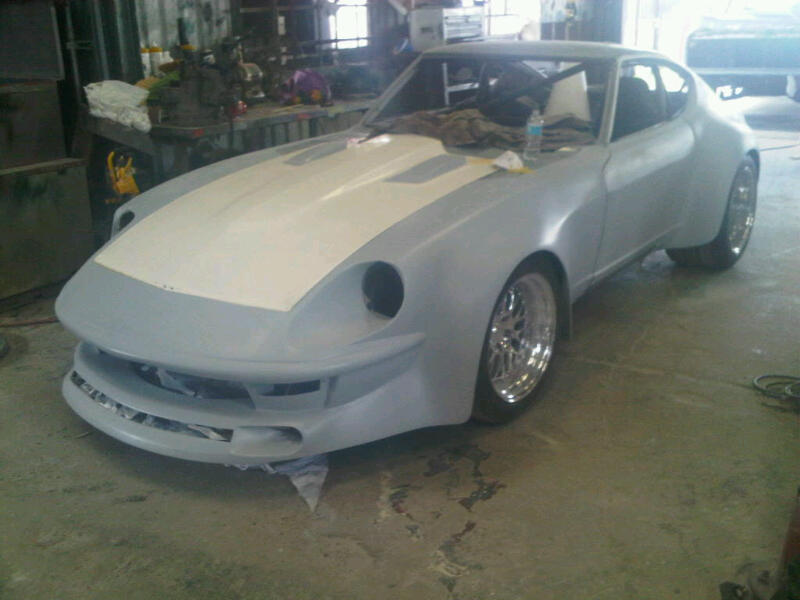
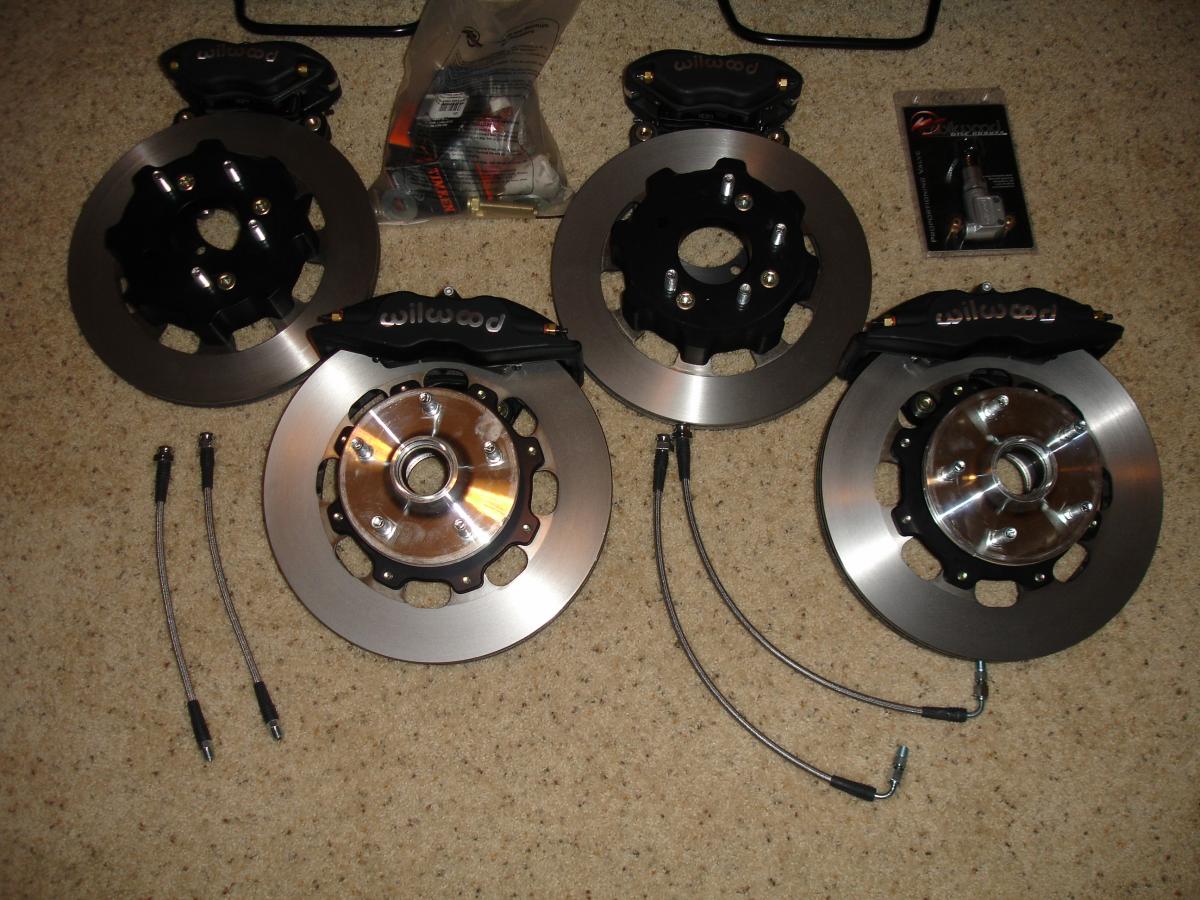
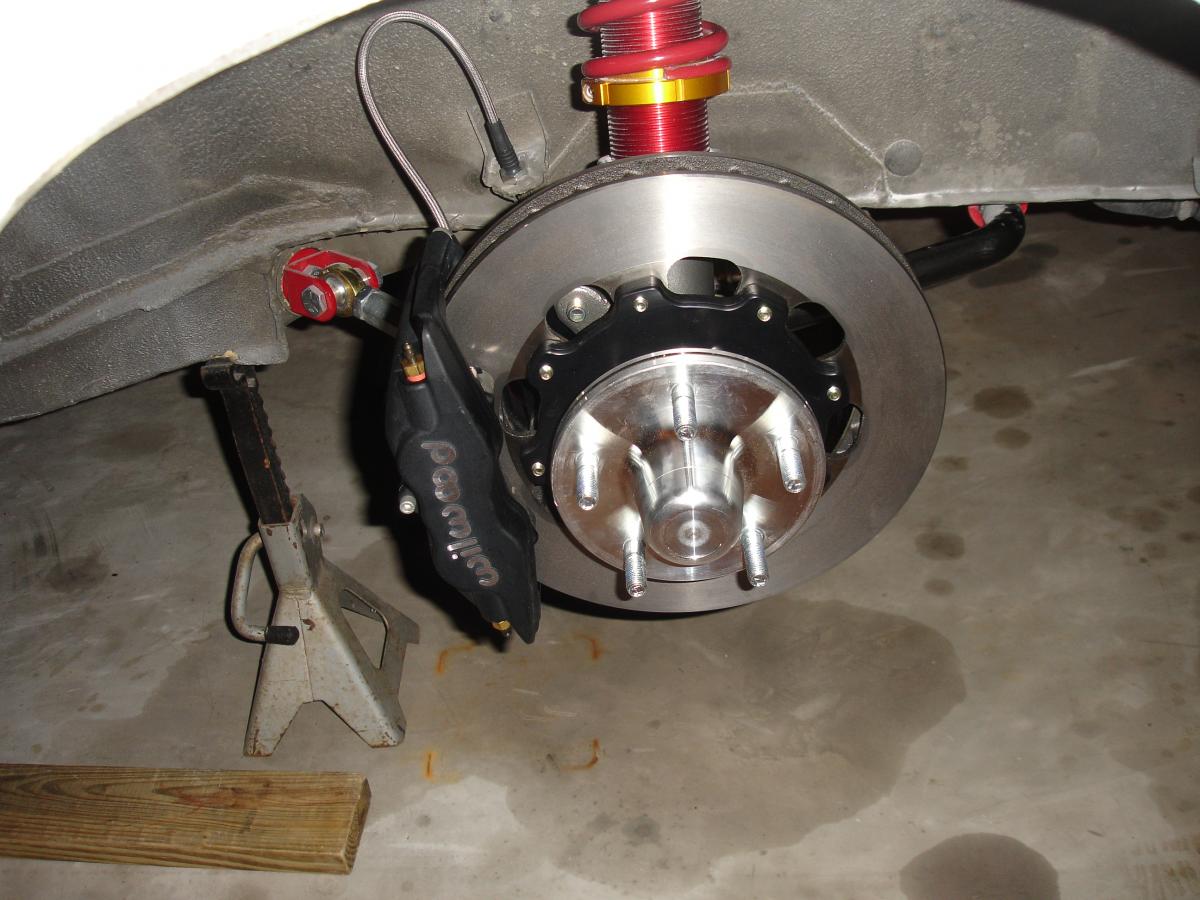
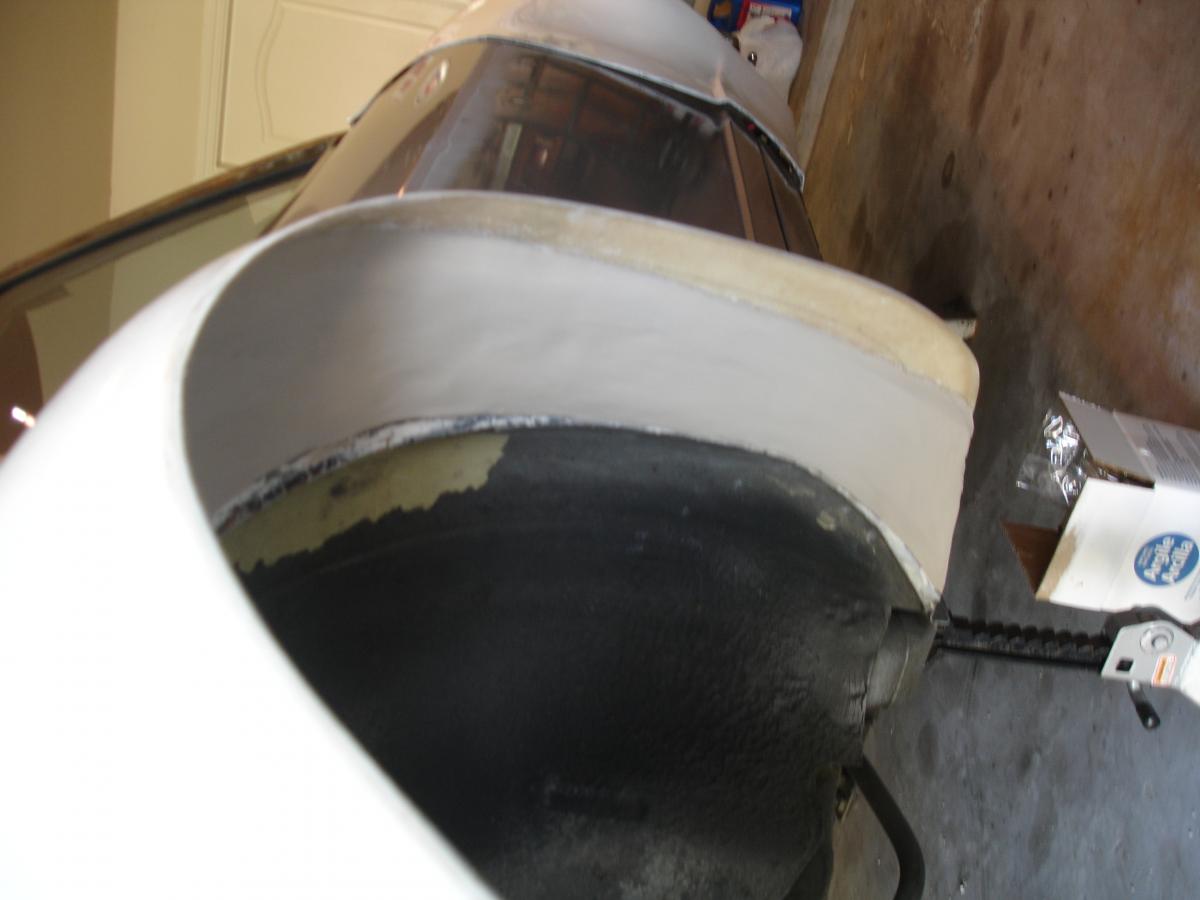
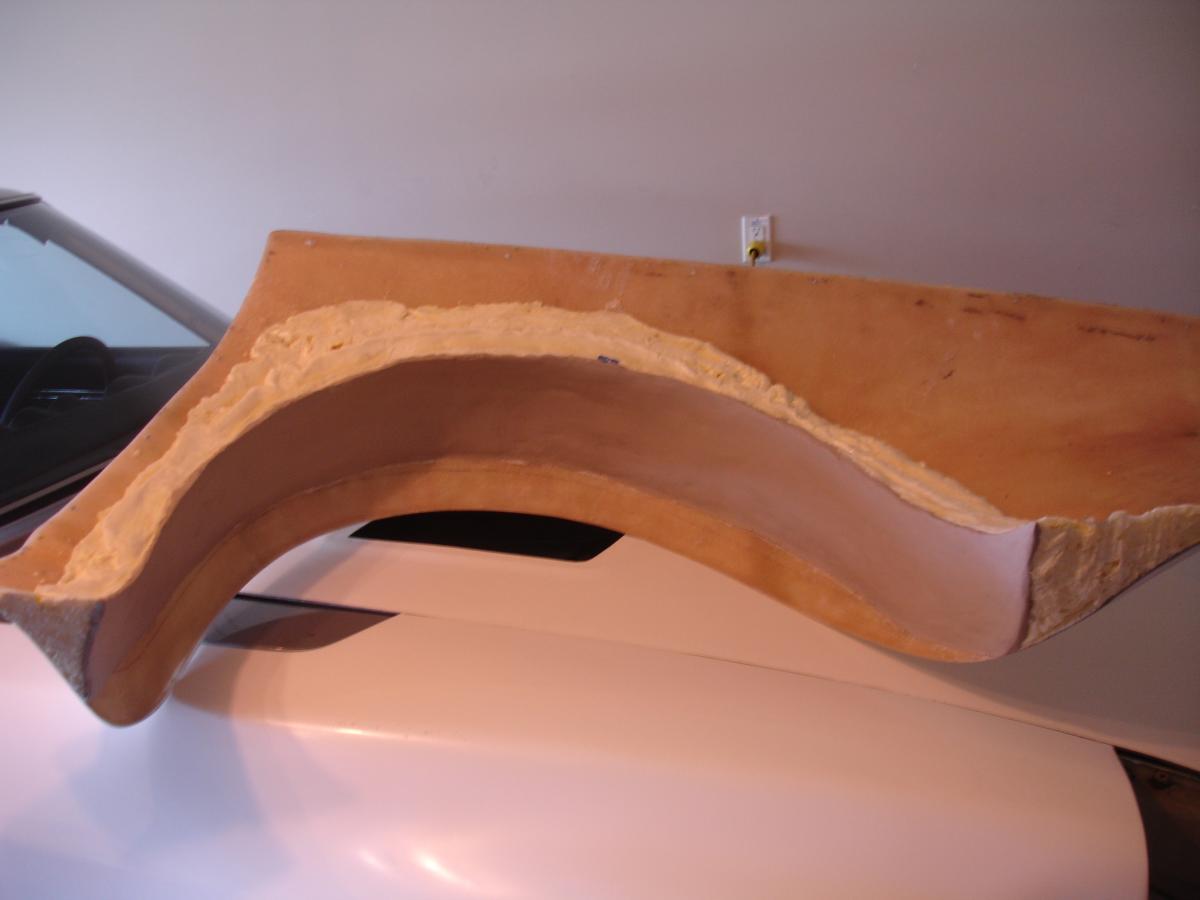
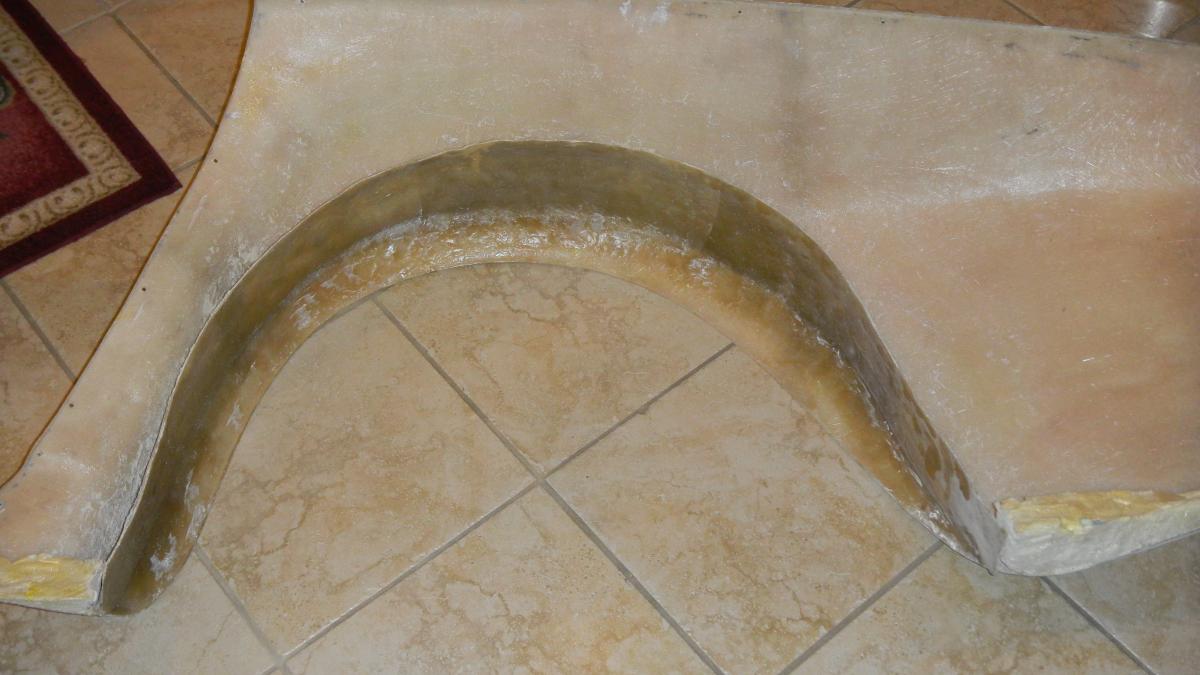
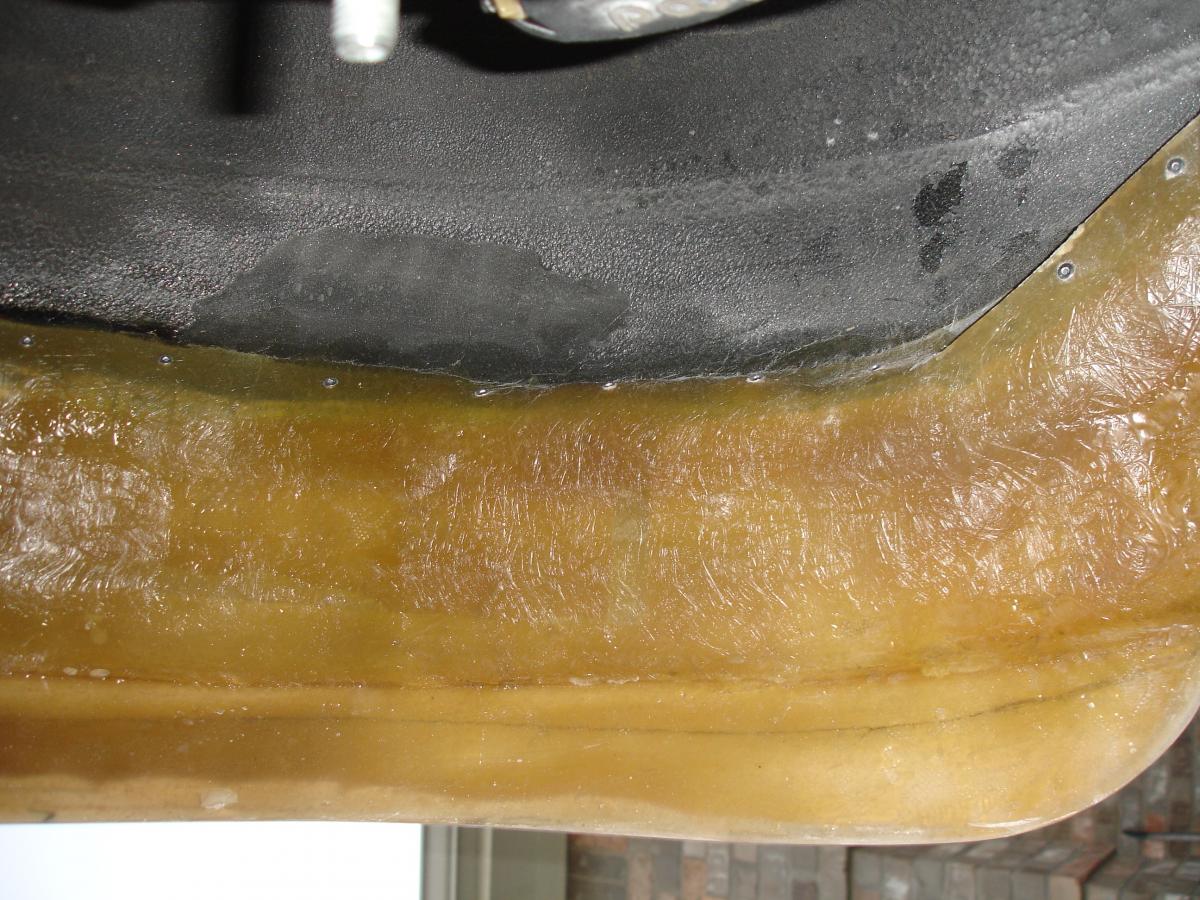
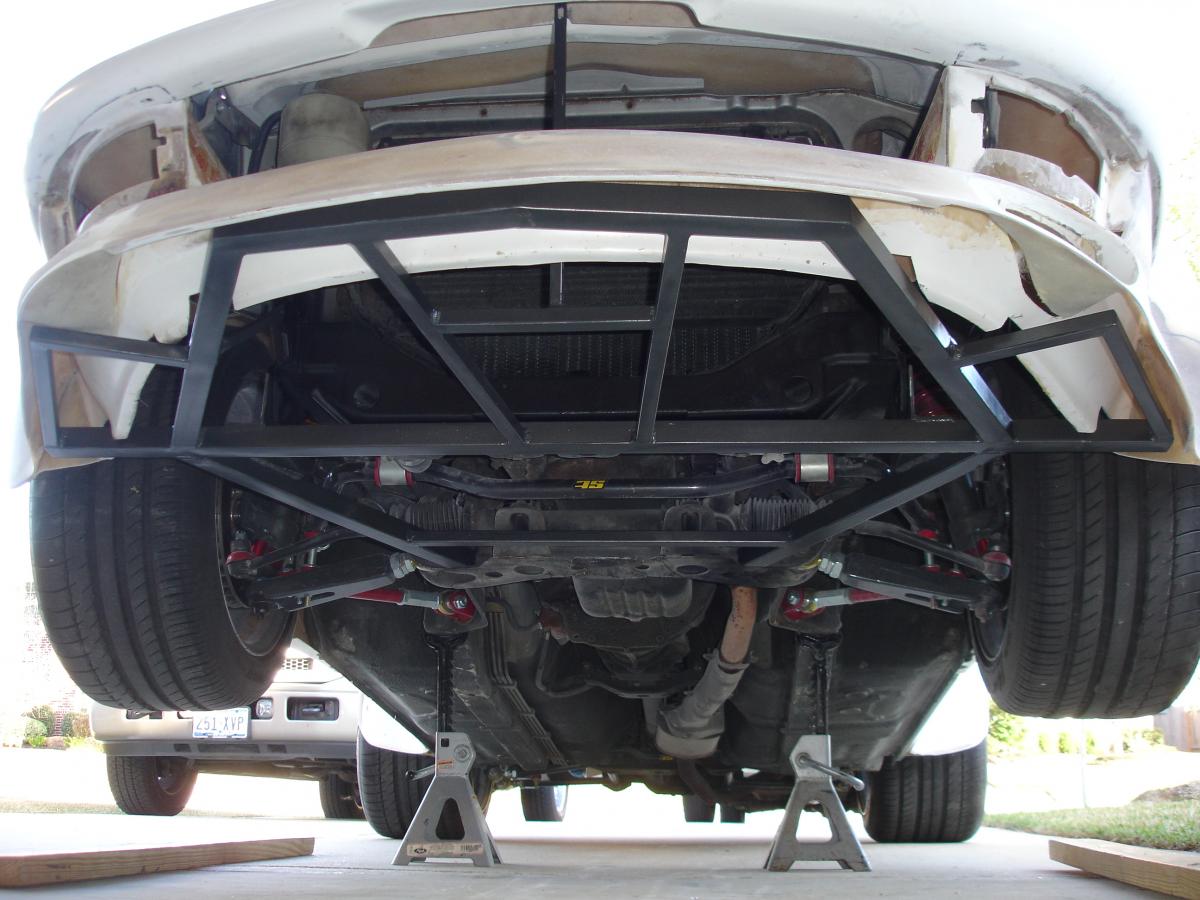
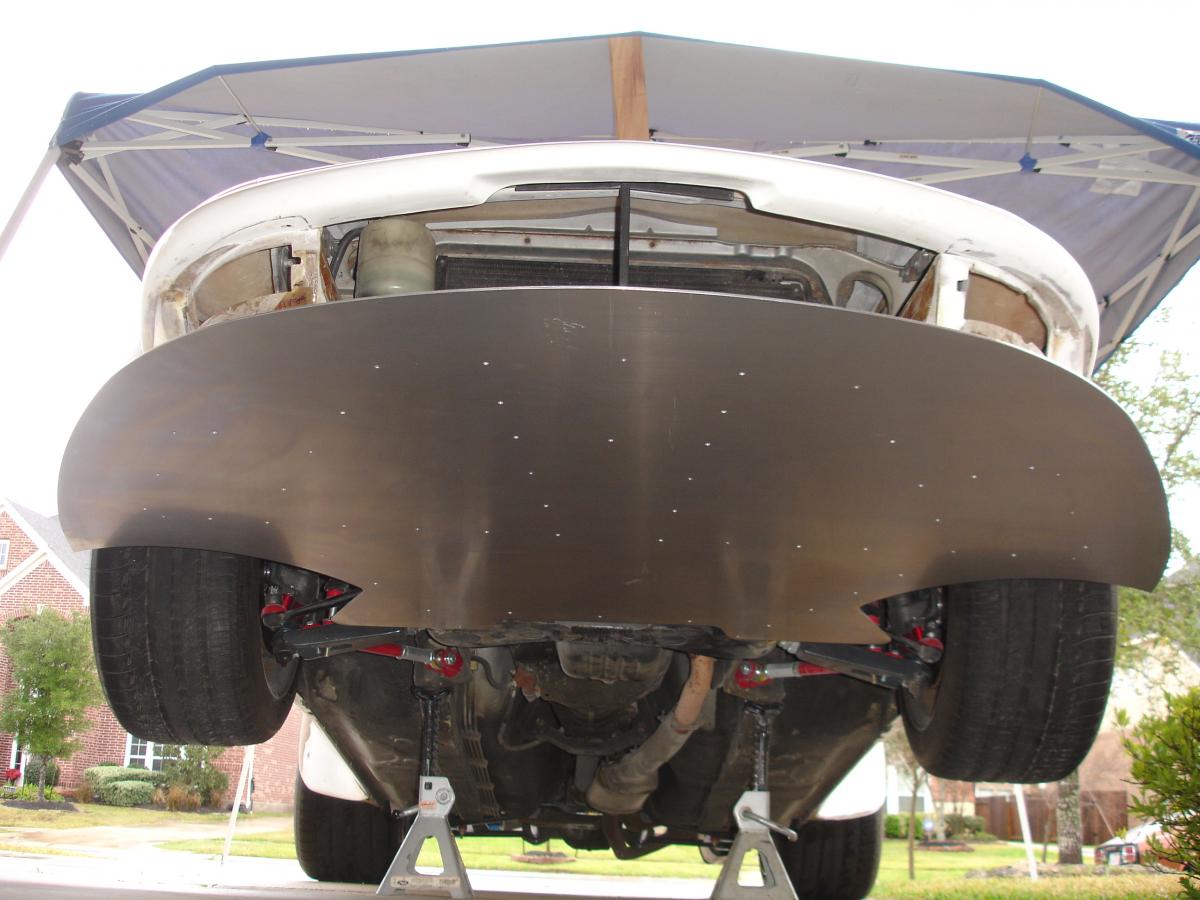
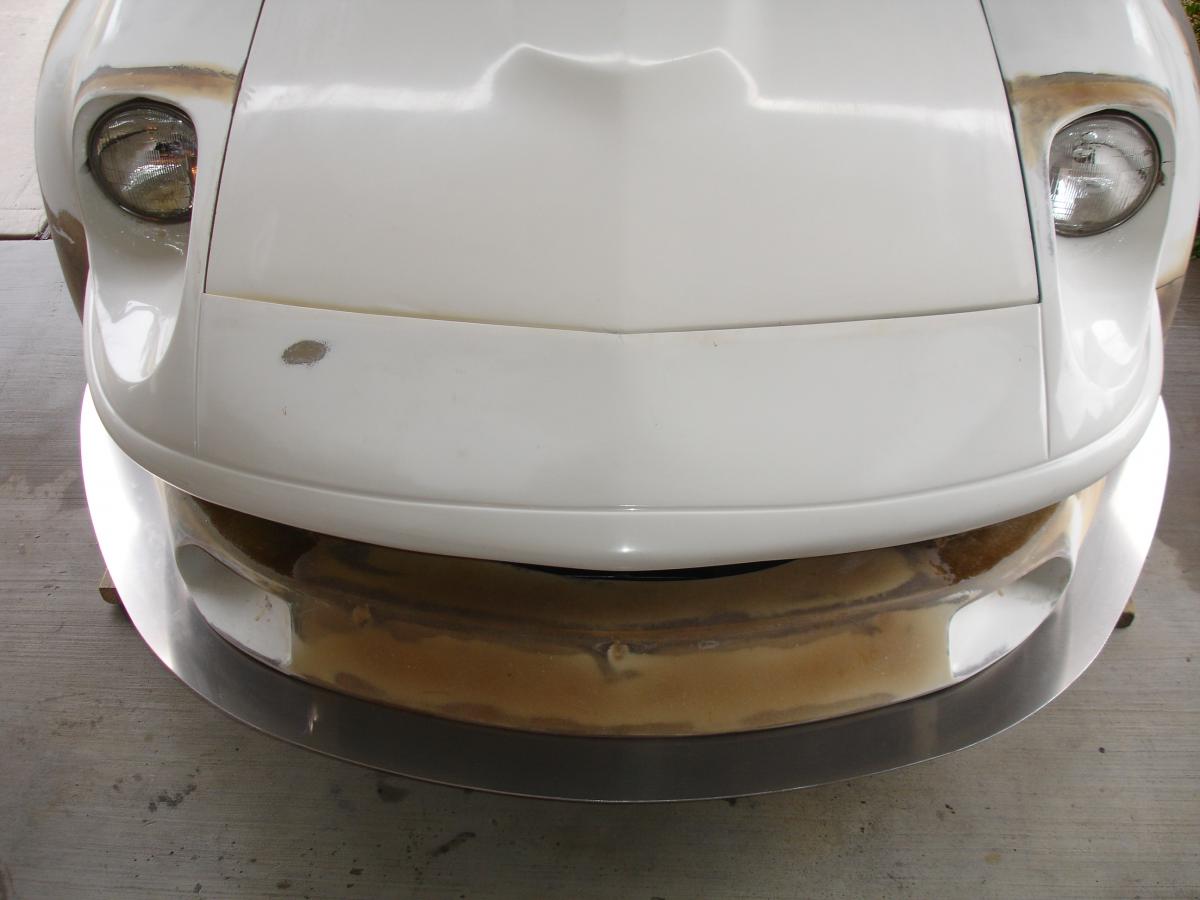
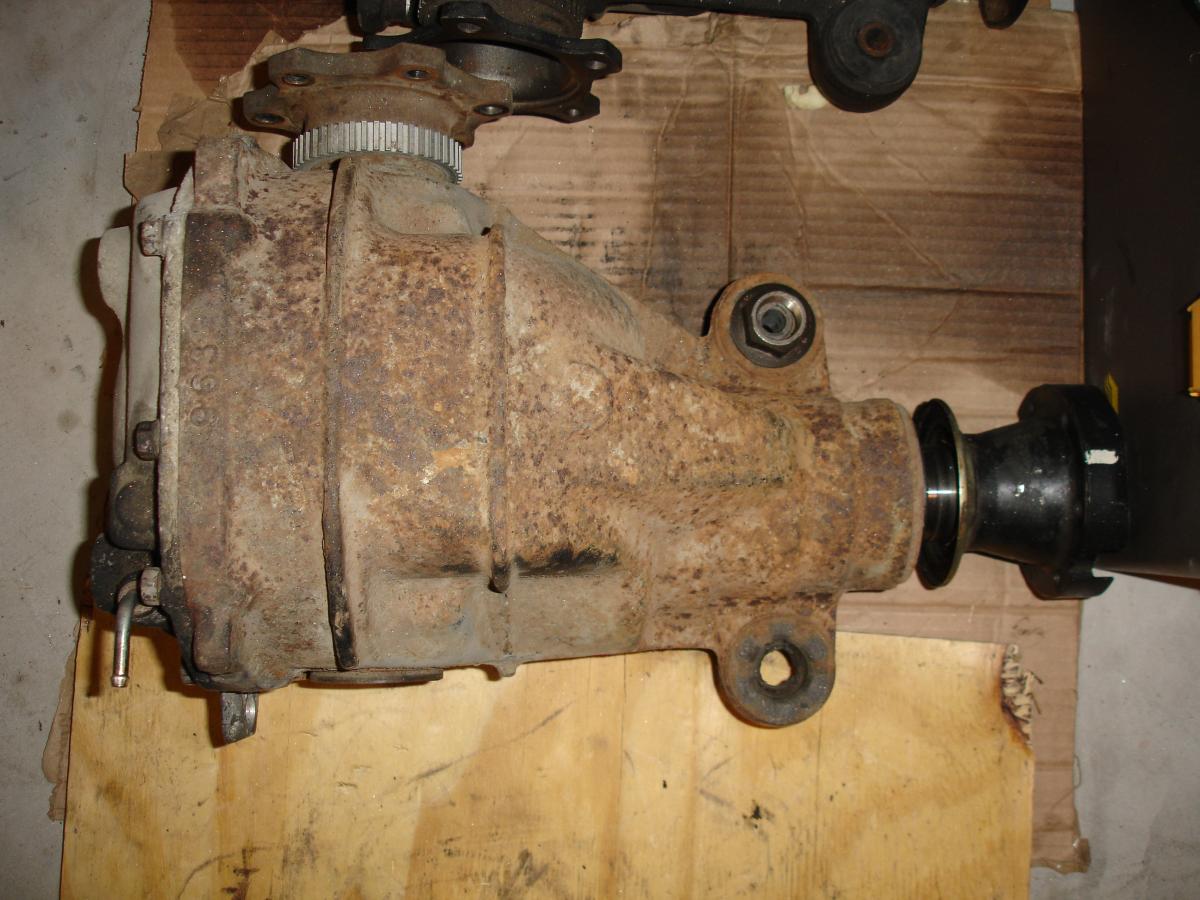
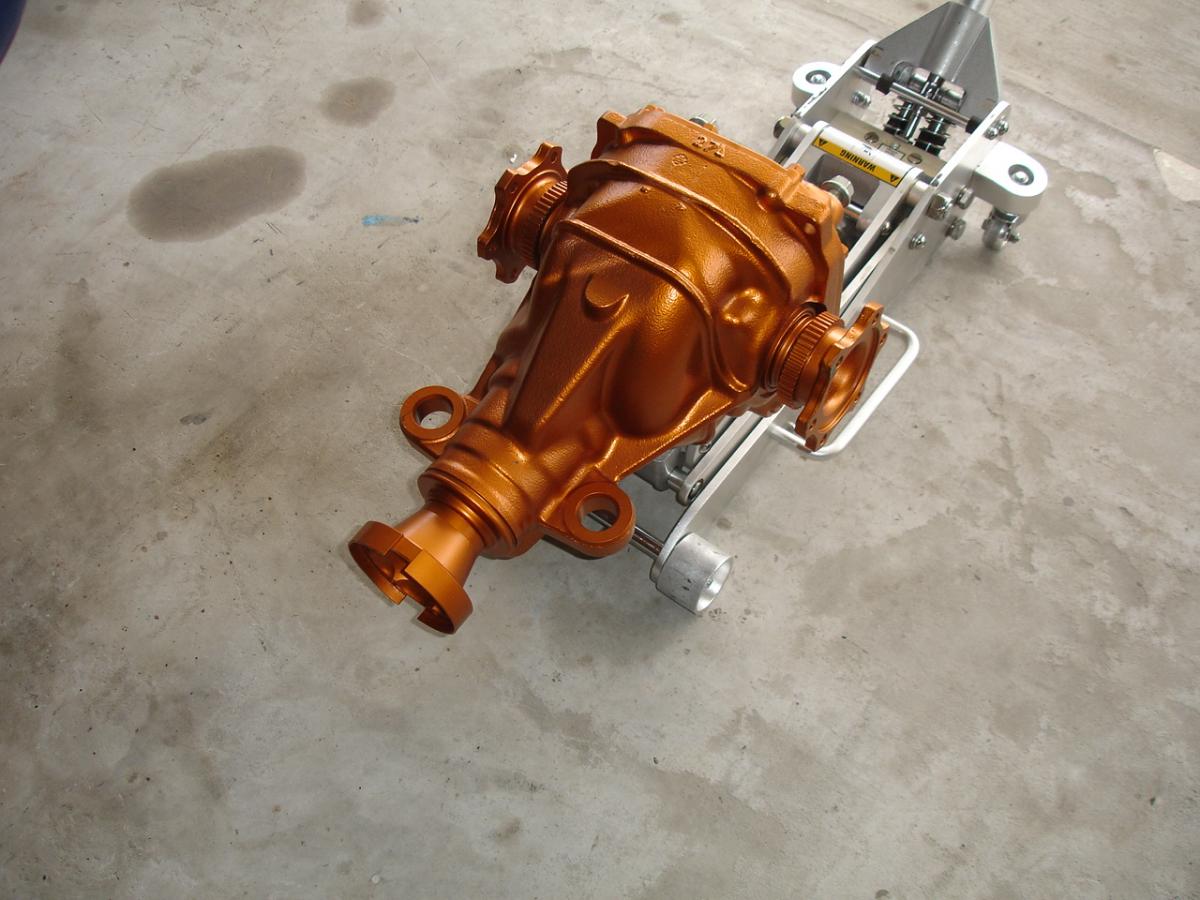
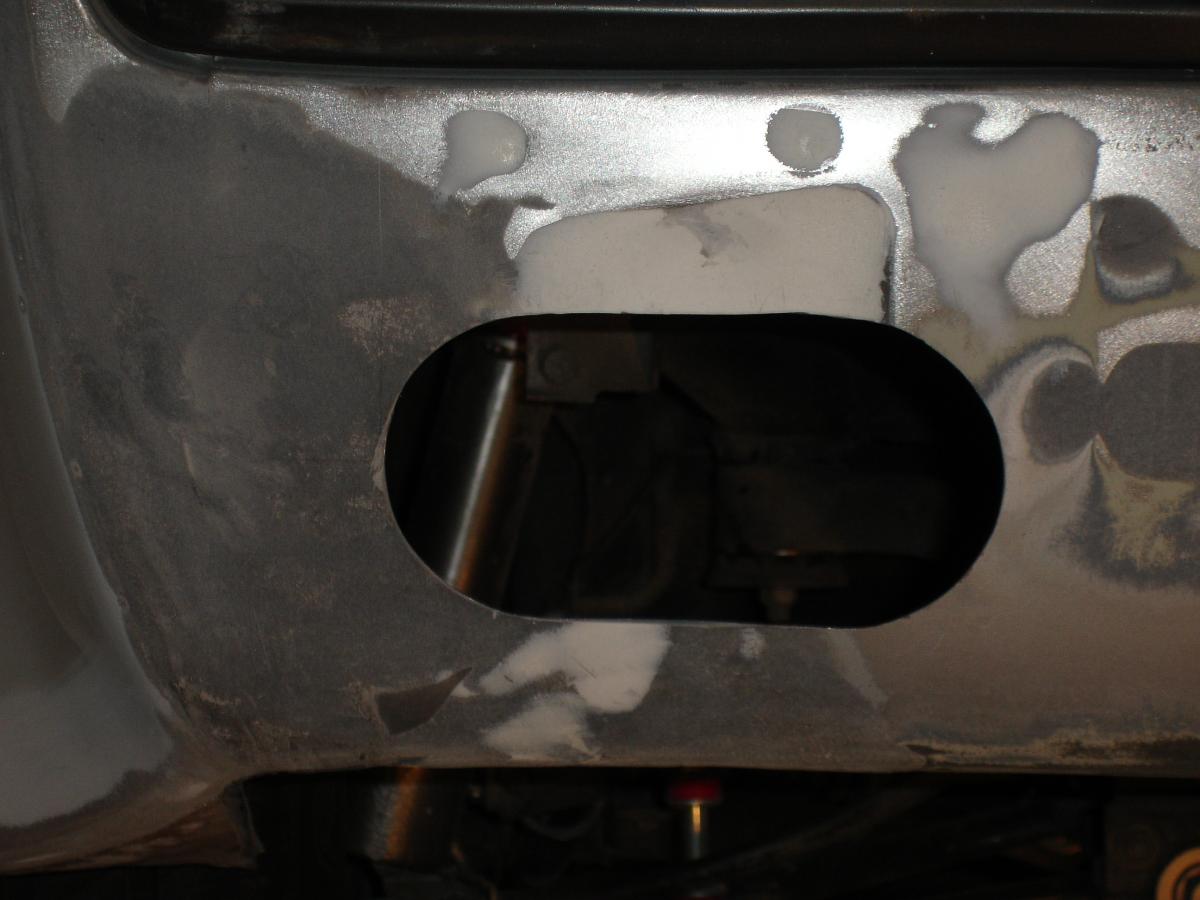
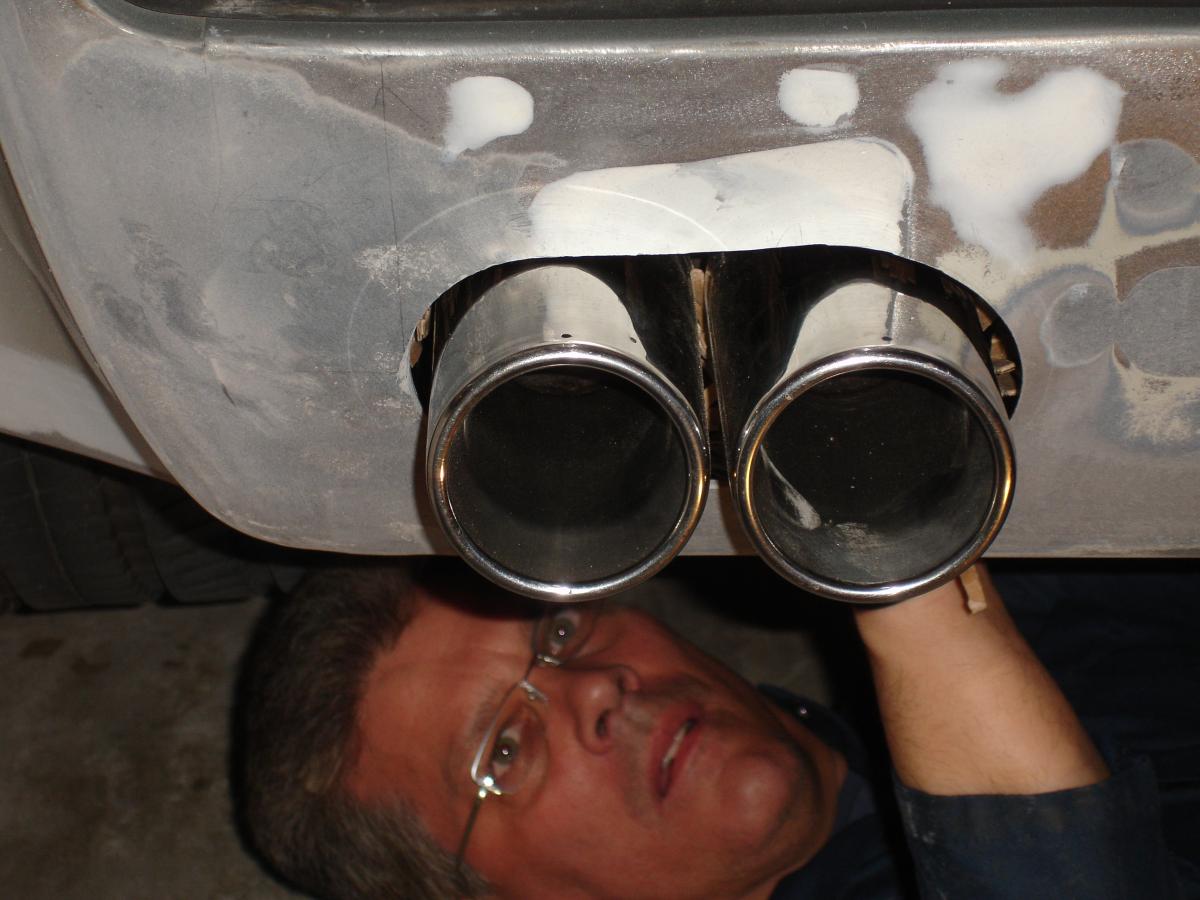
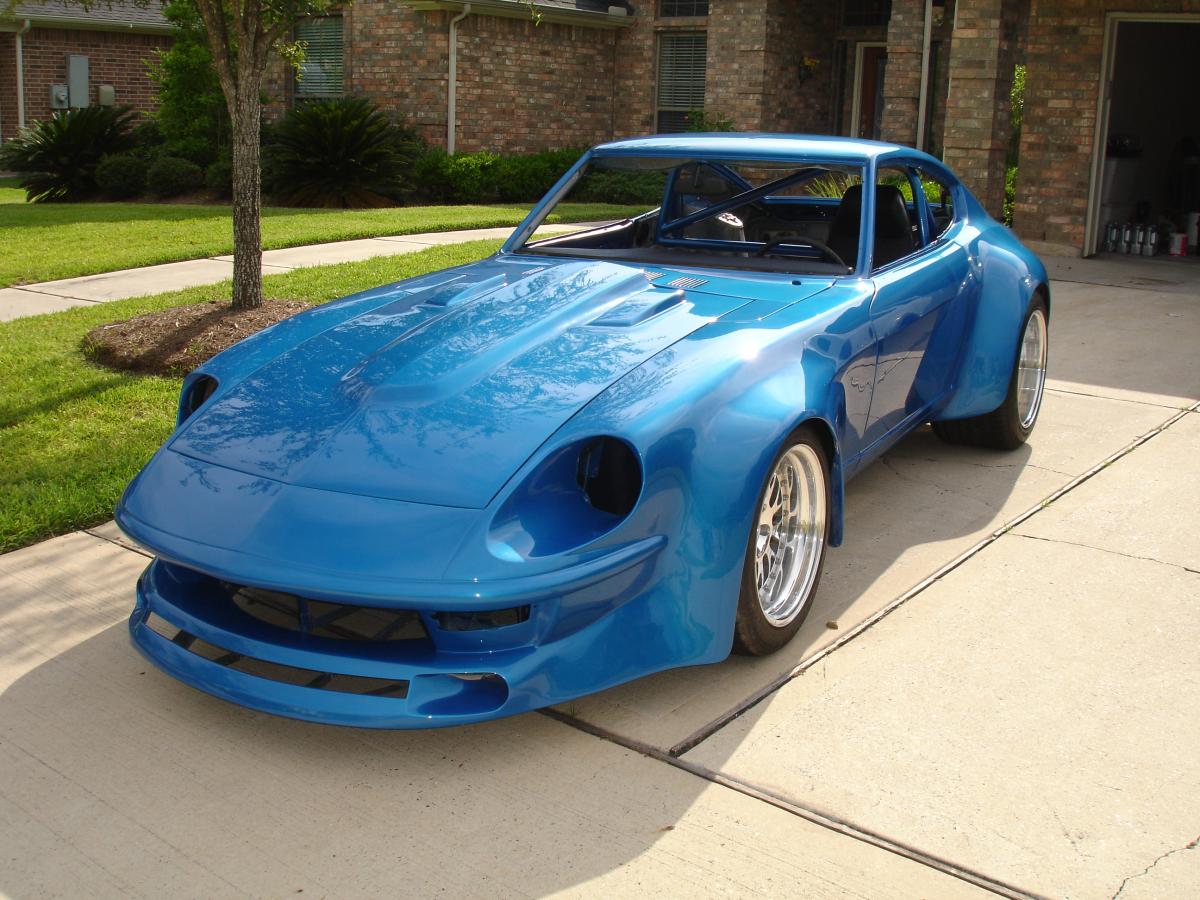
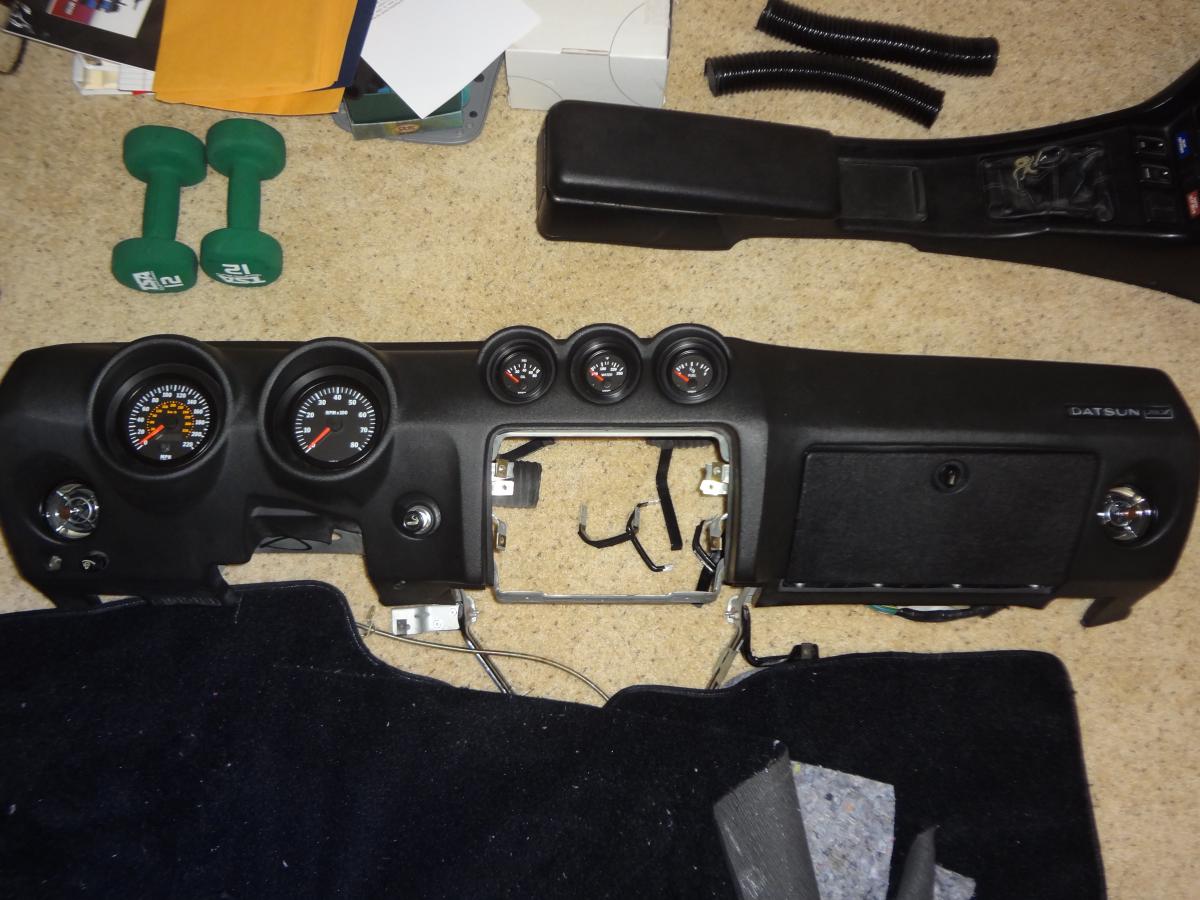
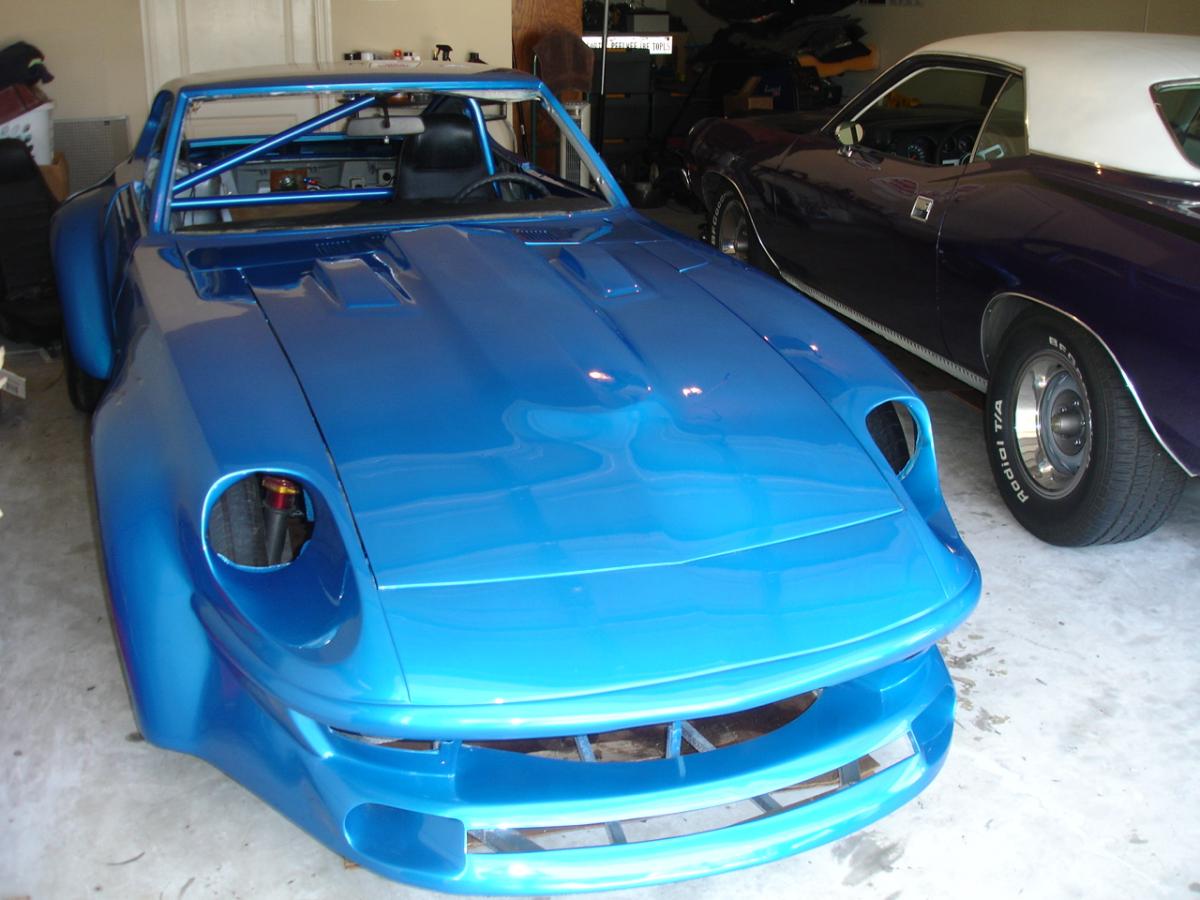
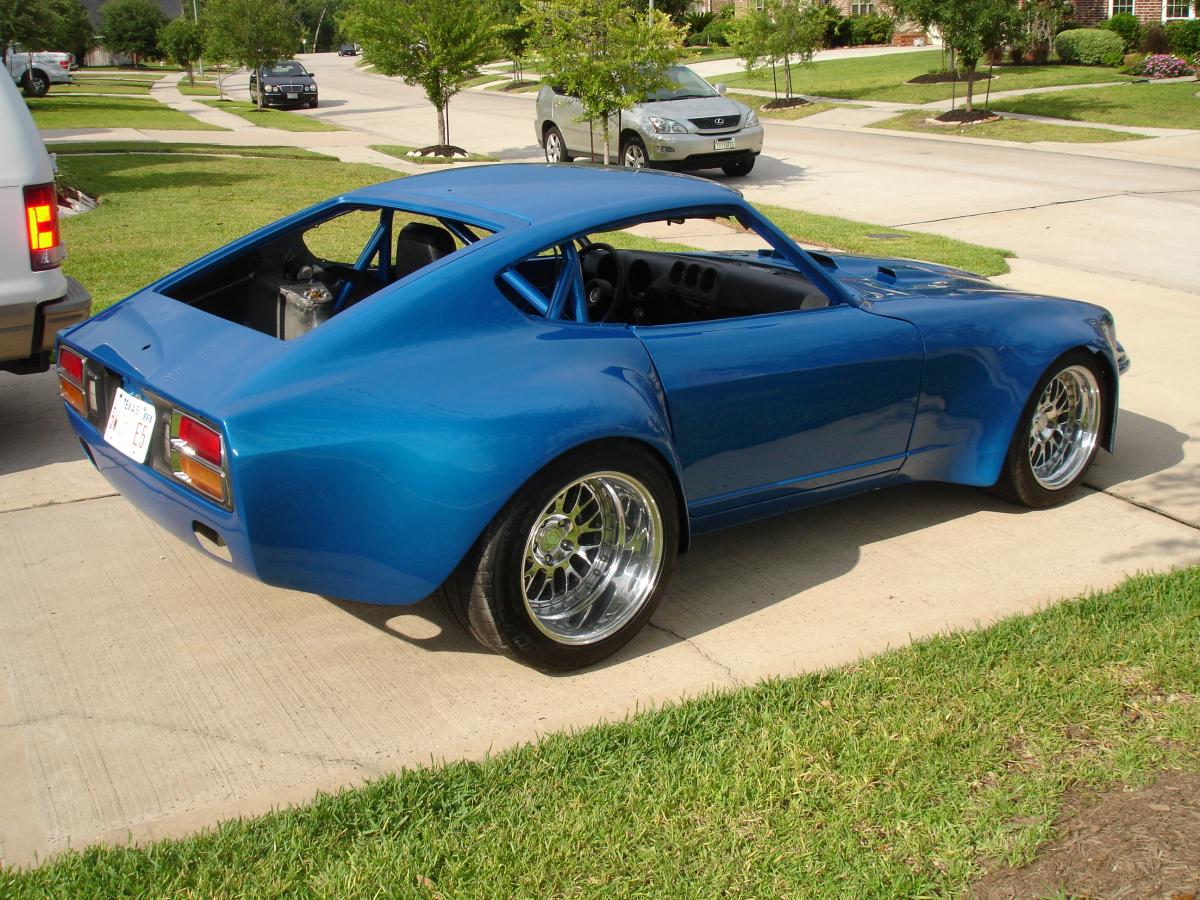
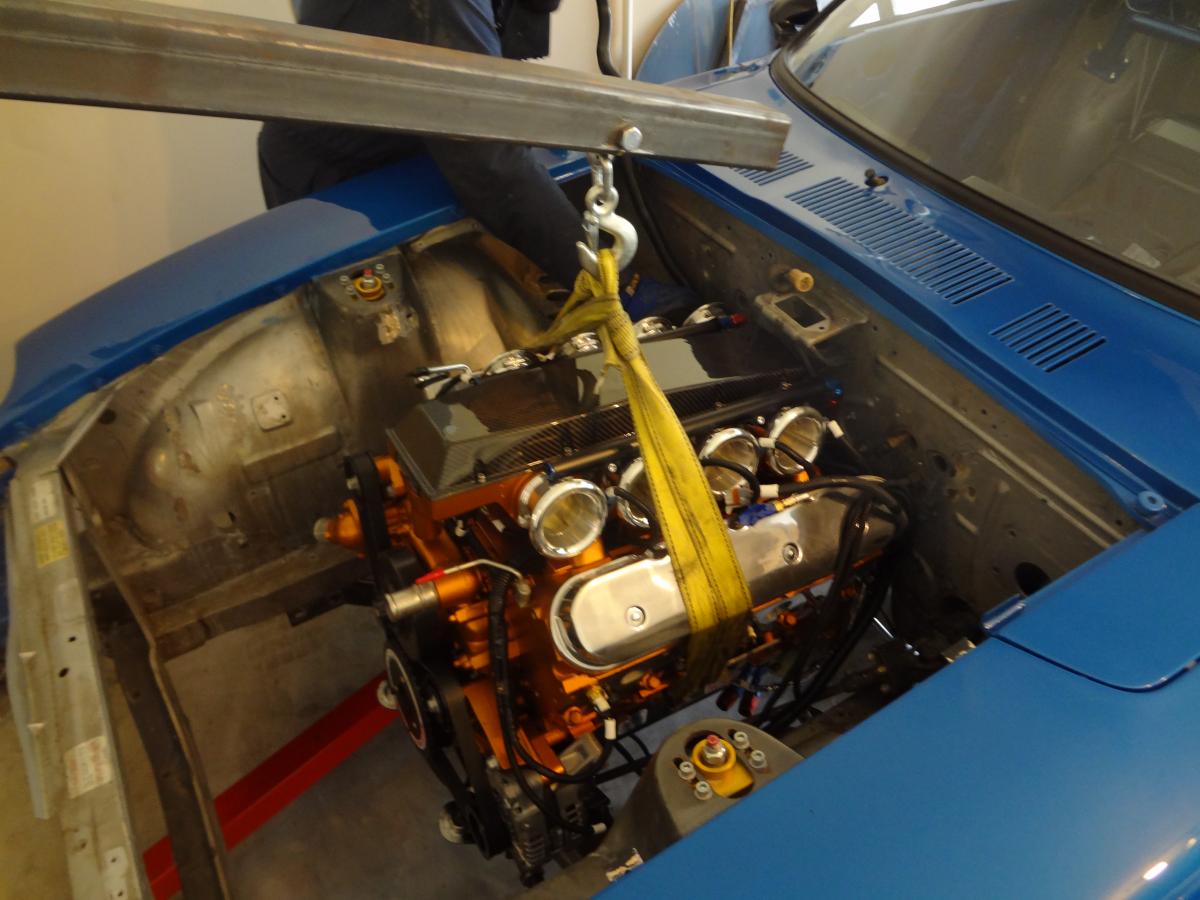
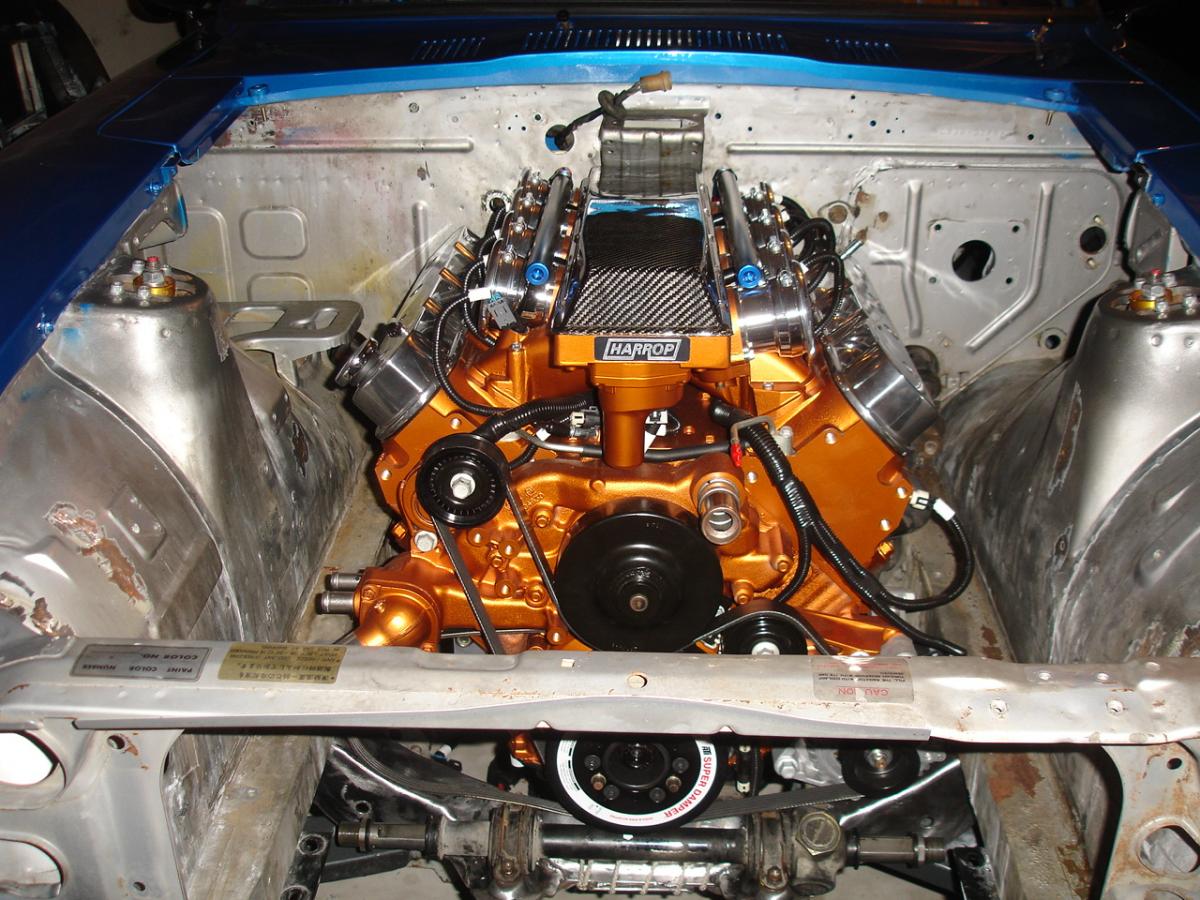
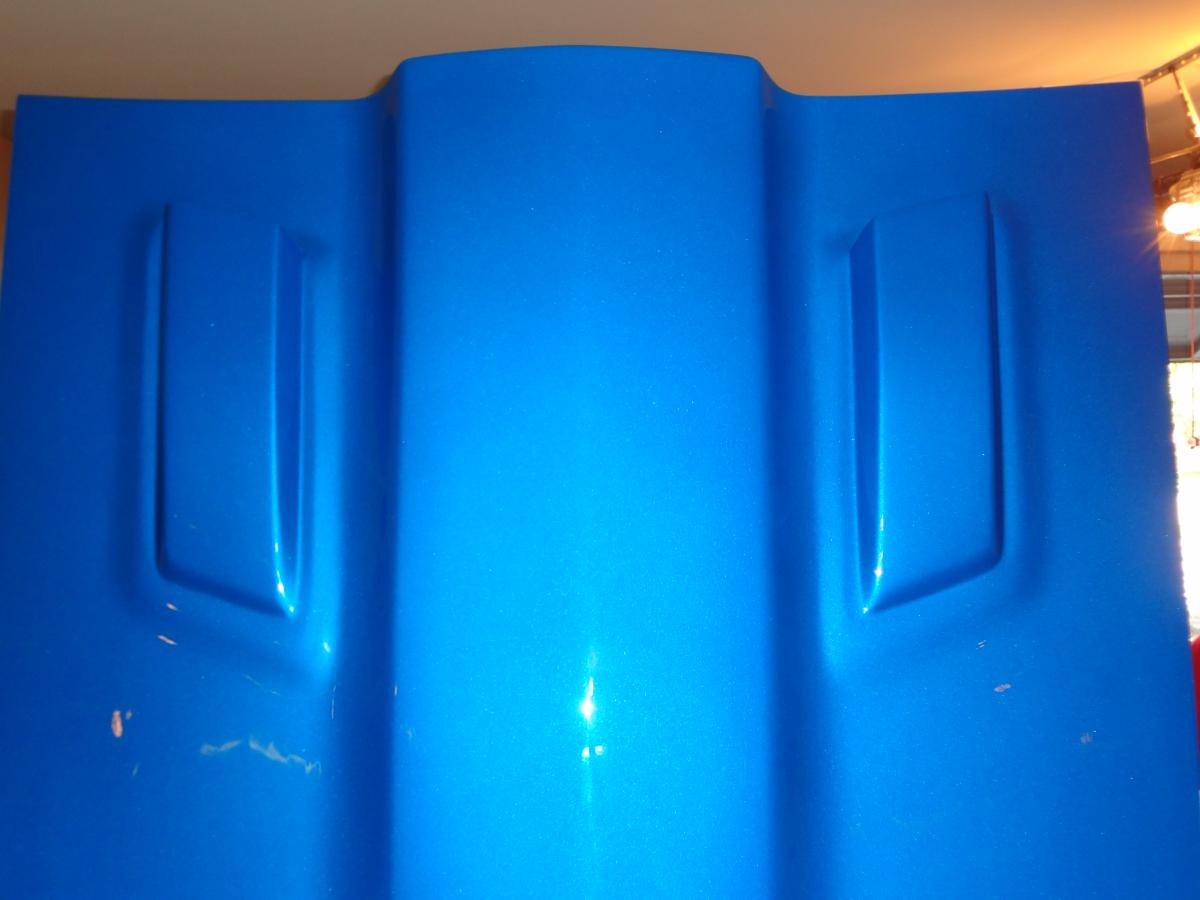
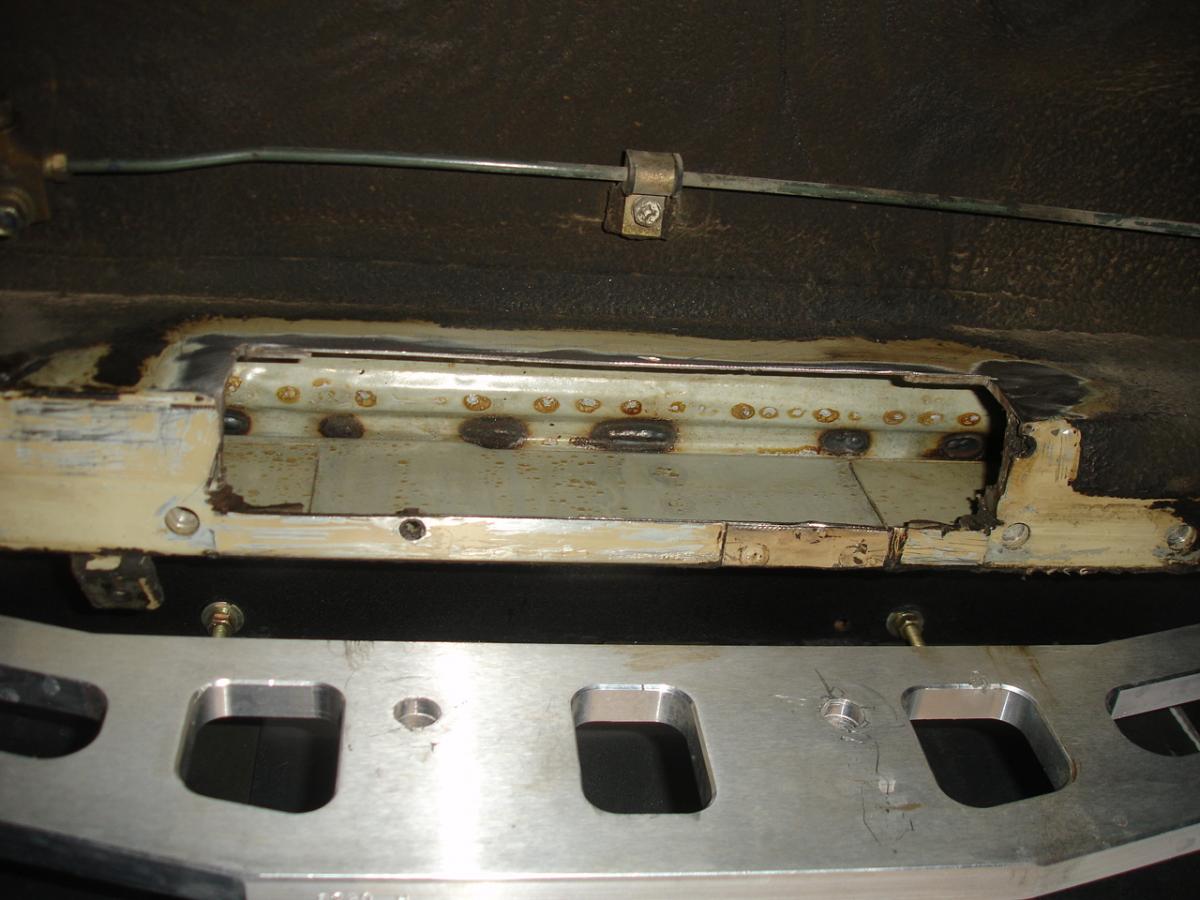
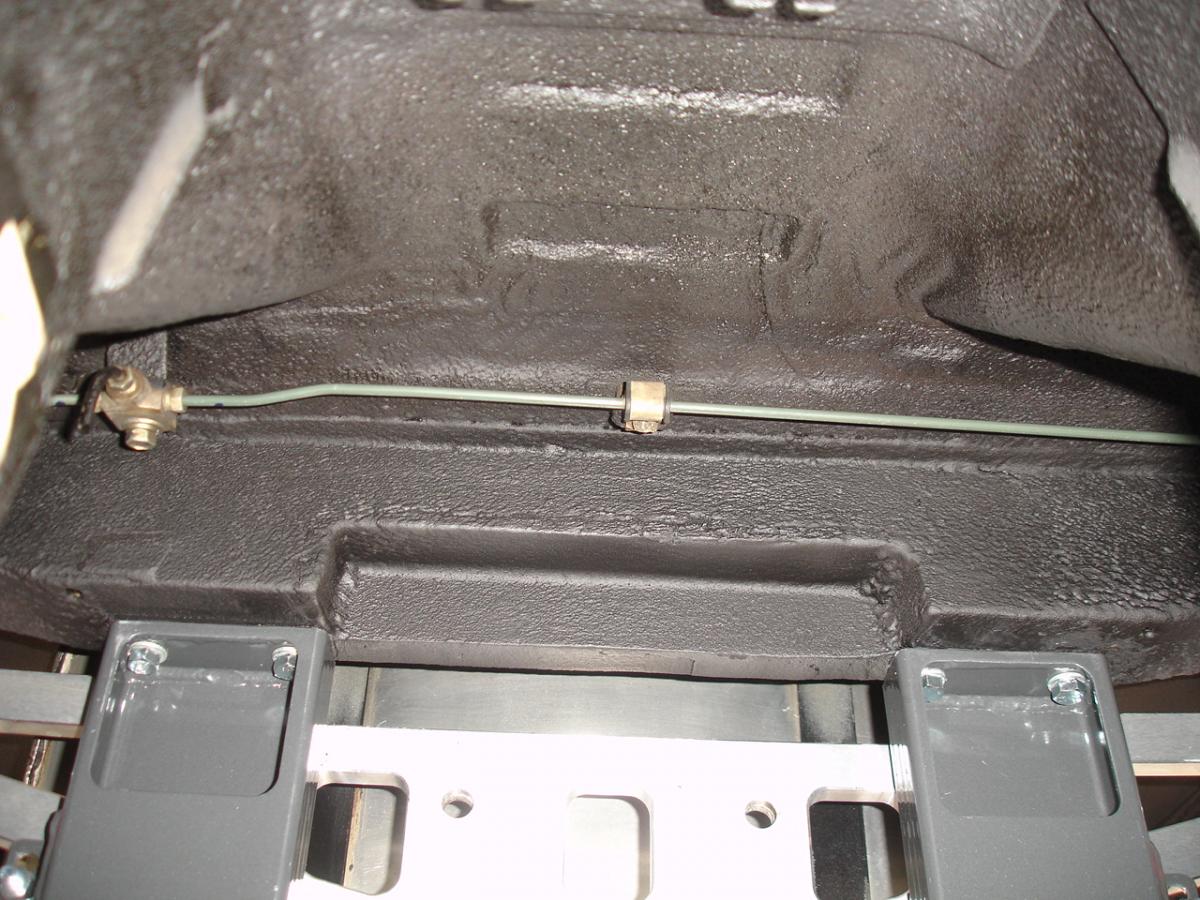
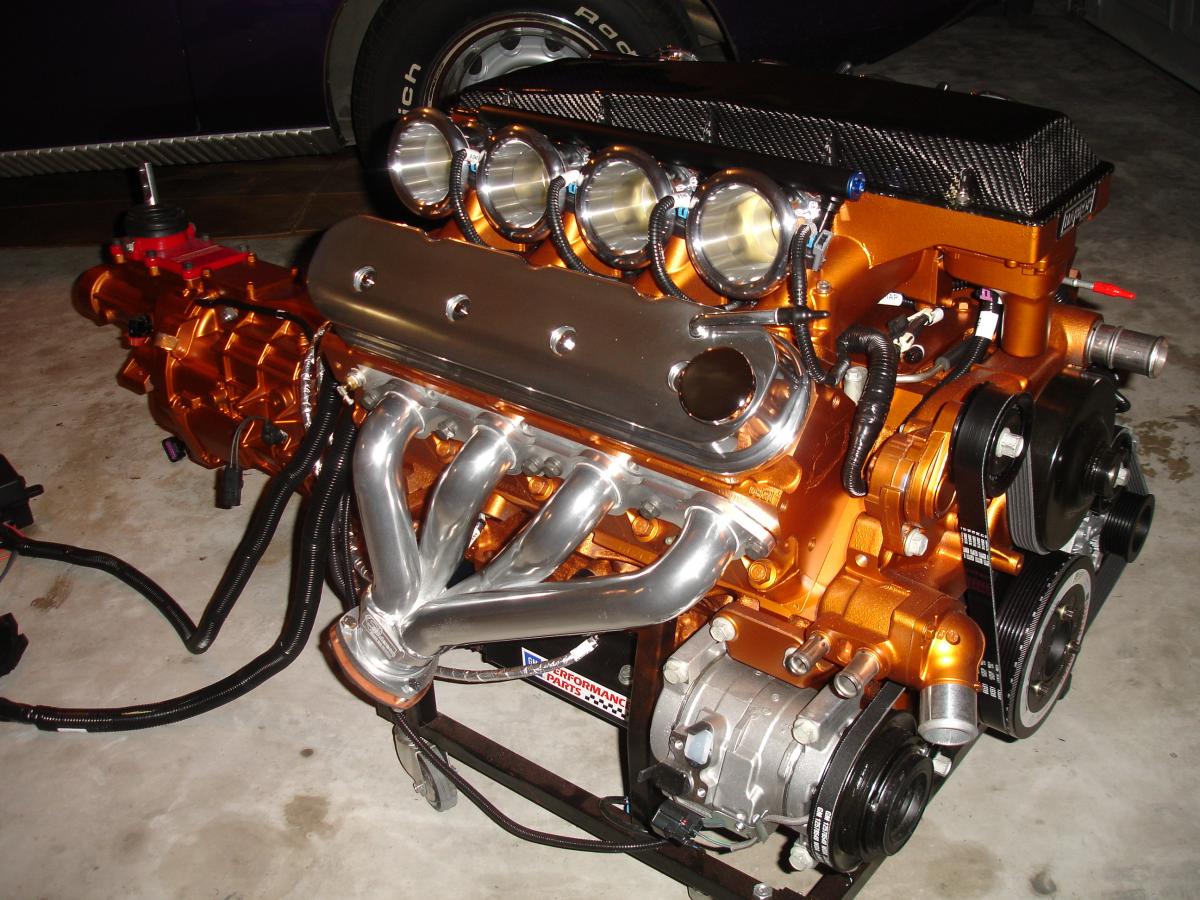
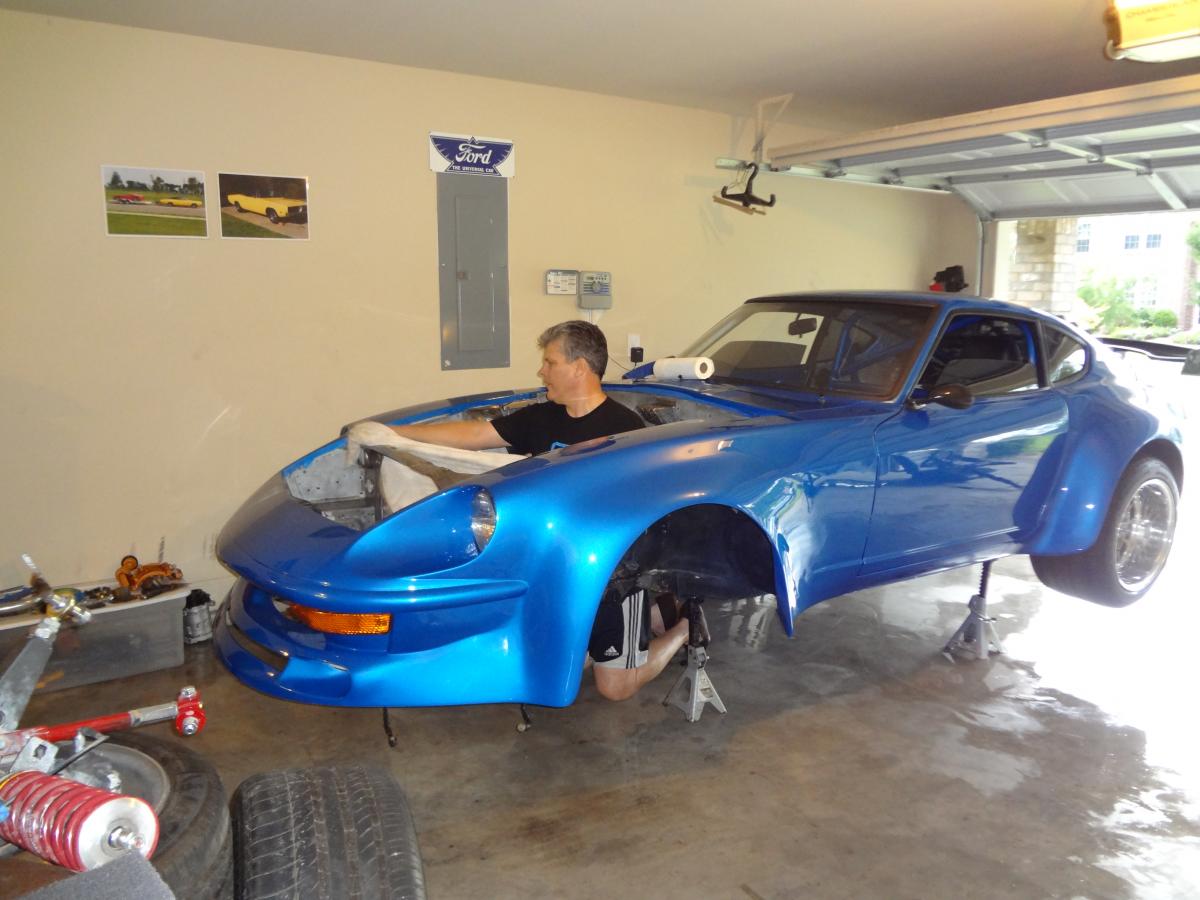
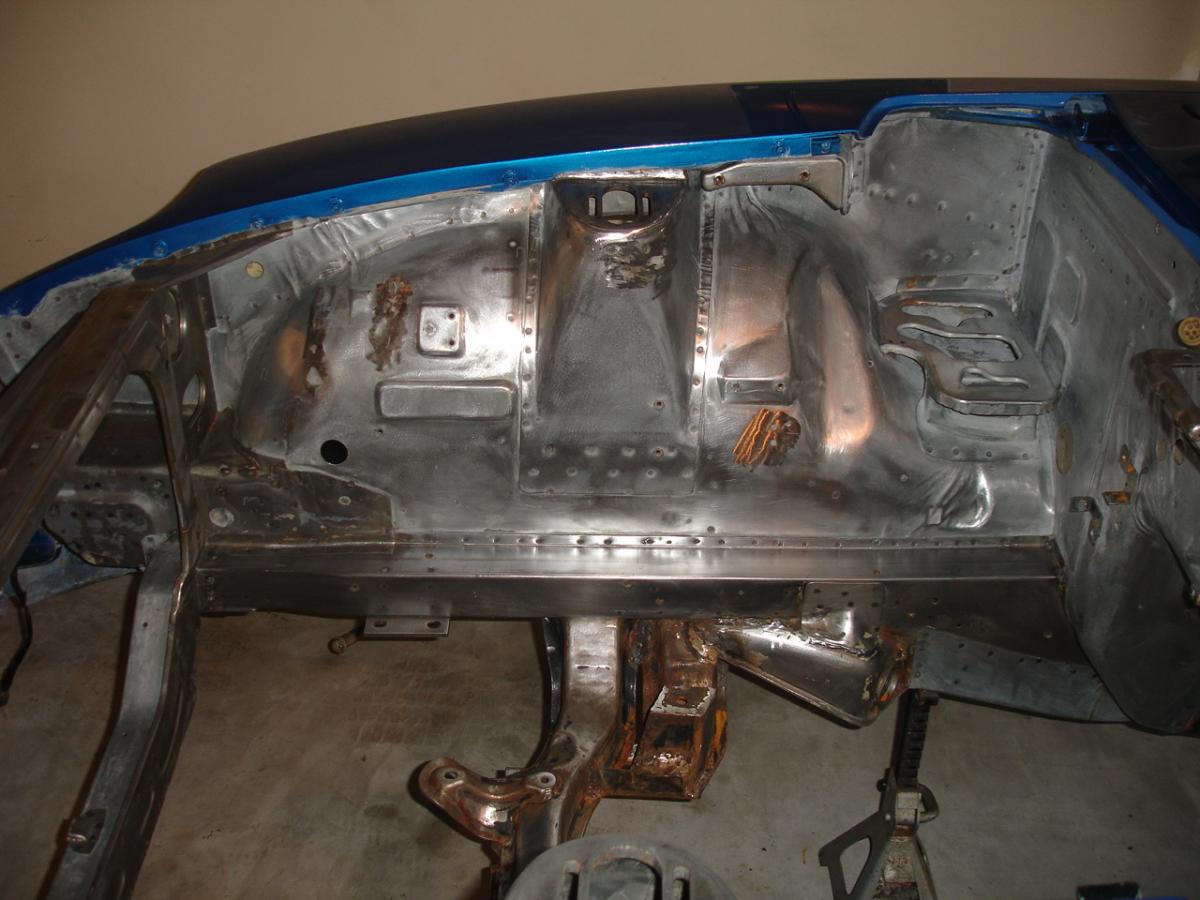
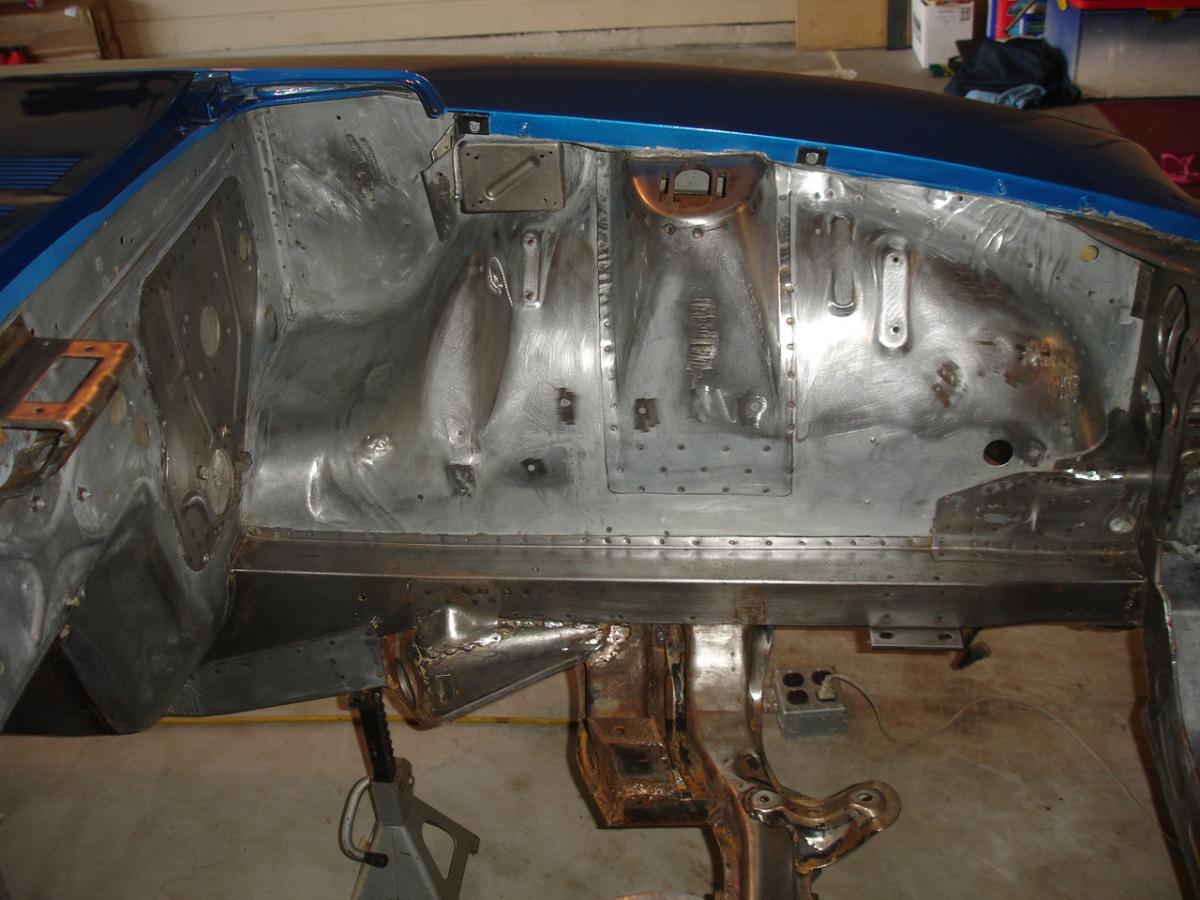
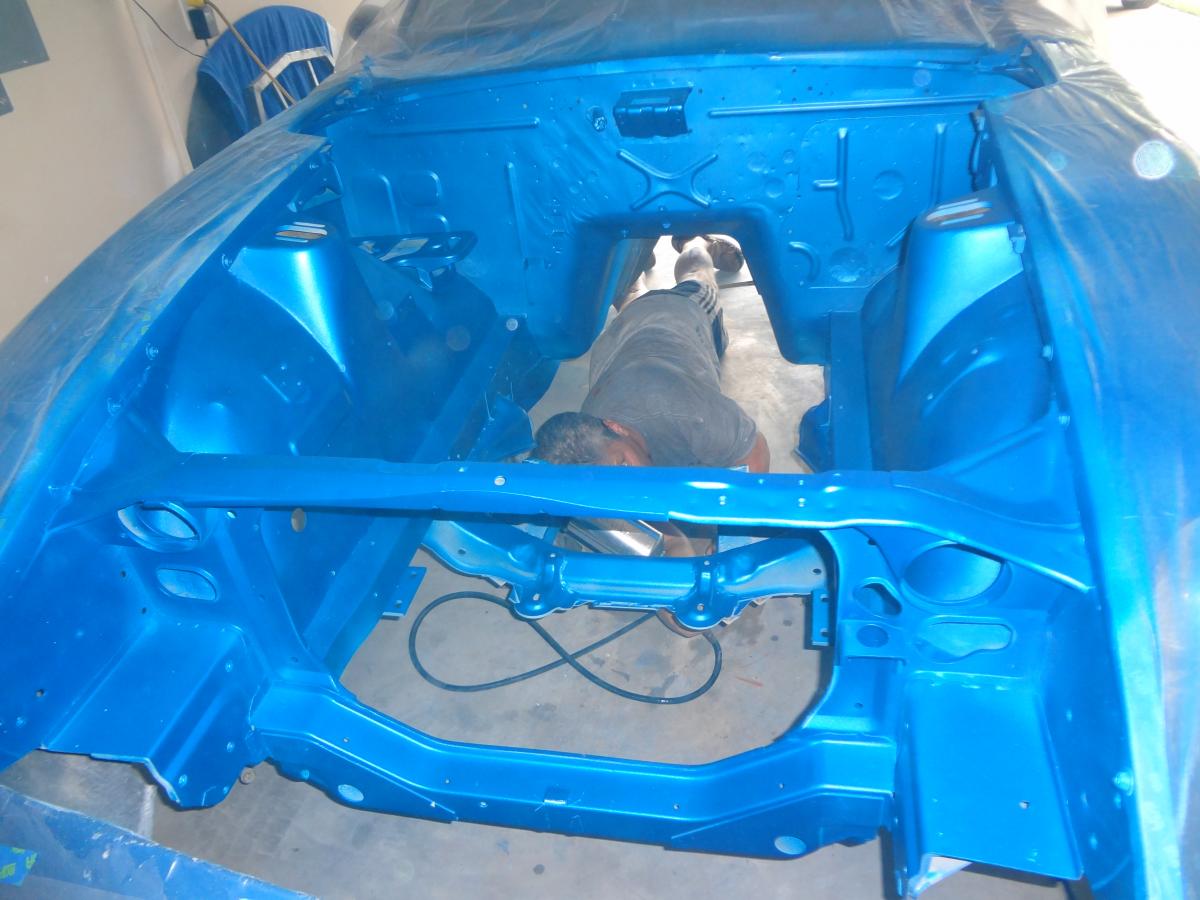
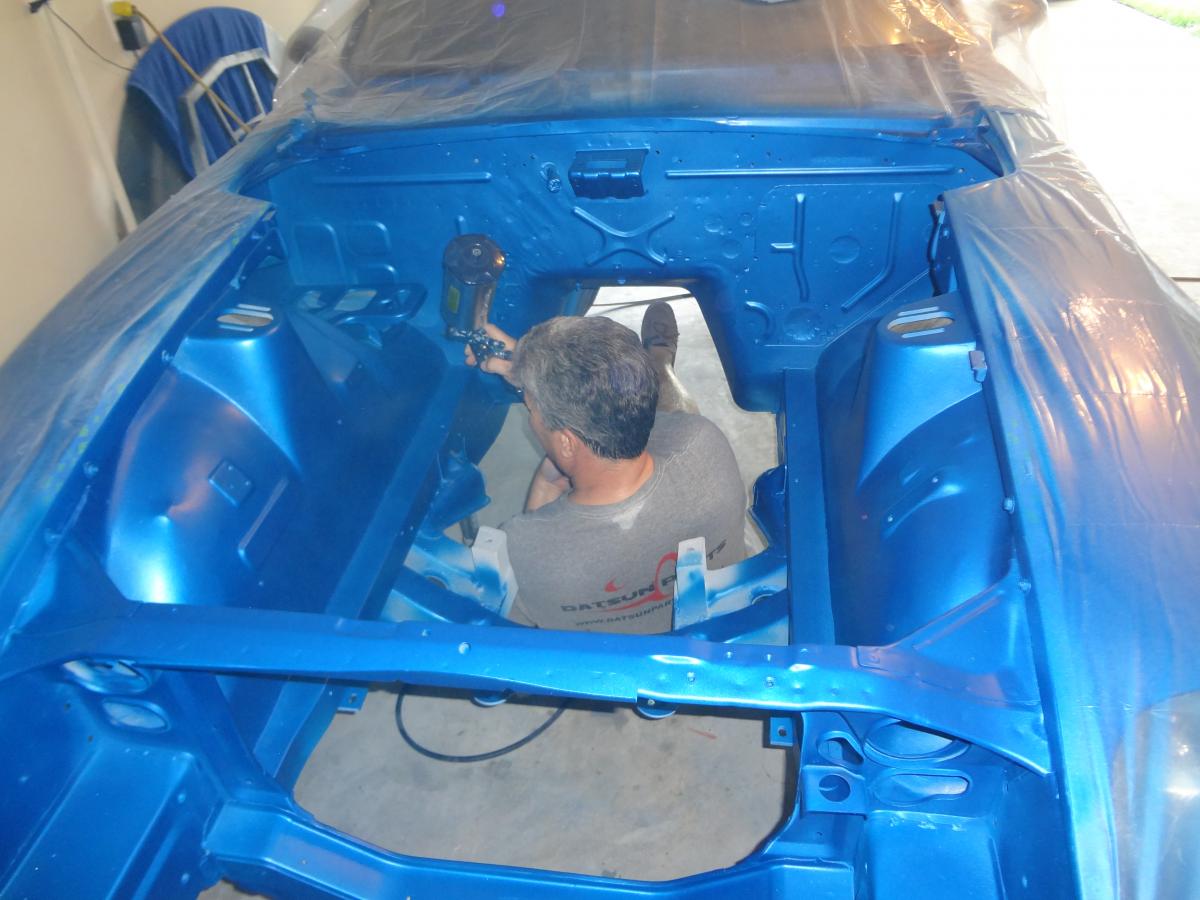
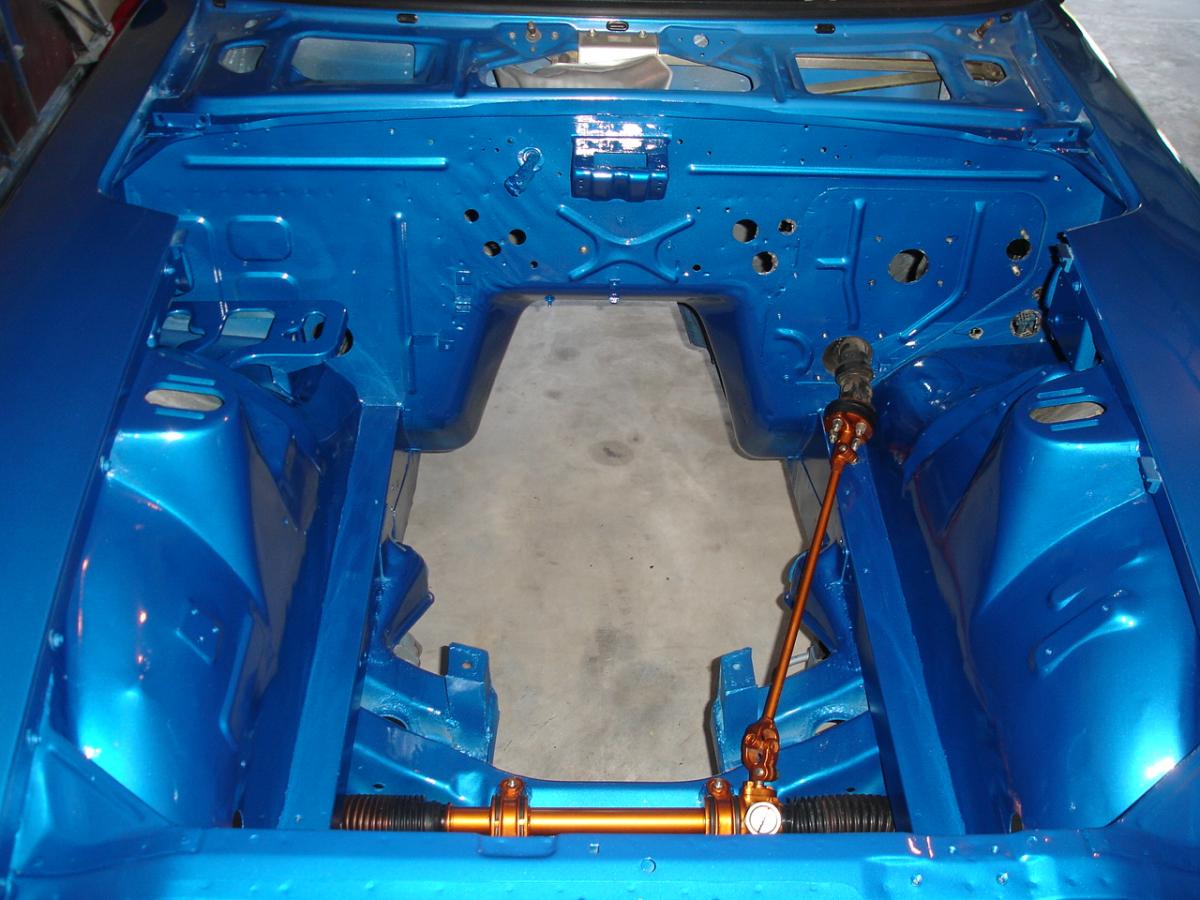
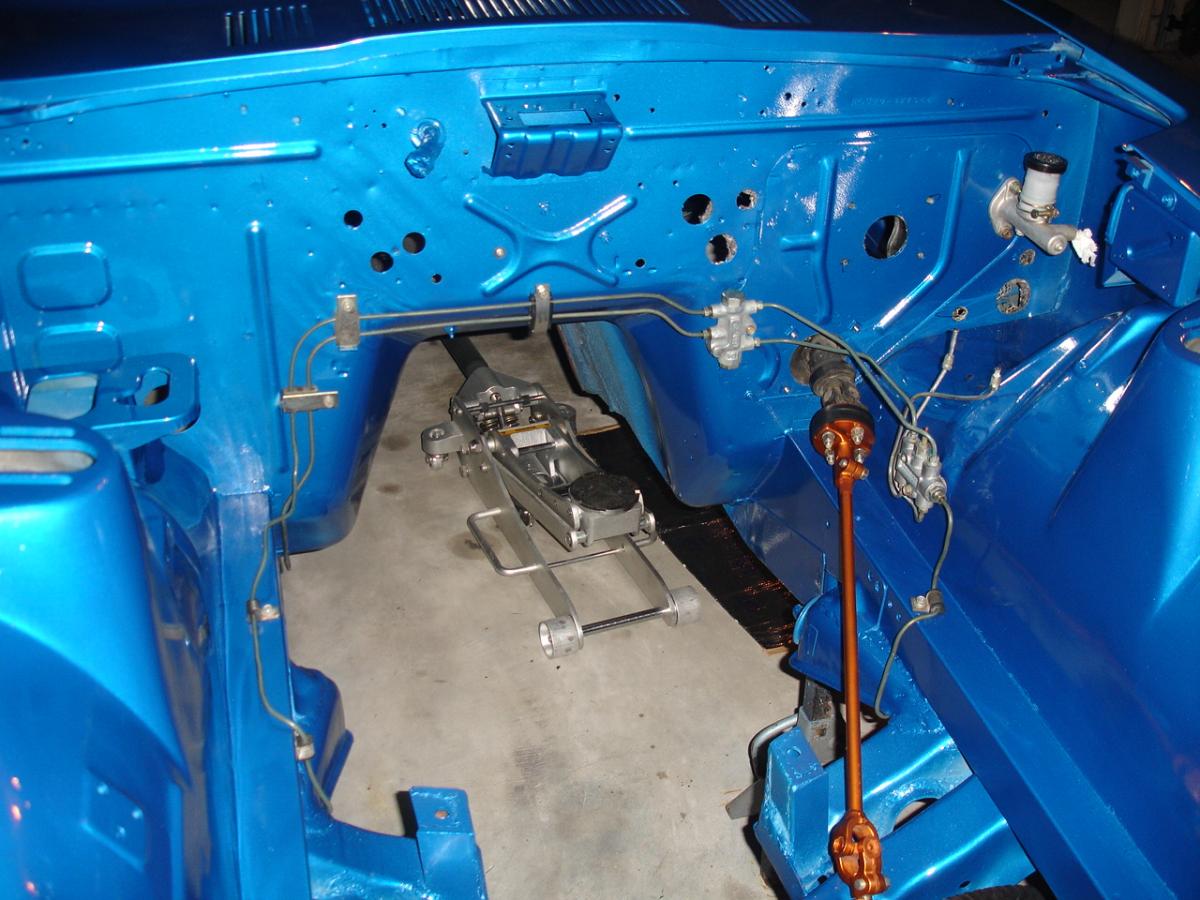
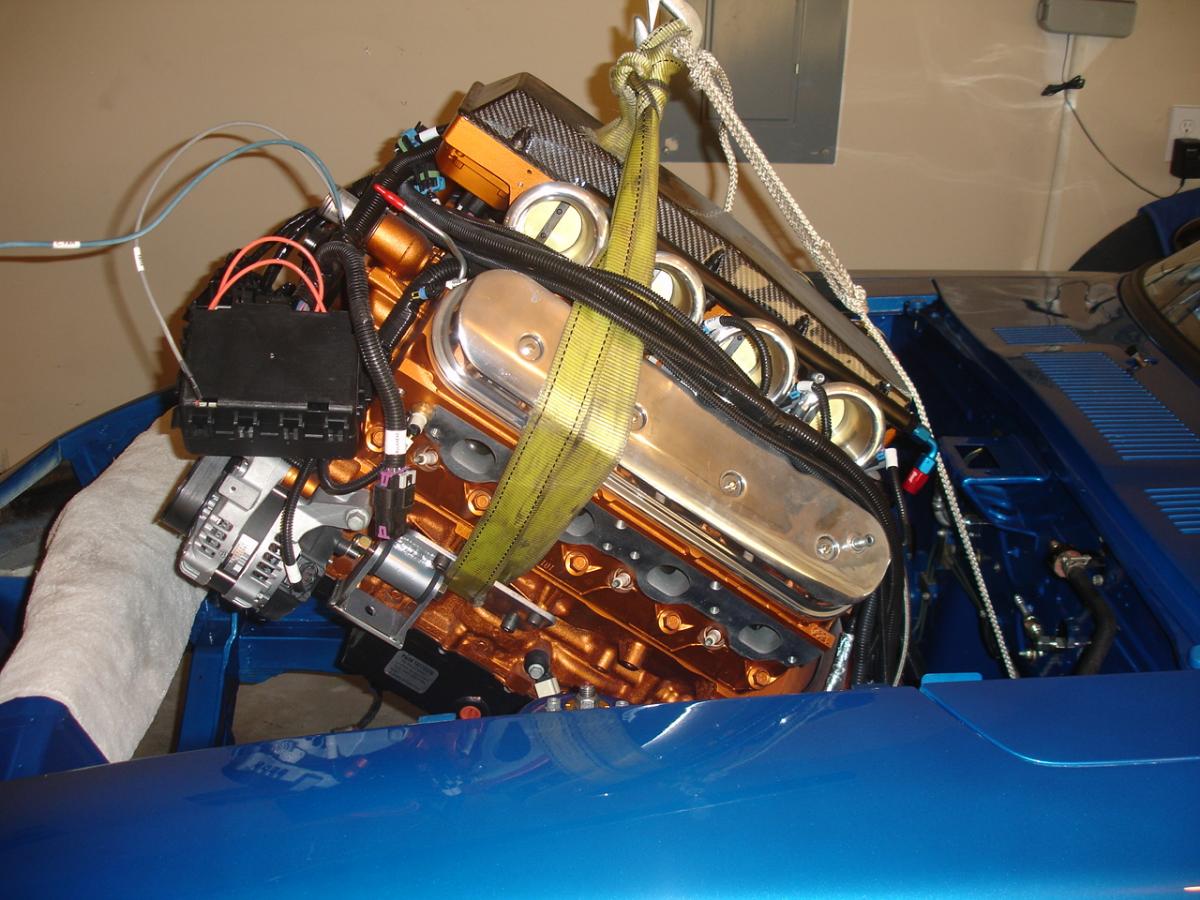
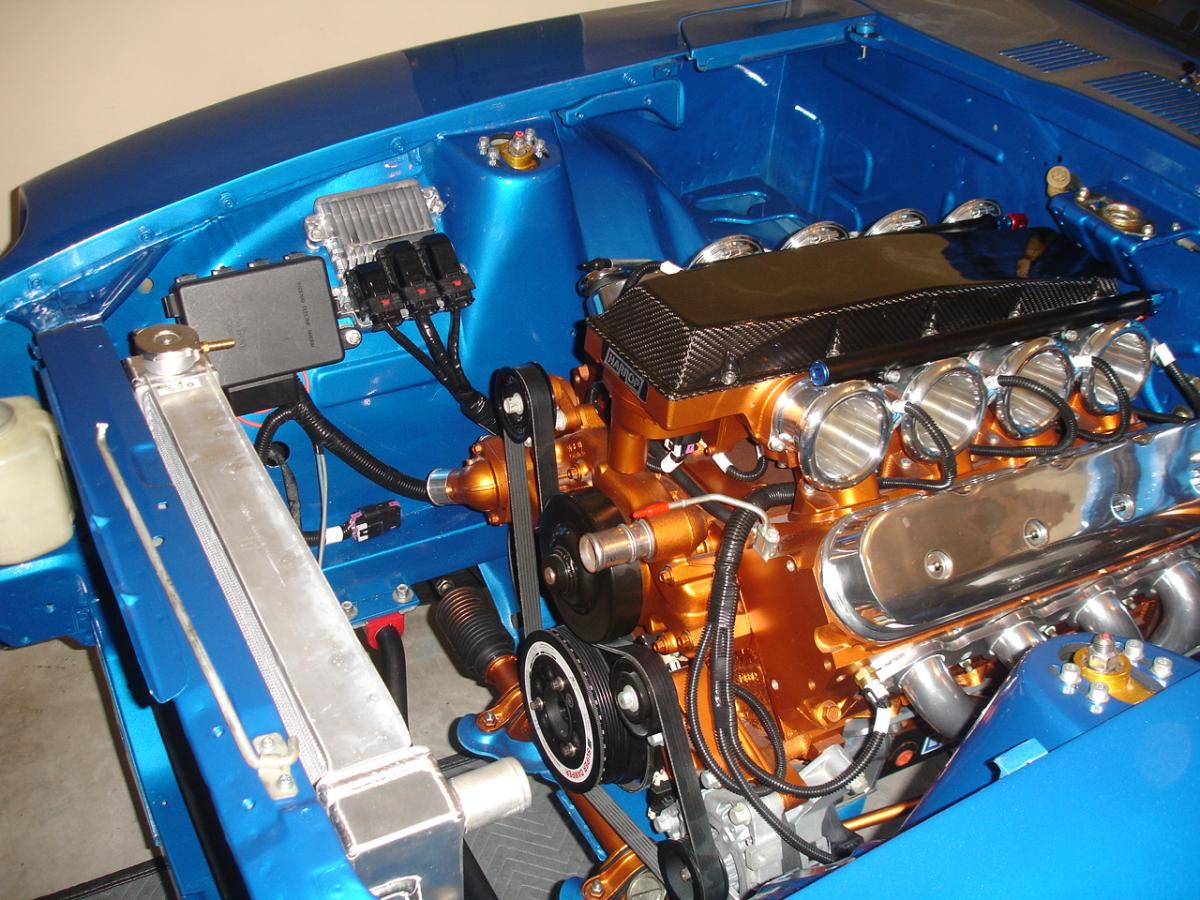
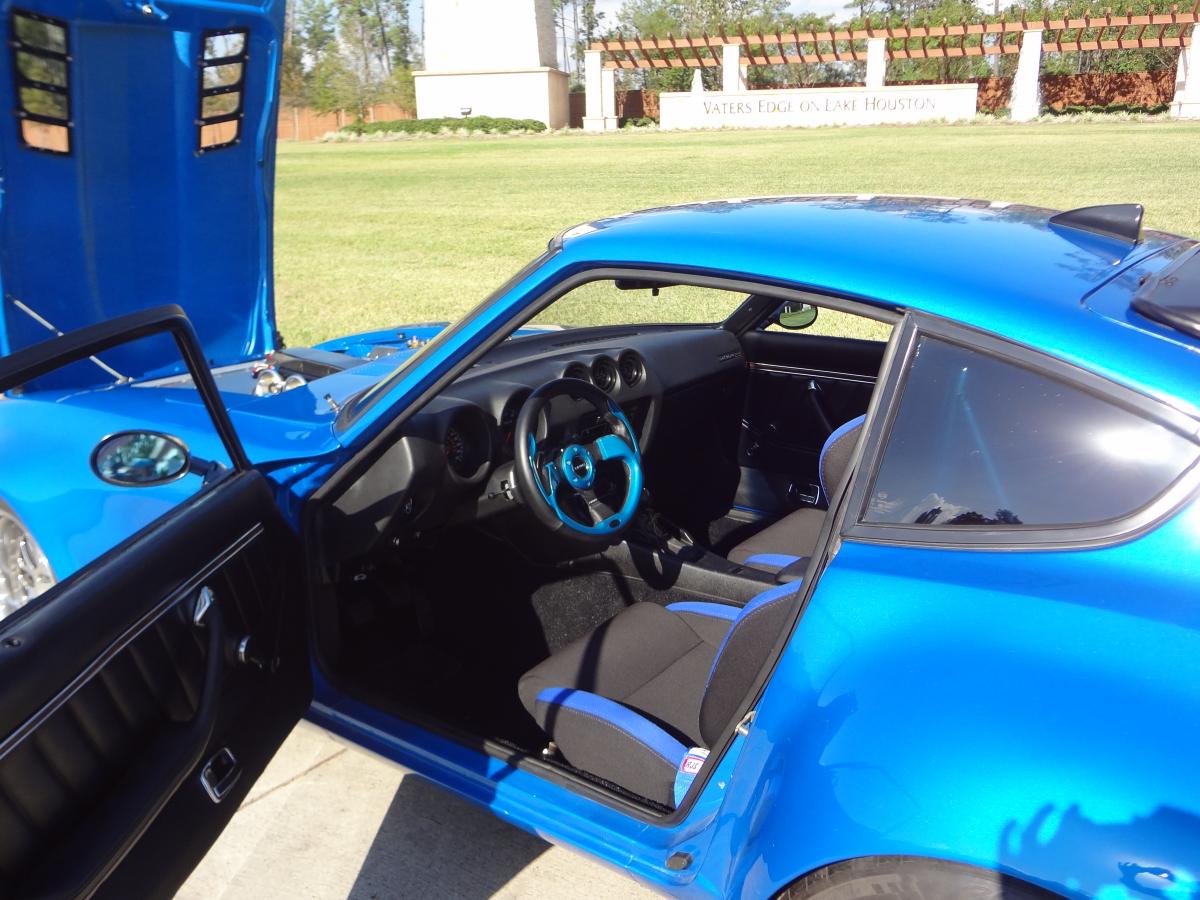
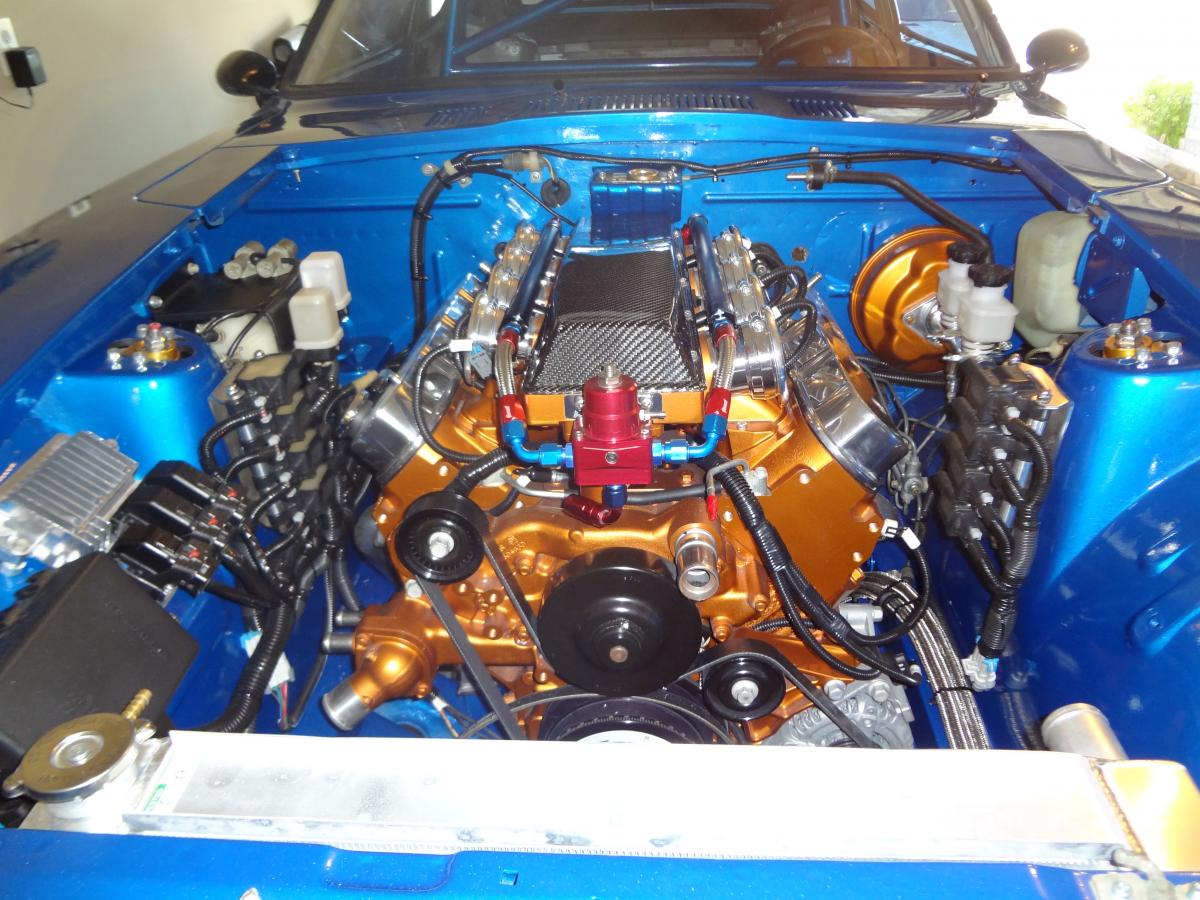
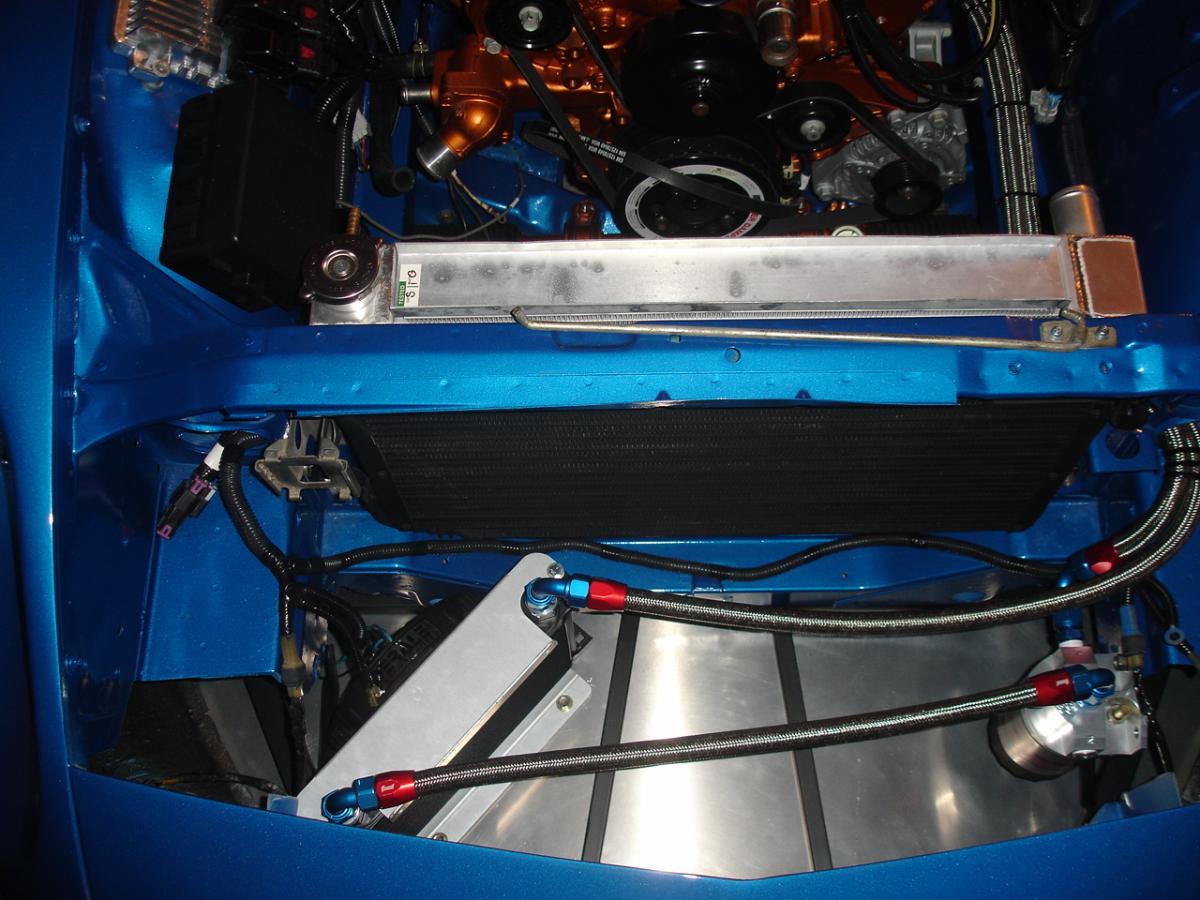
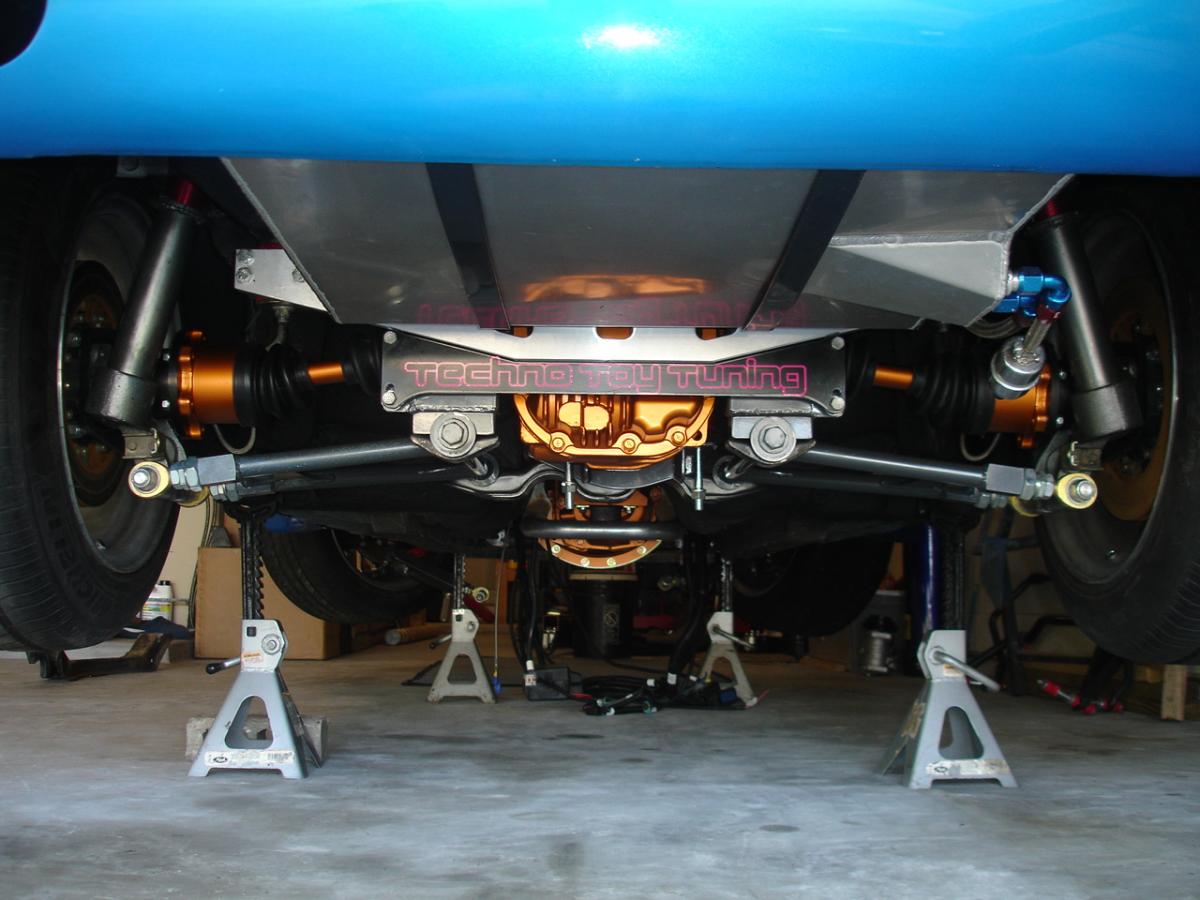
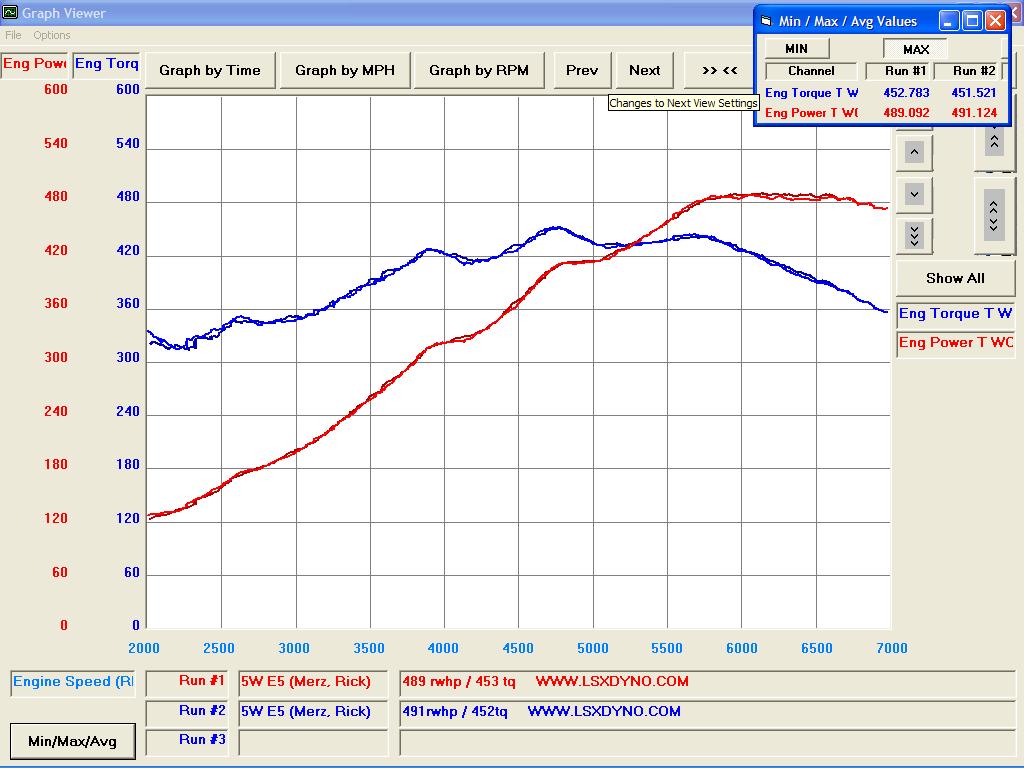
 Now that I am finished building my 280Z I would like to share the build story with everyone. I work long hours so I can only work on my build a couple of hours each night and 12 hours on Saturdays and Sundays so I didn't have the time to share my build as I went along. I wanted to do a high end build that would be both beautiful (in my eyes) and a fast track car when finished. During the build the only help that I received was from my good friend Joseph Morrow who worked many hours welding things that I cut apart and jigged (he did not trust my welding for the monster that I was building). Aside from some laser cutting and radiator fab work the only service that I paid for was the exterior body paint, everything else was done by me. I searched the internet for engine choices, body kits, rear ends, induction systems, transmissions, cooling, brakes, suspension, fuel componets, headers, wheels, dash gages and everything that would be needed to do my conversion. I decided that I wanted to start with a rust free 280Z and install a LS3 CT525hp engine with a Harrop Hurricane 58mm ITB intake and a T56 Magnum 6 speed transmission turning a R230 differential. I will start with a few pictures of the finished car and then list the steps that I took to arrive at the finished product with details shuch as pictures, part, vendor info, price and description of task. 3-13-11 purchased a very clean 1977 280Z from Rodney Goodwin that he listed on E-Bay for $7,502. This Z was only driven for 4 years when the owner passed away. The wife left it parked in the garage in Arizona until she passed away in 2011. Rodney got it for a very good price from her estate sale with the intent to flip it on e-bay. This Z had only 47,437 miles and was an absolutely rust free. Z is silver with black interior 4 speed with air conditioning that still blows cold. 3-24-11 Purchased G-nose, ISMA wide body kit, front spoiler and G-nose hood hinges from Z Car Customs – JDM (www.ZCCJDM.com) for $2,750. I selected this body style after looking at several other body kits, front spoilers and, rear spoilers because it fit my taste for what I wanted to do to my Z. Kit arrived about 4 weeks later in 3 large boxes without any damage. Fiberglass work appears to be very well laid up, first rate work. 4-5-11 I started disassembling the Z. I am still amazed that all of the body panels and parts I remove are rust free and that the bolts still retain their original cad plating, after cleaning them they look like new. All parts that I remove are placed into boxes or plastic bags for storage and are labeled for future use. 4-11-11 purchased JDM style tail lights listed on e-bay for $160. I selected these lights since I like the look of the amber turn indicators versus the red turn indicators used for the USA market. Rear tail lights were in very good condition with only 1 plastic tab needing repair (this was mentioned in the e-bay listing). 4-25-11 purchased (4) weld in camber plates, (4) coil over strut kits, front roll center adjusters, front tension control rods, front lower control arms, rear lower control arms from Techno Toy Tuning 530.626.7334 for $1,874. I selected these suspension components after looking at several other offerings because I liked the look, form and function of these components better than what their competition was offering. Parts arrived well packed with no damage; TTT was very helpful and had very good customer service. 5-14-11 removed the drip rail molding by cutting it with a 5†cutoff wheel since I wanted to modernize the look of my 280Z. After cleaning it up my good friend Joseph Morrow welded the roof panel to the roof frame. 5-20-11 installed (4) adjustable camber plates from Techno Toy Tuning. Used scribe to layout cut line, then used grinder with cutoff wheel to cut out top of strut tower. Test fit camber plates then welded (top and bottom), ground and sanded the weld smooth and then painted to prevent rust until the car is painted blue. 5-22-11 modified strut housings to accept a shorter strut. Housing is cut through the weld for the spring perch (this will allow the spring perch to be removed from the upper piece of the housing). Cut 40mm (my application) from the piece that was removed, chamfered it ½ of the housing wall thickness (for weld penetration) and weld 100% (ensure that the 2 pieces of tube are straight before welding). Weld perch for coil over collar (threaded tube) per the height listed in the directions and clean up the weld so that strut housing exterior is smooth then epoxy the aluminum coil over collar (threaded tube) onto the strut housing. 5-23-11 purchased a 20 gallon fuel cell (with fuel safe open cell foam to control fuel sloshing) with a 0-90 ohm fuel sender from Summit Racing for $288 (including Cleco pliers and pins to fit the fiberglass panels). Parts arrived in 3 days without any damage, very good customer service. 5-25-11 purchased 240Z front turn signals listed on e-bay for $115. Needed 240Z turn signals for the G-nose since 280Z turn signals will not work in the G-nose. 5-28-11 purchased (4) Tokico adjustable struts from Sparktec Motorsports for $463. After several weeks I find out that the factory was relocated and that it would be several more weeks before I would receive the struts. In total the struts were delayed 16 weeks during which I was not able to work on my car since I had already sectioned my strut tubes (new struts are shorter) while waiting for my new struts and I could not put the Z on the ground to set the fiberglass panels. Very poor customer service from Sparktec, I will never use them again. 5-28-11 purchased flip down rear license plate bracket listed on e-bay for $31. I need this for my rear gas fill conversion that I am going to do. 5-29-11 cut out floor below rear hatch between the frame rails from strut towers to the tail light panel. 5-30-11 I designed a plate to hold the fuel tank between the frame rails without the tank hanging below the rear valance panel since I do not want it to be seen. 5-30-11 purchased Smoothy Hollywood style mirrors listed on e-bay for $55. I like the style and the cheapest that I could find them was $110, so this was a good deal. 5-31-11 purchased Cowl Induction Fiberglass Hood and vents from Reaction Research for $708. I selected this hood because I liked the narrower width of the raised cowl versus the other hoods on the market. I also like the two smaller raised cowl scoops that cover the ’77-’78 Z hood vents. Hood and vents arrived well packaged with no damage, very good quality requiring little finishing to fit. 6-5-11 fuel tank plate was laser cut by Campo Sheet Metal (Houston, TX) for $120. Plate fits perfectly between the frame rails. I cut and welded 1.5†square tube to the plate to frame the fuel cell. Since I did not want a side gas fill so I modified the rear tail light panel to accept the gas fill (from the Z) and flip down license plate bracket from a 1970 Camaro. I also had to add a fuel fill to the fuel cell. 7-8-11 purchased front (1.125†dia.) and rear (.875†dia.) sway bars (by Suspension Technique) from Kuruma Motoring for $320. 8-21-11 purchased original rear window louvers listed on e-bay for $125 since I like the look of the Z with louvers. 8-25-11 cut the rear wheel fenders and wheel wells to fit the 26†o.d. tires with the car lowered 1.5†while allowing for proper wheel travel. After cutting the rear fenders the outer sheet metal of the wheel wells were cut into tabs about 1†wide so that they could be bent and welded to the rear fenders as shown below. After tacking the tabs (from the wheel well) to the fenders the excess tab (sticking out from the wheel well) was cut off with a cutoff wheel then welded 100%. 8-30-11 purchased a 57†JDM 3D carbon fiber rear wing from Street Regulator listed on e-bay for $259. I like the drift style wings and since this car will see a lot of track time the extra 150lbs of down force created at 100mph should come in handy. The wing was originally $800 but since it has some very minor flaws (that are hard to notice) I got it for a very good price. 9-10-11 made metal fillers and welded the door handle area, vent holes, exhaust hole and rear bumper shock holes shut. The doors will be opened by remote controlled electric solenoids and poppers. 10-8-11 struts finally arrived from Sparktec Motorsports after about 18 weeks of waiting. 10-10-11 assembled struts into reworked strut tubes and assembled front and rear suspension (front roll center adjusters, front tension control rods, front lower control arms, rear lower control arms from Techno Toy Tuning) to the car. 10-12-11 with the suspension on the car I can mount the body panels and start fitting them. The front quarter panels are simply bolted on in place of the stock front quarter panels. The upper g-nose is then bolted to the quarter panels and the frame, since the g-nose is meant to be installed with factory fenders I had to cut the molded bumper flush with the headlight bucket flange, and the front lower edge of the quarter panels had to be shortened by about 3â€. I mounted the lower g-nose forward about 3†from its intended position since I wanted to alter the profile of the g-nose somewhat. I then mounted the front spoiler about 1†higher than its intended position to bring it forward about an 1†which will complement the g-nose profile that I want. When finished all 5 pieces of the front end will be fiber glassed together as 1 piece. 10-14-11 made mold from aluminum tape (about 4 layers works well and the epoxy will not stick to it) to make the spoiler to fender transition. I cut out the front turn signal light mounting area and relocated it back and angled to the center to make up for moving the lower g-nose panel forward. All panels were then glassed together and ground down smooth to arrive at the final shape. As seen in the last picture I added a 1†lip to the bottom of the spoiler and cut a rectangle hole to mount 2 sets of Audi driving lights for a unique look. 10-18-11 purchased (2) Sparco black with blue trim cloth racing seats listed on e-bay for $340. The black with blue trim will work with the planned blue exterior color of the car. 10-18-11 purchased NRG/JDM combo steering wheel and quick release with short hub with blue inserts listed on e-bay for $330. 10-19-11 purchased Shaved-40 door kit with door poppers from Spal USA for $211. I am going to eliminate the door handles so the electric door solenoids with the door poppers will be required to open the doors. 11-3-11 purchased rear differential support bracket from Z Parts (www.zparts.com) for $92. Eric Neyerlin has many Z cars so if you need that special part he probably has it, he is very knowledgeable and helpful with most things related to Z cars. I needed this additional bracket so that I can cut my bracket and this one in the center and re-weld them together so that I will have a double relief for dual exhaust. 11-7-11 purchased (2) 17†x 10†wide LM20 wheels and (2) 275/40-17 Michelin Pilot Sport tires for the front of the Z and (2) 17†x 13†wide LM20 wheels and (2) 335/35-17 Michelin Pilot Sport tires for the rear of the Z from Complete Custom Wheel (www.ccwheel.com) 386.258.0083 for $4,207 including the center caps, lug nuts, valve stems, mounting and balancing. CCW can make wheels from 5†to 16†wide with several different coating options. They are very helpful and their prices are much better than the competition. I took a tour of the facility when I picked up my wheels and I was impressed with the CNC equipment and the way that the wheel was produced from machining to assembly to polishing. I will definitely be buying my next set of wheels from CCW! 11-8-11 purchased the Competition 4 Wheel Brake Kit including new aluminum 5 lug front hubs, stainless steel flex lines and 5 lug adaptors for the rear wheels from Arizona Z Car (www.arizonazcar.com) 480.844.9677 for 2,265. Parts were very well boxed and arrived un-damaged. Machine work is first class! Dave is very helpful and will take the time to answer your questions. I am looking to purchase their aluminum radiator in the future. 11-20-11 assembled struts into reworked strut tubes and assembled front and rear suspension (front roll center adjusters, front tension control rods, front lower control arms, rear lower control arms from Techno Toy Tuning) to the car. At the same time the Willwood brakes and 5 lug hubs from Arizona Z Car were assembled to the suspension as well. There were no issues with the fitment of the new suspension and brake parts; everything went together as if it was designed by Nissan. 12-15-11 installed the rear fiberglass panels with Cleco clips since I want to mold inner fenders into the rear fiberglass fenders before I attach them permanently. I sprayed expanding foam onto the panel to form a base to work with. Then I cut the foam and coated it with clay to form the inner fender mold. After laying up the fiberglass the clay and foam mold was removed and the panels were bonded and riveted (with countersunk rivets) to the rear fenders which were painted to protect them from rust. After the fiberglass fenders were installed I laid fiberglass to the inner wheel well and the fiberglass inner fender and riveted the cured assembly to the wheel well. The rear fenders are now bonded and riveted around the entire perimeter and wheel well making for a very strong connection. 12-28-11 purchased 4 point roll cage made from 1.75†x .120 DOM tubing from i/o port Racing Supplies (www.ioportracing.com) 925.254.7223 for $605 with shipping. Fabrication and fit is first class with production taking 4 weeks. 1-6-12 now that car is on the ground and the ride height has been set it is time to modify the wheel openings in the fiberglass panels to fit the larger diameter tires. The position of the left front wheel opening in the fiberglass fender is off by 3â€â€¦ I guess the race car that it was pulled from had issues that a 100% non-damaged car doesn’t have. There was a lot of glass work to do to get the openings like I wanted. The left rear wheel opening had to be re-radiused and pulled out 1â€, while both front wheel openings had to be pulled out 1†and an early Corvette style rear fender flair added to control stones from hitting the front of the rear wheel opening. 1-15-12 using AutoCAD 2010 I designed a front air splitter and frame for the Z. 1-26-12 purchased (2) polished stainless steel mufflers (2.1†inlet dia. with dual 3.5†double wall outlet tips, Magnaflow knock offs from China) from Seven Saturdays 714.523.4357 for $100 and that included shipping! They arrived without damage and are very well made. Since I am writing this build after the car is completed I can tell you that these mufflers sound great! 1-26-12 Great Western Metals laser cut the splitter from my AutoCAD drawing out of 0.125†thick aluminum for $187. I used (56) countersunk rivets to attach the splitter to the light weight steel tube frame. Steel frame is bolted to the Z’s frame by utilizing the front tie down brackets and the front bumper shock mounting locations. 2-8-12 purchased a 300ZX Twin Turbo R230 viscous limited slip differential from e-bay for $250. I disassembled, cleaned painted and reassembled the diff with new seals and bearings. 3-6-12 filled the rear valence panel and sanded smooth to prepare it for fitting the mufflers. 3-8-12 drilled and cut oval openings for the dual tipped mufflers. 3-12-12 purchased g-nose headlight covers from Z Car Customs (www.ZCC.com) for $450. These covers are hard to find and ZCC was the only place that I could find them when I was looking… Since then I found a second source for g-nose headlight covers, Mark Clapp (mclapp1@att.net) 816-286-6982 has the proper mold and can produce a set in a very short period of time. His product is much less expensive and the quality is equal to if not better than the ZCC sourced headlight covers. 3-19-12 purchased (2) sets of 3†wide, 6 point, cam lock, blue, racing seatbelts from Wesco Performance for $288. 3-25-12 cost of all materials (for the entire build up to 10-10-12) to strip, prime, paint, undercoat, assemble the interior, assemble body rubber, seal body panels and reshape the body including fiberglass, fiberglass resin, 2 part epoxy, disposable brushes, clay (for mold making), aluminum tape, primer, undercoating, turpentine, acetone, lacquer thinner, sand paper, ready strip, weld bond adhesive, body filler, spot putty, dual mix applicator gun, super trim adhesive, nitrile gloves, tape, plastic and body sealers from various suppliers was $2,104. It really adds up if you keep track of all your receipts. 3-26-12 took my car to Rocky’s East End Frame and Body Shop for painting. Total cost of paint job was $3,100. I selected 2008 Proton Blue since I liked the color for the car. Up to this point all of the body work was done solely by me. Rocky’s will block sand and paint the exterior and door jams of the Z. When I get the car back I will remove the engine then strip and paint the engine compartment. While the Z is in the body shop I will purchase and assemble the drive train so that it is ready to be installed into the Z when It comes out of the body shop. 4-18-12 purchased GM Performance Parts CT 525hp LS3 Engine, Tremec T56 Magnum 6 Speed Transmission 700 ft/lbs, Quick Time Bell Housing, Ram Dual Disk Clutch with Flywheel, GM Performance Parts Polished Valve Covers, Ram Hydraulic Throw Out Bearing, Pilot Bearing and CSR Competition Starter from Jegs (www.jegs.com) for $12,629. Parts all arrived in a short time without any damage. Jegs like Summit have very good service. 4-18-12 purchased LS376/525hp Controller Kit With (throttle by wire) and LS Series Accessory Drive with A/C from Crate Engine Depot (www.crateenginedepot.com) for $2,089. 4-18-12 purchased front windshield, all window seals, all door seals, all felts and all light gaskets from Black Dragon (www.blackdragonauto.com) for $994. Everything arrived well packaged and without any damage. I will warn you that putting on the window gaskets by yourself (as I did) is not a job for a novice. Don’t be fooled by the quarter windows, putting the new gaskets on them is somewhat difficult as well. I had the windows tinted 15% before I put the gaskets on and assembled them to the car. 4-19-12 purchased a LS3 Hurricane Manifold from Harrop Engineering (www.harrop.com.au) (located in Australia) for $5,348. This intake has (8) 58mm throttle bodies that will wake up a LS motor! It was designed and fabricated very well, first class! I chose this intake for the horsepower gain and because it just looks so damn good! With only the addition of this intake the engine made an additional 45hp at the flywheel. When I changeover to 1.85 ratio rockers and better springs it will make even more horse power. 4-19-12 purchased VDO Vision Fuel, Water, Voltmeter and Oil Pressure gages, VDO Vision Speedometer, Tachometer, Clock and Temperature sending unit from Summit Racing for $487. Using Inventor 10 Pro I designed adaptors for the gages so that they would mount with the stock hardware. Larry at Dynamic Machine used 5†black nylon (UHMW) rod to make the adaptors. 4-19-12 purchased 280Z LSX Swap Kit from BullDawg Musclecars for $494. I like this kit better because of the transmission mount. The transmission mount incorporates the stiffened area of the transmission tunnel for mounting rather than the floor like other kits. 4-29-12 purchased coil relocation brackets from CBM Motorsports for $125. I wanted to clean up the engine so I decided to relocate the coils to the strut towers. 5-6-12 purchased (8) 52lb Bosch EV14 Fuel Injectors from e-bay for $434. 5-7-12 purchased LS3 2010 Camaro MAP Sensor from Auto Parts Cheaper (www.autopartscheaper.com) for $69. I can’t use a MAF sensor since I have (8) throttle bodies and no common air plenum since for MAF ALL air entering the engine MUST be measured. I will be using MAP since the manifold has a common plenum for the vacuum from each throttle body. ECU will be reprogramed for MAP. 5-8-12 purchased Mustache Bar, Drop Mounts, Dog Bone and Front Differential Mount from Techno Toy Tuning for $750. Parts came well packaged and without any damage, very nice looking components for the Z car. 5-18-12 purchased aluminum radiator from Arizona Z Car for $365. For the money this radiator cannot be beat, since I am writing this after I have driven the car, I can tell you that it will cool a 600hp engine on a 95° day in stop and go traffic without any problems. Note, I am using a full radiator shroud with (2) high performance 11†spall fans. 5-23-12 purchased a Derale Cooling Products Oil Cooler with fan from Summit Racing for $203. 5-23-12 purchased a Bosch 044 Inline Fuel Pump from High Flow Fuel Systems 818.574.3835 for $249. 5-24-12 purchased (2) VA03-AP90/LL-68A * 11"P/12V/PK4 (high performance fans) from SPAL (www.spalusa.com) for $442. 6-6-12 purchased (4) 1994 Infiniti Q45 CV Half Shaft Assemblies from RockAuto 866.762.5288 for $405. I know that I could have found these in a bone yard cheaper but I prefer to use new or a as a last resort rebuilt parts. I had to disassemble the shafts since the only part that I need is the inner CV joint that I will assemble to custom axles. 6-15-12 drove the Z home from the body shop today. I left the drive train intact so that I could move the car around while I was modifying the body. Body work turned out very good for what I paid but I was expecting a little better since I had the body in pretty good shape before the body shop started. 6-16-12 removed the engine, transmission, differential and half shafts along with all wiring and lines in the engine compartment, removed the brake booster / master cylinder, steering rack, steering column, clutch master cylinder and front suspension. After removing all of the components I ground off all mounting brackets since I want the engine compartment to be as smooth as possible. 6-30-12 set the engine and transmission in place so that I could design the cross member for the engine and determine what modifications would need to be done (if any) to the transmission mount I purchased from BullDawg Musclecars. After taking measurements the engine was removed so that I could modify / fabricate the engine crossmember. The transmission mount needs to be lengthened by 3.5†for the Tremec T56 Magnum 6 speed transmission. 7-4-12 purchased a set of Hex Vent Hood vents from Hines Performance Engineering for $363. When I came across these hood vents I decided that I like them better than the small cowl vents that I put on my hood so now I will cut off the cowl vents and install the Hex Vents. To finish the job properly I will have to grind down the hood slightly to make a flatter surface since the hood has a slight raised area where the hood vents are located. I will do this during December because the hood will have to be repainted. 7-7-12 modified the rear frame above the differential so that I could mount the larger R230 differential 1†higher than the stock mounting height of the R200. Techno Toy Tuning drilled the aluminum mustache bar to accept the R230 with a mounting 1†higher than the R200. This was done because the R230 is over 1†Taller than the R200 since the ring gear is 9†in dia. Compared to the 8†dia. ring gear in the R 200. After notching the frame (with a 5†cut off wheel) I cut a piece of 2â€x 2†x 1/8†angle to fit the notch (one leg is cut shorter than the other, see photos). After fitting the angle my good friend Joseph Morrow welded the angle to the frame for me (I owe him big time). 7-16-12 purchased a 1977 280Z Engine Crossmember from ZParts.com (www.zparts.com) 541.679.0791 for $238. I decided that a second engine crossmember (after being modified) mounted directly behind the original crossmember would work nicely to support the LS3 engine. 7-19-12 purchased LS1 shorty headers from Stealth Conversions (www.jagsthatrun.com) 925.462.3619 for $495. After receiving the crate motor I removed the four barrel carburetor intake, coil packs, valve covers, flex plate and exhaust manifolds and packed them away. I then masked off the engine, transmission, bell housing, disassembled and masked off the Harrop Hurricane manifold and painted everything with metallic copper VHT engine paint. I then removed the masking tape and reassembled the engine with new components listed above, set up the hydraulic bearing to the transmission and mounted the bell housing, starter and Transmission to the engine. I am very pleased with the result! 7-25-12using AutoCAD 2010 I designed rear wing brackets to hold the carbon fiber wing at the proper height and angle. I also designed and fabricated brackets that mount in the rear hatch to support the wing plus 250lbs of potential down force. 7-28-12 modified the crossmember that I received from zparts.com by cutting off the steering rack mounting tabs, and engine mounting brackets. I cut new engine mounting brackets (3 sided, similar to the stock ones) out of 1/8†thick flat bar and welded the pieces of flat bar to the crossmember. The modified crossmember was then welded to the frame and original crossmember and (4) 1â€x 1/8†angle braces were added to help carry the load of the engine since I removed the center of the crossmember. The transmission bracket needs to be modified for use with an LS3 and a Tremec T56 Magnum 6 speed transmission. The “U†shaped part of the bracket (made out of 1.5†x 0.125†wall tubing) must be cut where the “U†is welded to the steel angle and (2) pieces of 3.5†long (my car, yours may be different) 1.5†x 0.125†wall tube must be welded in to lengthen the “U†part of the bracket. Welding was done by my good friend Joseph Morrow. 7-30-12 worked on original engine compartment wiring harness. I removed all tape from the entire harness and removed all of the unnecessary wires (about 12 of them). I then wrapped the harness with vinyl tape. 7-31-12 worked on the interior wiring harness. I removed wires that I would no longer need and added wires that I would need to operate the reverse lockout switch in the transmission and wires for the inductive speed output to the VDO electronic speedometer. 8-11-12 set the engine and transmission in the body a second time to ensure that the new engine crossmember / engine mount and lengthened transmission mount were correct. Everything looked good so I removed the engine and transmission to prep the engine bay for painting. 8-13-12 Great Western Metals water cut (2) carbon fiber wing brackets from 0.375†thick aluminum for $160. 8-18-12 covered and masked off the car to protect the car while I am stripping it with Ready Strip Aircraft paint stripper. Care must be taken when stripping the engine bay on a painted car since you cannot splash the stripper onto the painted body, it will instantly attack the paint. After stripping the Z I am impressed with the excellent condition of the sheet metal and I am happy that I did not damage the paint job in any way. 8-19-12 purchased (2) coil extension wiring harnesses from e-bay for $75. I needed these harness extensions to relocate the coils. 8-20-12 purchased stainless steel GM F-body X-Pipe, (2) down pipes, (4) 90° bends, (8) 1†wide clamp and (2) hanger assemblies from Summit Racing for $517. 8-21-12 purchased an aluminum drive shaft assembly from Shaftmasters 313.383.6347 for $378. Very good people to work with, drive shaft came completely assembled and balanced in just a few days. 8-23-12 purchased radiator fittings and hose adaptors from Stealth Conversions (www.jagsthatrun.com) 925.462.3619 for $80. 8-25-11 Covered and masked off the car to prepare it for painting. I painted the engine bay with the same base coat clear coat that the body shop used. I am happy with my paint job it turned out very good. I had to crawl in and out from the underside of the car and I had to be extremely careful not to touch the body with any part of my body which was not an easy task since I am 6’2†tall, 230lbs and 56 years old. 9-1-12 installed the steering rack, steering column, brake master cylinder and booster, clutch master cylinder, engine and transmission today. Engine went in without any problems and the transmission mount fits perfect. 9-4-12 purchased Optima battery, cables and stainless steel hose from Summit Racing for $268. 9-5-12 designed custom radiator shroud to house (2) Spal high performance fans to fit radiator purchased from Arizona Z Car. 9-8-11 installed the fuse center, engine control unit and radiator today. My goal is to make the engine bay look like it came from the factory with an LS3. 9-10-12 installed the sound deadener. I replaced the sound deadener on the firewall, floors and transmission tunnel with aluminum backed jute backed with a sheet of butyl rubber material, bonded to an aluminum facing. I covered the rear of the car and the fuel cell with the butyl rubber material, bonded to an aluminum facing which has a very tacky adhesive on the butyl side. 9-13-12 Great Western Metals laser cut the pieces to make my custom fan shroud from 0.063†5052 aluminum for $85. Draggers Industries bent and welded the pieces together for $189 (a little high but what can I do I can’t weld aluminum). 9-14-12 installed seats, seatbelts, roll bar, console, interior trim and dash. 9-15-12 installed the remote oil filter, oil cooler and oil lines, remote coil harness, brackets and coil packs, and headers. Everything fit well and the engine bay although looking full still looks good. 9-18-12 total cost of all miscellaneous hardware (not already mentioned), fittings, oils, grease and fluids used during the build including, stainless steel braided hose, AN fittings, fuel filters, injector spacers, nuts, bolts, rivets, seals, bearings, angle, flat bar, steel tube, hose clamps, vacuum hose, radiator and heater hose, header wrap, spark plug wires, electrical tape, wire, connectors, relays and plastic conduit, brake line, Mobile 1 engine and transmission oils, Royal Purple differential fluid and brake fluid from various suppliers was $2,228. 9-22-12 installed the R230 rear end, half shafts with CV joints, drive shaft, drop mounts and dog bone, rear sway bar, lower control arms, front differential mount and bushings. Techno Toy Tuning parts look as good as they perform! Note fuel line shown was temporary it will be changed next week when I plumb the fuel to the engine. Test fit the exhaust system then removed it so that the muffler shop can weld and bend the pipes as required. 9-25-12 Meineke Car Care Center welded the O2 sensors onto the down tubes and bent them according to my directions for $70. I assembled the down tubes and x-pipe to the car and temporally held them up in place with rope. I fit the (4) 90° bends (had to cut 1 end from each bend) and tacked them together. I fit the mufflers and hangers to the 90° bends and tacked the hangers to the 90° bends. I took the 90° bends and hangers to a local muffler shop by work and they welded out everything for $20. When I got home I assembled the 90° bends, mufflers and hangers to the rest of the exhaust system and it turned out great. 9-27-12 installed exhaust system and fuel system. Everything fit well but I am going to remove the down tubes later this winter and adjust (bend) the down tubes slightly so that I can raise the exhaust about 3/4†more which will bring it level to the frame but about 3/4†lower than the frame. I am loading the car onto the trailer to take it to the tuner to have the ECU re-tuned. 9-29-12 just got back from www.LSXDTNO.com (the tuner) and I am very happy! Tune and dyno time was $600. The engine made 491hp and 451 ft/lbs of torque at the wheels which would equate to 565 hp and 518 ft/lbs torque at the flywheel. Not bad for a crate engine rated at 525 hp at the flywheel. The Harrop Hurricane intake is doing its job very well! I will change the rockers (to 1.85 ratio) and swap the valve springs with better valve springs for a gain 25hp or more (this is possible since the intake has the capacity to flow more than my engine can use. The tune will be tweaked some to address the double humps in the graph even though the engine runs well without any lurching or bucking when driving 65 mph in 6th gear (.50 over drive). The only issue that I have is air in the fuel when I turn fast so I am going to completely fill the fuel cell with fuel safe foam to keep the fuel from sloshing around. 10-4-12 took the Z to Gas Head Motorworks in Houston (www.gasheadmotorworks.com) 713.461.7575 to have it aligned and corner weighted for $438. This shop specializes in building Miata track cars from mild to LS powered terrors. Clint is very knowledgeable about building fast track cars and how to set them up correctly. 10-6-12 if you were adding up the cost of car, parts, supplies and services you would find that I spent about $60,461. I will admit that I spent a lot but I wanted a high end Z (spent 9 months just looking for a rust free untouched Z) so I planned and researched for months before I started my build and I knew that I would spend a minimum of $55,000 on my build. I am happy (along with my wife) that my build came in at $60,461 since the reason that my build went $5,000 over budget was that I found the Harrop Hurricane intake ($5,348) and I just had to have it, otherwise I would have been right on budget. The point that I am trying to make is that every Z conversion (or restoration) will be different but the one thing everyone should do is to think through what they want out of the conversion (or restoration) and how much they have to spend. Think about if you have the skills necessary to do the work or if you will have to pay for certain services and then factor in the cost of those services. Think about the time that it will take to undertake the project and if you have the tools necessary to do the job. You can rent tools from many places, did you know that you can rent many tools from AutoZone by paying for them and when you return them you get your money back, so you get to use things like a vacuum pump for free, now that is a sweet deal. If you take the time to really think about your project you will be happy with it when you are done. 10-8-12 cut and fit the g-nose covers to the g-nose headlight buckets. This takes a while since you do not want to scratch the cover or cut it too small. Mark the cover very carefully and check it twice, cut it with a jigsaw and file to final size. I used adhesive backed trim to hold the g-nose headlight covers in place. 10-12-12 took my Z to the local drag strip to see what she would do. I had a hard time hooking up the rear wheels with the 335/35-17 Michelin Pilot Sport tires but I was able to run 11.8’s all night long. I will try again next year after I change the tires for track rubber. I had a lot of fun at the track and I was impressed with the number of complements that my Z car received. On the way home I heard a faint clicking sound coming from the passenger side rear suspension so I jacked up the rear of the Z the next morning and found that 1 bolt on the inner CV joint (passenger side) was missing and 1 was a thread from falling out and the other 4 were backed out over 1/4". I was lucky that I didn’t make another run or I would have damaged something for sure. After replacing the missing bolt and torquing the bolts I checked all the other bolts and they were fine. I must have been interrupted when I was torquing the bolts since I missed 1 complete joint.
-
So I'm looking to lower my stock 240z, aggressive enough to have a noticable difference from a stock z but still practical enough for the street. The guys at Ground Control sell a weld on coilover kit that most people are happy about but now im debating what type of struts and shocks to buy to replace the stock ones. I plan on having maybe a 200ish lb spring rate upfront and 225-250 spring rate in the back all depending on what struts and shocks i get.I know alot of people are getting tokicos, or even using aw11 struts and i was even suggestsed some Monroes or Gabriels. Opinions?? Suggestions??