dat240zg Posted June 15, 2007 Share Posted June 15, 2007 Well, it's been an eventful year as far as the Z's go. I just realized that the pics of me cleaning out #248 were almost a year old! The past year has just been collecting parts and pulling things together. As it sits now, #248 is about a month from being done/painted/reassembled. Thought I'd drop a few pics for you guys to look at. The pics should be going up on the body shop site (thehackshack.net), but here are a few that I've shot. Cleaning up: Stripped and ready for the media blaster: Early Progress: Lots of little details are happening: Car has been cleaned up: side marker lights are gone, firewall smoothed, joints re-leaded, holes filled in engine bay, roll cage is now in, spare tire mount has been removed for custom subwoofer and the list goes on.... Getting excited! Quote Link to comment Share on other sites More sharing options...
naviathan Posted June 15, 2007 Share Posted June 15, 2007 Nice work! Looking great! Quote Link to comment Share on other sites More sharing options...
JustinOlson Posted June 15, 2007 Share Posted June 15, 2007 Looks good! What is "#248" about? Justin Quote Link to comment Share on other sites More sharing options...
dat240zg Posted June 15, 2007 Author Share Posted June 15, 2007 Serial Number is 000248. I'm getting pretty pumped about it - the suspension gets back tomorrow from coilover perch/powdercoating. It's actually going to be fun putting a car back together that has fresh paint and no 1/4" thick layer of greese/grime dirt built up! Bryan Quote Link to comment Share on other sites More sharing options...
MonkeyKnifeFighter Posted June 15, 2007 Share Posted June 15, 2007 Good for you. Can't wait to see how she turns out. Tell me more about the sound system/sub. Quote Link to comment Share on other sites More sharing options...
dat240zg Posted June 15, 2007 Author Share Posted June 15, 2007 Kenwood deck, Kenwood excelon amp, Pioneer 10" sub, Alpine component speakers, fatmat throughout (literally every square bit of free space including roof, etc. Should sound nice! Quote Link to comment Share on other sites More sharing options...
dat240zg Posted July 11, 2007 Author Share Posted July 11, 2007 Just had a few more pics of the restoration that I wanted to post up. Camber plates going in: Undercoating sprayed: New Wheels: Pretty much all of the parts are back from the powdercoater and so the suspension subassemblies will be going back together this weekend. Had a "beat my head against the wall" moment last weekend. I had gotten the bushings pressed out of the front and rear control arms and when I went to go reassemble everything I realized that the machine shop had left the metal sleeves in. So I did a little searching here and a couple of other places, and proceeded to go at the sleeves with a hacksaw. A good 20 minutes or so later, I hadn't made very much practice, so I got out the sawzall (you can see where this is going) and attempted to make a partial cut that I would finish with the hacksaw. I thought that I had kept out of the control arm metal, but didn't and wasted a good, newly powdercoated set of front and rears. My wife, responding to my ticked-off-ness said "I take it that you weren't supposed to cut your a- arms, right?" Some of the cuts weren't too far into the metal, but I don't want to risk any metal failures. So....back to the parts car, tear out the suspension from #248, take everything apart again, this time make sure that the machine shop presses out the bushings and sleeves then back to the powdercoater.....2 steps forward, one back. On a cool note, I finally got my new wheels, a little wider so that I can run 245's in the back. My Konig Imagine wheels that were on the car will be going up for sale (brand new, 17x7, 4x114.3 with adapters). Hope to get a shot or two of the car with the cage installed to post. Bryan Quote Link to comment Share on other sites More sharing options...
Bartman Posted July 11, 2007 Share Posted July 11, 2007 Looking good! So what are the spec's on your wheels? I'm looking at getting 17 x 8.5's to replace the Konig Theory 17 x 7's and adapters that I'm running now. Quote Link to comment Share on other sites More sharing options...
dat240zg Posted July 11, 2007 Author Share Posted July 11, 2007 Honestly, I went pretty mild. The wheels are 17x8's, 5x114.3 42mm offset. They're not too heavy and with 245/45's on the back, should fill out the wheel well pretty nicely. Sommers is supposed to come over and we're going to fit one up to get an idea. Bryan Quote Link to comment Share on other sites More sharing options...
dat240zg Posted August 12, 2007 Author Share Posted August 12, 2007 Well, time for an update! I got the car back from the body shop on Wednesday, with everything from the firewall forward finish painted and the interior and roll cage painted. Since I got it back, I've gotten the front and rear suspension remounted and the sound insulation done throughout the car. Over the next week, the body shop will be finishing the doors, hood and fenders and I'll be sending the car back. I'm gettin pumped! The color turned out incredible! Here's a few pics of the car: While the car was at the bodyshop, I took the time to reassemble the suspension subassemblies so that when I got the body back, it was just a matter of mounting them up. I ended up going with one of the Motorsport steering racks and they seem to be the real deal. Nice and tight. The only thing that I'm kind of kicking myself for is not having thought out/planned out the rear camber plates. The finished product is really nice, but it wasn't until I re-mounted the suspension that I realized that there is no way of sealing out the weather from getting thrown up in the strut tower. More pics to follow! Bryan Quote Link to comment Share on other sites More sharing options...
a6t8vw Posted August 12, 2007 Share Posted August 12, 2007 awesome.. Quote Link to comment Share on other sites More sharing options...
cygnusx1 Posted August 12, 2007 Share Posted August 12, 2007 It's a dream Z. Very well done. I cant wait to see it driving. Quote Link to comment Share on other sites More sharing options...
texis30O Posted August 12, 2007 Share Posted August 12, 2007 Exactly what color did you go with? Looks good I will have mine on the road in a few weeks and I am going to start saving up to do all of the body work and paint on mine in the next year or so..... Quote Link to comment Share on other sites More sharing options...
dat240zg Posted August 12, 2007 Author Share Posted August 12, 2007 The lower color (that's on the car now) is '07 Mercedes Silver Pewter Effect. From the body line up it'll be Porsche Basalt Black - kind of a really dark charcoal gray. Should look nice. Bryan Quote Link to comment Share on other sites More sharing options...
olie05 Posted August 12, 2007 Share Posted August 12, 2007 Wouldn't it be more effective to have the roll hoop braces go directly to the strut towers, rather than the bar that joins the strut towers? I bet the guys at classiczcar.com are cringing at what you are doing to #248 Quote Link to comment Share on other sites More sharing options...
2126 Posted August 13, 2007 Share Posted August 13, 2007 Wouldn't it be more effective to have the roll hoop braces go directly to the strut towers, rather than the bar that joins the strut towers? I bet the guys at classiczcar.com are cringing at what you are doing to #248 That's why there is a HYBRIDZ!!!! Tom Quote Link to comment Share on other sites More sharing options...
dat240zg Posted August 14, 2007 Author Share Posted August 14, 2007 Actually, that's what I kept thinking. Weird thing was that when I finally talked about the project, the majority of people were ok (not that it matters). When I got the car, a lot of the parts that make it valuable for a stock restoration were gone, so it wasn't like I was "ruining" a complete low vin. I'm just pumped that the end is in sight....I, uh, think.... This weekend the plan is for the motor and tranny to go back in for the last time. Now that the fatmat is in and done, I can start on the wiring. The car should be back for final coat in about a week and a half. Final paint scheme should be stunning! Bryan Quote Link to comment Share on other sites More sharing options...
Heath Posted August 16, 2007 Share Posted August 16, 2007 Looks good. Very inspiring. Quote Link to comment Share on other sites More sharing options...
dat240zg Posted August 16, 2007 Author Share Posted August 16, 2007 Thanks guys. I really appreciate the compliments. Bryan Quote Link to comment Share on other sites More sharing options...
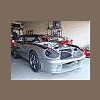
dat240zg Posted September 24, 2007 Author Share Posted September 24, 2007 Woo Hoo!!!!! Finally get to post some pics from the booth! Final paint was sprayed on Friday and Saturday. Without anymore talk...here's the results: More pics to follow. Car is now being rubbed down and cleared. Should be ready to come back to me on Friday. FINALLY!!! BTW, the colors are Mercedes Pewter Effect and Porsche Basalt Black Pearl. Quote Link to comment Share on other sites More sharing options...
Recommended Posts
Join the conversation
You can post now and register later. If you have an account, sign in now to post with your account.