

toolman
-
Posts
546 -
Joined
-
Last visited
-
Days Won
14
Content Type
Profiles
Forums
Blogs
Events
Gallery
Downloads
Store
Posts posted by toolman
-
-
Sorry for the delayed reply. Was having difficulty with my Password and trouble posting. Thanks
Administration for correcting problem.
Disc brake and Hand Brake Installation-
First, Important Notice-The Invinclble Extreme 8.8 Differential Conversion Kit requires the use of 2015 to
2024 Mustang GT Rear Disc Brake system. All related Suspension Parts were created to work with these parts.
Check carefully if any alternate brake parts are used for fit and function. Otherwise, Different Parts may require Modification at some level.
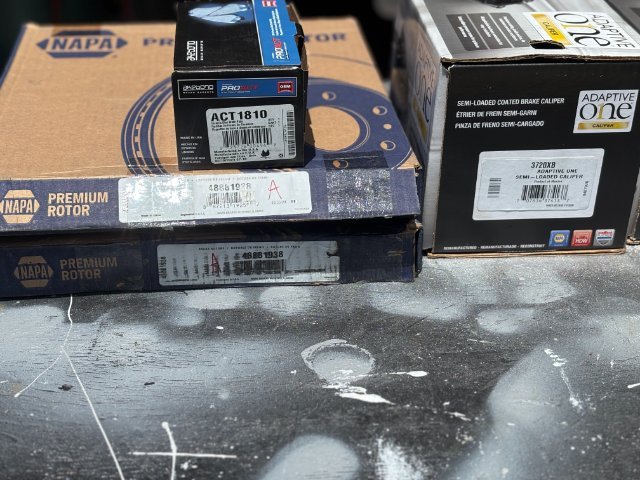
I utilized NAPA Replacements Brake Parts (Calipers, Rotors and Upgraded Pads) for 2019 Mustang GT

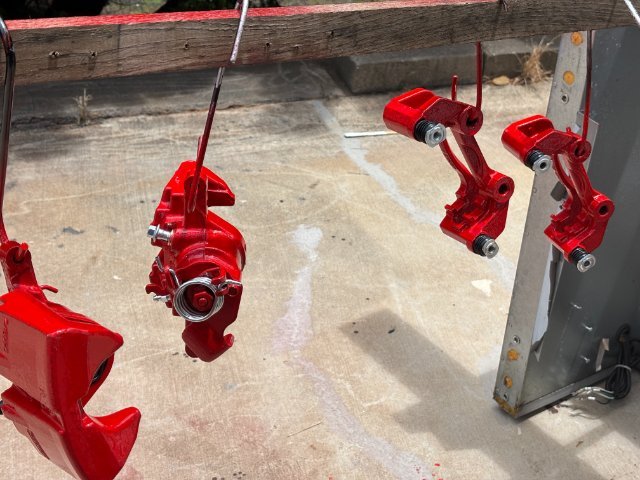
I painted the Calipers and Mounts with Polyurethane Bright Red to improve their appearance,
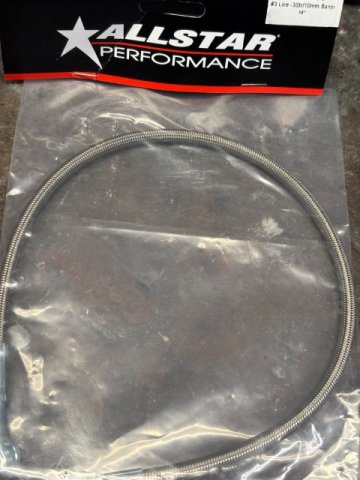
Stainless Steel Brake Lines(from Amazon) were used.
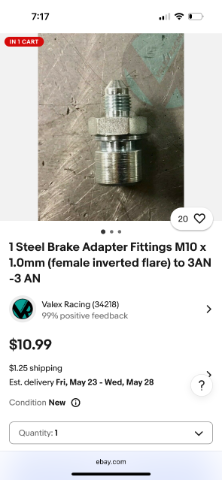
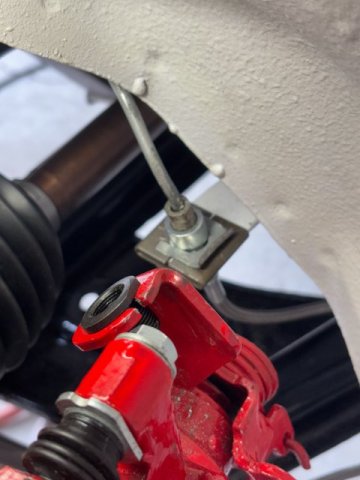
Brake Line Adaptors from EBAY connected the Male OEM
fittings to the Stainless Lines.
Brake Line Adaptor installed with OEM Clip to Stainless Steel Brake Line
Hand Brake Modifications-
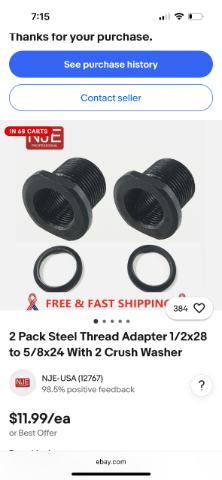
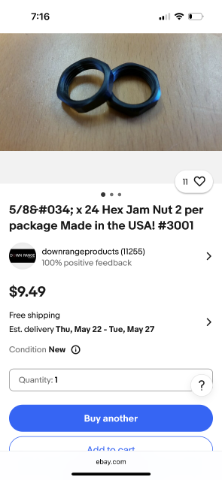
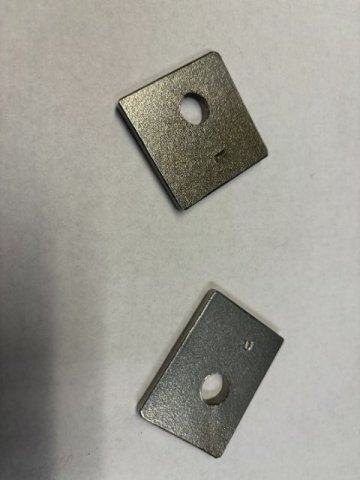
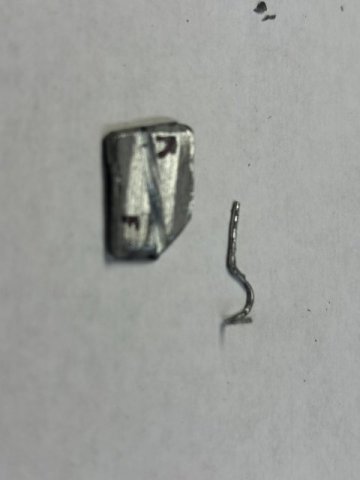
The Hand Brake required a little more fabrication to function properly. I found these adaptors on Ebay although they were not designed for this particular job.
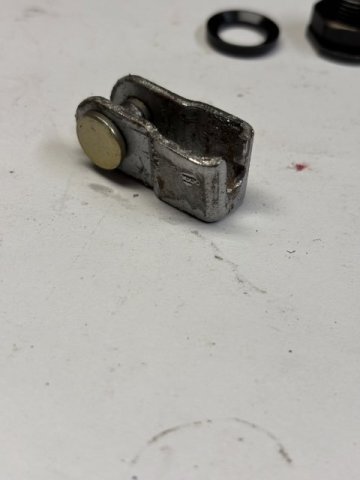
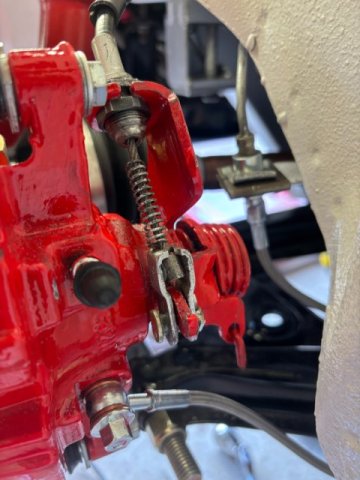
The Above Two Parts were used together to adapt the OEM Hand Brake cable to the Mustang Caliper Hand Brake Cable Mount.
The Cable Bracket with roll pin must be Slit to allow the cable to fit into the Threaded Cable Mount. After being inserted into the Cable Mount, the Bracket with Roll Pin is reassembled on the Cable. The Slot can hammered closed afterwards(or even tack welded)
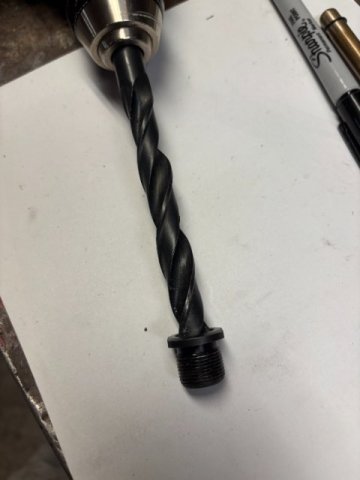
The Caliper Hand Brake Cable Mount had to be enlarged to 5/8" from 9/16"(use Unibit) to fit the Hand Brake Cable Adaptor. Insert Cable into the Nut assembly with JB Weld Epoxy to fasten cable to prevent movement. Allow 24 hours for the JB WELD to harden.
Drill out Adaptor to 5/8" to provide Cable fit.
/inserting Cable into Adaptor with JB Weld to hold it.
I
Assembled all together
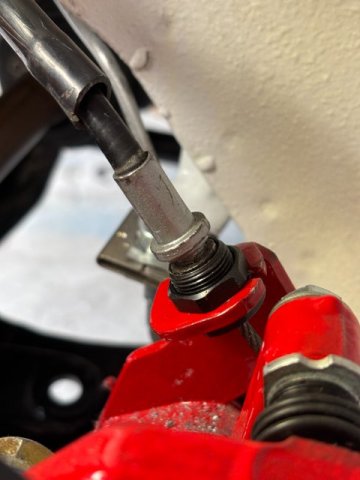
With the Hand Brake completely Loose, Slide Cable Roll Pin with Cotter Pin over the Caliper Lever Arm while pulling cable.
Note-Stainless Brake attached to Caliper with Bolt(with copper washers-above and below.
0
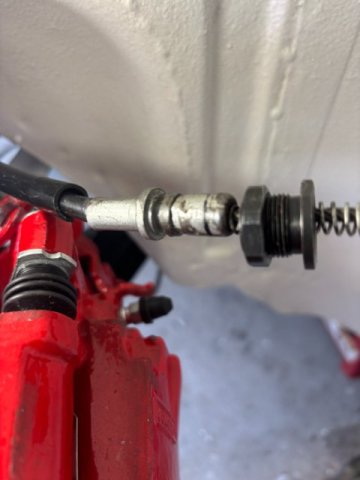
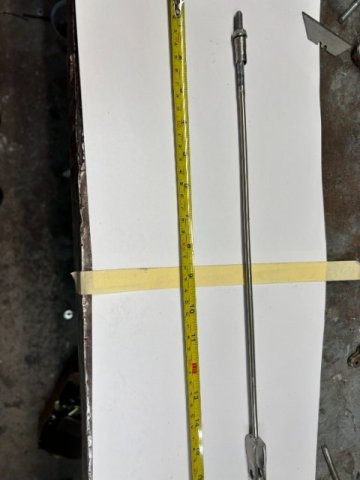
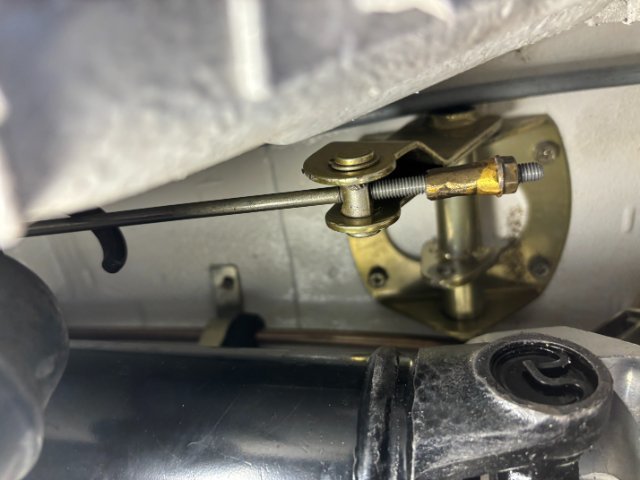
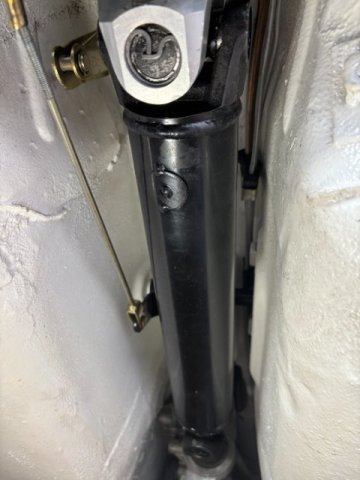
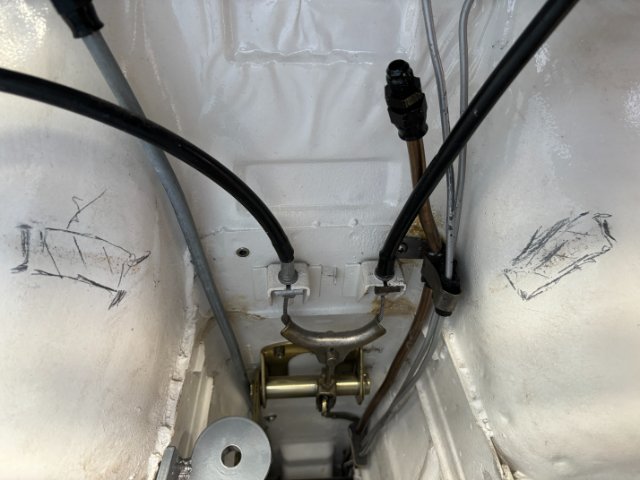
The Hand Brake Adjustment Threaded Rod must be shortened by 2 1/2". Just use a Hack Saw to shorten a non- threaded portion of the Adjustment Rod.
Pic of the Hand Brake Adjustment Rod in Trans Tunnel.
The Shorten Adjustment Rod will move the Hand Brake Arm forward and make it easier to access. Final Hand Brake Adjustment was made when all Four Wheels were on the ground to the point the vehicle could not be pushed be hand.
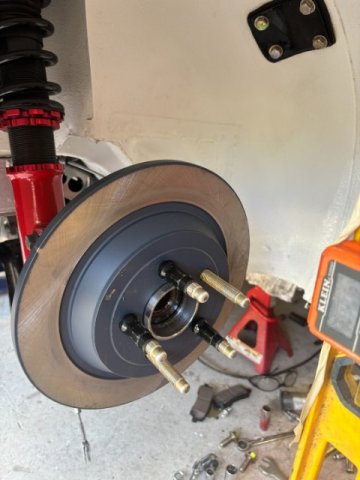
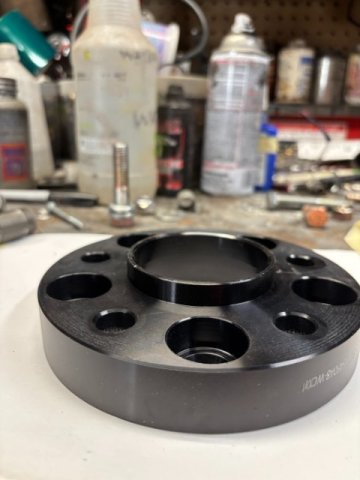
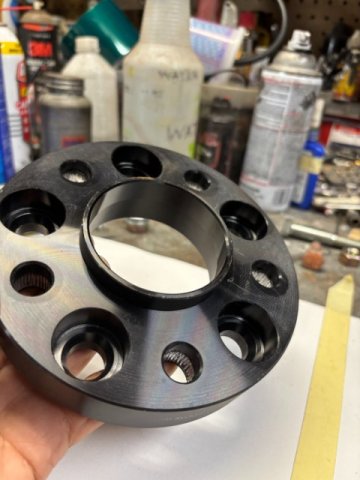
Wheel Spacers-
With my 17" x 11 1/2" Wide Wheels and Deep Offset, the Inner Wheel Bolts would contact the Ca[iper Outer Face. US Wheel Adaptors provided 1" thick wheel spacers which get about 3/4" Caliper Clearance. I can probably shaved the Inner Side of the Spacer about 1/2" to bring the clearance down to 1/4" Clearance if necessary. Bigger Brakes with Larger Calibers and Vented Rotors would probably fit now(trial fit to be sure) if you go
to LARGER Calipers and Rotors.
US Wheel Adaptors can make spacers to whatever spacing that you might need. Also,
the spacers can convert to different wheel mounting patterns.
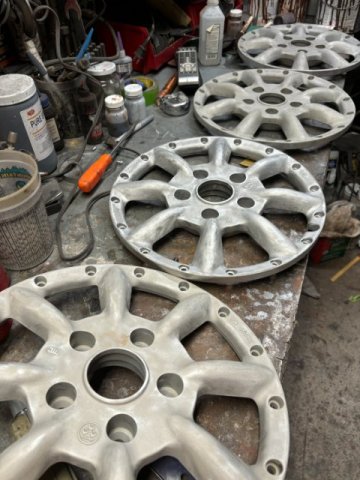
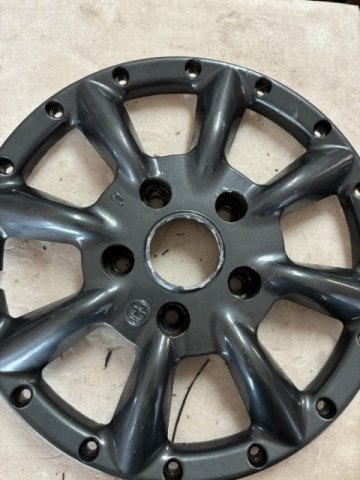
Wheel Inserts with 5 Lug and 4x 4 1/2" Pattern
Matt Cochan at LOVE20BEE IN California found Watanabe Wheel Inserts for me. I sandblasted and took them to a local PowderCoater to powder coat.
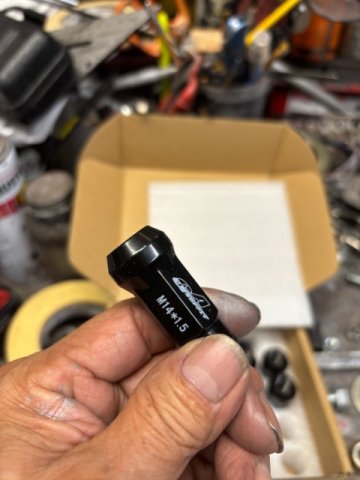
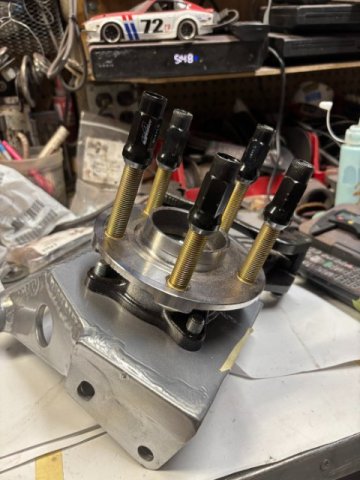
Extended Lug Nuts-
Because the Narrow Wheel Lug Pockets, I went to Ebay to purchased Extra Long and Narrower Lugs.
Almost all of these 14mm x1.25 lug nuts had to been retapped with Exlarge Long 14mm x 1.25 Taps because of bad threading.
Extra Long Wheel Lug Nuts on Extended Wheel Studs.
Next-Struts and Exhaust Pipes
-
Driveshaft Modifications and Driveline Alignment-
I sent my old Driveshaft to be lengthen as old R200 differential was
longer than the New 8.8 Differential. I got the new measurement by
inserting the Front U-Joint all the way into the T-56 trans. Then measured the distance between it center of Chevy U-joint to the center of the Front U-joint of the 8.8 Ford Differential. The Machine Shop will
make the shorter by 1 1/2" . This allows space to remove the Driveshaft
when it is installed.
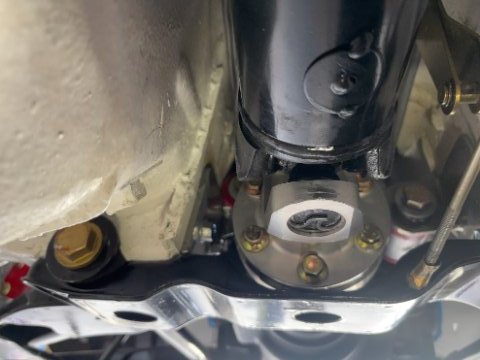
Note-How large the Ford Adaptor from Sonan is.
Driveshaft installed-Rear View
Front View-Driveshaft
After installing the New Driveshaft was installed, the Drive Alignment
was done to double check. I used Two Methods -1-using Spicer Drivetrain Products Application from the Web. It requires the use of
a Digital Protractor(mine was Klein Digital Protractor from Home Depot. I think it was about $30 but I bought awhile ago.
Front u-Joint Measurement.
Second-Middle of Driveshaft Measurement.
Third-Front Differential Measurement
After entering the Three Readings, the Application gives a Pass or
Fail Result. In this case, the Result was "Pass".
The Second Method you use the Tremec Tool Box Application. I used my IPHONE to enter the angle measurements.
The Result was "Pass" also.
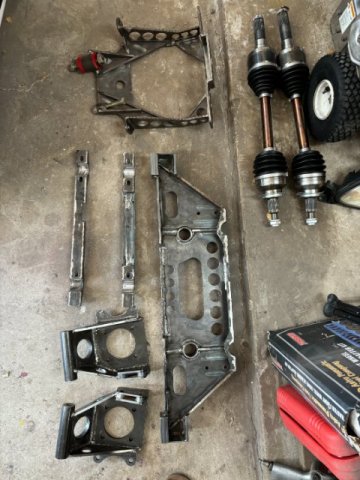
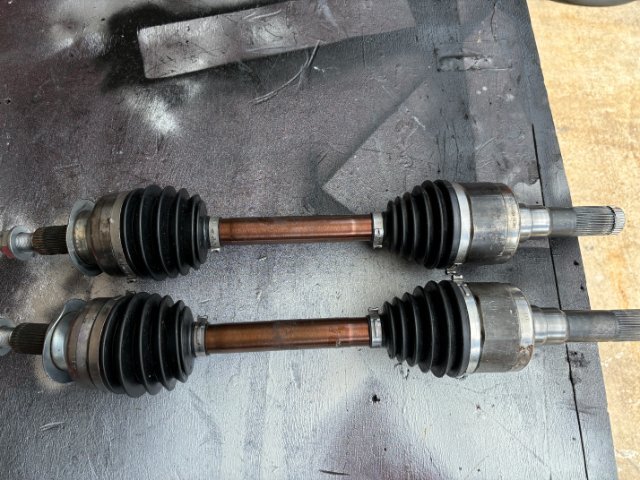
Half Shafts Installation-
This pic shows the difference between the Datsun Half Shafts and
the Ford 8.8 ones.
Left Side(shorter one) Half Shaft installed.
.
View of Both Half Shaft Shafts
Left Side -Shorter in Length.
Next-Rear Disc Brakes and Hand Brake
-
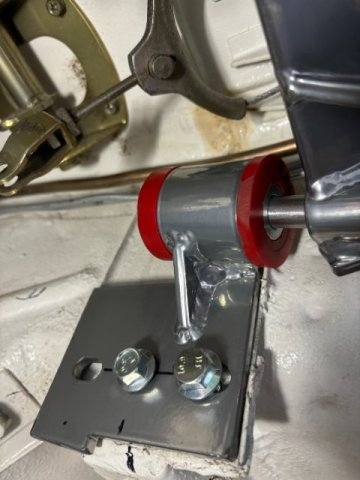
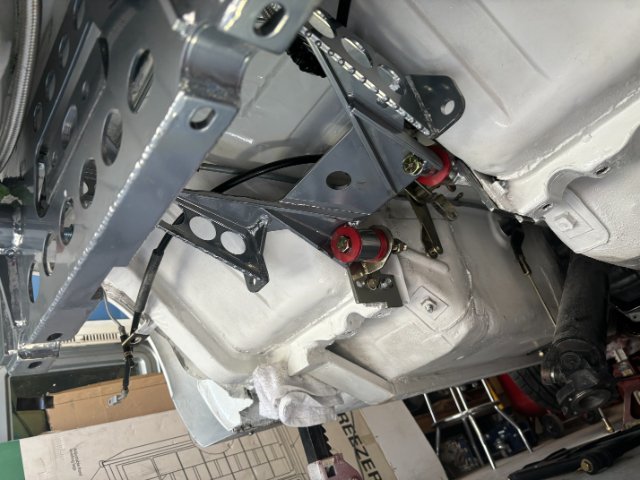
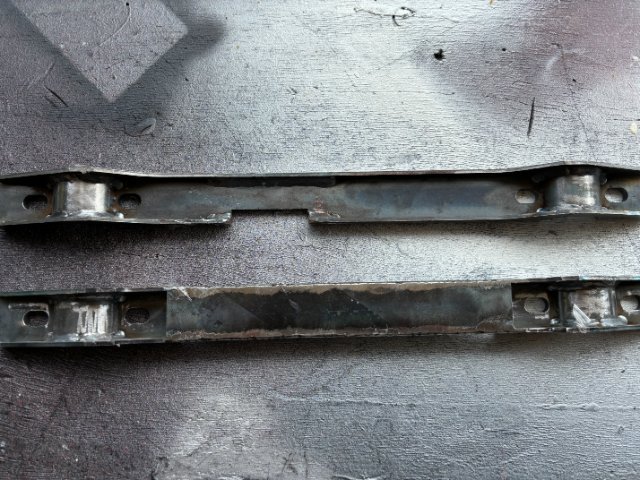
Once, you installed the Differential and Cage with the Support Bracket into the Two Vertical Mounting Bolts, the Two Forward Differential Mounts can be installed into the Transmission Tunnel.
Left Mount
Right Mount
Note-Earlier 240z has mounting bolt holes close together so drilling
an another hole maybe necessary(call Vlamir for assistance),
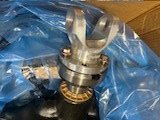
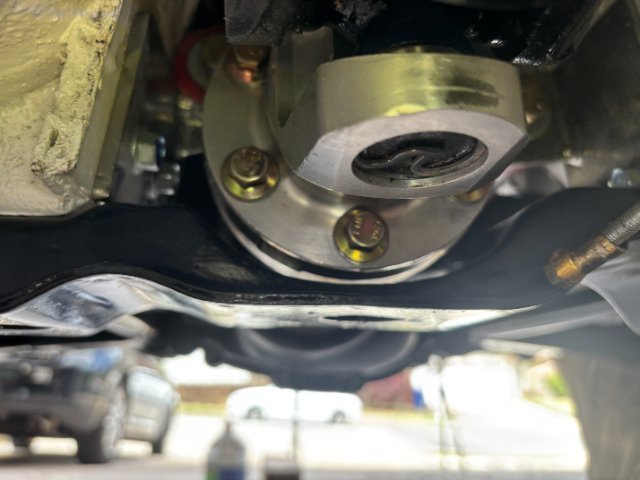
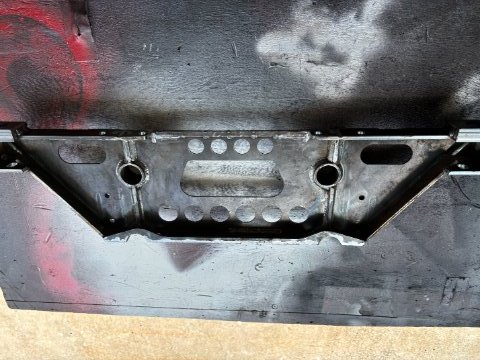
Important Fact------My New Ford Motorsport Super Duty 8.8 Differential came with the Large Aluminum Pinion Flange so I had to fabricate a New Crossmember for clearance problem. I decided to modify the Original Nissan Differential Crossmember.
Pic shows Sonan Adaptor on the Pinion Flange.
Pic of 8.8 Differential with the Old Style U-Joint. Note the Close Clearance between Flange and Incredible Extreme Crossmember already.
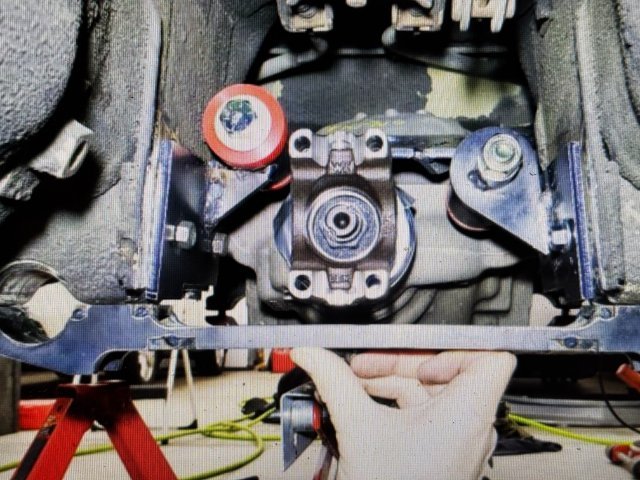
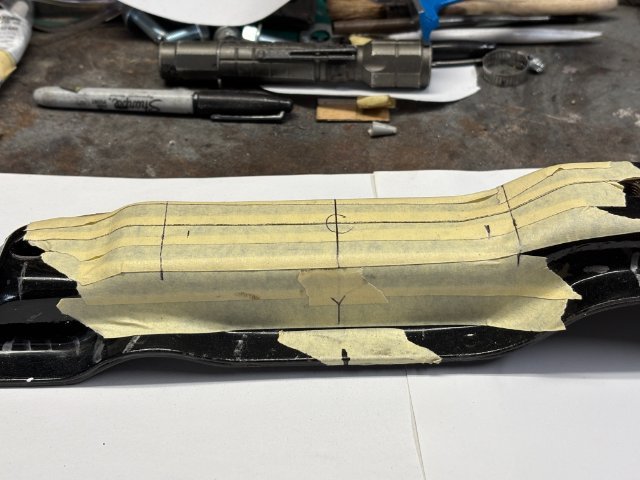
Original Nissan Transmission Crossmember taped and marked for metal cutout on top area.
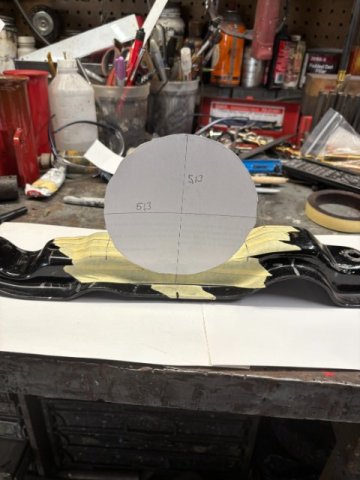
Cardboard Template of Aluminum Flange marking Side Cutout.
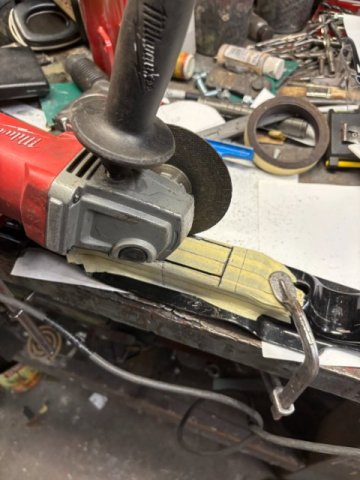
Using 4 1/2" Cutoff Wheel to cut out Top Section of crossmember.
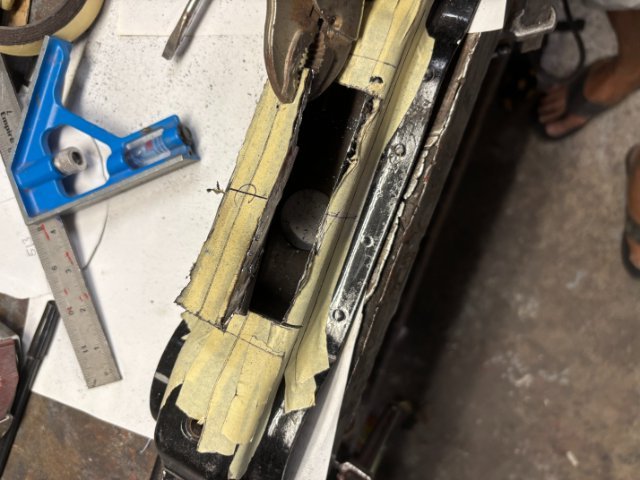
Top Section of Crossmember removed.
Both Side Sections were cut out to form the Lower Round Shape.
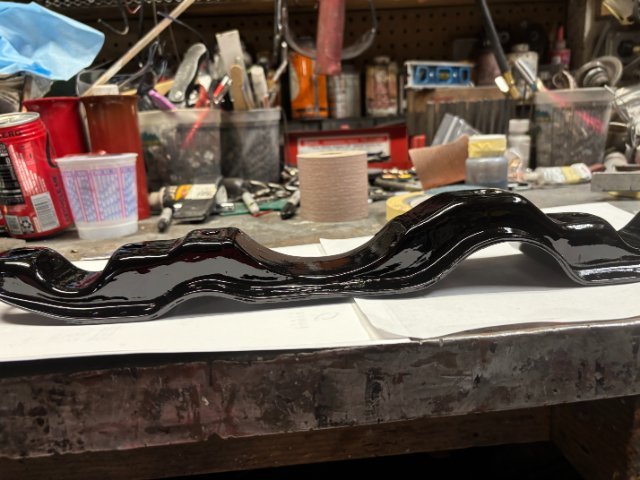
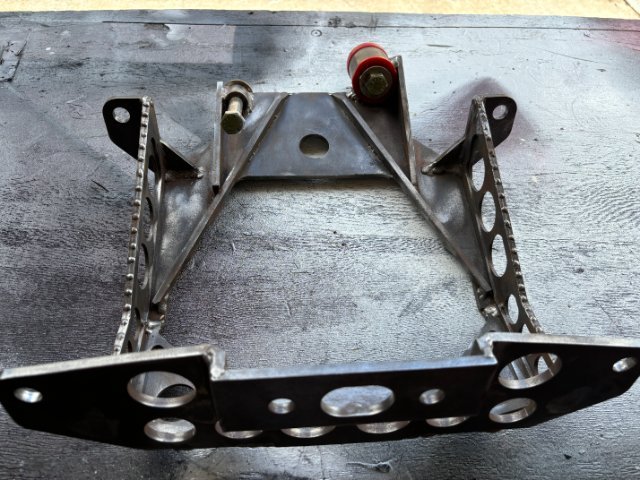
Finished Crossmember
Side View
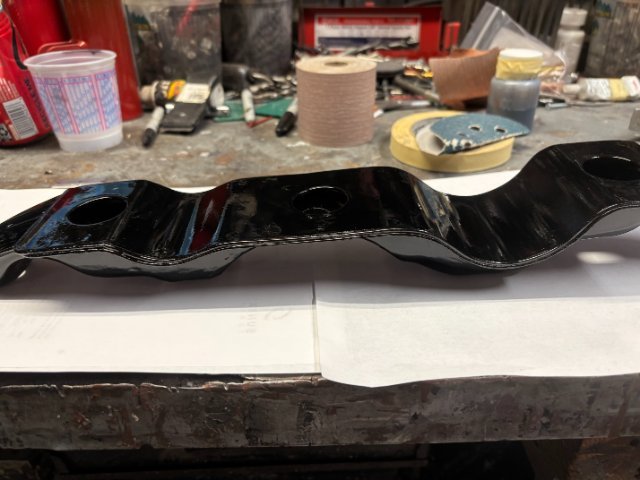
View of bottom of Modified Crossmember.
Finished and Mounted Crossmember.
Next-Modified Driveshaft and Driveline Alignment.
-
 2
2
-
-
Differential Installation-
I had additional work on my house after painting it. Sorry again for posting delay.
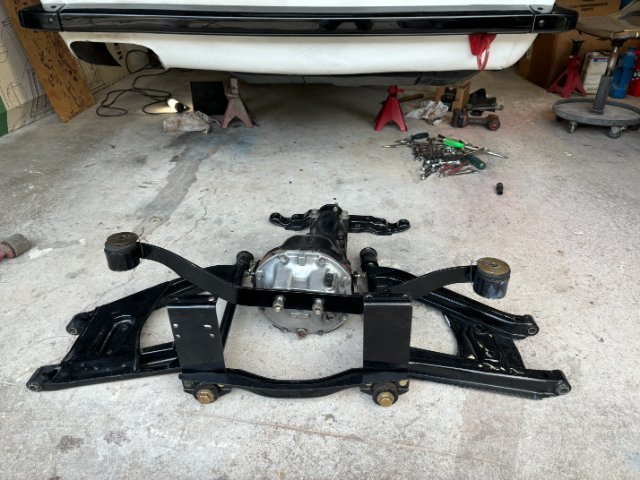
First, I Trial Fit the Rear Differential Support and the Cage before trying to install the Differential.
The Trial Fit is make sure all the Fuel, Brake Lines and Hand Brake Cable does interfere with the Differential.
Some Early Model 240Z , Nissan widened the Front Differential Mounting Bolt Holes. So make sure your Differential Mounts fit or
you must slot existing holes or drill additional ones.
Right Side Front Differential Mount
Old Mechanical Transmission Jack for Installing
the Differential and Support Frame Together.
Installing the Differential-
The Best Way to install the Differential is to preassemble the Differential and Differential Support with the Two 14mm bolts. This
way you just have to align the Two Main Vertical Bolts with the Two
Round Mount on the Support Mount. I used a old mechanical Transmission{ screw version) Jack. One person can install the Differential by himself. If you try to install the Differential after mounting the Differential Support by itself, you need other person to screw in the Two 14mm while you lift that 100Lb Differential- a difficult task. Also, early 240s with a Spare Tire Well, the well is close to the Differential Support on the Left Side Bolt and this 14mm can not even be inserted in. Some owner install Fuel Cells which are much smaller and allow the Left Bolt to be installed.
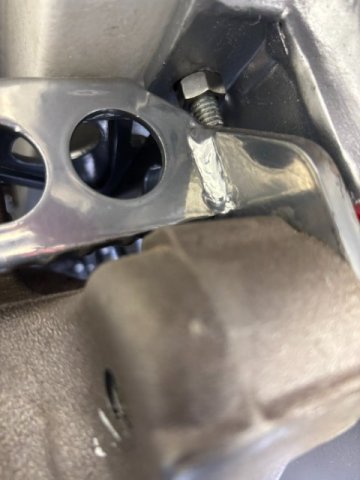
The only problem with the Preassembly Way is the Two 10mm Outer Bolts in the Center of the Differential Support can not be installed with the Cage. So I drilled their internal nuts to 3/8" hole
all the way thu the box crossmember. Then, install Two 3/8"x 4" long bolts from the top. Two 2"x 3" x 3/16" steel plates to spread the load over the crossmember top. Two 3/8"NC nuts under the Support Frame to complete this modification. Some people probably don't install this bolt but it is a structural part of this car.
Pic of the Two 3/8" X 4" Long Vertical Bolts through the Cross Member.
Closeup View
Pic of the Nut inserted between the Cage and Differential Mount. Left Side
View of Left Side Nut for Vertical Bolt.
More Rear End Modifications coming up.
-
I found this video on visiting a Metal Supply Shop in Japan. While doing a S30 Fairlady Restoration, the Body Man needed more sheet metal to finish his job. This video shows a side of car restoration that most people never see- where the sheet metal actually comes from. The rest of the video shows detailed 240z body restoration It shows how
to repair difficult body areas of the 240z.
I hope you guys find this video interesting.
Toolman
-
If your SU carbs were not modified to allow for the larger displacement motor, you might have a fuel problem. Meaning the carb needs to provide a richer
mixture to run properly. You can try smaller SU metering rods which would provide a richer fuel mixture. But doing this may still not provide a rich enough mixture as the SU bore size maybe too small.
-
Ford 8.8 Super Duty 8.8 Differential Installation-
First of all, I want to apologize for taking so long to finish this posting. I had to paint my house and had some other people's projects to help them with.
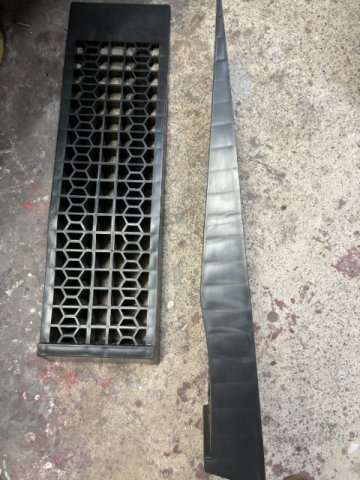
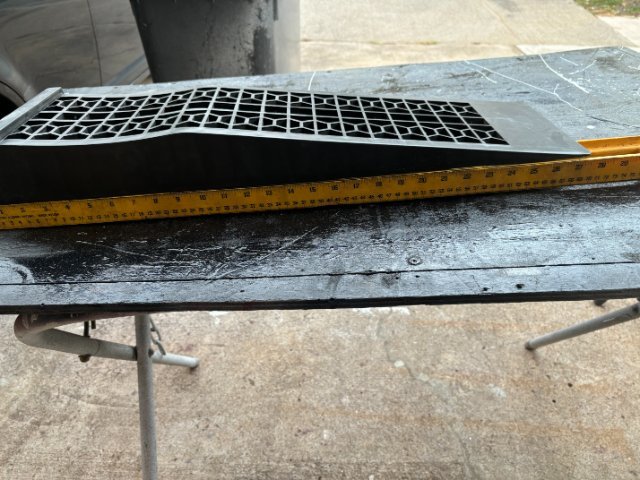
The first thing that I had to do was to find a method of jacking the front end of my 240z high enough to use high jack stands. Because of the low ground clearance of my Rocket Bunny Front Air Dam and Low Vehicle Height, even my 3 1/2" Low Clearance Floor Jack would not fit. I solve this problem by purchasing a pair of 3 1/2" Car Ramps. They cost about $36 on Amazon.
raises vehicle by 3"
These ramps were about 28" long and would work on low riding vehicles. Short steep ramps would not work. They are very light weight and can be sacked together (taking a small storage space).
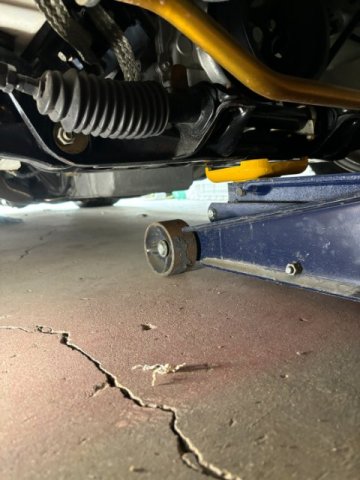
jacking cross member
The Ramps worked perfectly as my floor jack fit under the Front Cross Member easily.
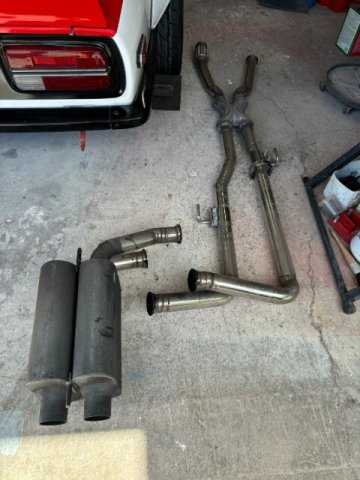
With the Car raised on Four Jack Stands about 6" off the ground, disassembly of the rear suspension can now take place. I designed my exhaust system for easy accessiblty. It consists of Three Sections-One -Front Motor Exhaust Pipes, 2-Middle Section with "X" Pipe after the transmission and Third- Rear 90 degree Exhaust Pipes with Two Turbo Mufflers. The pipes were also, connected together with V Clamps for fast disassembly.
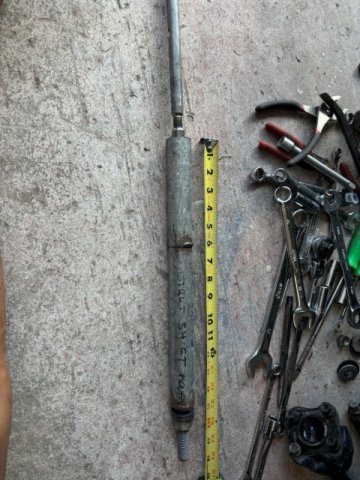
Next, the Two Rear Control Arms must be removed from the Strut Spindles. First, the Threaded Cross Shaft must be removed. The Tapered Shaft retaining Pins must be removed. With the Locking Nut removed, the Pins are removed by tapping them cafefully upwards. now, the Threaded Cross
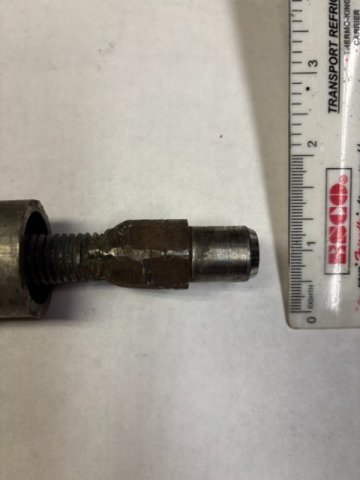
Shafts must be taken out. Because of Corrosion and lack of Lubrication, these shafts usually are difficult to remove. You can not hammer them out as both ends has threaded ends and hammering will damage the threads. ZDEPOT sells the Removal Tool but I made mine own. The tool consists of an Internal Threaded Rod which screws to the Threaded End of the Cross Shaft. The Larger External Tube( 1"OD" acts like a spacer of the Threaded Rod. A Large Nut on the opposite side of end of the Threaded Rod operates like a Forcing Screw to pull the Cross Shaft outward. I welded a proper size Lug Nut to the other end of the Threaded Rod. See Posted Pics for Size and Dimensions of this tool.
Metric Lug Nut welded to one end of the Threaded Rod
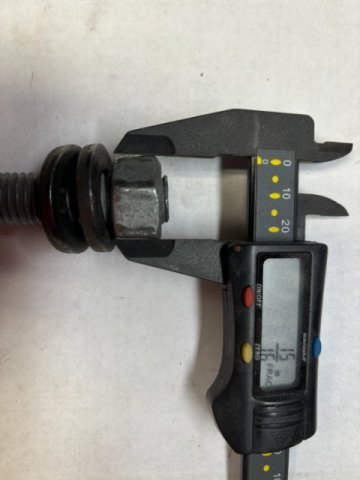
15/16" Nut( pulling nut) placed on the opposite end of the Threaded Rod
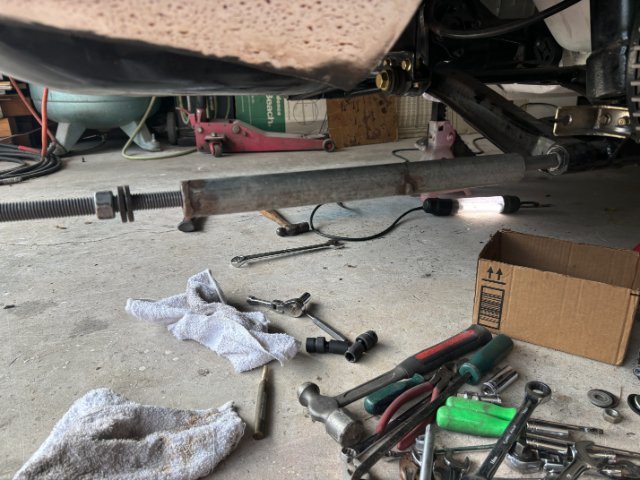
Removal Tool installed on Cross Shaft
Rear Suspension removed
With the Rear Suspension and Differential Removed, install the Differential Support Bracket on the two Long 17mm Mounting Bolts for Trial Fit. This test fit checks if any Fuel and Brake Lies and Hand Brake Cable are in the way. In my case, the Fuel Lines had to be extended and Hand Brake Cable modified.
Differential Mounting Bracket Trial Fit-
Next-Differential Installation
-
2
-
-
This video is Part 6- This video follows the complete Paint Job of the 240Z. It covers disassembly and rebuilding of the Front Suspension. Some of rebuilding of suspension parts from scratch are interesting but normally beyond normal rebuilding process.
But the video was made overseas(probably Northern European Country) where obtaining a Datsun Front Ball Joint is not easy like going to Auto Zone in USA. Though, seeing how parts can be created from scratch is informative.
-
Wedge, Check out my Jan 30,2024 post in Heavy Duty Frame Rails in Chevy IV section. I discuss why I decided to go with INCREDIBLE EXTREME 8.8 Super Duty Differential Conversion Kit.
Toolman
-
1
-
-
For Information and Installation details on Incredible Extreme Ford Super Duty 8.8 Differential Conversion go to:
V8 ZForum-GenIII & IV Chev V8 Z Tech-Heavy Duty Frame Rail and Connectors on Page 19.
Toolman
https://www.facebook.com/story.php?story_fbid=502465925737642&id=1065043032290757
-
Incredible Extreme Ford Super Duty 8.8 Differential Conversion Kit-
This Kit was designed and created by Vladmir Zagumennyy located in Golden Valley, Arizona. He has been working on this particular kit for several years and
is constantly upgrading it. His kit has been proven to go 8.6 and 161 already.
https://www.facebook.com/story.php?story_fbid=502465925737642&id=1065043032290757
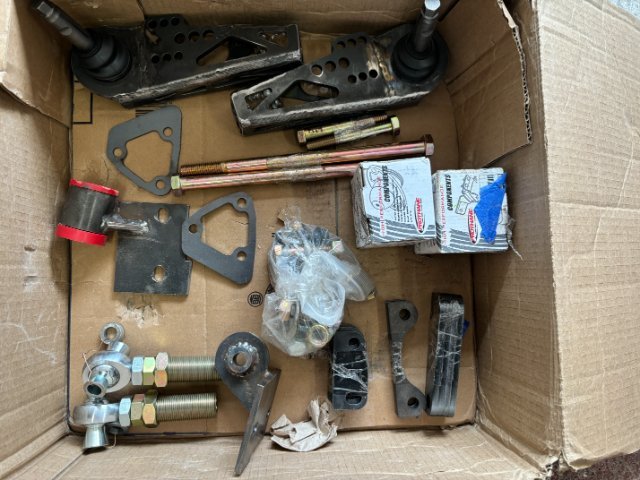
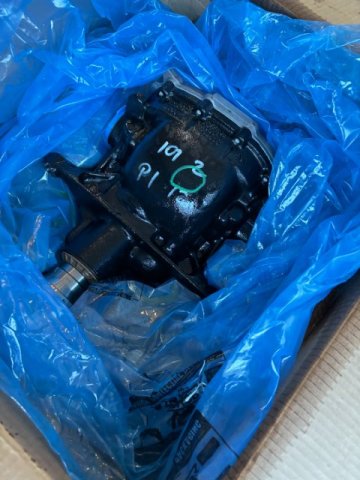
My kit arrived in two heavy boxes, Parts are constructed with 1/4" and !/8" Mild Steel with Gussets -Very Robust!
Besides the parts to do the 8.8 Differential Conversion, there were Two Adjustable Front Control Arms and Two Upper Rear Strut Plates. I do not
plan to work on the Z Front End yet. The Rear Disc Calipers and Pads are left
for you to choose. He recommends using Brake Parts fron 2015 -2020 Mustang GT. His Front Control Arms utilize Mustang GT Spindles. This will
also allow the use of Bimbo Six Piston,Calipers and Rotors from 2015-2020 Mustang GT. Using Ford Parts(new or Used) will save you alot of $$$ and are
readily available.
Differential Support -weigh 17.1 pounds
Differential Cage-12.6 pounds
Front and Rear Control Mounting Brackets-2.4 pounds
CV Axle Shafts-15.7 pounds one
Ford 8.8 Super Duty Differential-107 pounds
Rear Strut Support-9.5 pounds one
Front Lower Control Arms-4.8 pounds one
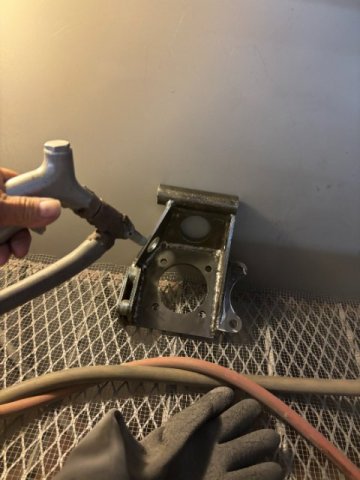
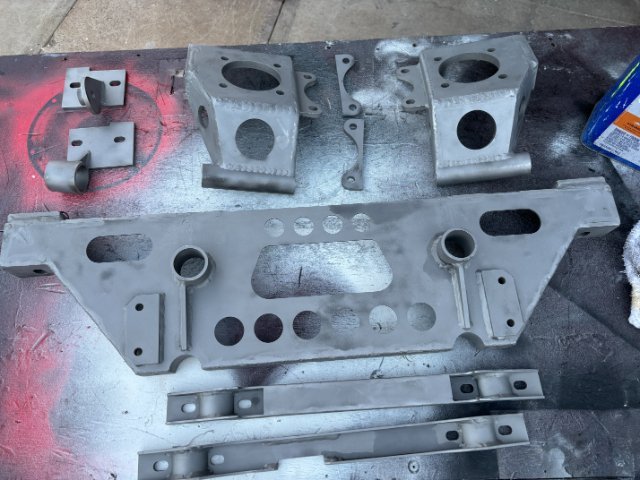
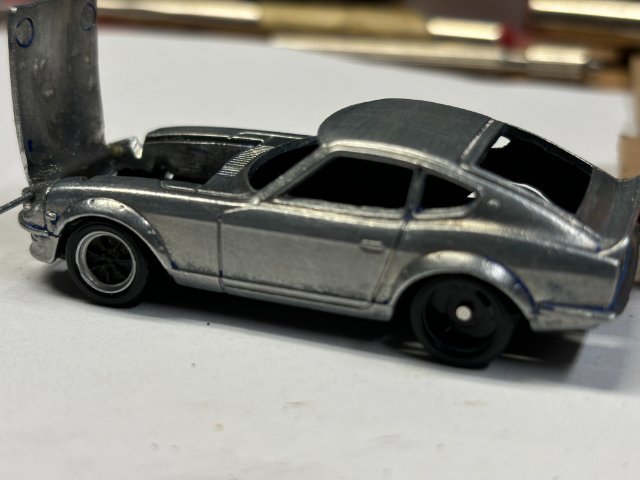
Parts were debrred and sandblasted.
Ready for Powder Coating.
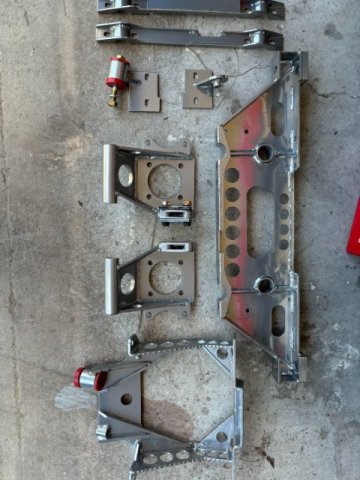
Back from the Powder Coaters.
Next-Installation of the 8.8 Differential-
-
1
-
-
As a exbodyman and auto painter, I agree with the previous individual about the rust condition of that particular FairladeyZ. The rust was definitely covered up with underseal and paint. What you can see, is only about half of the real problem. Having rust work properly in Japan would be very
expensive as there are only a few Japanese Body Shops that specialize in rust work. Majority of them are located in rural areas of Japan. If you still
wish to purchase your Z in Japan, you try to find Z car guys and make friends with them. They should know about Z prices and places to work on your
Z car. Places like UP Garage in Japan sells "second hand" auto parts at almost half the cost as compared to the US. Z body parts are a different story.
Because the Z is so popular now, there are many suppliers for z body parts. Z mechanical parts in Japan tend to better quality than Chinese parts if you
can find them. If you are interested in restoring a Z, check out Restoration of Z Cars on You Tube in both America and Japan. If you don"t have body fender and mechanical skills, your best option maybe to wait to return to the US and find a Z car in the Southwest part of the US. Places like California,
Arizonia, Texas,etc, their drier climates will provide you the best chance of finding a Z with little or no rust problems. Good Hunting!!
-
Ford 8.8 Super Duty Rear Differential Conversion Kit for my 71' Datsun 240Z
There are several different companies that have Ford 8.8 Differential conversion kits for S30 and later model 260 to 280z. However, most of them utilize the earlier model of Ford 8.8 Independent Rear Suspension from mostly 2005 Ford Explorers,Mercury Mountaineers and other SUV models. These differentials can handle 400HP and some even have Limited Slip in them. So they have been utilized in Drift Cars,Ford Trucks, JDM Cars and even BMW Racers. But, finding one is difficult because high demand and limited supply. Fortunately,a New and Stronger Version of the 8.8 came about-the# Super Duty 550 Differential with started to appear in 2015 Mustangs with Coyote Motors and Eco-Boosted 4 cylinder cars. This differential can handle from 600 to 1000HP ( with beefed up). It weighs over 100 lbs and comes a Torsion Limited Slip. I ordered my Super Duty 8.8 from Summitt Racing for $1300with 3.55 Gears. + shipping.
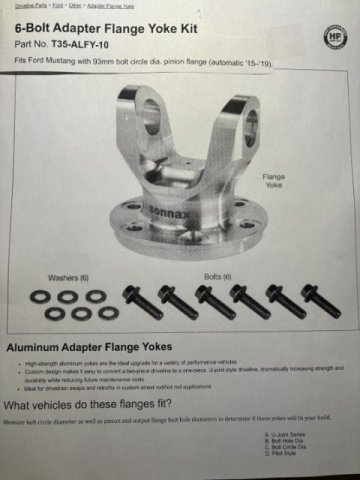
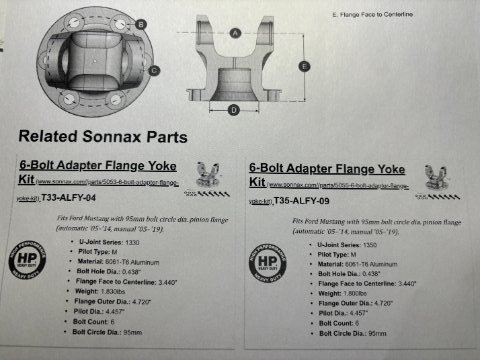
At the same time, I ordered the Sonan 8.8 Drive Shaft Adaptor from Summitt Racing for $179. They manufacture Two Versions of this Adaptor. One for Manual Trans and One for Automatic Trans. The difference is the existing Pinion Yoke Size. My 3.55 pinion takes the Automatic Trans Yoke Adaptor.
It is constructed of Billet Aluminum and handle alot of horse power. This adaptor costs about $179.
Next-Installation of Incredible Extreme 8.8 Differential Conversion Kit
-
1
-
-
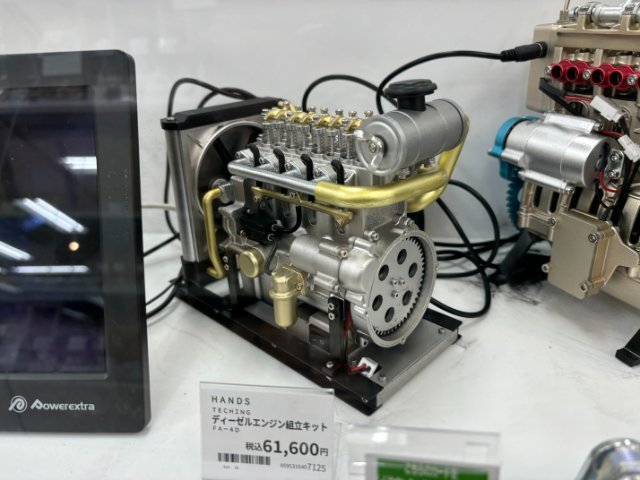
I manage to find two pics that show Model Displays of Scale Motors at AutoBacs Store. Note -the
prices of these motors are shown in Japanese Yen. To convert the price into US Dollars- just divide
the Yen Amount by 150. The 150 is the Current exchange rate in Japan. One US Dollar is worth 150 Japanese Yen.
These Motors have actual cranking movement driven by a small electric motor.
I finally found the K Van pic.
-
Before I start I wish apologize for not having photos of my JDM Tour in Tokyo. I had about 20 pics to show but they got erased while correcting and lost all of them. Anyway while in Tokyo, I found a 5 hour Night Tour covering various Car Related Places to see.
I chose the Shared Group Tour (about 6 to 8 people in a large Toyota van) and because it was a night tour,
it didn't interfere my daylight plans. The cost of this particulate tour e $250 per person. It started at 4PM and ended about 9PM depending on traffic.
Pickup Up point in my case was Toer Records in Shibuya. It was 300 yard walk from the Shibuya Train Station. At the end of the tour, you are dropped off near your hotel in Tokyo area.
The First Stop was the Liberty Walk Store which is tiny 2store in a back alley on Tokyo. It was mostly
Promotional Type of Store with t-shirts, hat, key chains,etc.
Second Stop-AUTOBACS is a two building which houses a Parts Store (similar to our O'Reileys) on the Second Floor. The Top Floor held
high end Racing parts(like Nismo, HKS,etc). Foreigners with Passports can get 10% discount off purchases.
Their Book Section had car magazines, books,photo ablums,etc)
ica 1/64 cars and all types of trucks and heavy equipment were on display...
to purchase. Even had a STARBUCKS CoffeeShop.
The Ground Floor, there was a Garage that could handle regular car maintenance or installation of even Turbo setup.
Last Stop was the Daikoku Parking Area. This large parking is located in Yokohama Harbor. This parking area is next to where the Japanese Cars(Nissann Toyota,etc) are exported to US, Southeast Asia,etc. There was
about 200 cars on the Friday Night that I went. Most of the cars there were
the typical Street Racer types. Some JDM cars had UnderCar Lighting systems. A few cars had Full Body Wraps(Cartoon Girls Designs were popular). Majority of the cars were mostly on the quiet side probably because Toyko Strict Noise Regulations. There was one vehicle that caught my eye-it was White K Truck with an Extended Cab and Flat Bed. It had a Dual Floating Rear Axles( total of 6Tires and wheels). The rear axles move individually of each other. Unfortunately, the vehicle didn't stop and kept moving thu the parking area. People said the best night for car viewing was Sunday Night but
I was leaving Monday morning, maybe next time.
I would still recommend this Tour for Car Lovers to learn Japan Car Culture and see some unique vehicles.
-
1
-
-
Detailing the Interior-
Installing the Battery into the Engine Compartment.
LS3 Motor installed in car-
Roll Bar installed and Chrome Rear Hatch Floor.
using Tweezers to put in Door Handles and Window Crank on Left Door.
Installing Door Pull on Door Panel on Right Door,
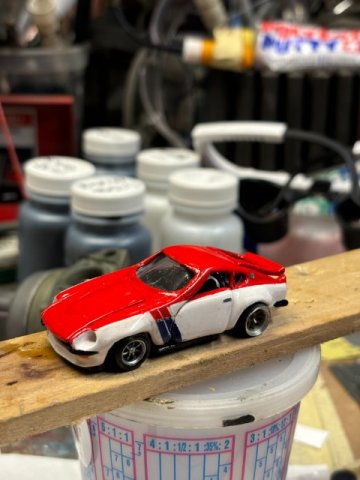
Ebay supplied the 240z Morton Race 240z Decal Sheet for $10.
After the Red and Blue Stripes with "DATSUN" were put on the cat then Clear was sprayed on.
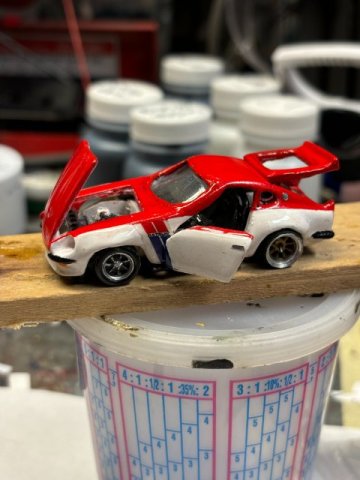
The Finished Car Pics-
Top View
240z with Open Doors, Hood and Rear Hatch.
Next- Ford 8.8 Differential Conversion
-
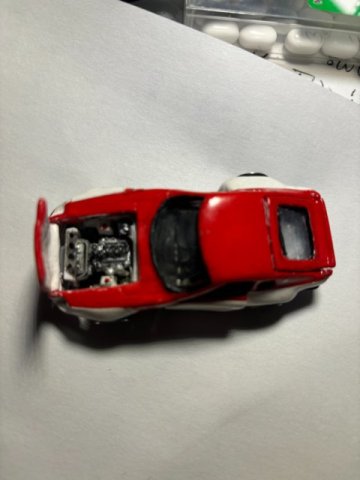
Painting the 1/64 scale 240Z-
I masked off the Bottom of the car for the Bright Red Top Coat. I had to mask off the sections that would end up White.
Next, After the Red Top Coar was sprayed and dried overnight, the masking paper was carefully removed. Now, the Red Section must masked off for the
painting of the White Lower Section to be painted.
At this point, the car should resemble something like this.
While allowing the White Paint to dry 24Hours, I decided to work on the Engine
Compartment. I had to fabricate the Aluminum Radiator. It made from Scrape
Flat Plastic Sheet. I glued a tiny piece of fabric to give the radiator finned look.
Then, I brushed it with Chrome Silver.
Yes, the Radiator is Tiny. That small size of parts gave me the biggest headaches
as parts were so easy to lose.
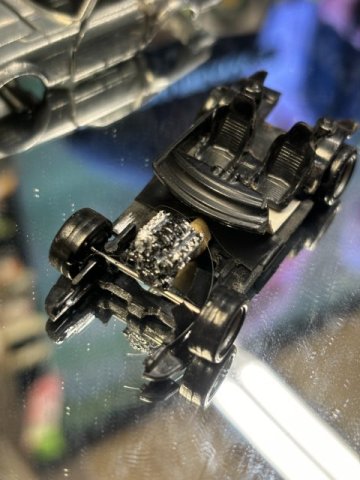
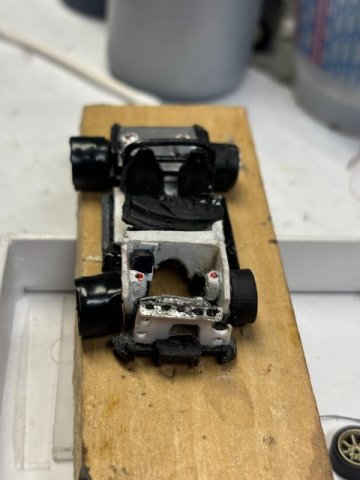
Engine Compartment was also constructed with Flat Plastic Sheets.
Note-Battery on the Left Side of the Firewall. The Radiator was mounted on the Fabricated Core Support
which has the Holes on both sides of the Radiator. The Strut Tops were painted Red Metallic.
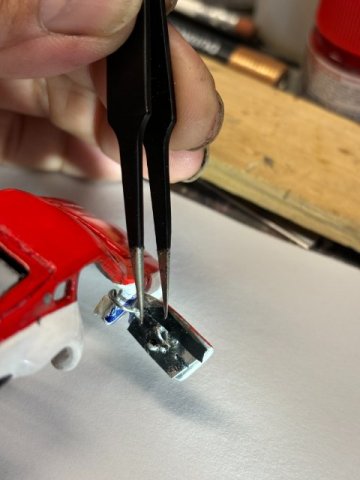
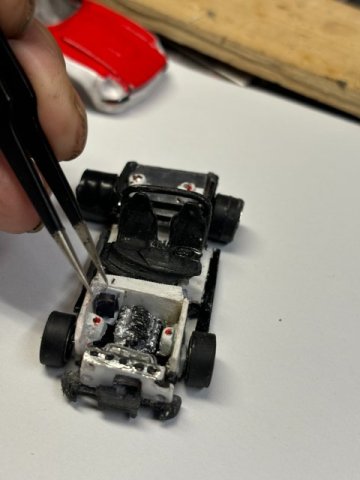
Tweezers had to be used to
installing all of the components (like brake master cylinder,etc)
Brake Master Cylinder
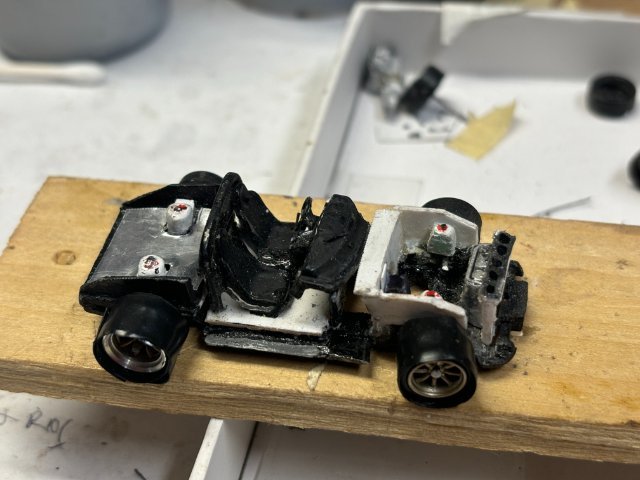
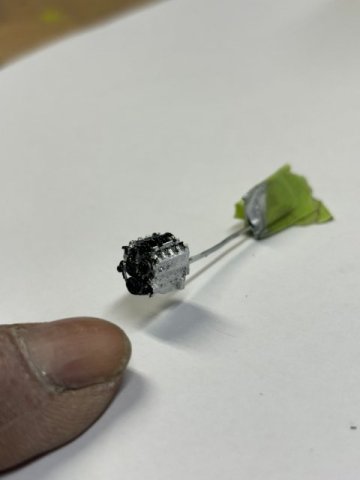
Finally, the LS3 motor (got from Ebay). but nobody made T-56 6speed
transmission. So I craved on out of Balsa Wood.
LS3 Motor detailed painted with Gloss Black on most engine components.
LS3 AND T-56 Transmission installed in engine bay.
Next-Detailing the Interior
-
2
-
-
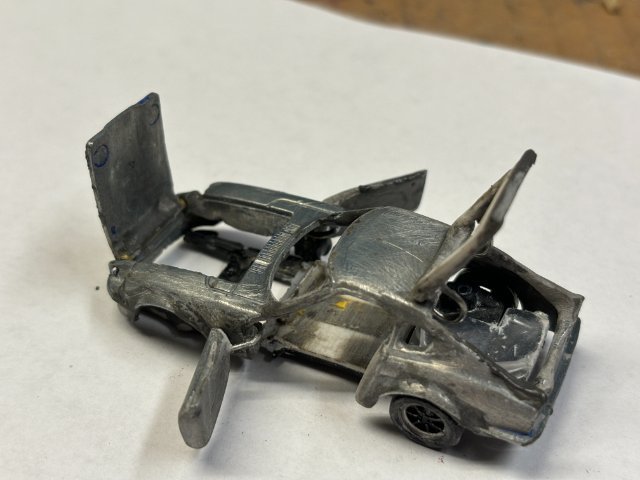
Creating Opening Doors and Hood-
First thing in creating Opening Doors is cutting the Doors from the Die Cast Body. A
Hobby Saw makes this easier if there curves involved besides just straight cuts,
Notice the Shape of the Wire( paper clip can be used). The Straight End will attached to the inside of the Door Panel and Cruve Side willbe attached to the inside of the Fender( a flat side of plastic will drilled for the Hinge Pin to be inserted). This will the Hinge Pivot Point.
The Body with Door Opening
The Door Hinge installed first on the Fender The Horizontal Side of Hinge can be glued to the inside of the Door Panel. You can use masking tape to test fit the door before gluing this end of the Hinge on the inside
of the Door Panel. Test Fit the Door by opening and closing the door and checking its alignment. You can carefully bend the Hinge till good alignment is achieved.
The Hood Hinge is easily made by drilling a .027 hole in the headlight buckets on both sides of the Hood.
Then a straight .025 wire is inserted between the Two Headlight Buckets. A Drop of Instant Glue can be used to fasten the Hood to this Pin.
Test Fit the Hood and Bend the Wire carefully to get the Hood Aligned properly.
The Car should resemble somewhat like this-Opening Hood and Doors with Hatch Open.
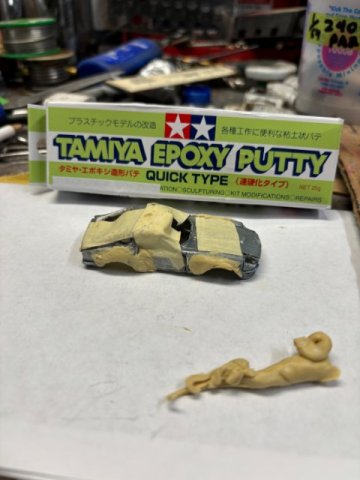
Body Work-Rocket Bunny Flares
Using Tamiya Epoxy Putty(available on Amazon) I formed the Putty into a Rough Shape of the Rocket Bunny Flares. Using a Sharp Knife, i sharped the Putty into Final Bodywork. Then Hand sanding with
# 80 Grit Sandpaper. Then going to# 400 Grit to get the surface smooth.
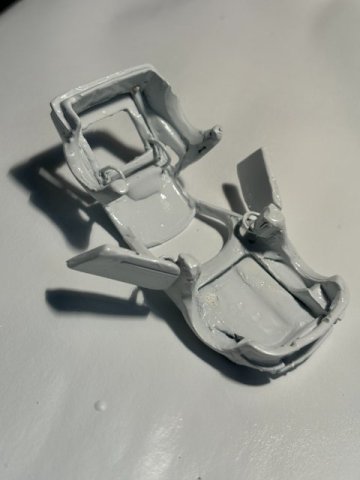
Priming the Car-
Now, the Whole Car must be Primed inside and outside with Primer Filler. This will cover any left over scratches and small imperfections.
Inside of Car Primered
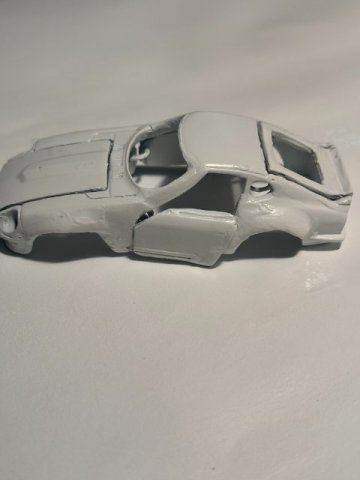
Outside of Body Primered.
Next-Sanding and Painting
-
Armorer, After much thought. I decided to use Incredible Extreme Muscle Car Garage one. He uses
the Ford Super Duty 8.8 Differential which is much Stronger than the older Ford Explorer one. The kit uses Ford Mustang Suspension Parts( Hubs, bearings,etc) which readily available. His Box Structure
for the differential makes the whole unit very strong. Watch his suspension work on that 8 second Green Z confirms this fact. Late Model Mustang used softer bushings in their rear suspensions. This caused
many Mustang crashes because of being excessively soft. Drag Racers ended up in replacing all of the Rear Suspension Bushings in their cars. The Super Duty 8.8 differentials also has 34 splines vs 32 splines in Explorer ones. More splines gives additional torque strength. Broken axles can make
the vehicle veer 90 degrees and cause a crash as there is no way to correct in time. Another reason to use a Super Duty 8.8 differential is it has a Torsion Limited Slip. Only a few Explorer 8.8 differential came with Limited Slip. I hope this info helps you make your decision.
-
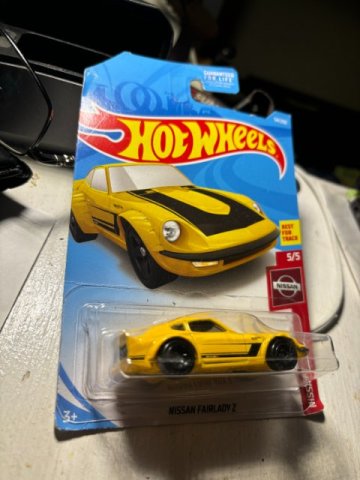
CREATING A HOT WHEELS 1/64 REPLICA OF MY 240Z
While awaiting my Ford 8.8 Differential Conversion Kit, I decided to create a Hot Wheels Replica of my 240Z. Sure I made a lot of 1/25 scale model cars when I was a teenager. But I never made a 1/64 scale car. Maybe some other 240z owners might be interested in process.
First, I started with a Hot Wheels version of a basic 71 Datsun 240Z.
This car must opened up by drilling out the two Rivets that secure the body
to the chassis. The body is stripped of all windows and prepared for paint stripping. Regular Automotive Paint Stripper can be used. This process should take only a half hour or so. The body shell is sanded with #400 sandpaper to provide smooth surface and eliminate any small burrs.
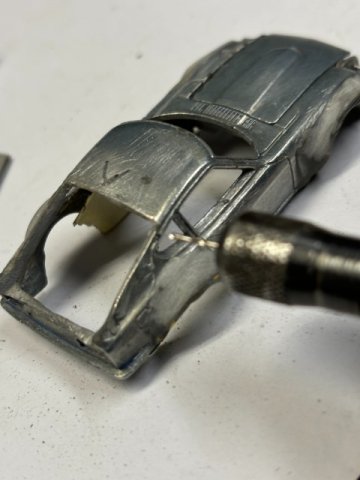
Now, the most difficult portion of this job is the creation of opening doors, hood and hatch of this 240Z. As this car is a sports car, cutting the body must be
performed carefully. I have used a regular hack saw blade to do the cutting. I would recommend to purchased a Hobby Saw(from Amazon). The Saw comes with blades small as 2mm and is much easier to handle in tight cuts.
This pic shows the cutting of the Rear Hatch with a modified Hack Saw Blade.
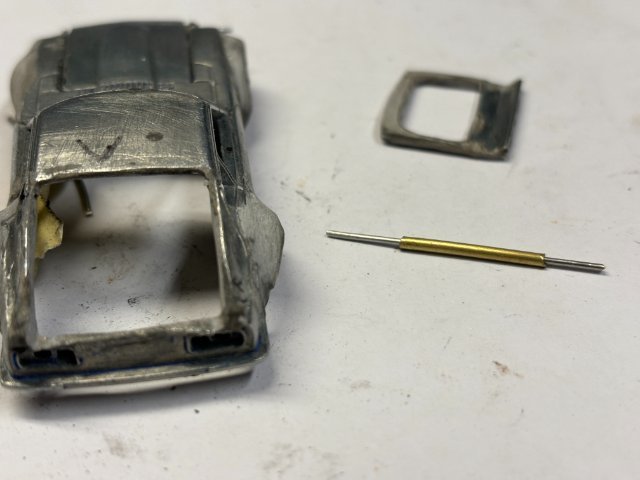
This pic shows a Pin Vise used to drill a .030 hole for the Hatch Hinge Pin.
The Hatch Pin and Hatch Hinge shown.
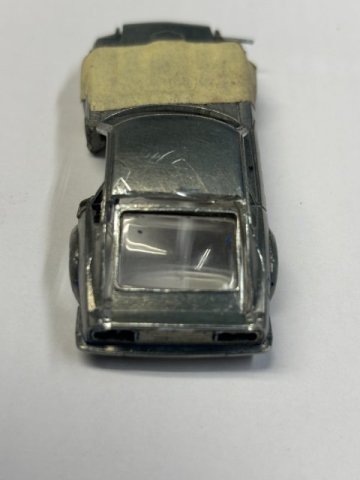
The Working Rear Hatch.
Next time, Creating Opening Doors.
-
I considered installing a late model Camaro Differential assembly into my 240Z. Mounting the Camaro would not be the biggest problem to overcome. Creating the Rear axle Bearing Housing connecting the Lower Rear Control Arm and the Strut Cartridge would be the Biggest Problem. It will needed to made of 3/8" Flat Mild Steel or Greater. A Machinist Lathe also be necessary to create the Bearing Housing. The Dimensions would have figured out by mostly trial and error. One, that Housing was made then you have get New CV Axles for both sides custom made. The Differential Mount would have to fit below the rear Frame Crossmember. The Differential Front Mount must allow for Driveshaft Angle. There are many factors that must considered before trying to installing any nonstock differential especially with Independent Rear Suspension Vehicle. My advice would be studied different Rear Differentials conversions on the market already and learn from them.
-
Finally, Preparing and Painting the car.
This video was very good to give you an idea of what a complete restoration (body work and painting) would look like. In this case, the vehicle was already in very good shape with only minor body work to do. The cost of this particular job would vary reatly depending on local labor rates, material costs,etc, Also, remember this vehicle was in excellent body condition, most Zs would seldom be in this good condition. So I would guess this job cost would range from $15,000 to$25,000 if done in the States. Maybe if you have a similar body work and paint restoration done, you post how much you paid and what region it was done.
-
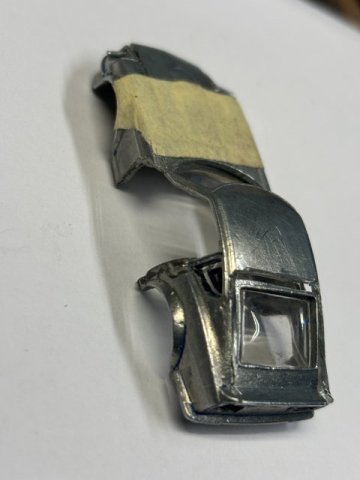
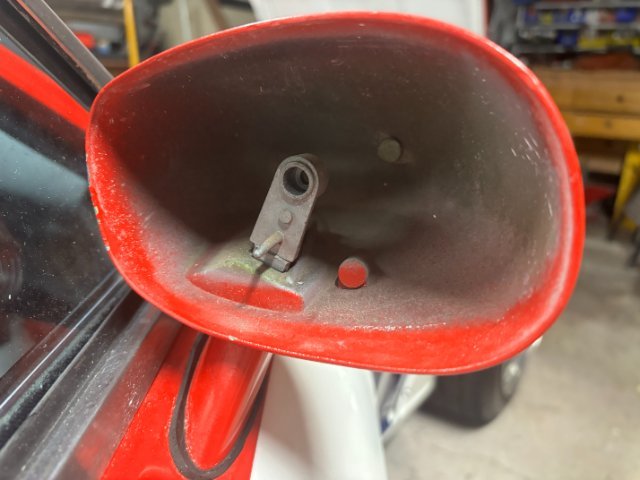
Replacing Passenger Side Mirror-
This topic is slightly off topic as my side mirrors are from &2 Camaro. But figured, some people might be interested in the process anyway. My Passenger Side Mirror fell off one night after I hit a Pot Hole. Not just the mirror itself but including the plastic mounting plate behind it. So I could not just purchase the Mirror itself. I would have to fabricate a swivel mount for the mirror and be small enough to fit inside the mirror housing.
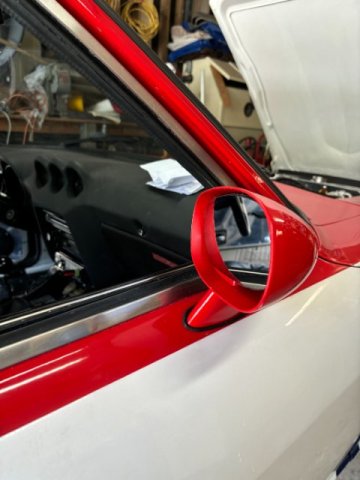
My Camaro Mirror missing its mirror
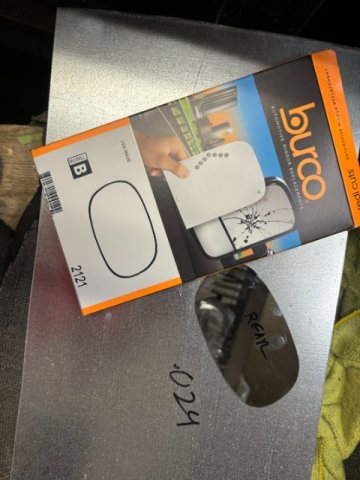
First, Ebay had the Replacement Mirror for 70-78 Camaro for $18.29-BurcoMirror Glass #2121.
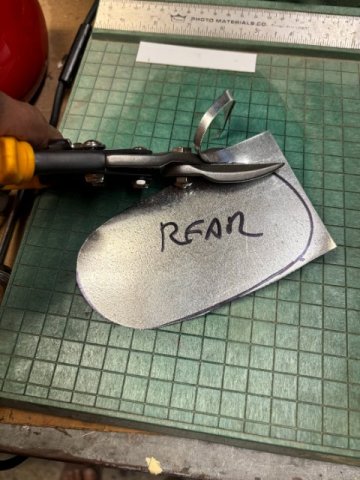
Only thing wrong was the mirror didn't come with a Backing Plate. So I traced and made a Template out of cardboard. I traced the Template over a piece of 16 gauge sheet metal. Shears was utilized to cut out Backing Plate.
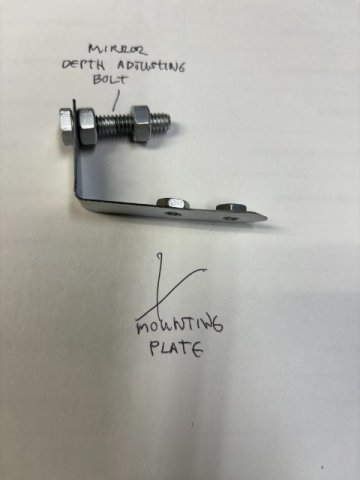
A 1/4" x 1" bolt was tacked to the rear of the Mirror Mounting Plate.
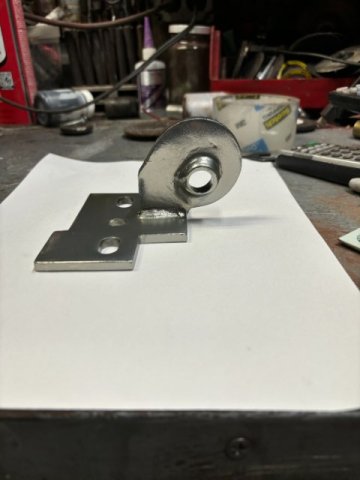
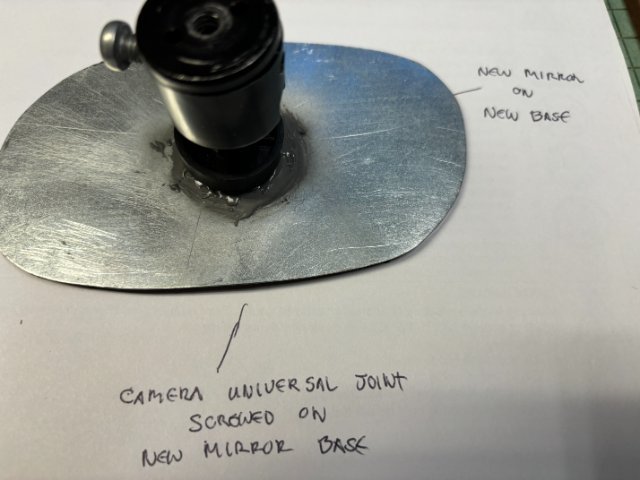
New Mirror attached to New Baking Plate Below that is the new Created Mount and new Swivel Mount
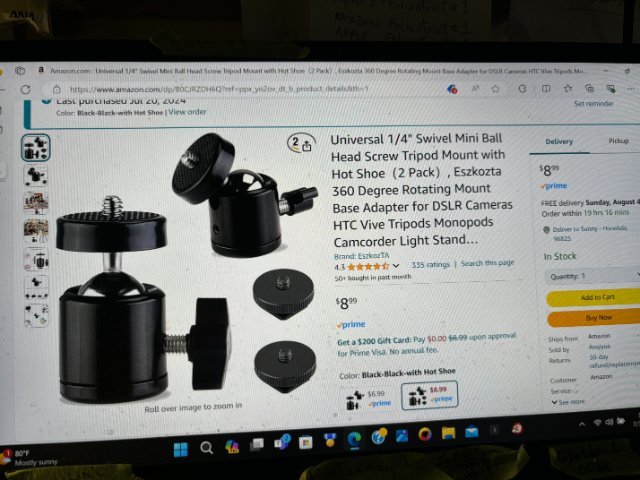
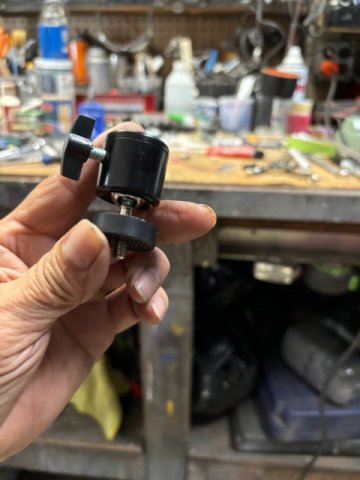
The New Swivel Mount was located on Ebay. It was a Universal Swivel Mount for small camera on tripods. Two Mounts were only$8.00. The main features were the mount was threaded 1/4" male on one end and 1/4" female threaded on the other end. Also, the Swivel Tension and Mirror Height could both adjustable. This feature was especially important in a custom installation.
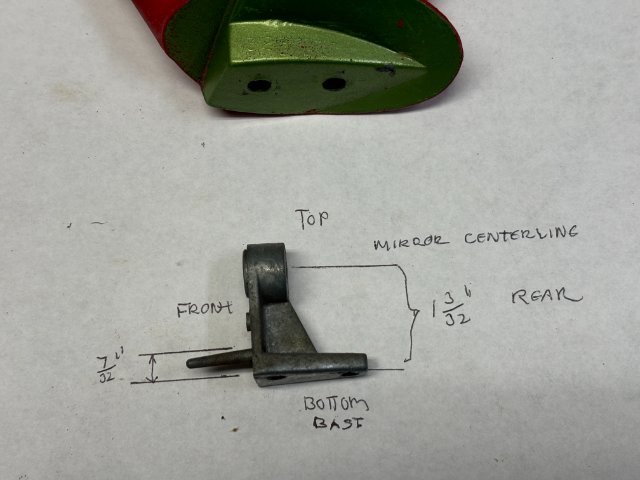
Note-Dimensions are on the left side of picture
Original mirror Mount Dimensions
New Mirror Mount for Swivel Mirror Plate
New Swivel Mount
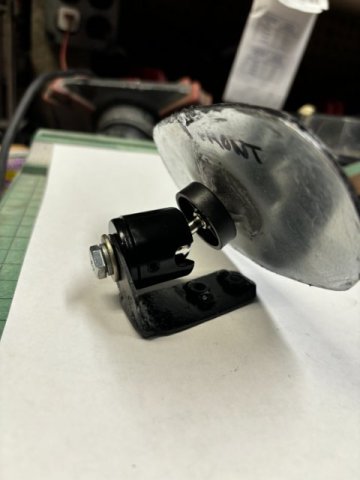
Swivel Mount attached to New Mirror Plate
Note - the Mirror Depth can adjusted by adding or deleting washers between mount and mirror
Note-Phillips Screw on Swivel Mount adjusts tension on Swivel.
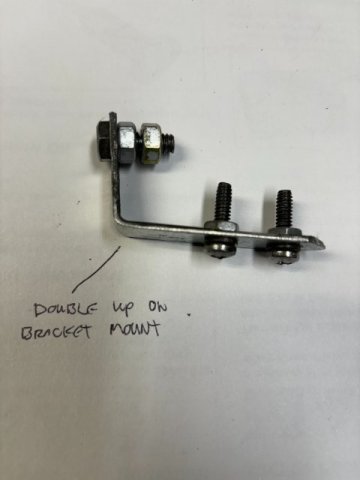
This pic shows the Double Plating on Mount Base to prevent Mirror Vibration.
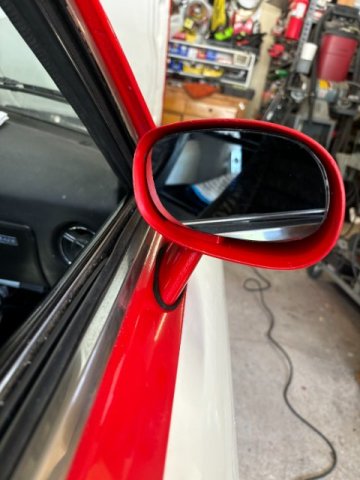
View of Mirror Assembled and Mounted
Closeup View of Completed Mirror
-
1
-
-
Sorry for the lack of photos in the previous post on Wrapping Door Handles. I had trouble loading pics
with the new IPhone Update. However, I now installed photos that went along with that posting.


 .
.


 Pic shows Sonan Adaptor on the Pinion Flange.


 raises vehicle by 3"
 jacking cross member


 Note-Battery on the Left Side of the Firewall. The Radiator was mounted on the Fabricated Core Support
 Tweezers had to be used to
 Brake Master Cylinder
 LS3 Motor detailed painted with Gloss Black on most engine components.
 The Body with Door Opening

 New Mirror Mount for Swivel Mirror Plate
 View of Mirror Assembled and Mounted
 Closeup View of Completed Mirror
password problem
in Site Support
Posted
Thanks for Repairing my PassWord Problem. Is there anything that I need to do prevent this problem from occurring again?
Toolman