

Erins.ZCar
-
Posts
28 -
Joined
-
Last visited
Content Type
Profiles
Forums
Blogs
Events
Gallery
Downloads
Store
Everything posted by Erins.ZCar
-
Love that color! Looks good keep up the good work!
-
I don't see anything on CL except for a Turbo ET Motor in Tulsa. Thanks anyways. If you a sepcific link, please PM me?
-
Thanks Dat260Z, you are about 1000 miles away from me. I'll keep you in mind if I don't find anything closer.
-
Dexter, Thanks I did see your ad. I would rather not put a turbo motor in a non-turbo car, too many variables since my daughter is 300 miles away from me with the car. Datsun Turbos are notorius for for needing alot of attention. Almost as bad as SU Carbs in my opinion. Appreciate the offer though! Have a Happy New Year!
-
My daughter blew the motor in her 76 280z this past weekend. Machine Shop wants two grand just for the block work. I need a good 75-78 L28 block I can rebuild. I can pick up in Kansas, Oklahoma, or Arkansas. Car is in Kansas now. Cash money! Call me 479-866-9667 please if you have a long block or a good used motor sitting around. Thanks!
-
1979 Fairlady Z RHD with No VIN Plate?
Erins.ZCar replied to Erins.ZCar's topic in S130 Series - 280ZX
I understand and appreciate your opinion here. The only point I am trying to make is that "for me", due to the combination of things I've listed previously, the vehicle is worth nothing to me. The VIN plate situation is only one of those reasons. I have been collecting, restoring, and selling custom vehicles for 30 years in my spare time. I have learned to walk away if it looks like a duck and smells like a skunk. I brought this situation to this forum for other opinions and because I could find no old threads similar. I can happily say that if anyone else runs into a similar situation your information will help them make the right decision for themselves. Thanks again for your info. I only quoted your earlier statement because you referred to the fact it should have some kind of plate if legally imported. Honestly, I thought you were joking about the Dymo Label. Sorry I misunderstood. Take care! -
1979 Fairlady Z RHD with No VIN Plate?
Erins.ZCar replied to Erins.ZCar's topic in S130 Series - 280ZX
I don't want to argue about this. The concern for me was as you stated above "if imported to legally comply" it should have some type of VIN plate or FMVSS body tag. The condition of the car, the possible title issues, and the questionable body modifications done did not warrant any kind of offer from me. It surely wasn't worth, in my opinion, the value of my 76 coupe nor was it worth the possible time and money I would have to spend if I encountered title issues were I to buy it. Thank you for your time and opinion, as well as everyone else's. This is the best Z community I have found! -
1979 Fairlady Z RHD with No VIN Plate?
Erins.ZCar replied to Erins.ZCar's topic in S130 Series - 280ZX
Just got from from seeing this inigma live! I feel so bad for the current owner. He was sold this car as some one of kind special vehicle and it is a cobbled up POS. No VIN plates anywhere, no holes in the cowl behind the battery or on the shock towers to indicate a plate was ever attached either place. There's no VIN plate on dash or even the FMVSS body tag to indicate this car was even legally imported. The rear hatch is just as I thought it was, a Panteta hatch with a whaletail spoiler very poorly glassed on to the back end. Both rear quarters are shot and need replaced. Doors skins are rusted thru in multiple places. The motor appears to be an 82 L28ET and has been pulled for at least 3 years. There is a 5 speed trans for it that I don't think came with the car or motor. The only two positives I saw was the fiberglass cowl hood and the original power remote fender mirrors. The hood is definitely professionally built of dense fiberglass matting using a mold of the original hood. Then they cut a rectangle in the center of the hood and mounted and blended a 4" raised cowl with vent pockets in front of the angular cuts into the hood for air flow. Not my particular taste, but very well done. I have never seen and can find no pictures of that cowl design on the internet at all. The drawback to the remote electric mirrors are they ABS plastic housings, cleaned, sanded, and repainted they would nice. I suggested that the owner consider parting everything out since it is already taken apart completely. He bought it on a Missouri bill of sale and never titled here in Arkansas. It was registered in MO last in 2008 which requires vehicle inspections as indicated by the window sticker, so I'm confused how it was titled without VIN plates. Oh well, it's his problem not mine! I suggested he register here and sell the parts, hopefully there will be an influx of RHD parts soon. Thanks again for all the advice! -
1979 Fairlady Z RHD with No VIN Plate?
Erins.ZCar replied to Erins.ZCar's topic in S130 Series - 280ZX
Thanks all! This VIN plate deal really concerns me. I'll look at it and take some better pictures and we'll see what happens! -
1979 Fairlady Z RHD with No VIN Plate?
Erins.ZCar replied to Erins.ZCar's topic in S130 Series - 280ZX
Current owner says it went from California to Missouri according the guy he bought it from and that it was SCCA raced in CA supposedly. I love my 4 speed coupe and hate the idea of trading it for a non-running project but if this is a rare car and not cobbled-up piece I don't want pass it up. -
1979 Fairlady Z RHD with No VIN Plate?
Erins.ZCar replied to Erins.ZCar's topic in S130 Series - 280ZX
He needs a daily driver and wants to trade for my 76 280Z coupe. I value my coupe at $4K. The Fairlady has the motor pulled and not been on the road since 2008. The missing vin plates do concern me especially since he has no title. -
Looking at buying what appears to be a true RHD Fairlady Z. Weird thing is it has no VIN plate behind battery or on shock towers or body tag on door jams.The cowl has the VIN S130-008634 stamped onto it. It also has a bizarre cowl hood and what appears to be a Pantera Hatch with a Whitetail spoiler glassed in. Has anyone ever seen anything like this? Problems uploading pics right now, will try to add later.
-
280Z Starts, Runs One Minute and Dies
Erins.ZCar replied to Erins.ZCar's topic in S30 Series - 240z, 260z, 280z
As usual you are 100% correct in the cause of the corrosion, Pharaoh! I felt I had rambled on long enough about the issues I had and forgot completely to describe my findings for the cause. During the paint job, we removed the cowl panel and found rust thru in several small areas. Repaired that rust but failed to inspect under the dash intensely enough. She gets a kick out of all the "old men" as she says who give her the thumbs up as she is driving! Her friends at school are definitely jealous! -
I was almost ready to deliver a 1976 280Z Restomod to my daughter 6 months late after her 16th Birthday! We started the car up and went to pull it into the shop for final buffing/touchups and low behold the engine died and would not restart. Needless to say my daughter was heartbroken. The car would crank but not start. If the engine was cold, it would start, run one minute or less and then die and not restart for hours. At first check my plugs were all soaked with fuel so we thought "flooded" clean the plugs, suck out the cylinders dry and and try again. No luck, no start. Pulled the plugs and checked again, dry as a bone no fuel in cylinders. Next, even though the fuel pressure measured correct before and after the fuel rail, we replaced the fuel pressure regulator just in case and still not the solution. Started intense troubleshooting with the EFI Bible and FSM. Replaced the MAS after cleaning the contacts and still nothing! Cranks just fine when cold and would start and run for a minute and then die and refuse to start until cold again. Checked the throttle position sensor, air temp sensor, water temp sensor, cold start valve, and thermotime, nothing! Still would start when cold most of the time but die after less than a minute. Double and triple checked the injectors listening to ensure the injectors continued to fire after the engine started and we weren't losing pulse, still no good. So what does the bible say after all these checks, replace the ECU! Luckily, I thought I already have a spare ECU for my 1977 FI 280Z. Guess what, doesn't work, wrong part number. Here's where ECU's get tricky I found out. The 1975-76 Auto Trans FI models use ECU A11-600, the 1977-78 Auto Trans FI models use A11-601. My 1976 280Z 4-Speed Coupe uses the A11-601 ECU! So off to Ebay to find an ECU to match A11-600 in my daughters car. Two weeks later it arrives and we plug it in and walla, nothing... It starts and runs less than a minute and dies and won't restart! Totally frustrated and confused we start the troubleshooting process again re-checking every pin on the ECU harness and we suddenly notice that Pin 1 is giving us varying voltages of .3 to 12.7 volts. At 12.7 volts the engines starts, runs less than a minute and dies, when we re-check the Pin 1 voltage and try to restart the engine we get .3 - .7 volts. Bingo! Finally we have a negative reading we can start tracing! So where does Pin 1 on the ECU connect to? The Ignition Input Circuit! We started tracing the wiring harness for the Ignition system around the engine compartment and back under the dashboard and find terminal corrosion on the connectors under the passenger side glove box. Cleaned the terminals and connectors and applied a generous dose a electolytic grease and instant start and run! Thank goodness for excellant mechanics and friends who spent 2 weeks with me crawling under the dashboard and hood testing and retesting component after component to find the issue and resolve it! I hope this might help someone else in the future. If your Pin 1 on the ECU measures anything less than 12 volts, you have an electircal problem not mechanical! You must have 12 volts on this pin for the car to start and run, if the votage drops after it starts and dies check the ignition circuit connections under the glovebox. Clean and grease those terminals because the corrosion heats up after ignition and interrupts the connection of power to your injectors. Good luck!
-
Erins ZCar 1976 280Z 2+2 Restomod
Erins.ZCar replied to Erins.ZCar's topic in S30 Series - 240z, 260z, 280z
Finally.... Delivered the car to my daughter 6 months late after her 16th Birthday! Would have delivered it a month ago except the weekend I was going to deliver it to her in Kansas several new problems arose. First door handle and lock mechanism broke on passenger side door and I had to replace both and then repaint with Black Chrome. As soon as we replaced those two items we started the car up and went to pull it into the shop for final buffing/touchups and low behold the engine died and would not restart. Needless to say my daughter was heartbroken. At first my plugs were all soaked with fuel so we thought "flooded" clean the plugs, suck out the cylinders dry and and try again. No luck, no start. Pulled the plugs and checked again, dry as a bone no fuel in cylinders. Next, even though the fuel pressure measured correct before and after the fuel rail, we replaced the fuel pressure regulator just in case and still not the solution. Started intense troubleshooting with the EFI Bible and FSM. Replaced the MAS after cleaning the contacts and still nothing! Cranks just fine when cold and would start and run for a minute and then die and refuse to start until cold again. Checked the throttle position sensor, air temp sensor, water temp sensor, cold start valve, and thermotime, nothing! Still would start when cold most of the time but die after less than a minute. Double and triple checked the injectors listening to ensure the injectors continued to fire after the engine started and we weren't losing pulse, still no good. So what does the bible say after all these checks, replace the ECU! Luckily, I thought I already have a spare ECU for my 1977 FI 280Z. Guess what, doesn't work, wrong part number. Here's where ECU's get tricky I found out. The 1975-76 Auto Trans FI models use ECU A11-600, the 1977-78 Auto Trans FI models use A11-601. My 1976 280Z 4-Speed Coupe uses the A11-601 ECU! So off to Ebay to find an ECU to match A11-600 in my daughters car. Two weeks later it arrives and we plug it in and walla, nothing... It starts and runs less than a minute and dies and won't restart! Totally frustrated and confused we start the troubleshooting process again re-checking every pin on the ECU harness and we suddenly notice that Pin 1 is giving us varying voltages of .3 to 12.7 volts. At 12.7 volts the engines starts, runs less than a minute and dies, when we re-check the Pin 1 voltage and try to restart the engine we get .3 - .7 volts. Bingo! Finally we have a negative reading we can start tracing! So where does Pin 1 on the ECU connect to? The Ignition Input Circuit! We started tracing the wiring harness for the Ignition system around the engine compartment and back under the dashboard and find terminal corrosion on the connectors under the passenger side glove box. Cleaned the terminals and connectors and applied a generous dose a electolytic grease and instant start and run! Thank goodness for excellant mechanics and friends who spent 2 weeks with me crawling under the dashboard and hood testing and retesting component after component to find the issue and resolve it! Now onto the final pictures! I added the 350Z Circle Z Emblem to the lower valance of the Front Spoiler after Black Chroming I removed the original 280Z Fender Emblems, welded the holes, and placed the 350Z Fender Emblems in their place Took the 15x8 205x60x15 Wheels and tires off my 76 Coupe cuz they look so much cooler on her car! Replaced the side markers with clear lenses and amber LED bulbs just becuase I could and installed clear headlight covers! Replaced the B Pillar Vent Emblems with generic C-Type Vents because my daughter says it looks cool! Along with the 65 Mustang tail lights I inserted the original fender emblem to maintain some throwback memories! Also, I added LED multi-function brake, turn, and reverse lights into the rear skirt vent for added visibility. The license plate cover also has a third eye brake light as well license plate light. Finally, the customized interior with the Houndstooth cloth inserts! Beats sitting on scalding hot vinyl in the summer! -
Erins ZCar 1976 280Z 2+2 Restomod
Erins.ZCar replied to Erins.ZCar's topic in S30 Series - 240z, 260z, 280z
Thanks! Waiting to finish Liquid Glassing before I add the new emblems and final touches. Sorry, been on vacation with the kids and just got back to check the forum. Appreciate the comments! -
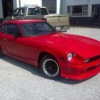
Finally almost done with my restoration of a 1976 280Z 2+2 for my daughter! Interior installation, paint touchups, and new emblems left to complete this 2 year project. A little background first! I love Z's and was looking for a new restoration project two years ago. My daughter had already decided when she was 10 years old she wanted a Mustang for her first car and being the loving father I am, I told her I would buy her one for her 16th birthday if she maintained her grades despite my personal distaste for the cars. One weekend three years ago, we were headed to the movie theater and I saw a 1978 280Z coupe at a used car lot on the way and had to stop and check it out. Halfway thru the test drive my daughter suddenly saw the light and announced she had changed her mind and wanted me to build her a 280Z because it was so much cooler than a Mustang and no one at her school would have a clue as to what kind of car it was! She is not follower and constantly bucks the status quo every chance she gets. It had been quite a number of years since I had worked on a Z and was looking for one for me to restore for myself but who can deny the next generation the beauty and power that is the Z! So my quest began the following weekend for a 2+2 to restomod for her. After about 3 months of searching I found a CL ad locally (about a 2 hour drive actually) with 1977 280Z 2+2, Auto Trans, perfect dashboard, SU Carbs!!, and a dark metallic blue, yay no color change needed, saves me a little on paint and sanding! PO claimed it had been running until recently when he developed fuel line problems and parked it not having the money to fix it. I picked it up for what I thought was a steal at $700 considering he started at $1500, rented a car dolly and headed home towing my conquest. As I began work to get the motor running I quickly determined the car had not been running for more than 7-8 years because the fuel had spoiled, fuel lines were filled with molasses, gaskets were separated and every time I cranked the motor, tar spewed from around heads. Not good at all! Thankfully, Slow78Z forrm this forum had just listed his 78 L28 with Auto for sale so he could do a V-8 swap. I drove up to Topeka, KS(3 hours) in January 2011 in record snowfall condition to claim my prize. Slow78Z had the motor and trans already on a pallet and all the extra parts boxed up and ready to go upon my arrival. Great guy and very helpful! I returned triumphantly to my garage and unloaded my prize and then spent the next 3 months in the hospital with kidney problems. Spring arrived and my health had returned so it was time to get going on the car. So off to media blasting first because during my health layoff, paint had started to peel all over the car especially the door jams, revealing the dull red original poorly sanded paint underneath the dark blue crappy paintjob as well as bubbles under the paint I had missed on first inspection. So here we start with the first set pics and you can tell from these that my luck had not changed yet: Devastating amount of bondo and rust throughout almost every major body part makes this a total waste of time for me. The bondo on the sides of quarter panels is not filling hail dents, these are 1/4" layers of bondo covering holes from rust thru of the body. Light steel work and patch panels I can handle with no problems but full inner and outer skin replacments, rocker replacements, on top of an engine/tranny swap was too much for to take on at that point. Best option, right off $1500 invested at this point and find a better car to start all over with. Craigslist to the rescue and the plethera of Z Cars over in OKC, OK it seems fate is smiling again! $3K for a low mileage 1976 2+2 280Z with auto trans and a fair interior. Running and driving nicely but with a lot of brake noise when stopping. Better than swapping a motor out! No hood vents on a 280Z? That was new to me! Weak Silver paint job over original silver metallic with an interesting painted pin stripe pattern... Nice scratch down the driver's side fender, easily workable metal issue... The worst rust found on driver's rear quarter at the bottom, will require some new steel welded in for sure... Surface rust under paint on passnger's rear quarter, smaill pin holes would be found and brass soldered after treament... Passenger's fender had small dent at edge of body line, a little hammer and dolly... FI L28 clean as a whistle, will replace all the gaskets, seals, hoses and do a full tune up to ensure motor is clean as it looks... These have to be the ugliest the tail lights anyone had ever put on a 70's car! That's OK, i have a plan to surprise my daughter with an omage! And right to the plan I go... First I remove the old tail lights and surrounds... Then I use a partial sheet of 1/2" foam insulation to make a template... Template cut and new tail light buckets fitted for mock up... Yes, that's right 65-66 Mustang tail lights mocked up on template! I will have to grind down the top edge of the repro light trim because the top edges are thicker than the bottom due to the sloped tail light panel on the Mustang. Now off to the machinist with the template and have the new panel cut from 18 gauge steel. Once it is welded in and skim coated it will look factory installed, hopefully! Next step while the machine shop works their magic I remove the park benches and alos remove only the front bumper shocks, these will be re-purposed later, but I cut off the rear bumper shocks first leaving the open tubes of the shocks, just wait, you'll see why! Don't forget if you cut off the bumber shocks at the tubes, remember to release the pressure and drain the fluid out before cutting off the shock tubes! Here's the custom bumper supports my body man and I came up with. Using 1" square tubing we removed the shocks from front bumber mount plates and welded the tubing perpendicular out and then welded another piece of tube across to provide front bumper crash protection of up to 10MPH. We welded the tubing directly to the rear shock tubes for rear skirt support and protection of the gas tank up to 10MPH crashes. While the body shop completes the front and rear skirt/bumper supports I pull the seats and make a run to my local Hot Rod Holstery shop. My daughter had changed her mind on color from dark metallic blue to a bright red, "as bright a red as you can find" were here exact words! I find a remnant of red and black Houndstooth heavy duty cotton fabic on Ebay and know exactly what to do with it! It's winter time now and auto upholstery shops are hungry for business so I negotiate a sweet price of $700 to repair the vinyl and insert the Houndstooth into both front and back seats. Sorry a little washed out color due to the bright sunlight... Oh yeah, before we added the bumper supports, I took the vented hood off my 76 Coupe and swapped it out on her car so we could trick out the hood with a little custome mod... Before I show you that mod, I mock up all the fiberlass parts. I bought the MSA Type 3 front and rear skirts, MSA Type 2 side skirts, and Classic Z Spoiler. Once mounted and mocked into place, you need to make sure all gaps are consistent and fit is type against the body. Simple trick I use was to place duck tape on the body centered behind the edges of all fibergalss parts. Once all the edges are trimmed to allow for a tight fit against the body I fill any gaps with polyester body filler so that all gaps are smoothed right up against the body. The aluminized duck tape does not allow the filler to adhere to the body and provides easy separation with a nice smooth fit. All the body peices can now be removed for sanding, priming and blocking. Now back to the my little hood mod! A little trip to the interweb and Ebay lands me AutoLouvers store where I find some louvered panels- 11 louvers, angled, 7"x16" panels... Now we trace the original vent shapes onto the new louverd panels, cut them out, test fit and trim if needed. Warning never weld on these hoods if you can avoid it! You are dealing with two layers of thin sheetmetal and warpage can occur very easily! Now that we have our perfect fit, get some 3M two-part epoxy. Read the directions thoroughly and follow them precisely. What we did here was use the 3M epoxy to "weld" these two metal sheets together. When done properly this 3M epoxy is stronger than steel you are bonding together! It is also sandable once cured so apply it liberally and don't be afraid to ooze it out of the seems and lightly smooth leaving you plenty of excess to sand done for smooth lines and factory finished look. Secure each panel in place with "C" Clamps temporarily. You have plenty of potable time for adjustment, while scured in place with the clamps place a self-tapping screw every 2" around the outside edges to ensure a secure bond and to force the excess epoxy out of the edge lines to provide a smooth tight finish. Once cured out 24 hours later you can simply remove the screws(some may have to be grinded off) and then you can start sanding the excess epoxy off with 80 grit and then use a polyester filler for final sanding and to fill your screw holes. This is how it should look after sanding and priming! Now to the rest of the body repairs, priming, and final blocking! Hail dents removed from roof and ready for skim coat. DA sanding the two layers of silver metallic and then on to skim coating... Now to the first quote of primer! And finally your first look at the modded tail light panel welded in. Sorry but earlier pictures were corrupted and lost... After days upon days of block sanding progressing from 300-400-600-800. We are ready for the first color coats! I chose the redest red you can find 2012 Ford Race Red Code PQ. This is a two stage paint used on Ford Focus, Mustang, and Special Order F150 Trucks. Stock paint makes it easily available for repairs and touch ups. So now we have every thing painted with 4 coats of basecoat each coat color sanded with 800 grit. Then it's on to 4 coats of clear for that glass like shine. Color sanded again and then buffed out for final assembly. Here it is as it came out of the paint shop on June 14th, 2013 partially assembled. I am currently installing the custom grill screens I made and painted satin black. I also have 350Z emblems to replace the fender emblems and the Nissan Z front emblem in black chrome for the nose. I also, used Dupli-Color's Chrome Blackout to give that black chrome look to all the original chrome around windows, roof rails, door handles, and locks. Still have to finish installing interior, stereo, speakers, fog lights, new carpet, re-surfaced interior trim pieces, and whatever else I forgot to do earlier! I will post the final pics in the next couple of days as I finish things up! Thanks for reading along and let me know what you think!
-
sorry, I wasn't implying that insurance would cover damage completely. Any customization to a vehicle is subject to underwriter approval. Probably best to to validate with your insurance company before modifying or go to an specialty insurance company like Haggerty.
-
The park bench bumpers were added at the last minute to accomodate US regulations for 5 MPH crash bumpers. I've never heard of a state in the US, don't know about Int'l laws, requiring additional protection above the regulations that were in place at the time of original manufacture. That being said, it's a matter of choice. Unibody designs with frame rails are a reasonably safe design. Since we used the original bumper mounts and mount points welding the square tubing directly to the mounts, I have the same amount of protection, if not more. I just don't have shock absorbance obviously of the park benches.
-
Luckily here, the cops don't enforce those laws when you have an Antique plate on the car. Although, our definition for an "Antique Plate" states the vehicle must be restored to original condition. Thank goodness most have never seen a ZCar in original condition around here to compare too! Good luck, I hope the judge gives you a "grandfather clause" exception.
-
125 Steps to Perfect Paint The only use I have for wet sanding is in the final finish after painting or between basecoat and clear stages. This is used to remove any contaniments and orange peel effect before clear coating and after clear coating. I would never use wet sanding to strip paint my self. As far as primer color, most auto paint has "Visibility(VS) I think it is called" rating which can help determine what color primer to use before basecoat. Different colors of primers will effect the final color or your paint. Always have your painter shoot a test card with the VS Rated Primer Colors first and your paint color and after it dries completely take it out into bright sunlight to decide what test strip is the color and shade you are desiring. Most paints are somewhat transparent and will change shades of your basecoat. Work with your professional painter closely! Using a sealer is a good idea if you want a showroom finish but not neccassary for a daily driver. The first time I tried to save money by prepping my car for paint first by doing all the sanding, priming, and blocking first ended up being a complete waste of time on my part. The painter had to re-sand the entire vehicle, re-primer, and block out again because I used the wrong rated primer for my two stage paint. If you are wanting a daily driver paint job consider and use all the good advice in this thread. If you want a showroom finish, stick to the basics we are describing here, body and steel work with basic primer, but let the professionals provide the final blocking and paint work. Good luck and can't wait see your ride!
-
If I strip by hand I start off with 80 grit and sometime 26 grit when dealing with rusted areas. By the time I put in the effort, time, and money for supplies, media blasting is my preferred method for paint removal. In the midwest I'll pay as much as $800-1000 for media blasting an entire car. I imagine with the number of metal shops in your area the price might be more reasonable. Search this forum and you'll find lots of help regarding this subject already and maybe even some local suggestions for media blasters. Good luck!
-
Had sunroof, now hole. Patch hole or replace roof?
Erins.ZCar replied to ccwade81's topic in Fabrication / Welding
On the wrong side of the country for you but just listed last night... Click -
Type 2 body kit, anyone build in collision protection?
Erins.ZCar replied to afbrian13's topic in Body Kits & Paint
I just posted this last week in Fabrication Forum. Minor crash protection and support for the skirts. Click Here -
No more chance of tweaking the frame rails with the park benches installed, since I am using the original bumper shock mounts. Also, I do plan to use "bed-liner" on the inside of the fiberglass bumpers after paint and then fill the skirts around the support bars with expanding foam insulation for additional support and protection. Originally thought about cutting down the original bumpers, releasing pressure from the bumper shocks, collapsing the shocks, and welding the shocks into a fixed position but that was going to be too tight of a fit behind the fiberglass. Also considered leaving the bumper shocks in place, collapsing them, and welding a 3/8"x3" wide steel bar across the bumper mounts, but decided to go with steel tubing so I could support the underside of the skirts from downward pressure. Cool discussion guys, thanks!