redneck1545
Members-
Posts
216 -
Joined
-
Last visited
-
Days Won
1
Content Type
Profiles
Forums
Blogs
Events
Gallery
Downloads
Store
Everything posted by redneck1545
-
Is this worth purchasing?
redneck1545 replied to hatepotholez's topic in S30 Series - 240z, 260z, 280z
I bought mine from a junkyard in 06' for 150 bones. I then let it sit in my yard for a few years while I built up "funds" to build it. I finally started stripping it about 2 years ago which lead me all the way to the rotisserie stages. Rusty floors, doglegs, rear hatch area, wheel archs, and battery trays are the norm. I have cut out most of that stuff and replaced it with new metal...I didn't know how to really weld when I bought the car and its been a learning experience ever since. Don't worry so much about whether you can do something now, all that matters is that you find out how to do it right before ya take it for a test drive! And as far as budget...geez....Lets just say I wake up EVERY day searching craigslist and here on the classifieds looking for "parts"...yep thats right, I've got most of the stuff to keep me busy for quite sometime now but ya never know when you'll stumble upon that deal of the century kinda thing and its for a part your nowhere close to needing but you'll want it on the car before your driving it around town! haha I think I did a rough estimate the other day and I've wrapped up about 5k in this car and its STILL on the rotisserie and does not look like a show car chassis or anything remotely close to a barret jackson auction car in the making. But you know what, it sure is fun to go piddle in the garage with it every now and then to break the day to day routine!!! -
^^^ haha, mine has been quiet for far too many years as well...I wish I could complain about exhaust droning
-
You know you own a datsun when you've done everything from fred flinstoning, drag launches, and high g-corners all in a stripped unibody sitting on a rotisserie just hoping the thing doesnt flip upside down with you still inside...but you physically couldn't do any more work on her until you took her for a "test drive"
-
I don't think you want to be using cutting torches to cut the kind of tubing were talking about.
-
Coil-over install - sectioned struts
redneck1545 replied to redneck1545's topic in Brakes, Wheels, Suspension and Chassis
Thanks! I get bored far too often in this crappy town im stuck in for the time being, so time is not something I mind spending lol. As far as the rotisserie yea its just two engine stands. I bought two harbor freight engine stands when they were on sale and then chopped them up and added about a 1' section of whatever size metal the upright was made out of. I made the "arms" out of 1.5"x1.5" square, welded them to the "engine" backing plate that came with the stand, and cut holes appropriately where needed and mounted them to the front and then to the the rear bumper mounts. i actually used this idea form a neighbor and then looked at some pics on here to make it work for the z car. I'm not the first person to use engine stands for a rotisserie on here...in fact there is a whole thread dedicated to the topic i believe. Go look for it. Much cheaper than buying a "real" one. I think I have about 200 bucks in the whole setup and my car has been flipped about a 100 times, been through about a dozen trailer hauls and is still holding strong. I cant take some additional pics if you want them. -
Coil-over install - sectioned struts
redneck1545 replied to redneck1545's topic in Brakes, Wheels, Suspension and Chassis
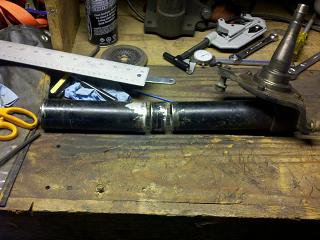
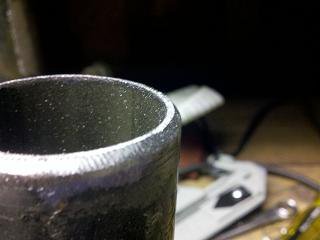
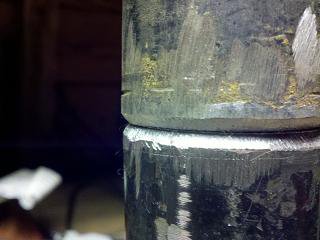
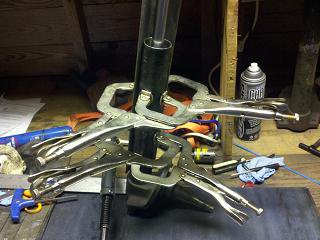
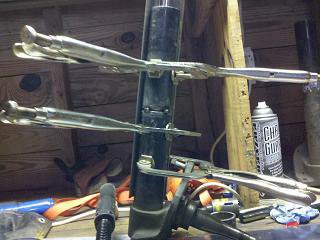
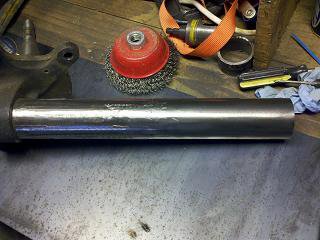
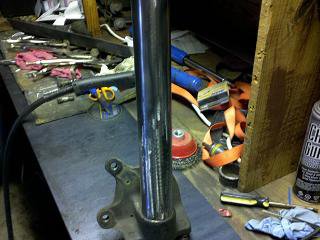
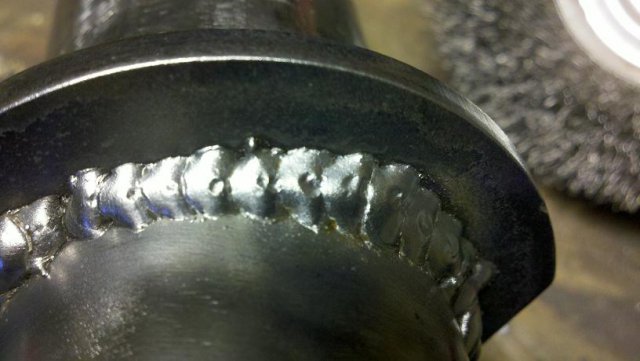
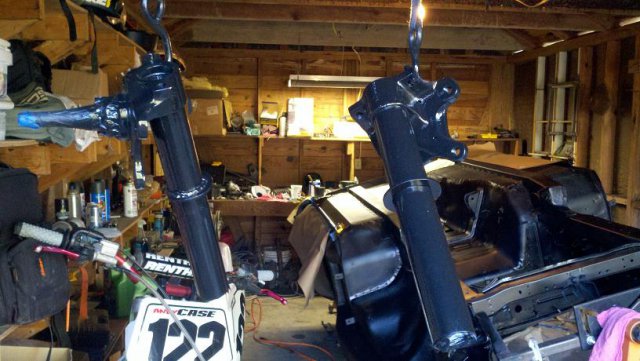
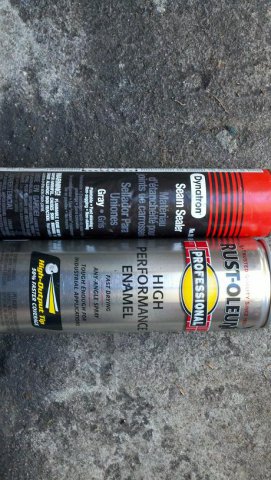
Finished the sectioning and painting so here are the pics. After remoiving the desired amount from the strut I beveled both sides at about a 45 degree angle to make sure the weld had enough area to "fill". I took a piece of 2x2 angle iron 1/8" thick and placed both halves of the strut housing inside it. Using four c-clamps I made sure they were aligned and dropped the insert inside the strut housing just to make sure. I left the insert in the housing while adding about 6 tack welds. After I welded all the way around the housing ensuring that no weld protruded inside the housing I took an 80grit flap disc on an angle grinder to smooth everything out. I followed that up with a crimped wire wheel to try and further smooth out the imperfections in the castings. heres the difference in an 80grit finish vs wire wheel. After cleaning the entire housing I located the spring perch by taking my thread collar and placing it on the housing. Using the measurements found on Johns website I tacked the back side down so as to allow me to center and square up the rest. The important thing here is to make sure the threaded collar sits flush ALL the way around the perch. If its cocked off to one side you will see a gap between the threaded collar and the perch when weight is put on the car...not a good thing. Heres the perch welded. prepped for paint and painted! Pictures really dont do it justice, this stuff after about three coats resembles a smooth high gloss powder coating more than rattle can paint. Here's the paint I used in case anyone is wondering. Anyways, thats all for now on the coil-over install. More to come in my other threads! -
My plan was to spray as much as i could before applying seam sealer. I'm I in the wrong to do it that way? Kinda too late seeing as how I only have an engine bay left to spray but figured i'd ask anyways.
-
Im planning on using the ZeroRust as a base sealer so to speak. I plan on only having the exposed coat on the car for less than a year before I tear it all back apart and spray some undercoating on the underside and a top coat on the interior. But thank you for the heads up! Looking back are you happy with zero rust or would you recommend por15 or something similar in the future?
-
But as John stated above, you generally do this for style meaning you dont care about functionality/performance as much, or you do it because you dont have a centerline radius die that will fit the tubing your working with.
-
Coil-over install - sectioned struts
redneck1545 replied to redneck1545's topic in Brakes, Wheels, Suspension and Chassis
Now were getting somewhere. I wanted a more precise cuts with simple measurements...One thing you probably never took into account was the thickness of the blade on the chop saw you were using. I wanted to know EXACTLY how much I would have to section and measure everything with a dial caliper and came up with the exact measurements to within about 0.010" and both struts are exactly the same. Johnc posted on his site and his recommendations as to how to go about sectioning struts. He owns a race car fabrication shop and I value his take considering his history and knowledge base about this very subject. I'm pretty sure he has a really nice chop saw somewhere in his shop and CHOOSES to use a pipe cutter or a lathe for the PRECISION! I agree and so have many others on here. I made this thread to serve as a pictorial guide to a different way or, "A WAY", to measure to see how much you should section before people start cutting up good tubes and say well hell im gonna cut 2" from each tube. I didn't want people pulling numbers from the sky and cutting up good parts just because of misdirection or lack of understanding. But it seems we have moved more towards the picture referenced above. Your method, my method...who cares...ure happy as am I. Now if your finished I'm sure there are someone's elses cornflakes you can tend to. -
Coil-over install - sectioned struts
redneck1545 replied to redneck1545's topic in Brakes, Wheels, Suspension and Chassis
I have some pics I need to upload on here but I did just that. I used a piece of 2x2 angle iron and four clamps to hold everything in place. Not talking trash my friend. I just prefer to use a method that has a proven track record with less leg work in the long run. -
Its all good man...I was just wondering what else could have added up to that as im about to do the same swap and didn't want to run into surprises.
-
Coil-over install - sectioned struts
redneck1545 replied to redneck1545's topic in Brakes, Wheels, Suspension and Chassis
Kinda answered your own question here dont ya think? cheap chop saw = 100 bucks, nice chop saw= much much more. Tubing cutter = 20-30 bucks and a more precise and PERPENDICULAR cut. -
I added EVERYTHING up for the rear straight from TTT's website and my total is about 2500 minus diff... and thats adding in the coil-overs and struts and such. still not sure where your coming up with the 5k figure.
-
Coil-over install - sectioned struts
redneck1545 replied to redneck1545's topic in Brakes, Wheels, Suspension and Chassis
I sprayed the strut housings a few days ago and ended up with runs. It ruined the look so i tried sanding them out, and miserably failed. So out came the whire wheel again and back to bare metal they went. And then more runs. I hate spray paint by the way. I should say im too impatient for spray paint i guess. So after stripping them AGAIN I sprayed three coats on them today. May finish with about two more coats tomorrow but i've got a bigger problem on my hands at the moment. One step forward two steps back. After prepping the exposed seam welds for paint today I sprayed with another coat of Zero-rust...BUUUUUT, this coat went on MUCH thicker compared to the rest of the body. In hindsight I think thinned out the first coats on the undercarriage and interior too much. The coats I put on previously were always a little "dusty" and light black color. The properly thinned coats I put on today are a dark rich smooth coat. It looks MUCH better and has caused me to want to paint the whole undercarriage and engine bay again at a minimum. If I have enough left over I'll be re-doing the interior as well. So plans for tomorrow include some 3M scouring pads to scuff up the previous coats, friends, and lots of beer. Hopefully the day will conclude with a fresh properly thinned coat getting sprayed on the whole underside and interior and the car will then be ready for the seam sealer. -
One step forward two steps back. After prepping the exposed seam welds for paint today I sprayed with another coat of Zero-rust...BUUUUUT, this coat went on MUCH thicker compared to the rest of the body. In hindsight I think thinned out the first coats on the undercarriage and interior. The coats I put on previously were always a little "dusty" and light black color. The properly thinned coats I put on today are a dark rich smooth coat. It looks MUCH better and has caused me to want to paint the whole undercarriage and engine bay again at a minimum. If I have enough left over I'll be re-doing the interior as well. So plans for tomorrow include some 3M scouring pads to scuff up the previous coats, friends, and lots of beer. Hopefully the day will conclude with a fresh properly thinned coat getting sprayed on the whole underside and interior and the car will then be ready for the seam sealer.
-
It does not cost 5k BTW. Im doing the same conversion and the most expensive parts are gonna be from techno toy tuning's shop and shipping both ways. Looking at $1400 for the front mount,axles, strut housings and backing plates and they install the axles in the CV's for you. Add about 200ish for a bling bling mustache bar. get a diff from a junkyard and you wont pay 1k for the chunk. hubs and rear disc brakes come from a multiple abundance of junkyard cars as well. I will have less than 2k in my whole setup. BUT i took my time and collected parts over the years when the price was right.
-
Coil-over install - sectioned struts
redneck1545 replied to redneck1545's topic in Brakes, Wheels, Suspension and Chassis
Today I cut up the other strut tube and welded collars on both of them. Cleaned with flap disc and wire brush to prep for paint. I also put about 3 coats of rustoleom premium or professional grade gloss black on them and all was going well until i rushed the third coat and got some runs. Ill be sanding the runs out and putting another two coats or so on them tomorrow but my my my they are looking mighty nice so far. I doubt pictures will do them justice but ill try to snap some good ones tomorrow and put em up here. Update on the TTT mono ball play as well. The shorter strut for the front is a tokico TOHZ3099, this strut is out on an MR2 and needs a 15mm bushing to take out the play from the strut top and mono ball supplied by TTT. Gabe said he'd send me one ASAP to take care of the issue. He also said I would have to use the existing nut that was supplied with the strut and not the nut that was supplied by TTT with the camber plates. Hope that helps people in the future. -
I dont know of an "upgrade per say" but you can check into getting them cyrogenically (SP?) treated to increase strength. There, at one time, was a company on here advertising the services for a very resonable price (free).
-
Do you think my goal for 2600 is unrealistic with all the added metal and heavy drivetrain?
-
All the highlighted words = MONEY and lots of it. Notice this is a PROFESSIONAL SHOP doing this type of work. This is not something you would want to tackle with an angle grinder or chop saw in your garage. Pay the money and have it done right. There is a reason fabrication stuff like this is so expensive. Not trying to knock your desire for this down by any means, just putting this out there for anyone else who sees work this good and thinks to themselves "hey i might wanna try that to make such and such"...leave it to a shop fellas.
-
Yea I've considered all of the responses of what and you an johnc have said. I will be running a mini hoop or a dash hoop and tie the door bars into that. Then, I will most likely end up running tubes through the firewall to the strut tops. I'm trying not to go tube crazy right now because I keep telling myself this is just a street car...Yet I always find myself in my shop building a race car and can't seem to find the disconnection I'm trying to keep this car sub 2600lbs but with a Q45 R-200/T56/early SBC Im already adding extra weight in the drivetrain. I'll be buying Techno Toy Tuning's rear-end conversion kit here soon and as most know, that kit is not known for its lightweight characteristics. So far my 4-point cage is 1.5"x 0.095 and depending on how much the thing weighs in already I may just decide to stick with the little 4-pointer and call it a day. How much does your car weigh Jmortensen? Or what weight are you shooting for might be the better question. We shall see what the future has in store I suppose. I think the 4' of tube from the dash hoop to the strut tops will be well worth the weight in the added stiffness. But I haven't tackled that monster yet because i've been working on this strut sectioning and coil-over install deal. Almost done, i think. I still need to upload some pics to show progress but where im sitting with the car right now is as follows. TTT camber plate tops welded, 4 point cage welded, and painted in all the spots that would not be accessable after the bar was installed. (still need to paint the rest of it) One front strut sectioned, welded and prepped for paint.
-
If you look at the other pics of the intercooler tubing you can see that the last piece is only a piece with a reemed out end, it is not cut at an angle. at least in the pics it doesn't appear to be. But as stated above, buying prebent mandrel pieces is really the better way to skin this cat.
-
yea, the diff's stub axles are the next weekest link. if your using the TTT setup im assuming your using z32 hubs and wheels bearings right? But to answer your question the actuall stub axles that go inside the differential are the next weekest part. Someone on here has already broke some at one point in time, cant remember why or from what though. Most people keep the IRS to make the car more road course worthy...with that much HP im assuming your doing the straight line thing with hard launches...Back half it, tub it, slap a ford 9" in an be done with the worrying. Hope that helps.
-
I dont think its the geometry that is your issue...its your math desired angle =90* desired sections =X (in this case its five sections) 90/X=angle needed if your only cutting one angle side and leaving the other a straight cut. 90/X= angle needed/2 (if your planning on cutting angles on EACH side of peice so in this case you have 5 sections with a desired bend of 90* 90/5=18 each peice would need to but cut at an 18* angle to make your bend 90* Now if you were to want a more "round" bend and use less material in the long run then you will want to cut angles in BOTH side of each peice your working with. 18/2=9* So if you cut 9* angles on each side of each peice your trying to make the result will be five sections would give you your 90* "bend" ORRRRR you could just take it to eigther a professional fabricator, or get the tube mandrel bent professionally and probably save your self time, headaches ANNNND money!
