redneck1545
-
Posts
216 -
Joined
-
Last visited
-
Days Won
1
Content Type
Profiles
Forums
Blogs
Events
Gallery
Downloads
Store
Everything posted by redneck1545
-
Holy crap... I'm speechless
-
^^^ I decided to sandblast. Wire wheeling and sanding didn't appeal to me in the least seeing as how I needed to prep the whole chassis anyhow. Point being, while yes, sandblasting is not required to seam weld, whats the point in seam welding a car your not going to fully prep and repair properly??? You are correct in the fact that BOTH sides have to be properly protected from rust and corrosion. I think the end all be all the the OP's question is at what point would one consider seam welding? My solution was simple as I had way too much rust to want to pursue any other option. Sandblast the entire CHASSIS, not body, and start there. In the mean time while I had a stripped bare metal body I decided why not seam weld everything that I could get to. I think the OP was trying to decide if he was going to seam weld at all. My suggestion, if your not going to strip the enitre car to the point where complete stripping or blasting could take place then seam welding should not be considered.
-
My $0.02. Stay away from pre-fabbed cages. They fit the car very poorly and still require some hefty fabrication to make it fit right. I was in your exact shoes a few years back and I kept researching. What I found out was that it would be a waste of time. Find a reputable cage builder or race car shop that will be willing to bend your main hoop for you. I payed $150 for 1.5" 0.093 wall mandrel bent tubing that was custom fitted to my car. They bent the tube just enough to fit inside the car and not a single inch more. And then porta-powered the downlegs in place. What this results in is a roll bar that rests again the door jamb pillar all the way to the floor mount. Im planning on copying 74-5.0l's cage design...You can find his main hoop drawing in the welding/fabricating FAQ. I found pics of his cage and will be mimicing that route. Much better fitment and design. The way this JEGS/FLEABAY cage rests so far away from the door jamb pillar will only add weight and not necessarily serve to improve safety. These cages have a "gap" between the main hoop and door jamb. In a crash your body will be the first thing to feel the impact instead of the cage doing what it was supposed to be designed to do. If you want to this style of cage, save your money and buy some lead weight to stick in the car. Results will be similar, lots of weight for not alot of purpose. Again, just my $0.02
-
Threaded collars don't fit on strut tubes
redneck1545 replied to mclark999's topic in Brakes, Wheels, Suspension and Chassis
^^^ so lets say I actually purchased some 280z sleeves from a guy who thought they were 240z sleeves? I havent had the chance to mic them yet so I cant be certain but lets say that is the case. Is it still not a big deal or should I go ahead and purchase the right sleeves from someone else. They are only like $20.00 a pop so its really not that big of a deal to me. I'd rather have the right part on there than wrap tape on em. Any advice would be greatly appreciated. Thanks -
Threaded collars don't fit on strut tubes
redneck1545 replied to mclark999's topic in Brakes, Wheels, Suspension and Chassis
After reading this im concerned I dont ahve the right ones either...Although I didnt order them from john. I bought them from a guy on here and were told they were for an early 240-260z...I slide em on but the dont fit very "snug", they are fairly loose really. I have them at the shop a few hours away awaiting the typical sectioning treatment. Should I be looking for a new set of threaded sleeves as well? Thanks -
Having just completed a ton of seam welding for my car I can assure you the words monumental task does not do you justice on how difficult and time consuming seam welding is. I decided to sandblast (not with sand of course) me entire chassis. Body panels were DA'd as to prevent warping. Even with renting an industrial tow behind 210CFM air compressor the blasting still took me the better part of the weekend. Not to mention my car is on a rotisserie which took me an enitre other weekend to build. After blasting the cars seams where seam welding was planned to take place was taped off with masking tape and the entire interior and undercarriage was painted in zero-rust black. I towed it back down to my house that weekend and have been seam welding steadily for the past few days. Its going pretty good but I can assure you without sandblasting you will not want to even attempt to seam weld. Even the seams where just a smidge of seam sealer remained it makes welding at the spot almost impossible. Hope this helps
-
I made mine out of two harbor frieght engine stands in a single day for under $100 bucks that gets the job done pretty well.
-
There is a powder coater right across the street from me that has two ovens that are big enough to put the entire shell in. I seriously contemplated it for a while as they only charge $3/sq ft. however, I dont wanna deal with trying to cover up the chips after a few years on the road after the fact. the 185CFM tow behind compressor is $92/day and the 200# pot blaster is $46/day. the #300 blaster is $75/day. This was the cheapest local rental place I found around here so im sure you could search around some rental places and come up with similar prices. Hope that helps.
-
Were those 50lb bags of sand? im looking at getting some black diamond coal slag media that sells for about 8 bucks per 50lb bag. I dont wanna deal with the issues with blasting with free silica. I might buy a few more bags just in case. I think it took me around 4-5 bags just to do the engine bay, granted that was blasting with a itty bitty 40lb pot blaster. thanks for the info!
-
Do I need to flare my fenders? [pics]
redneck1545 replied to BrandenZ's topic in Brakes, Wheels, Suspension and Chassis
Are the coilover sleeves and collars set to same height??? Although that would be kinda too obvious and easy to fix. -
^ZTR How much media did you use? Im looking at blasting the under side, engine bay, and the interior...shell is already DA'd and primered Just trying to get a rough estimate on the amount of media to purchase. Ill be renting the same 185cfm compressor and about a 300gal pressure blaster to cut down on refill times. Any help would be appreciated.
-
...autozone, advanced auto, oriellys auto parts, napa... All have them brand new for around 30-40 bucks.
-
5 lug stock offset front hub
redneck1545 replied to svMike's topic in Brakes, Wheels, Suspension and Chassis
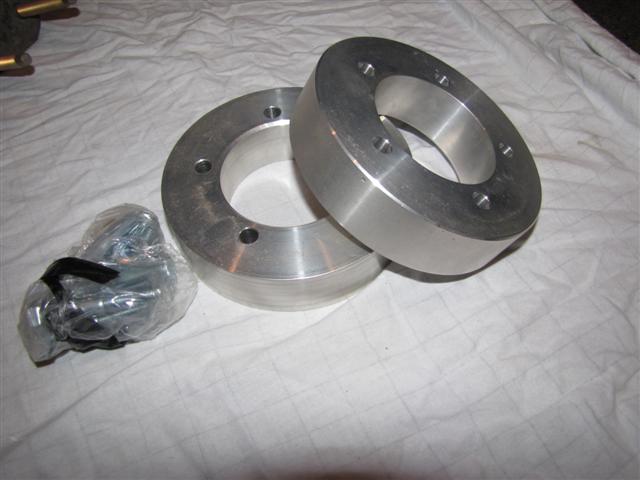
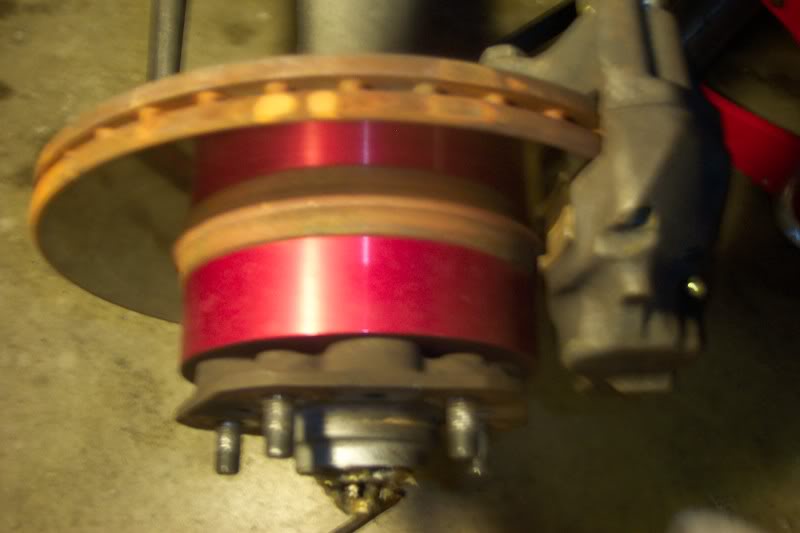
So staying glued to the forums for a few days here's what I found. You need the front hubs off of a 84-86 300zxt (turbo), or a 87-89 300zx (turbo model or non-turbo) as long as the 300zx has the PENTAGON style hubs they should work. The wheel bearing should be a 240z wheel bearing The dust seal should be a 300zx seal. using these parts you will move the offset of the wheel out 3/4" on each side. I think I read that if you use the 300zx caliper you dont need to purchase a rotor to hub spacer. BUT, its a pain to mount the caliper to the s30 spindle an is not a bolt on conversion However, if your planning on doing the 4x4 vented rotor swap you do need a spacer. But using the 4x4 yota or the 4runner setup maxes this a bolt on conversion. So far Modern Motorsports is the only company I know of who makes this spacer. If anyone knows ANYBODY else who makes this part please let me know. hope this helps.
-
R230 and 1200+ horsepower
redneck1545 replied to Motivational's topic in Brakes, Wheels, Suspension and Chassis
I have been trying to get ahold of Ross at MM for a few years to no avail....All I can say is its pretty hit and miss trying to get in touch with him. People have sent him money and still never heard anything for over a month, only to end up having their money returned. Sorry but i'll send my business elsewhere. good luck with the build. Ill have to agree with 260DET though, Im thinking your going to have to do some serious beefing up of the entire chassis so as to not rip the attatchment points off. -
5 lug stock offset front hub
redneck1545 replied to svMike's topic in Brakes, Wheels, Suspension and Chassis
it means you dont have to spend 500 bucks and wait for a million weeks of unreturned emails to get the hubs you want. Ive tried contacting ross at MM for YEARS, never once has he responded to any email I have sent him. I've given up on MM and am now sending my business to Techno Toy Tuning. I too am in the same boat with needing the 5lug front conversion. I believe the hubs need to be pulled from a 87 and up 300zx but im not certain. I also need some more details on the front 5 lug conversion. -
Weight Reduction Mods-240z
redneck1545 replied to Armand's topic in Brakes, Wheels, Suspension and Chassis
I got to thinking about this very subject the other day. I think the biggest thing people forget about is a little thing called gyroscopic precession. If you clock the calipers perfectly at the 6 o'clock position, yes you are putting the weight as low as it can go, but when you stomp on the brakes you will actually get an increase in forward momentum due to gyroscopic precession. Mounting them at 3 o'clock will give you the most added traction when stomping on the brakes because of the increase in "weight" on the tires when precession takes affect. As dan pointed out earlier the optimum placement would be 4:30 and that would take into account precession on CG and would be a comprimise of the two. I understand the intrest in minimizing polar movement as to why you would clock each caliper differently. Nice to know im not the only one who, instead of singing in the shower, pictures moving parts. -
Why are Watanabes so expensive?
redneck1545 replied to kce's topic in Brakes, Wheels, Suspension and Chassis
I like HRE wheels...but at 1200-1500 PER WHEEL i simply cant afford em either. Welcome to the club. -
Maybe not, take the inspection cover off of the bellhousing and have a look to see whats going on in there while moving the clutch fork around.
-
I used a 240amp stick welder at first...it was set to about 70 amps so im sure your 90 amp could handle it. However, when I picked up a 140amp mig the welds were MUCH MUCH better. Both work and will do the job but the MIG will be easier to use and provide better welds IMO.
-
Cheapest way to install a Q-45 DIFFERENTIAL!
redneck1545 replied to redneck1545's topic in Drivetrain
Thanks for your input. Mine will pretty much be put in a spirited driven street car with the occasional, and I mean OCCASIONAL, track day. I dont think I will have a problem laying down some rubber on the street or abuse it enough to turn into a one wheel wonder on the track. Who knows, only time will tell. But for now im happy with my decision to go with the short nose r-200 VLSD. Now I just have to get those dang companion flanges and axles and my setup will be complete! -
Cheapest way to install a Q-45 DIFFERENTIAL!
redneck1545 replied to redneck1545's topic in Drivetrain
I spent some but I still dont have the complete package yet. So far I have the mustache bar-$200 front mount- $150 280z stub axles, companion flanges, and new wheel bearings.- $150 total-$500 Im still seeing what the deal with ross at modern motorsports is before i spend 700 bucks to wait 3 months and possibly never get parts. The main reason I'm going with the q45 diff is I have three of these diffs sitting around in my garage, so burning up a VLSD is much less costly to replace than an OBX or Quaife. I havent done much research on the 20% torque transfer number you just threw out there but i'll be looking into that. But mainly the reason is its less costly to replace should something break. Junkyards are full of Q45's too should I ever need to make a trip back out there for another. -
ask and u shall receive... http://forums.hybridz.org/index.php/topic/51254-sbc-and-the-t56-which-one/
-
Toe Changes for Track Use
redneck1545 replied to heavy85's topic in Brakes, Wheels, Suspension and Chassis
id put a quote box around everything that has been said but whats the point in quoting two pages??? some really GREAT info on this page...MAYBE if we get to where we can agree on things it could be a sticky in the making in the mean time all i have to say is, this is worse than physics class... -
I Bought the fidanza aluminum flywheel. with stock clutch (we'll see how long that lasts) I have an older (pre-86) two piece rear main seal i plan on mating to a t-56 and there is a special "conversion" flywheel you have to buy for that setup. Ram and centerforce also make flywheels that work but they are around 25-30 lbs and made from steel for $400. The fidanza is made from billet aluminum with a replaceble steel face for $425.00 and weighs in the 15lbs range. well worth the 25 bucks if you ask me. Course i lucked out and bought mine off a craigslist as for $125.00. guy was selling a lt1 clutch with pressure plate...well that was all bolted to "something" and the something happened to be a fidanza flywheel that just so happened to be the exact flywheel i needed! needless to say I was very happy to pay the money i did for it! PM me if you have any questions...I can look up part numbers for u but ure looking at $400+ if your mating it to a pre-86 block.
-
I guess i could just measure up the undamaged side and then apply those measurements to the other half of it and go from there. thanks for the help!