
hughdogz
-
Posts
757 -
Joined
-
Last visited
-
Days Won
2
Content Type
Profiles
Forums
Blogs
Events
Gallery
Downloads
Store
Posts posted by hughdogz
-
-
Can't you just move the cat rearward the two inches? The cat doesn't have any mounting tabs (hangers).
Perhaps they designed it this way...bolt the cat to the header, then bolt the pipe to the cat, etc...
-
Yay!! Happy 21st Birthday Skib!!

I'll buy you a beer next time we're at the racetrack
(after we're done racing, of course) -
^^^ Cool! Thanks Guys, keep the conversation going...this is interesting stuff.
-
I stop tuning when the tweak makes it run worse!
After which I revert back to the previous tune. -
I got mine from here: http://www.motorsport-tech.com/
They are the only outfit I could find where they GUARANTEE they won't break!
-
I think you're right. The far left looks like it bolts after the cat. The second to the left looks like it goes under the axle. Third one over the rear crossmember. Some early ZX's have the exhaust cross over to the passenger side, so the last one may (or may not) be needed after the muffler.
-
That is looking like the best option so far--- i jut have to make sure i got the right thread pattern on the autometer sensor
I hope you purchased the 0-1800F one. I tried the 1600F one and after sustained periods over 1600F, it is stuck there
-
Didn't get much further tonight, but at least I'm pretty sure the oil feed and drain lines will fit. Not sure if I'm going to go through with the oil cooler yet, but I wanted to test fit the sandwich plate and fittings...
Back to oil filter service tomorrow to pick up some more AN fittings for the head cooling lines. I also need to get various fasteners at Parkrose hardware soon.
At this rate, I'll never have it ready for Canby this weekend
I'll see how much further I can get tonight. -
Never thought about that one, didja?
Mine is in the manifold plenum...
All this is great information!! Many thanks Tony et al.
Now I just have to purchase (or fabricate) a wastegate actuator bracket. I'm probably going to go with a Forge Motorsport actuator where you can swap out the preload spring.
-
Ron, that was one of my most favorite car rides EVER!!
I've never been very scared as a passenger, but when you took me down Ten Eyk road that one time, I about pee'ed my pants!!
Nice linear acceleration, and insane grip.
I'm not liking you very much right now. I miss my M... -
You could run a line to one of the intake manifold ports to your wastegate if you want too instead,or tape a line into the compressor.
I thought of this, but then you'd get all the pressure drop from the IC tubing and intercooler (perhaps a couple psi below compressor pressure). Plus, when the throttle body is closed between shifts, you're not getting the "surge pressure" before my recirculation valve opens (not that that should be an issue).
or you can add a niple to you intercooler piping close to your turbo so you have short vacuum lines and you dont have to mess with the turbo.That's what I was thinking, and will probably go this route.
I appreciate the feedback Guys!
-
Hi Guys,
My compressor didn't come with a wastegate actuator signal port.
- Should I just tap one (the wall is kind of thin)?
- Do I need to weld a bung?
- Do I need two ports like the stock one that "y" together?
Thanks! -hughdogz
- Should I just tap one (the wall is kind of thin)?
-
-
I'm no expert, but my friend Bryan had Oregon driveline weld rzeppa joints to the pathfinder axles to install the R32 Nismo LSD. The guy said that two tripods won't work
I still want to try getting some tripod bearings out of an AMC Eagle 4x4. I found one in Washington but they want ~$100.
-
ARP Studs...
-hughdogz
-
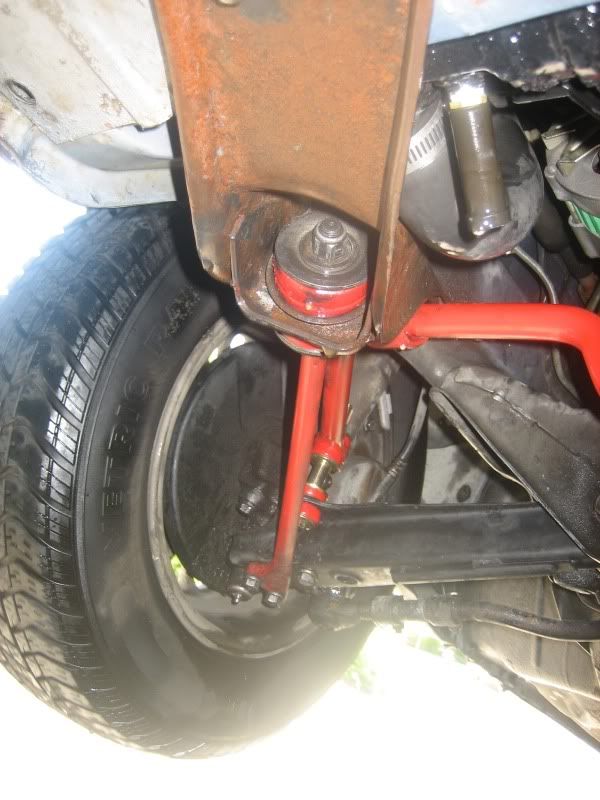
If I do swap back one of my OEM bushings....or just get a new OEM set and put on there...do you know which side to put it on (side facing the Tension rod, or side facing the front bumper)? Please say side facing front bumper.....I don't want to take that thing out again
Hi PhilbertZ,
From Guy 80LT1's S130 T/C rod build thread:
....John C. recomends using a conbo of rubber and poly with the poly on the same side as the nut.Link to Dime Quarterly article about drilling the poly (thanks zcarnut): http://www.dimequarterly.tierranet.com/articles/tech_tcrod.html
-hughdogz
-
Front tension rod and sway bar:
Uh-oh, that is a recipie for disaster!
You don't want two poly-bushings for T/C rods! You have to keep at least one OEM, or else there is a trick of drilling holes the the poly one.
Reason being is that most of the flex is now taken out of the bushing and transferred to the rod. Fatigue will ensue in a short time.
Otherwise, Awesome Job!!
Hope this helps, -hughdogz
-
More progress pics...
Here is my painted oil pan. What a saga!
I cleaned the slude out of the inside of it using a little bit of Gunk engine brite. I'm not sure if it was from the solvent, but the paint on the inside started flaking off when it dried. For sure it would clog the screen in the oil pickup tube. I cleaned off all I could, and a week later it started flaking more!! I had to get it hot-tanked, then I painted it with two coats of etching primer, then 3-4 coats of 500 degree gloss black engine enamel (no way I was going to paint the inside again).
Here you can see I finished polishing the front timing cover. I must have spent ~20 hours on it.
Since the turbo I'm installing needs a spacer, the stock oil drain line isn't long enough. So I had Oil Filter Service here in P-town braze on a -10 AN bung:
Then I had to repair some bubbling paint on the brake booster from brake fluid leaking out of the master cylinder. Then I had to remove rust on the driver's side frame rail since the brake fluid leaked all over that paint too!
-
Check out this one with an F1 V-10!!
Is it real?
-
Have you checked to make sure the turbo's oil feed line is not blocked? The drain line could get blocked too, but it is ~3/4" so that seems less likely. Try blowing some compressed air through it to see if it can flow freely.
I've seen it recently, where they suspected the turbo was bad, but it was really a completely blocked (used) oil feed line which caused the shaft to completely shear in half.
Hope this helps..
-
i am also very confused about the psi to kpa !!! the map sensor in megasquirt is connected at the same place as my boost gauge...0 psi (say just after vaccum and before beginning to boost i have 100kpa on megasquirt....but if you convert 100kpa in psi it gives 14 psi ???? what the ?
That's because your boost gage reads in gage pressure, and the MAP (manifold absolute pressure) sensor measures absolute pressure. The absolute pressure scale starts at a total vacuum (zero psi), and the gage scale starts at negative atmospheric pressure (-14.696 psi).
In other words, gage pressure plus atmospheric pressure equals absolute pressure.
As Nigel stated, 1 atmosphere = 101.3125 kPa = 14.696 psi absolute = 0 psi gage.
To convert kPa to psi gage, divide the kPa reading by 101.3 (this will give the % of atmospheric pressure). Then multiply that percentage by 14.7 (this will give the absolute pressure in psi). Finally, subtract that number from 14.7 and make it negative (this will give the gage pressure).
To convert psi gage to kPa absolute, add 14.7 (this will give absolute pressure psi). Divide that number by 14.7 (giving percentage of atmospheric). Multiply that number by 101.3 to get absolute pressure kPa.
My boost / vacuum gage reads vacuum in millimeters mercury (Hg), but the boost is in psi. You can also measure pressure by inches Hg, etc.
Hope this helped clear things up a bit...
-
Good thing I only got as far as buying the bung
I appreciate all the info Guys!!
-
If I run the coolant hoses into the UPPER thermostat housing, will that work? I figure it is equivalent to running directly into the radiator inlet.
From the looks of RossMan's diagram, he's planning on running into the lower thermostat housing?
Thanks! -Hugh
-
I noticed that too.
Luckily, it only seems to happen after I've already had the initial five second prime...if I go key-off then key-on within a short amount of time, this seems to trigger the behavior IIRC.
I doubt the Wolf knows whether or not the target fuel pressure is already reached.

 (after we're done racing, of course)
 After which I revert back to the previous tune.

 I'll see how much further I can get tonight.


The build of a l6 turbo header
in Nissan L6 Forum
Posted
It think this project is coming out totally awesome myself.
So I take it you're going with an internally waste-gated setup?