

X64v
-
Posts
543 -
Joined
-
Last visited
-
Days Won
1
Content Type
Profiles
Forums
Blogs
Events
Gallery
Downloads
Store
Posts posted by X64v
-
-
Heh, good guess then. The pic is the art behind the cd in the Lucy Ford: The Atmosphere EPs case, which has the songs It Goes (which was my hint) and also the song you quoted.
-
If I was better at finding the right words to say, I wouldn't need to write these mother-lovin songs!
Ha, good job, you are correct sir. I didn't even realize at first that was off the right album.
-
I was lucky to find a high res image of this to use.

There's a major hint on the screen as to what it's from.
-
RadioControlZone, perchance? I know they had a trader feedback section.
Never did visit there much. It was on the forums at Unlimited Engineering. Haven't followed any RC site for years now though, my last post there was in '06.
-
On an RC forum I used to frequent, there was simply another subforum in the B/S/T section titled 'Trader Feedback'. If you bought from someone, you started a thread titled as their user name and gave feedback, good or bad. That would be pretty cool to have here.
-
I'm not sure on the bore, but it was either 90mm or 92mm. I ran across several articles and either bore was mentioned (someone can do hte math and repost below, I suppose).
90mm would give that displacement.
-
The one in Forza 2 is listed as the 432 version. Just FYI. Sucks that it won't let you flare the car, it limits the tire width at 215 or 225, can't remember which.
-
I thought running a slightly colder plug added a bit of detonation resistance, which was my main reason for switching. Is this not correct? or did I misinterpret something?
This is my understanding as well. I run BPR7ES plugs on the street daily so that I can keep my timing advanced running 12 psi without an intercooler, even when ambient temps are 110+ in the summer. I have no problem with rough idle or fouling. Next track day I go to I'll throw BPR8ES plugs in to ward off any detonation that could be caused by the prolonged flogging.
-
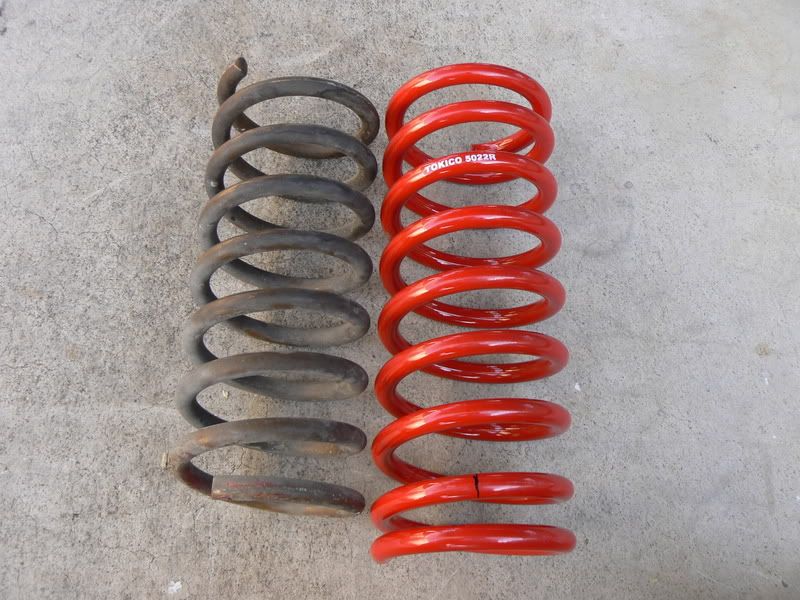
Alright, so I've been running the 25-year-old Suspension Techniques drop springs my dad originally put on the car in the early '80s. I didn't know the spring rates, and wasn't aware of any way of calculating them, save for removing them and using a press/scale. That is, until I found this handy calculator. According to it (and a few others to which I compared the results), I had 125lb/in springs in front, and 160lb/in in back. These numbers were far too wimpy for my taste; they simply would not do. The 'obvious' solution would be coil-overs, but as a full-time college student, I'll have neither the time nor the money to do so for a few years yet. So, I did some looking around to find what was available in the stock spring diameter, and ended up ordering two 200lb/in Tokico springs made for the 280z rears from John Coffey (www.betamotorsports.com). They need to be cut for ride height, but that's 20 seconds with a cut off wheel, and it ups the spring rate anyways. I used those for my new rears, and moved my old rear springs up front.
One of the new Tokico springs next to an old rear (new front) spring. The sharpie line on the red spring is my cut line.
I needed to alter my rear ride height anyways, so this was the perfect oppertunity to do so. I was at 6" all around (rocker outboard of pinch weld). After cutting all the springs (front and rear) to account for the differences in ride height and spring rate, I ended up with 5 7/8" up front and 6 1/2" in back, which is perfect, because once I get the rear end fixed, I'll put the spare tire, carpet, and speaker box back in, which will give me around 6 3/8" rear ride height. After cutting, I ended up with 215lb/in spring rates in the back and 200lb/in spring rates in front; not too bad for stock size springs. I didn't take any pictures of the process, it's just a spring change.
I'm also in the process of setting up megasquirt to run wasted spark coils via a hall sensor and magents in the crank pully (not through the ford edis module and 36-1 wheel). I'll detail that as I continue building it, but here's the hall sensor, since I have it built. [EDIT: I wasn't very happy with the original sensor/wiring, so I made a new one, and changed the picture below to reflect that.]
-
Thanks again, Sean. Whatever problem I have you've been there done that.
Heh, it's 'cause our set-ups are so similar, and I've had mine running on MS for right about two years now. Car looks great in the video. 30kpa at 750rpm is a very strong idle, what's the ambient pressure where you are?
Attached is that map I PM'd you about. It's actually a .vex file, when you save it to your computer, just change the file extension back to .vex. I changed it to .txt so I could attach it without putting it in a .zip file.
-
Sean - Yes I understand all of the sources for variance, but I was surprised it added up to 10 degrees. Question for you - if you pull off your cap can you wiggle the rotor a few degrees back and forth? Mine moves a little... I'm worried I dorked up the welding job.
Yup, mine moves a bit, too, and I know mine is welded down solid. This is due to the slop in the mechanical connection to the crank, I think mostly at the slot between the oil pump shaft and the dizzy shaft.
If you did botch your welding, it would be able to move as far as the mechanical advance mechanism lets it, which is a lot.
-
I put both adjusters in the middle as you said - and I have no idea why I ended up at 67 versus your 77.
That's because there's no 'right' answer for trigger angle, it just needs to be whatever number makes the timing in MS match up with the timing at the crank. Mine isn't exactly in the middle of both and neither is yours, and the vacuum plate in my dizzy isn't welded exactly in the same spot as yours, so the numbers are going to be different. Even something as simple as unbolting the dizzy tower base from the front cover (leaving the dizzy bolted to the base) and bolting it back up can cause a trigger angle change of one or two degrees.
-
Here a is low-tech photoshop (place wheels in front of existing wheels and stand way back, LOL) of my Z with XXR's.......
Ahaha Jon you had me fooled there for a second, I couldn't figure out if you bought Kevin's wheels or got your own or what was going on there.
-
1. Yes, I ran a 10x5x14 for a long time with no problem.
2. That's how I did it, with the offset out being towards the bottom so that the muffler was tucked up into the fender as much as possible.
You can see in this old picture that it fits nicely.
-
My friend and I were using some of the different 0-60 timers and such in the z on my iPod touch and were wondering the exact same thing. Though I don't know anything about iPhone apps or programming, so I'll just have to wait until someone else figures it out.
-
I took some liberties to lower the front stance a bit, and to modify the mouth.
That's the ticket right there. Leaning it forward actually compliments the rear end I think, makes it look more correct.
-
You know, I like the way the lights and front 'fangs' work to give it a mean look, like a shark or tiger or something.
I was hoping for a little bit more of a drastic change, but whatever. Is it the same chassis code (z33) or a new one? If it's the same one, I can understand it.
-
Wow, absolutely brilliant placement of the MAF in this situation.
Hopefully you can come spectate at Willow Springs on the 14th so we can tell you in person how bad ass your car is.
-
Do I need to set #1 to TDC? Do I then need to orient the rotor in the distributor (by loosening the screw and turning the assembly I welded) so it points to #1? Or does none of that matter and the computer handles the adjustments??
Inside the distributor you don't need to adjust anything, if you welded it down where it sits normally then you're fine. It's the plate outside that you want to adjust to about center.
-
My dizzy (exact same as yours, ZX NA VR dizzy, welded up) is set pretty much in the middle of both adjustments on the plate (middle of plate to dizzy, middle of plate to base). This gives me a 122 degree trigger angle (77 +45). So put it right in the middle, try my numbers, set the timing to 10 degrees btdc fixed, and using a timing light, dial your trigger angle in 'til the timing light shows 10 degrees btdc.
-
Didn't make it either.
I see Bo's car though, front cover, 8th row down (same row as 'celebrating'), far left.
-
Wow, an old split-window. Awesome.
For turn signals, these actually had semaphores that popped out from the B pillar on either side. Crazy.
-
What management system are you using?
MS-I, Newest extra code. I'm really surprised MS-II doesn't have it. I looked through a friend's Megatune for MS-II and couldn't find a setting for it anywhere. On my menu it's just in an advanced options drop down labeled 'over run settings'. Oh well.
-
Cygnus - Not saying you shouldn't try to get the car sealed up, but as an aside: Why don't you set up your overrun settings in Megasquirt to cut all fuel during decel/engine braking? It saves fuel during engine braking, makes the effect stronger, and would completely eliminate all fumes on decel. You'd still want to seal up the car for all the other fumes, but at least it wouldn't bother you so much in the meantime. I've got mine set up and it's wonderful.
Or does MS-II not have that capability?


New 370Z is pretty ugly in person
in Non Tech Board
Posted
I thought it looked ugly in pictures, but I got to see it in person up close yesterday, and I really liked it. The rear end looks horrible in the pictures, but I think it just kind of fits and works in person.
Bigger brakes? It's already got 12.5" front rotors 12" rear rotors on the base model, with 14" front rotors and 13.8" rear rotors optional. The base 370z brakes make the base 350z brakes look like they're off a Honda Civic.