

X64v
-
Posts
543 -
Joined
-
Last visited
-
Days Won
1
Content Type
Profiles
Forums
Blogs
Events
Gallery
Downloads
Store
Posts posted by X64v
-
-
What it looks like if you do nothing but switch to megasquirt and ditch the extraneous stuff:

-
That was a really good read, thank you. I always try to be a nice guy but wouldn't have thought of something like cookies or donuts for major service. Thanks for the tips.
-
You do it by going stand-alone. Sure, you can do it with the stock fuel injection, but the easiest/cleanest way is with megasquirt/wolf/whatever.
It's been covered 978234.3 times.
-
I stumbled upon these videos all over youtube today. I haven't stopped laughing for hours.
A few examples:
I love the Rammstein ones as well, but those aren't work safe nor...family appropriate...
Edit: And this one...
-
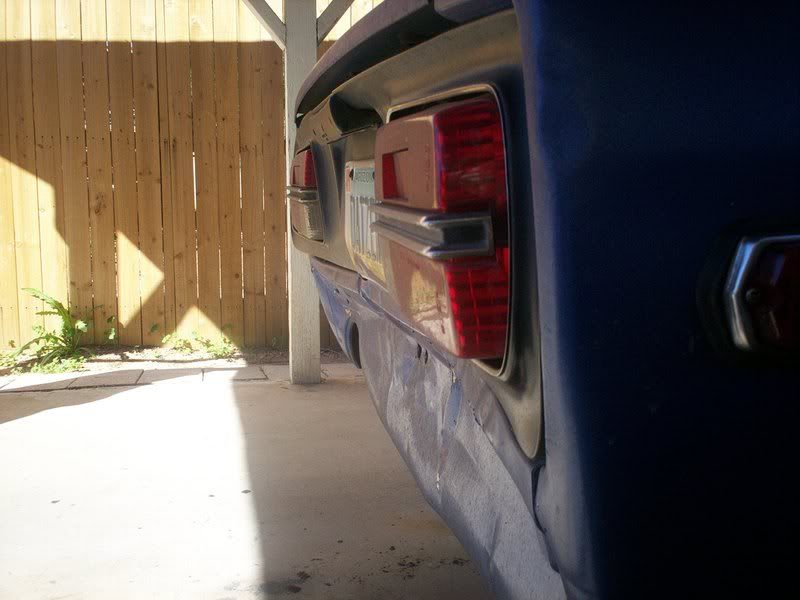
I get rear ended. It actually happened about a month ago, I just have been too bummed about it to post until now. I was in traffic, big curb on the right, bumper-to-bumper cars on the left, and stopped cars in front of me, trapped like a rat. An old lady in a Focus didn't slow down quickly enough. The damage:
It's not obvious in the picture, but the tail lights point inward at each other now.
There were no injuries, and my tail lights made it through okay, but the z's a little worse for wear. No suspension or drivetrain damage thankfully, but the hatch is jammed shut, and the gas tank leaks over 3/4 full (I'm just thinking a vent line got cut).
Her insurance is taking care of it, but it's still been a major bummer.
-
All three or four of you who actually follow this thread are probably wondering why I haven't posted any updates lately. Well, about a month ago, I got rear ended on my way home from school. The damage:
According to my friends, the damage looks worse in person. There were no physical human injuries, but I've been super bummed out about it, and the z is a little worse for wear. No suspension or drive train damage, thank god, and the tail lights are intact, but the hatch is jammed shut, and the fuel tank leaks above 3/4 full. I'm going to get an estimate in a few days.
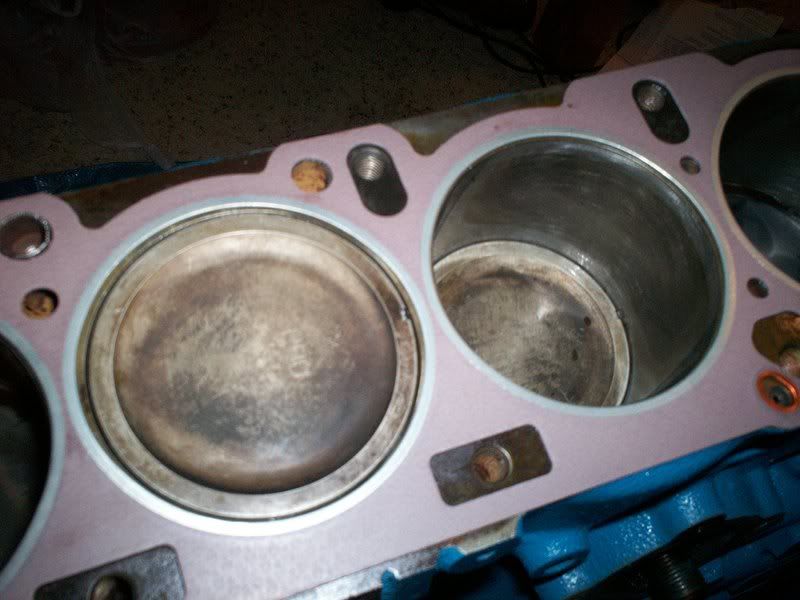
In other news, I also blew a head gasket at cylinder 4 the other night. I was also pinging all the way back to 20 degrees spark advance at 7psi, so I have an abnormal problem causing excessive ping. I think it's my cylinder head; it's designed for an 83mm bore, not an 86mm bore, and the edge of the chamber is pretty sharp. When I replace the gasket next weekend I'm going to radius the edge of the combustion chambers to take away the hot spot, and we'll see if that fixes it.
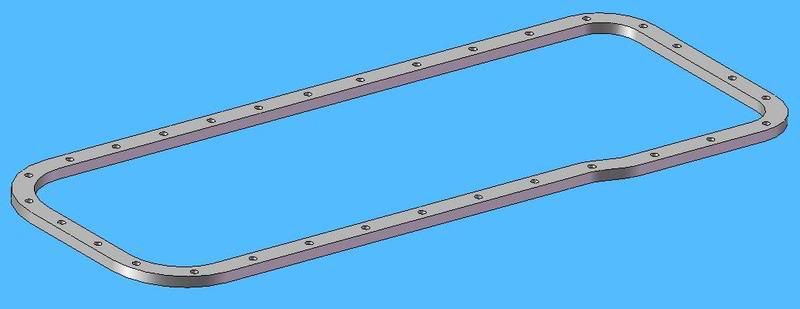
Also, my oil pan has been leaking like mad, with no end in sight, so I'm finally going to do something about it. Instead of battling with the thin stamped flanges on these damn things like everyone does, I'm going to have a 3/8" thick flange made up, cut the flange off a spare pan, and weld the new flange on. This way I'll have a nice big flat sealing surface that can actually be torqued a little without warping. Here's the design so far:
A buddy of mine is going to cut it on a waterjet. I'll run a test piece out of thin scrap to check fitment, then I'll have two flanges cut (one for him, one for me). If they fit and work well, I may consider cutting more up to sell. After that, I'll also post up the dimensions and Solidworks/AutoCad files for whoever wants to cut their own.
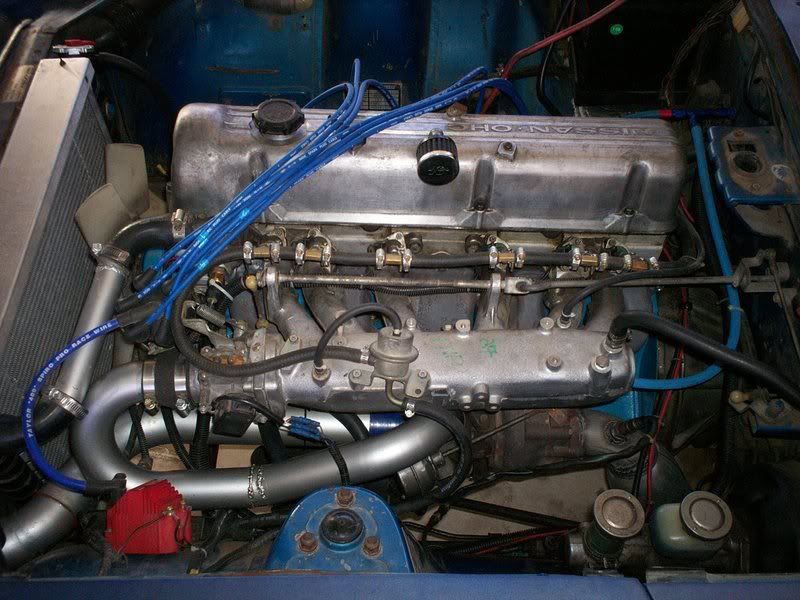
Almost forgot, I also threw on a 'Turbo' valve cover that I got for free (thanks Dan!) and got my 1g DSM B.O.V. on. I really like the sound of it, just a nice psshhhh on shifts.
-
Phil, as Bob_H said in the last sentence of his post, just use lambda. Forget the specific AFR, switch megatune to display/log lambda instead of AFR, and tune for .78, regardless of how much meth you're injecting.
-
I had thought of using a piano hinge across the hatch and the turnbuckles as well. My thought was that the hinge might just be flexible enough that it would still function despite the curve at the tail end of the hatch.
That's definitely an issue to research. It's clear on johnc's that it's not bent to the curve at all, some spacers are visible taking up the difference. On speedgato's, it's not clear in the pic, but it was made flat and then when screwed into the back of the hatch, it just bent to fit the curve.
If the piano hinge wouldn't work with the curve, johnc's method would allow it to stay straight.
-
-
I think at worst all you'd have to do is throw a set of stock needles and nozzles in if you can't get it to run right on what it's got, otherwise I doubt you'd have any issues.
-
Wow, those super-close-ups are awesome, Ron.
-
BTW - is it normal under boost and quickly climbing RPM to have the AFR flucuate a few points?! For example 11.5, 11.2, 11.5, 11.8, 12.2, 11.9, 12.4 all in about 3 seconds or so.
I cant seem to get a SOLID number that doesnt bounce at all
Yeah, that's about how mine are. Mine jump between 11.3-12.3, with their average around 11.8 or so.
And just recalibrated mine two days ago
-
And another thing, should the "tool" fit into place with the cam sprocket still in place? cause it didn't.
Yes, it should. That way there's still full tension on the bottom end of the chain when you remove/re-install the sprocket, otherwise it will be extremely difficult to get it back on.
And wow, the Haynes manual told you to make one 10" long? That's huge. Mine's no more than 5". I think I got the instructions for mine out of the How To Rebuild Your Nissan/Datsun L-Series Engine book. I'll see if I can find the dimensions of mine when I get home.
-
Congrats, man! I've been following your build thread, it's great to see it all work.
-
-
I would be down with grabbing a few drinks and something to eat in Tucson while I'm there, I'm not 100% sure when I'm going to get into town but it might be late, maybe around 8pm. either way though it sounds great.
when I get my hotel information I will post it up so that maybe we can find something close, I might not have access to a car once I'm in Tucson.
If your hotel isn't near anything good I'm sure one of us can swing by and pick you up. All of our Zs have the passenger seats still in them
-
There's quite a few of us HBZ'ers here in Tucson, I bet we could all get together with our Zs and grab something to eat when you're here. I'll point some of them to this thread to see what they think.
Sean
-
-
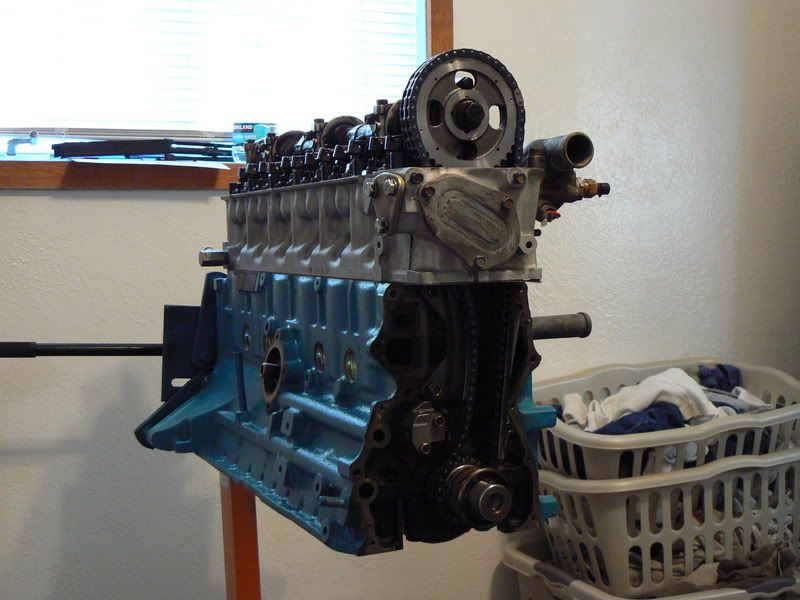
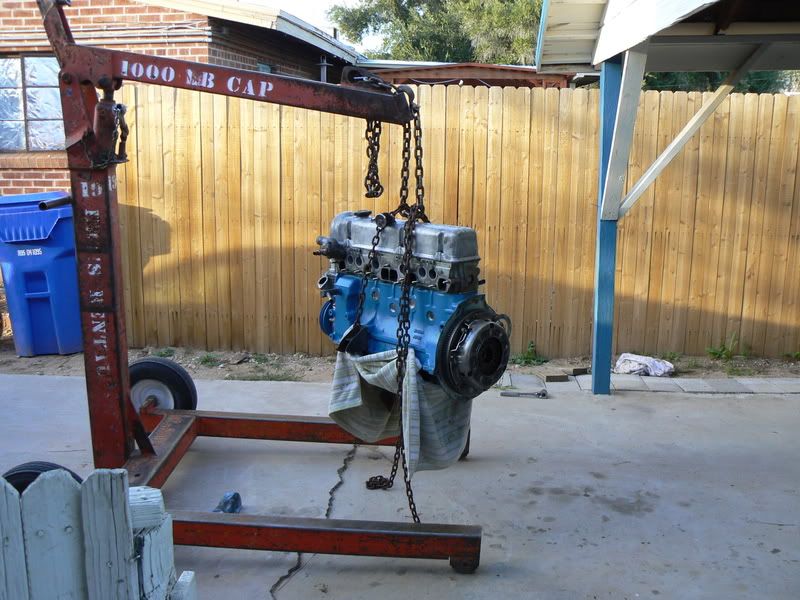
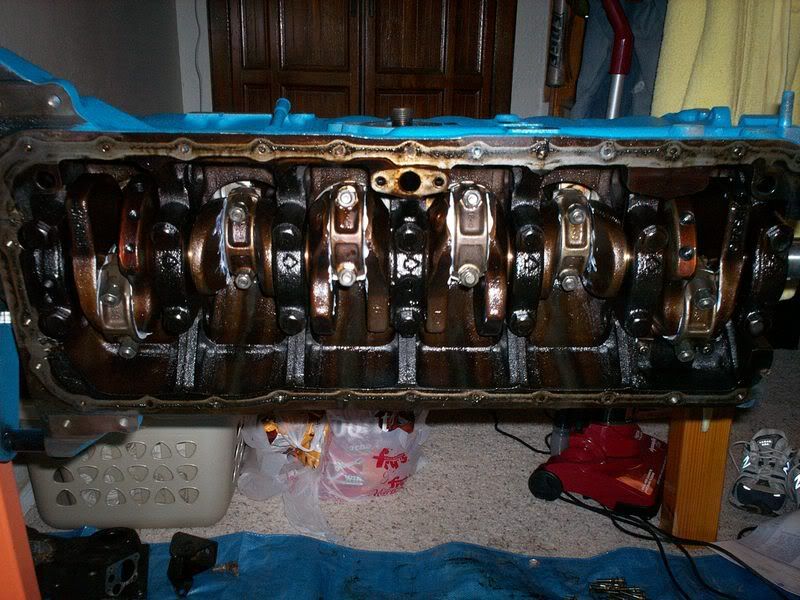
Lots of updates for today. I'll start with what I did yesterday (Saturday).
Finished building the engine on the stand. Timing components assembled.
Front cover, water/oil pump, oil pan, and valve cover on.
The giant engine hoist from the rental place a block down. It looks like it could lift the entire car. Clutch looks the same as before, but it's hiding a 6 puck sprung disk from clutchnet.
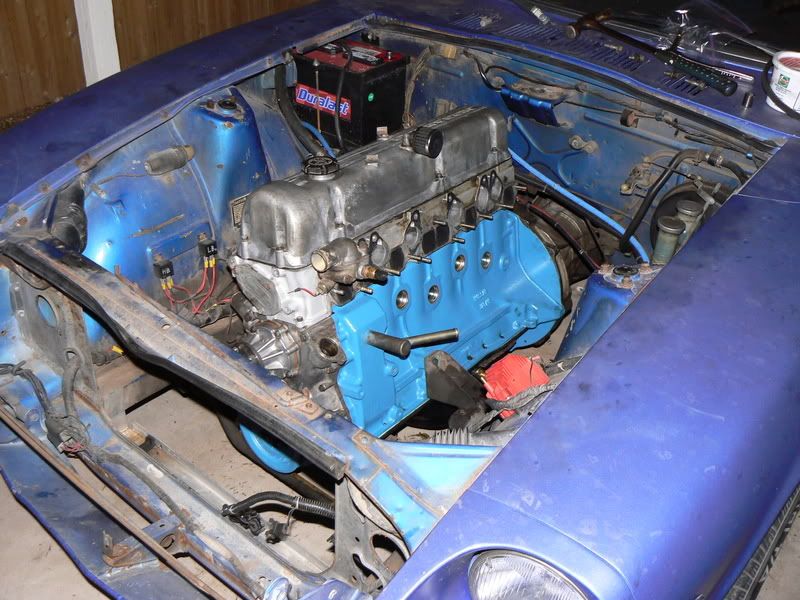
With a helping hand from my father, the engine went in without much trouble at all.
And that was it for last night. Got up and assembled the engine this morning, but don't have any pictures during, just after.
Just back from the first test drive.
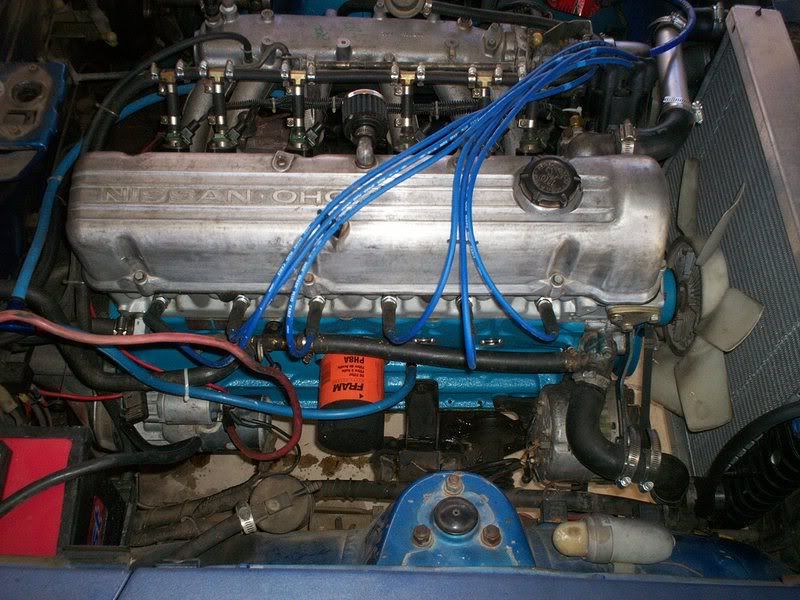
I'm really happy with its first run. No water or fuel leaks, and just a small oil leak on the right front corner of the oil pan. The engine has lots of torque (much more than I was used to with the L24). The new clutch disk isn't broken in yet, but so far I really like it. The sprung center really makes smooth shifting easy. This is the clutch disk I'm using.
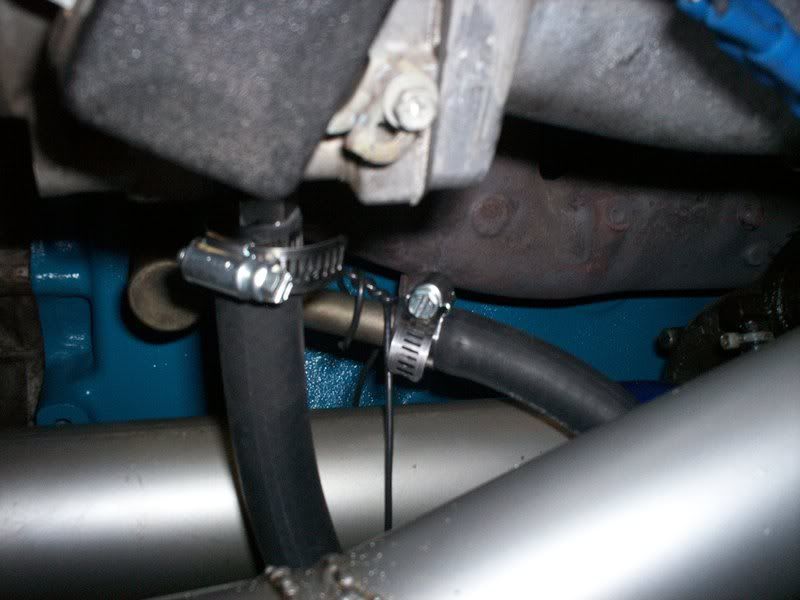
I was tired of having oil all over my engine, and I wanted the ring-sealing benefits of pulling a vacuum in the engine block, so I decided to set my pcv system back up. Instead of drilling and tapping a hole in the underside of the intake manifold, there was a hole I had plugged in the underside of my '82 zx n/a throttle body which was the perfect size to take a 1/4" npt tap, and after the butterfly so it would be under manifold vacuum.
And installed on the engine.
Also, I owe a big thanks to Clifton for the turbo pistons and the recommendation on the clutch disk.
Edit: One final note, replacing the pilot bushing in the end of the crankshaft made a HUGE difference in the feel of the transmission while shifting. Remember how it felt to replace the warn out (or non-existent) bushings in the shifter? Well imagine that again. The whole thing feels so much tighter and crisper, I'm surprised it's just from a new pilot bushing. -
:lmao:
-
The last of my parts arrived today (rod bolts, couldn't do anything without them), so I got straight to work this evening. Sorry for the crappy pictures this time, had to borrow my roommate's camera.
Pistons are in!!!!! (stock turbo dished)
Bottom end is all done.
I'll finish getting the cylinder head cleaned up tonight, and get it on and get the timing chain set up. Tomorrow morning I'll finish cleaning the front cover and oil pan, and then it's ready to go in (hopefully tomorrow afternoon).
-
not really, since when do I resemble a peacenik?
Pshh, my point exactly. (It was supposed to be a peace sign in the first place, I just made a mistake and did the Benz symbol instead)
-
Mmmm, MRE cheese. I love that stuff.
I think the best MRE I ever had was the cheese tortellini. Though the tastiness of an MRE varies proportionally with how tired you are and how long it's been since you last ate.
-


L28 + 5-spd into 240z
in Nissan L6 Forum
Posted
Wrong and wrong. An 81-83 ZX N/A 5-speed bolted right into my '73 240z, original cross member and driveshaft.