Z Greek
-
Posts
110 -
Joined
-
Last visited
Content Type
Profiles
Forums
Blogs
Events
Gallery
Downloads
Store
Everything posted by Z Greek
-
I just installed a set yesterday on an engine I am putting together for a Chumpcar. I was actually saving them for my 3.1 project, but the head bolts that were in the L28 looked like they had been at the bottom of the ocean for a week or so, so I broke out the arp's. Guess I'll have to get another set for the stroker! I also have them in the U20 in my roadster, and have never had a head gasket problem since using them (I had been plagued with head gasket issues prior to using them). One interesting note, the nuts on the arp studs I just installed on the L28 are 12 point 12mm. The nuts on the arp studs on my roadster are 12 point 1/2-inch. I fumbled around for awhile before I figured what they were. All of my metric sockets are 6 point, I had to borrow a 12mm 12 point socket to torque the head. FYI.
-
Looks pretty nasty. If you pick it up cheap enough, anything can be repaired (almost). Worth a chance, I'd give $50 for it.
-
Thanks Thor, we already have dished pistons. I am looking for flat tops.
-
Alex, L28 won't work, too long. U20 that is in is an excellent engine, but VERY expensive to overhaul. For example, timing set (two chains, two tensioners, two guides, four sprockets) will set you back in excess of $1,200. A proper rebuild will cost north of $3,500, but will run great. Gearbox overhaul will cost $1,000+. I LOVE Datsun Roadsters, but go in with your eyes open. Probably go with the Miata if daily driver is what you are after!
-
What year/model is the Roadster (yes SHO-Z, I called it a roadster, I have owned one for over 30 years, and that is what we call them here!) I assume it is a 1600 for that money (but who knows). If a 1600, a mod I have always wanted to do was stroke it to 2000 (either with a U20 crank with the snout cut off, or nissan made a 2000 version of the R16 for industrial applications aka forklifts), fit the 46mm su's from a 2000, and have a bit of a sleeper. This is not re-inventing the wheel, it has been done many times, the Aussies seem to do it often. The SR20 is also a great option. My buddies run an NA SR20 from a Sentra in a Chumpcar 67 roadster, and it works really well. It was quite a bit of work, buy my buddy is a master fabricator, and lives for this kind of thing. The SR20 is set in longitudinally, and mated to an L-series 5-speed (more seat of the pants engineering) Another buddy here in Spokane runs one with a VG30, fun car (also built by same guy who put the SR20 in the Chumpcar). Anyway, would like to hear more about the car, and some picture Alex. Obviously I have a very fond spot in my heart for Datsun ROADSTERS (sorry again, SHO-Z). Here is a picture of my car (the black one) with the Chumpcar at the Spokane 24 hour race last summer, the chumpcar's name is Bob, like racecar, same forwards and backwards! (the roadster won by 9 laps after starting with an 11 lap penalty)

-
Hey guys, putting together an L28 engine for a Chumpcar. Looking for some standard bore, flat top pistons. If you don't know about Chumpcar, it is real racing, with REAL cheap cars. We are running a 77 280 that was free to good home. Need pistons to be cheap, or donate to the cause. Will probably stick with the dished pistons/N47 combo, but thought if I could come up with some flat tops for cheap, I'd go with 'em. I thought about the 3.1 shortblock on the stand in my shop, but that just would not be in the spirit of Chumpcar! Thanks in advance, Andy K Z Greek aka ChumpZ
-
That is a beautiful sounding engine.
-
OK, you guys are giving Alec sound advice, optimize the wipe pattern. One detail you neglected to tell him (or maybe you just assumed he knew), is what exactly is he looking for in an optimum wipe pattern, so I'll chime in. The wipe pattern on the rubbing surface of the rocker, or cam follower, should be as close to centered on the wear surface as possible. You do this by trial and error, using thicker or thinner lash pads. Once you figure it out on one valve, the rest of them should be damn close, unless some monkey did a lousy valve job, and did not set the valve stem heights the same (story for another day) After I get close, I personally take it one step further (and you can all chime in and call me insane). I set up a dial indicator on the valve retainer. I then set valve lash on the valve I am working on and slowly roll the engine over to see what the exact valve lift is with the rocker, and lash pad I have chosen. I do this on each valve and document as I go. When I find the valve with the highest lift, I leave that one alone. I then move one by one and try to duplicate that lift number. I do this two ways. 1) I have a whole box of cam followers that I had re-surfaced. I juggle cam followers around first (they are all slightly different, believe it or not). If I cannot get there by juggling cam followers, I go to number 2) I take the lash pad over to my belt sander, and take a thou or two off, and try it again. By taking a small amount off the lash pad, you are moving the contact patch back ever so slightly, creating an ever so slightly different (higher) rocker ratio. After a long evening or two of this, I have each wipe pattern optimized, and each valve lift identical. Or you can just set them all so the contact patch is as close to centered as you can, and it will work fine!
-
Or PM me.
-
I admire you saving a car. Let me box them up and find out how much it will cost to ship, should not be too bad. Send me your shipping address. You can email me if you want srl198@hotmail.com Andy K
-
Since you said your car had damage to the quarter around the light recess, I assume you need the trim bezels for the rear as well? I have those too. If it made sense, I could even cut the rear of a quarter, and light recess off the parts car I have. I would really rather trade than any cash. Let me know.
-
What is your car. I have a couple of sets of 260/280 tail-lights I would give to you if you pay the shipping.
-
Do you still have these patches? I would like one front, one rear if you do! Happy Thanksgiving! Andy K
-
Is it a too high compression issue, or a timing chain/cam timing issue you are concerned about? Cam tower shims can be used to correct slack in timing chain, but you end up with a rocker geometry issue you will need to correct with thicker lash pads. Either way you need to spend some money. If your head has been milled excessively, or is badly warped, and you feel you will need to mill it excessively, get another one!
-
Thanks, I'll do that.
-
The Honda has two lives ahead of it. Originally, I had planned on building the car for Vintage racing, club track days, etc. I had a full SCCA legal cage built for it, patched a bunch of rust, and lost momentum. Then I watched the movie, "The Worlds Fastest Indian," and also read the book it was based on (1920 Indian Scout, Burt Munro, New Zealand, 183+ in 1967, record still stands). I am hooked, I am taking the car to Bonneville. Last I checked, the record for 31-46 cubic inch stock coupe (508-753 CC) is held by a N600 Honda at around 103 mph. I figure if a 2 cylinder, air cooled pre-civic turd can do it, my twin cam, four cylinder, four carburetor, roller crank, machine should be able to, also. To fit into that class, I will need to have liners and custom pistons made, since the stock displacement is 791cc. 791 would put me in the 46-62 cubic inch class where the record is 123+,held by a Subaru Justy of all things. Pretty tough to do even if I can coax 100 hp out of the little sh#t. Remember Bonneville is like 4,500 feet, and it is over 100 degrees F during speed week, not much air to work with on a naturally aspirated engine! After a run or two at Bonneville, I will follow through with the Vintage effort. Thanks for asking!
-
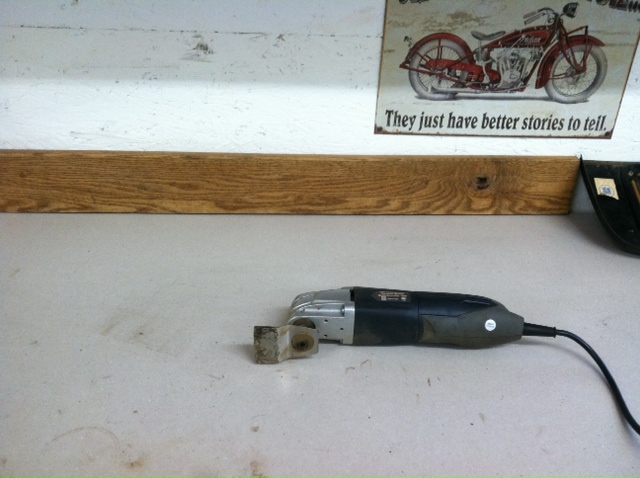
Here is a picture of the tool I was talking about. $49.99 at Harbor freight, wife had a 20% off coupon (my wife is the coupon queen), forty bucks plus tax. The other pic is of my left inner fender. I spent less than two minutes there, and then back under the car. Not quite as fast or easy under the car, but still works really well. It kind of looks like it is gouging the steel in the photo, but it really is not, couple of minutes with wire brush, and smooth as can be. The scuffed area off to the left is where I spent 30 seconds or so with wire wheel on angle grinder.
-
Bastard Z is a little harsh don't you think? How about, umm, Hybrid Z, no that's already taken.................
-
I was reading on a Porsche forum that a cheapo Harbor Freight oscillating multi-tool works pretty well, so I went out and bought one. They were right, it works GREAT! Combination of it, and the wire wheel to get the residue, and wow! Don't get me wrong, it is still work, but MUCH faster.
-
You are doing great work. I just drug my early 260Z (9/73) into my shop last weekend, and I am having a blast. Not moving as fast as you, but making some progress. Found a tool that works GREAT for removing undercoating (I have some patching to do in the floors and floor rails, too). Cheap Harbor Freight oscillating multi-tool. I got done in an hour tonight, what took me three evenings to do last week! And WAY less mess. I was using a wire wheel on an angle grinder before, and that sh#t goes EVERYWHERE. Congrats again on the great quality work you are doing.
-
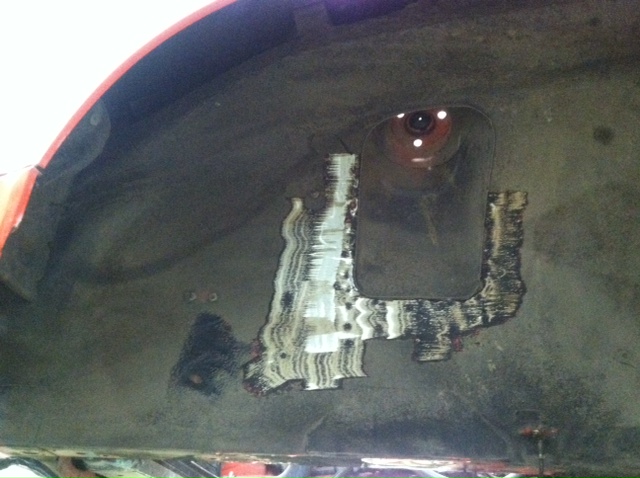
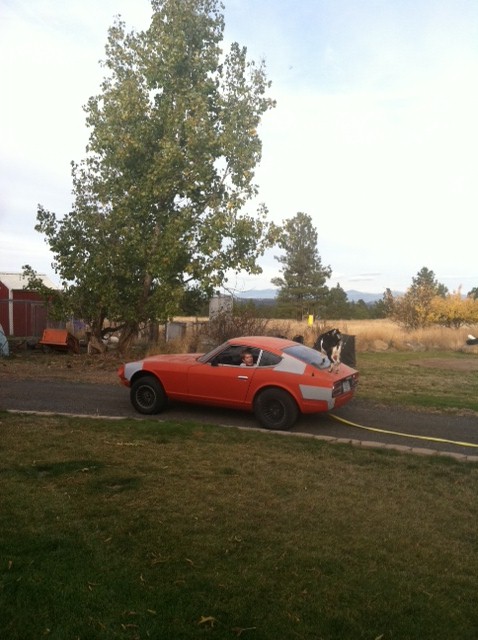
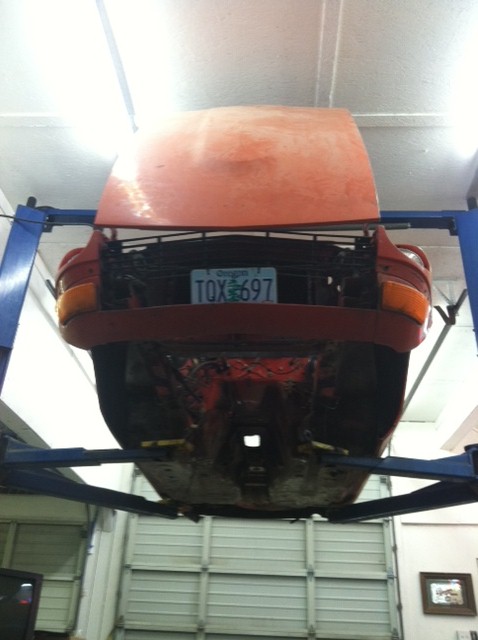
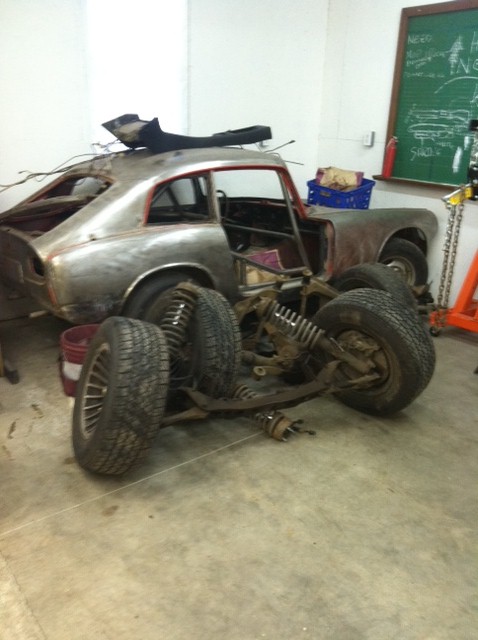
Well guys (gals?), I bought this car back in April, and have been gathering parts for the last 6 months. I am calling this project resto-rod, because I want the car to look very stock from the outside, and under the hood, but with a bit more bite. Engine is 3.1 NA with SU's. The block, crank, rods have been at the machine shop for several months (the shop does mainly race stuff, so until recently was really busy with that stuff).The head is done except waiting for cam kit from Rebello. Anyway, I finally cleared another project out of my shop, and decided it was time to give the Z some attention. My son and I towed it out of the garage, and up to the shop. Just as I took this picture, one of my daughters damn goats jumped on the car, I nearly lost my mind, kind of funny in hindsight. Look at my sons expression driving the Z, if you can see, it tells the whole story! I got the car up on the lift, and started looking it over. There is some rust on the drivers floor, but could be a hell of a lot worse. Kind of hard to see in the pictures, but the floor rails are HAMMERED. It looks like a PO thought this was a 4-wheel drive! I have new floor rails on order from Bad Dog, and need a drivers floor pan only. Charlie at Zed Findings said he would sell me the pair with out rails for $260, or one for $220. Anyone need a passenger floor pan? My pass floor appears rust free. Only other rust so far is under the battery box. I spent a few evenings with a wire brush on an angle grinder working on getting a TON of undercoating off the bottom of the car. I decided it would be nice to clean it ALL off, and do a nice refinish of the whole bottom of the car. I really had not planned on the project being such an extensive one, but the car is, what 38 years old, so I threw off the gloves (or rather put them on) and dove in. As I am alone in my shop most of the time (as most of us probably are), I thought about how to best utilize my lift (I know I am spoiled having one!), and remove front and rear suspension. I unbolted everything except for the strut retaining nuts, and the two nuts that hold the horizontal differential mount to the body studs, lowered the car, put the wheels back on, and set the wheels lightly on the ground. I then quickly finished unbolting everything, and picked the car up over the suspension. Worked pretty slick. Whole process start to finish, about an hour and a half. I repeated the process in the front end, and rolled the front and rear suspension out of the way. Front went really fast, one hour at the most. Unbolting the steering shaft took more time than anything. I continued to remove the fuel and rear brake line from the bottom of the car. So far ONE bolt has broken off, and it was just one of the little 5mm screws holding the brake and fuel lines to the body. Everything else has come unbolted slick. This comes as a surprise, as my other old Japanese cars have not been this way, particularly my 67 Honda S800 (in the background of the picture showing the suspension on the ground. I am going to continue working on the undercoating removal. Very slow process, and hard on the arms, and neck! And what a mess, that sh#t goes everywhere! Anybody had any luck with alternate methods of undercoat removal from bottom of car? Chemicals? I'll take some more pic's as I get more done on the bottom of the car. The paint comes off the car next.
-
Thanks for the heads up, good price.
-
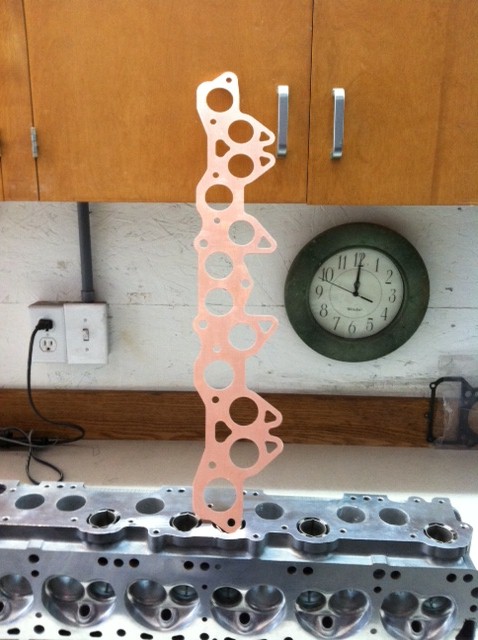
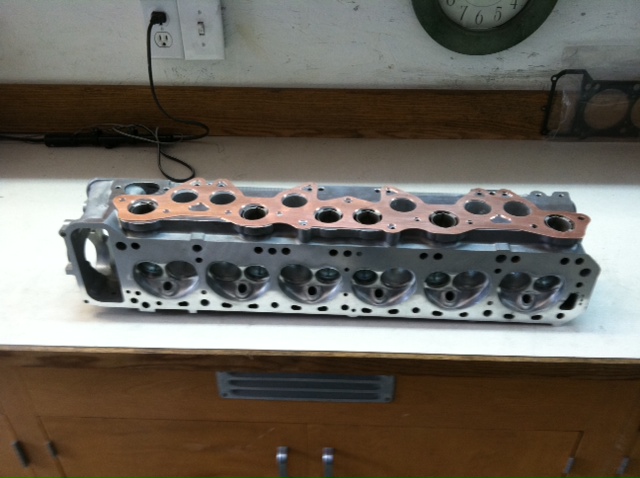
Guys, I am building a 3.1 liter engine for my 74 260Z. My goal is to make a decent amount of power, yet look as close to stock under the hood as possible. Research, internet shopping, etc., left me with the following combination: N42 Block VO7 Crank KA24 pistons P79 head 240Z rods, polished, balanced, shot peened, arp bolts N36 intake 3 screw SU carbs The head, and intake combo leads me to my topic. I did not like the looks of the injector "divots," in the top of the intake ports, so I welded them up. So, I end up with a head with round intake and round exhaust ports. Any off the shelf gasket I can get has the cutouts for the injectors, and of course does not have the correct holes for the N36 intake manifolds. I did not feel like punching a bunch of extra holes, and still not end up with a continuous sealing surface around my intake runners. Some internet research led me to Copper Gaskets Unlimited in Phoenix, AZ. He already had a pattern for a gasket using SU manifolds, but with rectangular exhaust ports. We spoke on the phone, and I sent him an example of a gasket with the round exhaust ports I desired. From the time he received my sample, to the time I received my gasket today, was 6 days! Check out the pictures, I am thrilled with the results If anyone is interested, the fellows name is: Lani Copper Gaskets Unlimited www.coppergaskets.us Price was very reasonable $55 plus shipping
-
Oh, I see what you mean about the original post date, I thought this was new this week! Obviously I am new at this forum stuff (and I am pretty old, so I need my 13 year-old's help anyway!), but I am having fun reading, and occasionally chiming in. Thanks for putting up with me! Haven't heard of the term "necropost," but I have figured out the meaning.
-