luseboy
-
Posts
599 -
Joined
-
Last visited
-
Days Won
2
Content Type
Profiles
Forums
Blogs
Events
Gallery
Downloads
Store
Everything posted by luseboy
-
260z clutch slave cylinder home position?
luseboy replied to 882993md's topic in S30 Series - 240z, 260z, 280z
Do you know the history of the clutch/throwout collar? It's possible that you have the wrong combination, there are two different pressure plates and two different throwout collars, the wrong combination can cause the clutch to not work properly (as it seems to be in my case). Obviously it's much easier to start by addressing the hydraulic components and their adjustments (well, really just the brake pedal adjustment). If the car was sitting for a loong time it's possible that the hard line for the clutch is either clogged or has a hole in it, but you'd probably see brake fluid leaking if it had a hole and you wouldn't get any fluid at the slave if it was clogged. You say there's no brake fluid in there yet? Why not try bleeding it out? This will tell you a lot more. Also, did you install the copper (or brass, not sure) washer that goes between the soft line and the slave? I failed to do this and had a nice puddle of DOT on my garage floor the day after I bled it. -
260z clutch slave cylinder home position?
luseboy replied to 882993md's topic in S30 Series - 240z, 260z, 280z
Did your clutch work before you changed the hydraulic components? Did you keep the master cylinder push rod from your old master? The new masters often come with pushrods that are too short. There are a couple of topics addressing similar poblems that are active currently, and I too am dealing with it (though I believe my problem is the pressure plate/throwout collar combo I'm using). Start by making sure the pedal is adjusted properly(according to the fsm) and go from there. -
Far too easy! But it's nice coming back to it. I'm only able to work on my car one day a week but I should be able to drive it this summer, though it will be kinda bare bones. This 260 is looking like it's gonna be a monster!
-
Awesome, that's simple! Everything I found online said bspt so that's what I had assumed it was, which would make sense seeing as how a few other engine plumbing threads are cut in bspt.
-
You recently started working on Z cars again too? I let mine sit for a while....
-
Alright alright this is what I was trying to avoid lol. I'm not trying to re-invent the wheel, and I'm also not claiming I have some super special set up. My whole point was that I'm just trying to figure out a simple yet effective PCV set up. So the stock PCV valve is bspt right? I guess I can find an adapter to use that to plumb into the carb, simple enough. I'm still mostly trying to determine what I should do with the breather on the valve cover, I don't just want to leave it open with a filter right? Should I use a check valve on there like was suggested earlier, a restrictor like you mentioned mitsubishi uses, or something else? If I can answer that I can figure out the rest.
-
Interesting, thank you for your insight! I was thinking that they would all be similar enough but now that I think about it they would probably be designed to work properly with the way the vacuum would change in different engines, which is not the same in all engines I would assume. I'm not so sure if I want to put the vacuum hose over the threads on the stock pcv valve but I guess if I can get itto seal it doesn't matter, I'd just be worried about it coming off in the middle of a drive giving me a nice vacuum leak. Maybe I could find a bspt thread to hose nipple adapter... I'll have to look into that. Still looking for more guidance. I'm not anything near an expert on this shit, so what should I do with my valve cover breather?
-
I was hoping you would chime in! So for the sake of my setup (I know you'd never run a 4bbl but let's pretend), what would you do? Crank case fitting to Pcv valve to manifold vaccuum, and valve cover restrictor to breather? If so, any ideas on where I might find a suitable restrictor and if the same size as the mitsubishi would be ideal? Also any reason I can't use a universal PCV valve? I don't really want to use a stock pcv valve because that would entail finding a british pipe thread to npt adapter or drilling/tapping my manifold. Two things I don't want to do. I don't have any of the other pieces of smog equipment and would like to avoid trying to set them up, so I just want to make the PCV system work as best and as simple as it can short of being the factory set up. Also I haven't noticed any smoke coming out of the open pcv ports other than the few times it dieseled on me, so I feel hopeful that it won't be too much of an issue. As far as the exhaust ejector goes- I'm not building a race car, just a fun street car. It will not see a whole lot of WOT and will mostly see street driving and maybe some autocross. As such I really just want to have a functioning PCV system for engine health and to help prevent sealing problems from arising. So what would you do if you wanted to set up a simple but effective PCV system on an L28 with a 4bbl? I clearly am not as well read on this stuff as I could be but I'd just like to try and make sure I have things working right.
-
Fsm is available from xenons30. Many people have rebuilt these cars and there is tons of info out there on google, here, and many many web pages and other forums.
-
Many or all of your questions can be answered by searching as has been suggested. I ditched almost all the factory components, including gauges, heater, combo switches, etc. So if you're trying to stay stock I have no insight for you. If you're going with aftermarket gauges then look at the instructions for them. Ignition diagrams are easy to come by and easy to figure out with a continuity tester. EZ wire apparently has better quality wire than the painless but I'm not so sure if that's true. I'm more than happy with the quality of the harness, it's quite nice. Difficulty of installation is an entirely impossible thing to answer. For me it took a lot of thinking and double checking and reading and studying and testing. Some people can just throw it in and it works. Some people get lost and don't know how to get back. I will tell you I put the harness in when my car was still a bare shell, then put in the dash and everything else, so that probably made it a lot easier than the other way around. If you have no experience with this stuff and aren't comfortable doing these kind of things then maybe you should re-consider. If you're hoping to have it done over a weekend you really need to reconsider, this is time consuming to do right.
-
Yep, though I'm not entirely done yet (car is still in the "building" phase). I went with the 21 circuit kit as I wanted to have some extra circuits for various accessories I may decide to add in the future. It was quite a process and you're going to need to do a lot of homework. If you haven't done much wiring before you will want to give yourself a lot of time to think things through, and you're still going to need a number of other things to do it right. There is another topic going right now about the same thing called "rewiring my 260." And definitely search for older topics as there are many.
-
There are many topics about both the painless and EZ-wire kit. I personally went with the EZ-wire kit and am very happy with it. It takes a lot of time and patience and many of the stock electrical components are difficult to figure out. It is a partial engine harness but mostly a body harness, so you're likely still going to need to figure out the wiring for the engine.
-
I haven't really been on this site in the last couple years aside from the last couple weeks. Was this a ground-up head build or did it utilize two KA heads or something like that? Sounds pretty cool in any rate. Well I have been doing some reading on honda forums (trying to decipher slang gets old though), muscle car forums (lots of 'merica and confederate flags sorta dilluted the point), FSM's, wikipedia pages, etc. The only thing I know for sure is that PCV is a good thing, and that I am over thinking my set up. So if the manifold vacuum is not too much for the engine seals, I still like the check valve idea. Seems like it solves all my problems and is a solid approach. I'd just like to make sure it isn't going to be too much. I'd be running an air compressor water/oil seperator just to diminish the amount of oil going into my combustion chambers. But I'd really like to avoid pulling seals into the engine, and am a little concerned that manifold vacuum at idle might be a bit much. That being said, would the PCV valve be sufficient at limiting the pressure? I guess it is made to do this very thing. And for check valve, how much pressure would I want it to open up at? Maybe 5psi (of positive pressure)? And would you think it'd be best to have the input to the manifold be centered so all 6 cylinders get the same amount of crank case fumes? Or would I be find just plumbing to one side of the manifold (first three cylinders would be getting the fumes/oil), I'm thinking central. The story about your friend sounds funny! I think he solved his problem (of having a yugo) by it burning to the ground. This is not the outcome I want at all in any way shape form color or theme. Luckily I pay attention to things and don't forsee something like that happening (I'm sure he said the same thing).
-
DOHC os giken head? Your wallet must be a little lighter since you got that. I may plumb into the air filter but I'd like to avoid oil residue on my carb if I can. Plus I'd like to have a setup that I can make work with triple webers in the future, which I guess may mean header valve
-
Interesting, that makes sense. I don't really see any mention of flow reversal, but at high rpm the vacuum would be reduced in the manifold, but I didn't think it went all the way up to 14 psi, which would cause a flow reversal. Maybe in a super/turbo charged application with enough boost, but I thought there were systems in place to avoid this. So far everything I've read has said that there is simply a breather on one side and the other side is hooked up to manifold vacuum (for a pcv system in general). No mention thus far as to a check valve or anything like that. I'm a little concerned that if I do the check valve on the valve cover breather and hook the crank case up to manifold vacuum that I may have too much vacuum running through the engine, possibly resulting in a seal being sucked in. I'm assuming I'm just over-thinking and missing some key points but maybe I'm wrong. I can also see, however, that running a breather on top and manifold vacuum on bottom will basically give me a vacuum leak, but if I messed up on any of my seals in my engine the same thing could/would happen, right? I guess this is why a lot of people just run breathers on top and bottom and don't worry about it, but I'd like to set up something if for no reason other than I'd like to avoid oil leaks, and PCV systems seem to help keep the engine healthy. I guess I need to look further into the stock set up and get a better idea of how Nissan engineered it. Edit: Just read the FSM, you were totally right. The FSM says that under full throttle the manifold vacuum is insufficient for the amount of blow-by being produced, so the blow-by goes to the air cleaner where the inlet is. Also, there is a flame arrestor in this tube near the front (not sure what that consists of or how important it would be for my setup, any ideas?) and under normal conditions the pcv valve pulls fresh air through the engine through this tube. But there should be a small amount of vacuum in the air cleaner under normal conditions right? So I couldn't just put the breather on top and connect the crankcase to vacuum and call it a day, right? I still like the check valve idea but am still worried that might be too much pressure. I think it's safe to say I am over thinking this system, but was hoping for some more guidance on which route to go...
-
Distributor/Oil Pump Shaft Timing
luseboy replied to Bigbrowndog's topic in Trouble Shooting / General Engine
So you're unable to get it to start right? It's a little unclear from your original post. If you can get it to start, see where the timing is at with a timing light. Additionally, make sure you have the right firing order, and that the wires are in the right spot on the dizzy cap and verify by setting the motor to TDC and seeing which spot on the cap the rotor is pointing to. If I remember correctly, this will go to cylinder #1, and then you want to set the firing order off of that. Also, pull out your multimeter and start testing for voltage at the coil. If it's not starting, verify that you're getting fuel and compression and that the carb is functioning reasonably, perhaps it's not starting due to another problem. I know I had a really tough time getting my pump shaft timed right at first, as it can be a little tricky to decipher, I wish they would have put timing ticks or something on there. I personally know pretty much nothing about points as I got my distributor with a pertronix already installed, and I've never had to deal with points, but I'm sure many members on here know all about them. The "shotgun approach" to fixing things (replacing parts blindly) is generally frowned upon by the more experienced members here, but you might try the other distributor, if nothing else it will help you narrow down what the problem is. Another thing to look at is the harmonic balancer, these are known to fail (especially after 40 years) which often starts out with the outer ring sitting at a different spot on the outside of the pulley than it once did. This makes the timing mark no longer relevant. It may be that your harmonic balancer has shifted and your "TDC" is not actually TDC. You should be able to confirm this by pulling the valve cover and looking at the cam lobes while cylinder #1 is at TDC. I'm bad at explaining this kinda stuff but this has been discussed quite a bit, there are two cam lobes that stick up at actual TDC, so confirm that your engine is really at TDC when you're trying to time the distributor. If none of that works you may want to go through the ignition wiring rabbit hole and make sure it's all hooked up right and getting voltage and not shorting. Beyond that I can't think of anything rational that would cause it not to start, unless the plugs are corroded to the point of having no more gap but I assume they got replaced after the rebuild. -
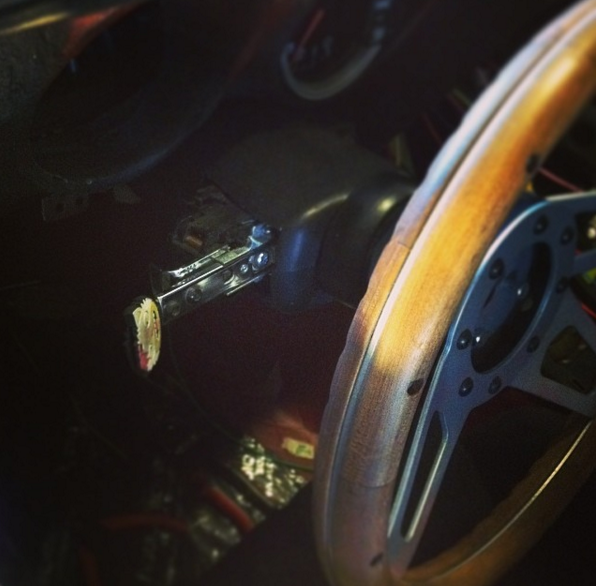
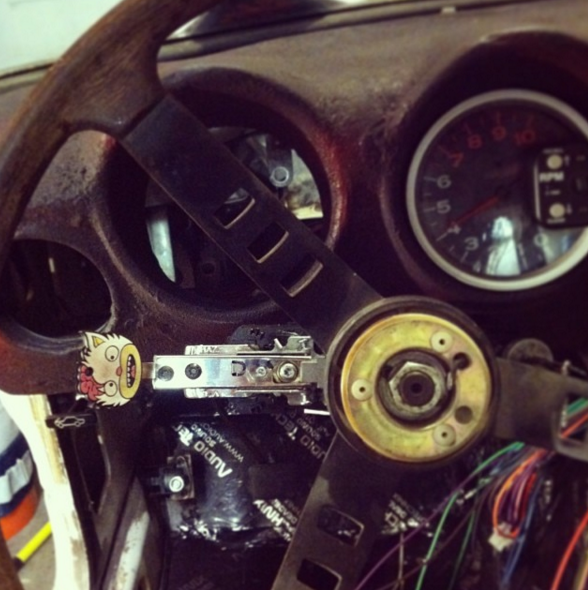
Well I didn't get a new combination switch, just a universal turn signal switch; no headlight dimmer, no wiper function, just simply turn signal. I couldn't even tell you who made the one I got and I had to make a custom handle as the one I got was for a semi and the handle would almost hit the door. I also had to cut the clamshell to make it fit, it wouldn't fit over it. Search "universal turn signal switch" on ebay or summit or something, I think I got mine off ebay. Use a multimeter to figure out how to wire it, or use the instructions if you're lucky enough to get some. For headlight dimmer I got a high/low floor switch from summit or jegs and put it on my dead pedal. Wiper control will just be a dial on my dash. Some people have used the stock combo switches with the EZ wire harness but I didn't want to mess with it, and I like my set up better. But then again my car is kinda a street rod that no one but me really appreciates. Here's some pictures, not that it'll tell you much lol. Turn Signal Switch: You can see the headlight dimmer off to the left below. Push with your left foot to switch between high and low, like old American cars. Have a separate toggle switch on my dash to turn the headlights on and off through a relay which is in the engine bay.

-
This is a really good point that I hadn't thought of. It may be more simple to just replace some of the electrical components, I wouldn't want to put in a universal harness on a Z that wasn't already stripped down and far from stock like mine was. Adding relays for the headlights and a few other components such as the fuel pump can really work wonders.
-
Brakes! Who is running what?
luseboy replied to SUNNY Z's topic in Brakes, Wheels, Suspension, and Chassis
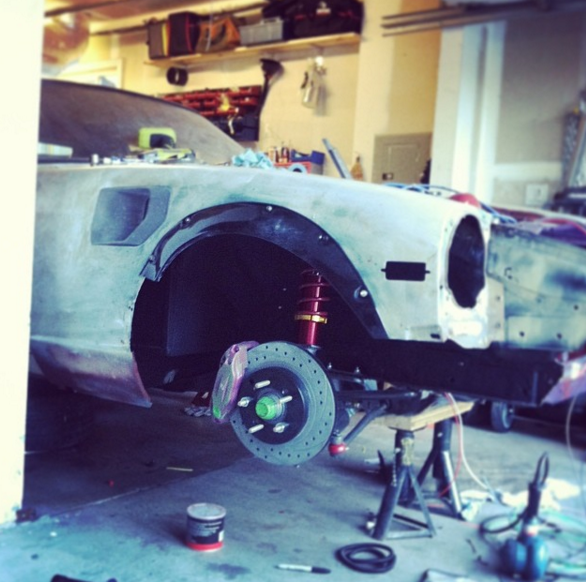
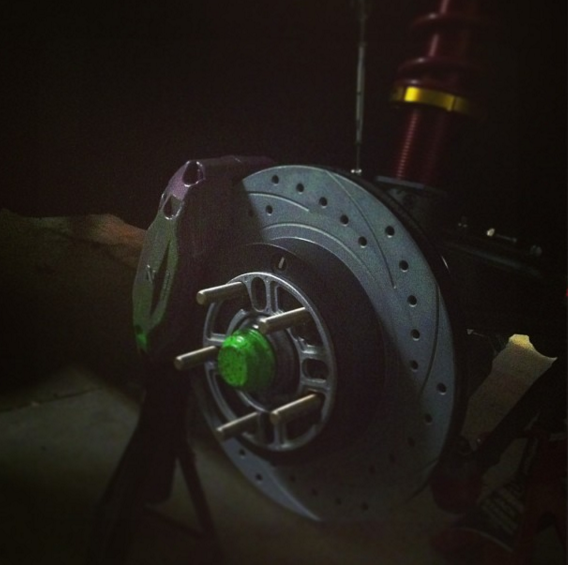
I'm running '93 RX7 turbo front calipers with Evo 8 rear rotors up front utilizing a steel bracket. In the back I went with the Silvermine Motors Stage 4 kit so I could retain a parking brake but still have a balanced brake set up. In addition, I've got a Wilwood 1" master and a Wilwood proportioning valve, which I have mounted in the ash tray pocket so I can adjust it in the car. I haven't driven my car yet so I can't speak to how well the brakes actually work but I have pretty high hopes. The front brakes are 4 piston aluminum calipers, and while they used to say MAZDA on them, the guy I bought the kit from ground down all the letters except Z, so now they just say Z. I haven't actually seen anyone else running this set up, but I have heard it mentioned before but not in much detail. The brackets are super simple, just a straight piece of steel that gets bolted to the stock brake ears, with two holes that are farther apart and tapped so you can bolt in the RX7 caliper. I did have to do a lot of filing and messing around with spacing to get them to center properly but they're all good now.
-
The t5 that came in the turbo cars is basically a bolt-in transmission as long as you have the driveshaft for it. Good luck finding one though, they are hard to come by and fetch a pretty penny. Personally I'd take this trans over all the other feasible options but will probably go for the SX trans if I decide to keep my L series long term.
-
I did the EZ wiring kit on my car. One thing that was suggested to me that I'm glad I listened to was to get one with more circuits than you think you need- that way you have some extra circuits to wire things in with that you forgot about, and also for later use if you decide to put a stereo in or something like that. Definitely get yourself a nice crimping tool for non-insulated terminals, a good assortment of non-insulate blade terminals and an assortment of non-insulated ring terminals, an assortment of grommets, a good amount of heat shrink tubing, some corrugated plastic wiring tubing (I bought this at the hardware store), lots of electrical tape, lots of the non-adhesive cloth tape for wrapping up your wiring, and a bunch of variously sized zip ties. All of these things really come in handy and it's better to have it to begin with than to get it piece by piece as you're doing it. You're also going to want to have a good soldering iron and solder on hand, as well as a multimeter that has a continuity (or OHM) setting. The most difficult part of this wiring is the combination switches, and mine were all worn out so I just got a universal turn signal lever/switch and that made life a lot easier. Since you already have a V8 in the car your wiring will be a bit easier, as they are basically designed for v8's. Give yourself quite a bit of time to do this, it takes forever and is very tedious and your back, brain, and arms will be sore from all the different positions you're going to be trying to feed wiring the right way and what not. That being said though the EZ wire kit is actually pretty nice, the wiring is good quality, the box itself is nice, and there is plenty of length on almost all the wires to work in our little cars.
-
That makes perfect sense, I think the fact that my trans has been sitting so long only makes it that much harder to get it into gear, so I'm sure after a couple thousand miles it'll come around
-
Ha well assuming is really all I have most of the time- I have one day a week to even look at my car as 6 days a week I am an hour away from it where I go to school full time, so I don't get a whole lot of time to diagnose my problems. I ran the engine again today and afterwards the cam was wet with oil. I haven't pulled the cover off yet but I'm pretty sure there's oil up there. I will confirm this next time I run the engine. From what I could find the oil pump can put out that much pressure, I'm just confused as to why I don't have any seals blowing out. That being said I do have some oil dripping down from two of the bolt heads on my oil pump, so I'll have to figure that one out too. Lol no fancy cap for me, I'll just keep it off and wait. Gives me some good time to confirm I don't have any exhaust or vacuum leaks and make sure my timing is set and what not. Next time I need a new cap I'll look for one of the fancy ones. Ya I totally hear you, I guess I got a bit excited because I hadn't been doing anything with the car for so long and all of a sudden I am, but of course I have some things to address. I still haven't had a chance to really diagnose my problems but things are getting there nonetheless. Today I took some time to do some silly things that made me feel more motivated, like putting on the door panels and headliner and cleaning some stuff up, and testing out some of my electrical components I hadn't really had a chance to do (like my dapper headlights that are extremely bright) anyways in the process I pushed the car out of the garage into the driveway, and what do you know? All of a sudden the damn thing would hit all gears no problem, with a great shifter feel. Of course once I rolled it back in to the garage, it would no longer shift into the gears but at least I know it's able to do so when the output shaft gets spun. I'm feeling hopeful that it'll come around.
-
It is the one that came with the gauge when I bought it brand new a couple years ago, but perhaps something has gone bad. I'm gonna start by pulling the relief valve cover off and cleaning out the valve, I read of a couple people having the same thing happen and that was all it was, so that's where I'm gonna start. I'm concerned though that my oil galleys may be clogged, but if they were, I imagine there wouldn't be any oil flow and the top end would be making quite some noise, right? There was no knocking or clicking or anything like that, so I assume oil is flowing. I should have pulled the oil cap with it running to see if I could see any oil spraying out of the cam. By fill it up, you mean just the radiator right? If so, that's what I had thought, but I want to leave the cap off so it doesn't develop pressure right? I have a heater core with a little valve in the engine bay, so I'll make sure that valve is open. Well I was assuming the other day because I was just fiddling, but now I'm gonna go track down my problem. I'm sure I will find out more when I measure the pedal travel. I feel pretty confident about my bleed but if everything else seems right and it's still not working then I'll give bleeding another shot. What were you thinking? And what do you mean by captive pushrod? Haha ya honestly I should have left it alone, aren't the 280z slaves with the non-adjustable push rod supposed to be self-adjusting anyways? I know I read a few topics on here or elsewhere that recommended having an adjustable pushrod and that just making a simple one was totally fine. I'll check the FSM for the proper measurements for free play and travel and make sure I get that proper. It'll all work out somehow.
-
I know that's what AZC recommends but it seems like a very rudimentary set up to me. They also just have a breather on the lower PCV inlet, which seems like not such a good set up, right? I am using a plenum with a cone filter so would have to drill and tap my plenum to do a set up like that one. And oil in the carb would not be such a great thing either, unless I'm mistaken. I think plumbing the manifold seems like a good solution, I have an extra port already and could probably find a PCV valve that would screw right into it. I am using an edelbrock carb (it's a 500cfm carb though so I may need to swap it out for a holley 390 anyways), but for whatever reason I think I'd prefer to have the PCV plumbed separately from the carb, unless that means it already has a PCV valve in there? I guess the advantage to this would be that the gasses from the crank case will go through all 6 cylinders equally, where as the port on the manifold would put it going through only the front 3 cylinders, so maybe that's the best place to plumb it in. I like your idea, that sounds like the way I want to go. I like the look of a breather on the valve cover, and the fact that I can then pull the valve cover without undoing any hoses. I don't know a whole lot about PCV systems, but in my quick internet searching I found that the PCV valve is never fully closed, so I couldn't just use a PCV valve as my check valve. How much pressure would I see at that valve cover inlet if I hooked the block inlet to manifold vacuum and had a check valve on the end? I'm trying to think of where I might be able to find a check valve... I can't seem to think of any easy applications but I'm gonna have to start hunting one down.