
Daeron
-
Posts
2148 -
Joined
-
Last visited
-
Days Won
2
Content Type
Profiles
Forums
Blogs
Events
Gallery
Downloads
Store
Posts posted by Daeron
-
-
I am fairly certain that there are differences (albeit minor) in the sheetmetal panels that were welded together that a true purist would be able to detect.. ie, chopping even a 72 up for this as a donor car still wouldn't set that "right" so the only real value lies in the number. The same thing holds true (although to a little bit less degree for the white car, since the sunroof was added. (although the sunroof COULD be removed cleanly and be closer to "mint" that the 230 car)
The real $$ value comes from straight straight original straight low number cars that are untouched and have had all the fasteners etc EVERYTHING replaced.... with series 1 pieces, NOW or used original if possible. Other than that its just a quirk that adds to the value, more along the lines of the "black pearl" edition of 78... special but only to a certain extent.
As has been pointed out, the good news is, mod away. The cool factor and whatever $$ its worth will be present as long as the car is still number 230, or 1400, or whatever.
-
Its funny; my dad just did a bit of engine bay clean up on his 78 280 and he removed that little shelf entirely, and fastened the relays and fusible link holders down to the threads in the fenderwell originally used to hold the shelf

I don't think any of this looks out of place at all; to me, a Datsun S30 is a starting point for making a Porsche-Buster Z, and that which needs to be done to it to achieve the goal must be done. Thats why I finally swallowed my pill and got over the problem I had with the SBC swap.
-
So basically you are saying that unless you find an easy way to transfer the signalling apparatus to the L-flywheel, your efforts on this front are pretty much stalled?
Don't forget that Jeeps use a crank sensor in the bellhousing as well.. Certainly wouldn't be as likely to adapt as the Nissan piece but you never know.
-
Who rebuilt the block?? If you had it done at a machine shop, I would call them up and ask them what to do.
I would NOT trust everything to WD40 in this instance. To tell the truth, I use WD40 for little more than a glorified cleaning solvent anymore. PB Blaster is good, but Sea Foam Deep Creep is the BEST penetrating lube spray I have found yet. Its pricey, but WELL worth it, especially if you keep a $20 can of WD 40 around to use in bulk and then apply the $7 can of Deep Creep sparingly.
-
Wash tanks with soap/detergent not solvent. Tape all openings, but one vent on top. Fill tank with CO2 or fill with water up to one inch of top vent and toss in a few small chunks of dry ice. Cut tank with cut off blade on an angle grinder. Check insurance before beginning, kiss the wife/girl friend/significant other goodbye, and commence mixing vapors with sparks or flame. You might survive.
What I am saying is: don't rush into this work. Make sure both tanks are dry and vapor free. Gas vapors are heavier than air and will sink to the lowest part of the tank and stay there.... for a long time. You need to purge them.
z
Thats just classic
-
how much work was involved in removing the EGR plenum from the one intake???
I have a Pile O Manifolds, that unfortunately only containts ONE non EGR N42.. add to that the one on my 75 280 and out of say, 20+ EFI manifolds we have all told, grand total of TWO non EGR manifolds.
I LIKE working with aluminum and metal. My "career" has been a joke (long story involving self esteem versus intelligence, and lack of Booty.) and I currently work at Papa Pohn's delivering pizza making $6.50 an hour plus tips.. This is NOT a losing proposition to me!
However, I had looked at the EGR plenums on those manifolds and thought "what a shame, these are all just scrap, or at best a place to hack a flange off of" (a-la Z-ya's dual SU manifold) Is it really not that much more work to remove and plug that up? In that case, I could make one of those up for my car and paint it, and that leaves me with two non EGR manifolds that can be welded and polished..... These things are going to be how I pay for my car, sooo... We also have lots of valve covers and I have a HUGE electric motor I am going to set up on a stand with a gigantic buffing wheel. I have plans
Challenger: you know, we are at opposite corners of the country. If I get into this, maybe we ought to team up for promotional/reference purposes; you send Georgia people to me, I send any Oregonians your way. In any case, I HIGHLY doubt we would be competing very "directly" in any sense..
-
Yea, I'm reading through. Trying to figure out the quench thing, and also trying to figure out whats going to be a good revving combo. Would rather build something relatively high strung than a torque monster with no revs.
its an OHC japanese inline six.
it will rev high (unless you put a head from a non-Z car on it, like some JDM or australian vehicles had with much smaller ports; there ARE heads out there that were designed for torque at the expense of horsepower but you have to go outside the US to find them.) and it will be high strung... BUT it will still have the torque where it is needed. Thats why the I-6 is Superior.
Read the stickies, and don't forget to check the bottom of the page on any interesting thread.. there is a feature down there called Similar Threads and that frequently turns up things that the search didn't highlight for you.
-
OMG I haven't even read the whole thread yet but how did you DO that I have been wanting to do that to every car I have ever owned since I first got indoctrinated into the roadsters!!!!!!!! If you haven't posted details yet please do!
oh yah and congrats A: on the whole weekend thing and B: thats ALOT of NA HP from a 2.4!!!
:2thumbs::2thumbs:Sorry, but that is a modification I have wanted to do to every car I have ever owned (especially my old subaru; ask braap how hard it is to "brup" the cooling system!!!) so please forgive a little excess exuberance.
Regarding the camshaft discussion, a few thoughts to be considered by my fellow skeptics:
Radically welded N42 head with abnormally high quench coupled with straighter ports than your standard P series, but larger valves (naturally) than your standard E series heads.
Radically enlarged and straightened (and I presume "equalized"?) runners, as well as a highly modified plenum. Radiused runner inlets, and the entire plenum certainly LOOKS like it distributes the air more evenly than stock.. Far more evenly than stock. I think Monzter deserves some credit, and if an intake he made looks likely to perform better I will tend to believe it (lunacy, I know, I am like, SO naive
)So he has a one-off head, and a one-off intake.
Why should a stellar performance from a camshaft that is typically less than stellar be so surprising? Who knows where the specs came from in the first place, but I suspect there is likely a reason (and possibly an histoirc one) that MSA sells that cam as their "hot number." Could be they just made some notes one day while talking to a tech in a paddock somewhere and went home to order their first "racing cam." Granted, thats sheer speculation, but my point is A: the character of his motor is unique (or certainly a-typical) B: he has had it dynoed twice now C: It makes alot of sense to believe that alot of people lack an indefinable "ability to build Z-car motors" because otehr data supports that. The converse also holds true (norm the 12 sec dual SU dude, my old man and my uncle, many many others) DO have a simple knock for putting them together right.
I forget who said it, but I am going to agree with the verdict that you need to do this for a living.
-
For my own knowledge, what is the impact of cam advance? Why do we do that?
Go to the L series sub forum and read Braap's sticky on how to degree your L-series camshaft. Even if the details of the procedure and how its done just get glazed over, the post will explain better than anything else the answer to your question.
Its a longish post, but like I said you can more or less skim the process he is going over and not worry about walking away knowing how to degree in your cam.. just worry about understanding the what and the why of it.
-
Is that a bad thing?
I was almost thinking a "Powered by Walmart" windshield sticker would really suit the car!
Sounds like a NASCAR thing to me. I do my level best to use wal-mart mercilessly, like a cheap hooker. If something is not SUBSTANTIALLY cheaper there than somewhere else, I won't buy it; I am trying to do my best to run them out of business (Said Don Quixote)
-
what are those rims on the orange car!???
As for the white car, it is simply GORGEOUS, why couldn't MY dad have had that to give to me when I was a teenager???? You, buddy, just made my "list!!!!" (j/k)
-
I have a question.
We've got alcohol in our fuel now.
Are the vaporization/misting/venturi effects of the fuel in any way altered by the addition of alcohol?
I am no carb person either, but with regards to the 200SX I almost wonder if there isn't something happening that is causing an air bubble to form in the float bowl somehow at that point.. Maybe there is a range there where the floats open up, fuel starts flowing in and there is a "slosh" air pocket formed that the emulsion tubes snort up some atmosphere instead of petrol. Is he by any chance running a slightly high fuel pressure (or low fuel pressure) for any reason? Could the fuel pressure be higher than it "should be" (ie, malfunctioning pressure regulator?) Overly high fuel pressure might just cause a splish situation or a tiny pressure hammer or something along those lines...
I am trying to approach this from a point of view like so: The carb is working right, but something unanticipated is causing the E-tubes to starve. Any chance that incorrect floats are in there, or float arms? Maybe the floats are too light for some reason? (don't open up quickly enough)
You know how I work by now.. I throw ideas out there, you feel freee to shoot them down.
-
Wow that 300ZX looks subtly radical!! The grille seems almost totally blocked off, the front lip of the car naturally has a bit of a splitter on it, and I can only assume that is some sort of air duct to let air move through the car rather than around the windshield? What is the silverish thing in the midst of all that? Car looks like it is riding LOW too, that looks like a wild ride!!!!
The 280ZX is nice looking, too.. what are those doubled hoses coming up above the intake for each cylinder, fuel lines? Carb or EFI? And is that an exhaust pipe running along the passenger rocker?
Lots of questions, I know.. not looking for an instant answer (you DID say "no info") just shooting in the dark wondering if anyone else has anything to say..
-
Maybe even Daeron will be proud...
Rolling in the aisles, my friend... I don't think I have a photo of my maxi fuse install because I hacked mine into the car to replace the burnt wiring and see what state my car was in. In addition to that, mine is an OEM unit out of a Caddy I believe, or some other GM vehicle, so it is going to take a little work to mount up and make it look nice. In other words, right now its dangling by wires in a manner totally not conducive to actually driving the car.
That looks great man, I would just get some little stickers to cover the Scosche name.. that name just screams "wal-mart audiophile" to me
-
As usual Tony, thanks for explaining something nobody else has taken the time to explain the nitty-gritty details of. Just goes to show you the difference between professionals and amateurs. I never even thought to consider the different ways the pressure can build.
-
Stupid me of course you use your thumb, the louder the fart the higher the compression right. If they all sound the same then it's all good.
I do know how to use the search function, but at 4 in the morning after an 11 hour shift at work, it's just too much
Chuck
No, the volume of the fart is actually a test of the battery and starting system.
The compression test is either run based on the frequency that the fart noise makes (IF you have the fancy equipment for that) or, as Tony mentioned, we shadetrees are forced using the Peeled Skin Index
http://www.harborfreight.com/cpi/ctaf/displayitem.taf?Itemnumber=92720
The short version:
Run engine, warm it up, pull all spark plugs. Plug compression checker into each cylinder one at a time, and run the starter for a few moments with your foot flooring the gas pedal. Your assistant will tell you when the reading is no longer increasing, and that is your compression reading for that cylinder.
The objective number doesn't mean much; generally speaking, if all the cylinders are around 100 PSI an internal combustion will still run.. but 100 is sorta low. 200 is pretty bloody high, and most motors tend to be around the 150-170 PSI range when tested brand new.... but there are 230964972356459782398697234 different things that can effect the actual numerical readout of the compression test.
The IMPORTANT things about a compression check are "high enough?" and above all EVEN. The cylinders should not deviate more than 10% from each other. By that token, take two identical 4-banger engines which SHOULD read say, 170-170-170-170. One reads say, 125-128-130-122, and the other 165-165-140-165. I would bet money that the low PSI motor runs like a top, and MAYBE has lost half a drop of efficiency and power. The higher PSI motor might run... but probably extremely rough, it may overheat.... who knows?
Theres my compression test 101.
-
Bump, project thread updated, will post some more goodies here tomorrow.
Should I buy a $90 hydraulic kit from harbor freight or not??
-
did you pull all the spark plugs for the duration of the testing? Just checking. Don't forget that atmospheric pressure will lower compression numbers artificially as well.. I know you are at sea level like me but the point is that compression testing is not a test where "accurate" numbers are the hallmark; it is consistency as has been said already.
-
ezzzzzz: have you looked into subaru bolts? the EA-82 head bolts were about 6-7 inches long IIRC and were 12mm diameter, uncertain on the pitch though. I think the pitch was pretty fine but I may be mistaken. What happened to the original bolts? If you still have them, what length are they? (I presume 1.75 thread count)
PalmettoZ: the problem is not big end journal diameter, but big end thickness. The journals on the L series crankshafts are wider from front to back than the honda and for rods being discussed; the question at issue is whether those big ends will slop forwards and backwards on the crankshaft too much, or if there is a way to bush them into place that is actually reliable. I have often wondered that myself in the past, but never seriously thought it would be remotely feasible....
-
Okay! So, as I reported in my feedback thread in the Miscellaneous Tech sub forum, I got my bumper bar in from http://www.TheHondaPartsStore.com on Monday and got set to work. Monday was a wild goose chase for some stainless hardware, and then setting to familiarize myself with the complete task at hand; namely, straightening out the bent and kinked sheetmetal on the front driver corner. The car drives nice and straight, but the hood got seriously borked and the headlight and bumper rather smashed up, and I labored for several hours trying to get my head wrapped around the task of taking sheetmetal thats bent up one way, and making it bent up in the slightly less complex way it USED to be.
I test mounted the bumper last night and was working on various pedantic fitment issues. I jammed the bumper cover on in a remotely even way, lowered the hood, and suddenly my car looked almost finished!! I thought about grabbing a snapshot, but then realized it would not do without at least setting the missing headlight into place.. Only to look and realize instantly that the bumper bar is obstructing the approach to set the headlight into its socket, so I let the camera be.
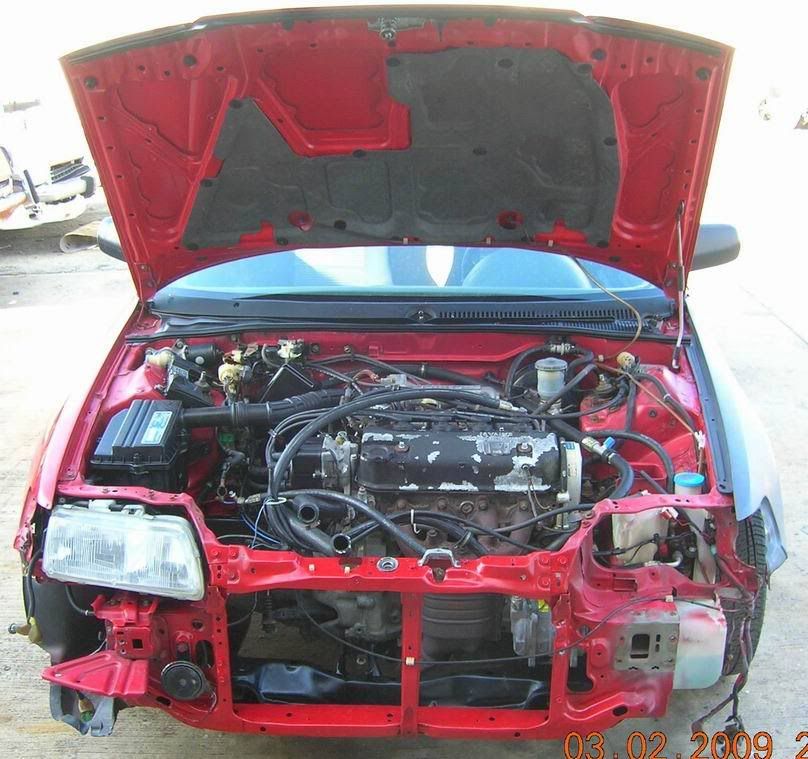
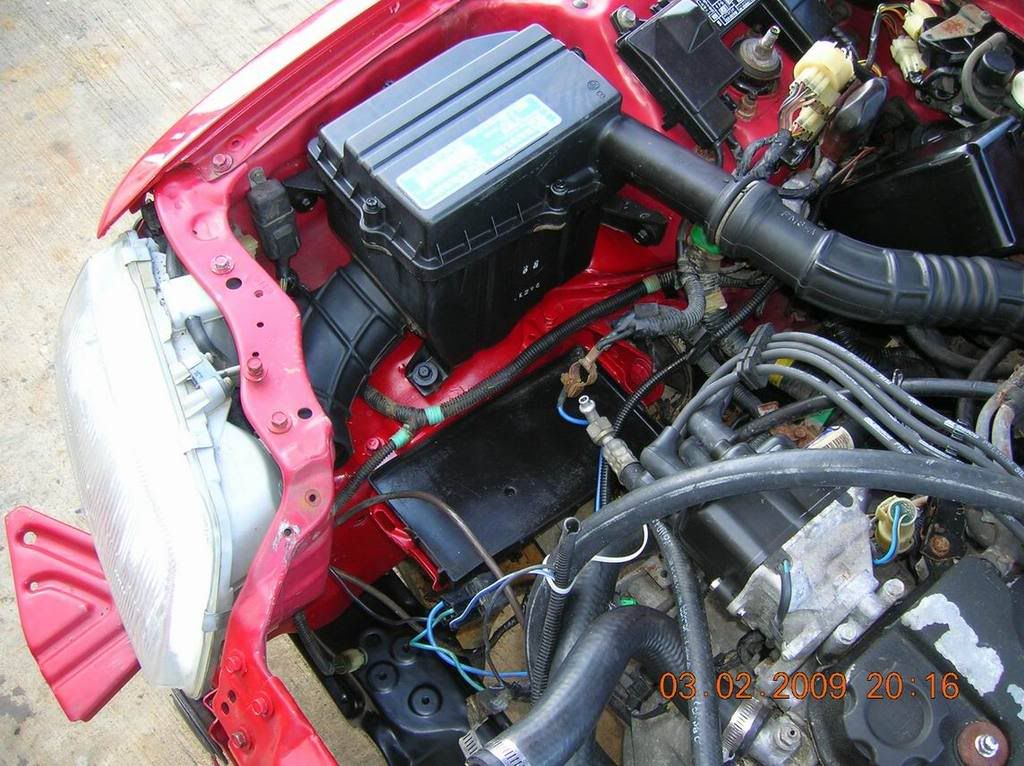
Here is a full on shot of the front of the car as I started work today:
Note that I have done some painting and improvements in the under hood appearance; detail shots of that will come after the summary of today's work.
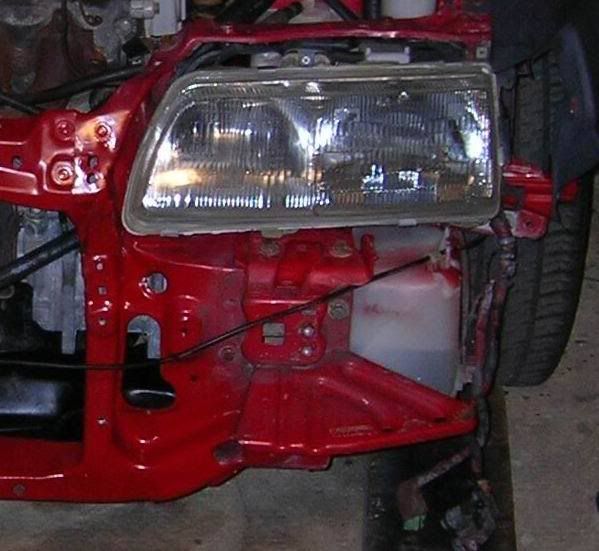
And a couple of detail shots, first showing the front radiator support area (the "T-bar" has been replaced with a junkyard pull by the kid I bought it from)
The passenger side is "largely" undamaged, which is to say things don't look 100% regular but it isn't in need of serious attention and is (except maybe in a few minor ways) a useful guideline on how the other side "should" look (the most noticeable exception to this is some irregularity in the vertical pillar between the headlight and the radiator opening)
This is the headlight socket/radiator pillar/corner fender mount junction that requires such an absurd amount of ridiculously subtle bending in order to move an inane handful of points an infinitesimally small distance relative to the rest of the car.
One might ask why the string of multi-syllabic adjectives; with good reason. In the end, when I mount the driver headlight, there is a wide gap between the headlight housing (eyeball) and the radiator pillar/eyebrow angle. (By which I mean, the pillar and its upward, rightward extension up until it becomes horizontal.) The corresponding gap on the good side (and the good car) is maybe 3/8 inch, not enough to get a finger into by any means.. the bad headlight is more like 5/8 or more, my index finger slides in up to the second knuckle. Additionally, THIS position leaves a fairly significant gap on the other end of the "see-saw" headlight (once the screws are loosened enough to allow wiggle room to see what adjustment I might need to make) so something needs to be pulled in out there...???
note: the headlight in this picture is NOT bolted in by the two top bolts that lift it up about half an inch; however, the gap between eyeball and eyebrow is visualized better set like this. The move upwards also includes a slight move outwards that maintains the same clearance as shown, and tucks it up closer to ther horizontal aspect of the "eyebrow".
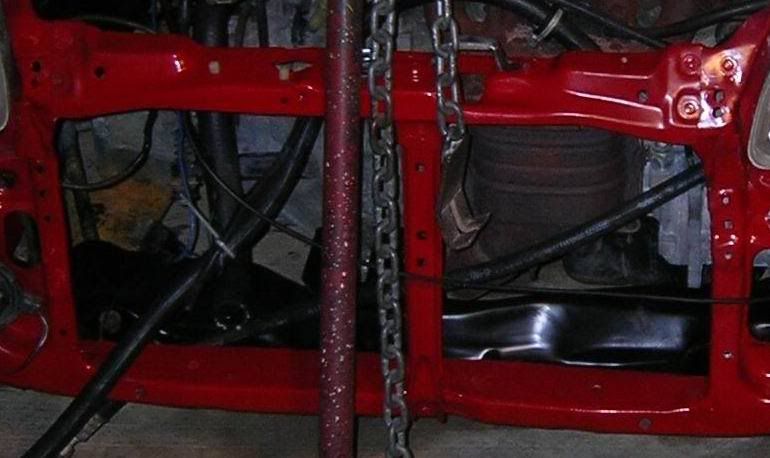
This is how the headlight socket area looked at the end of the night; I had done alot of work smoothing the angle of the channel that forms the driver side radiator pillar by using a piece of 2x4 bracing it, with another 2x4 bracing THAT against the AC compressor. Fortunately the compressor has two ears on it that have a slope to them, so I was able to slide the backing 2x4 in between the channel 2x4 and compressor and get it good and tight. I hammered at it with a rubber mallet and got it looking pretty nifty TBH.... but that was before virtually ALL the rest of the work I did tonight, so in the end I am not certain how much of that straightening survived
Here is a detail shot of the radiator support area at the end of the night.
In addition to this, the hood latch plunger is too far to the passenger side, slightly. I have adjusted every adjustment possible to the extreme and it still wants a bit more.. but on top of THAT, when I close the hood fully (it will pop over and engage easily enough) the hood seems to want to go down about another half an inch relative to the headlight tops and the fenders. the hood release/radiator support T bar definitely needs to move down a bit.. BUT....
..Down at the base of that T, where it bolts to the lower red/rad crossmember (NOT a frame crossmember, that is the pretty black shiny behind the red crossmember) the holes are misaligned in a way that indicates the top and bottom red/rad crossmembers need to spread apart about 1/4 of an inch. So, it seems that the lower red/rad crossmember needs to move down from 3/4 to an inch, and the upper needs to move down from 1/2-3/4 of an inch. Sounds straightforward.. but its REALLY hard to see that lower red/rad bar being THAT far bent upwards!! It doesn't look that far off to me.
So I am somewhat stymied! Intimidated to say the least. The body guy at the shop has been SUPER NICE in letting me borrow his tools, helping me with little push clips etc, and advice.... but I get a vibe that he really doesn't want me to friggin bother him anymore so I REALLY can't go to him and ask him what he thinks it needs. Fortunately we do have a family friend who is great with body work and loves to come by and chew the fat and help show people stuff he is good with, and get us to show him crap we are good with and he needs help with. His name is Dave and it fits him SO perfectly. Hopefully we can get in touch with Dave and Dave can come to the rescue. I *might* look into buying some hydraulic equipment at harbor freight; there is reasonable chance of it being very useful in the future (on my Z, for instance)
89.99, hard to beat.
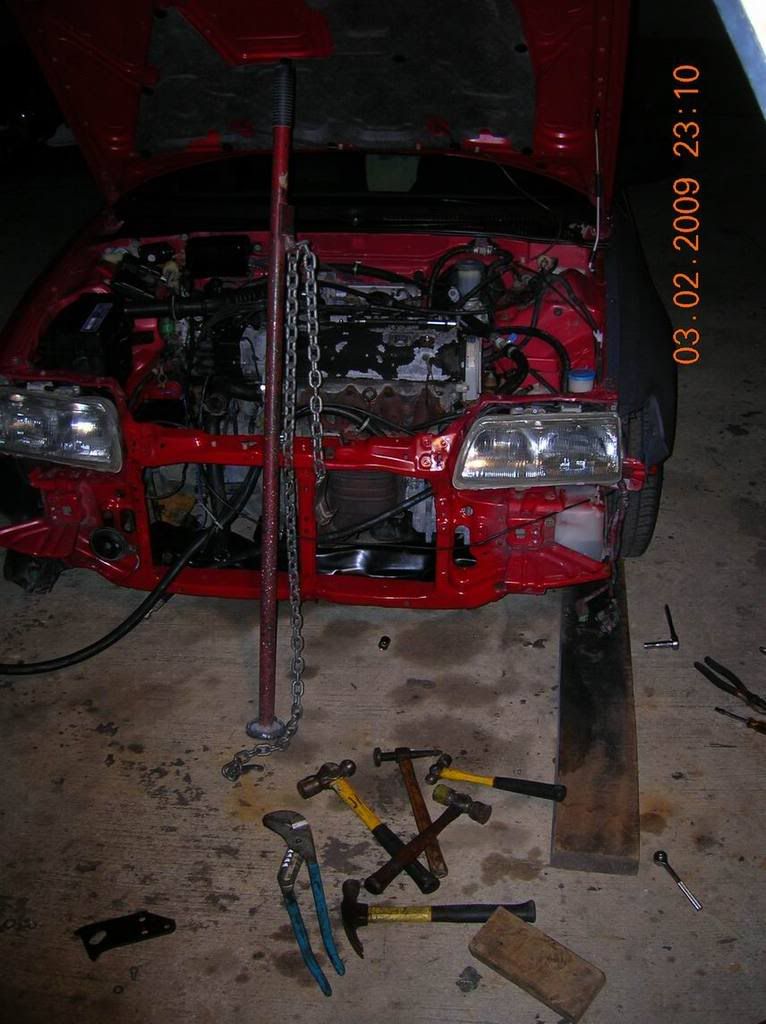
Other than Hydraulic equipment, here are a few other tools of the trade:
The big bar and chain is called a Pogo Stick; I will post another detail pic of that in the discussion thread and explain it a bit.
And on to photos from the beginning of the day showing the fruition of the asinine chores of the previous two weeks while waiting on Mister Bumper to come in the mail!!
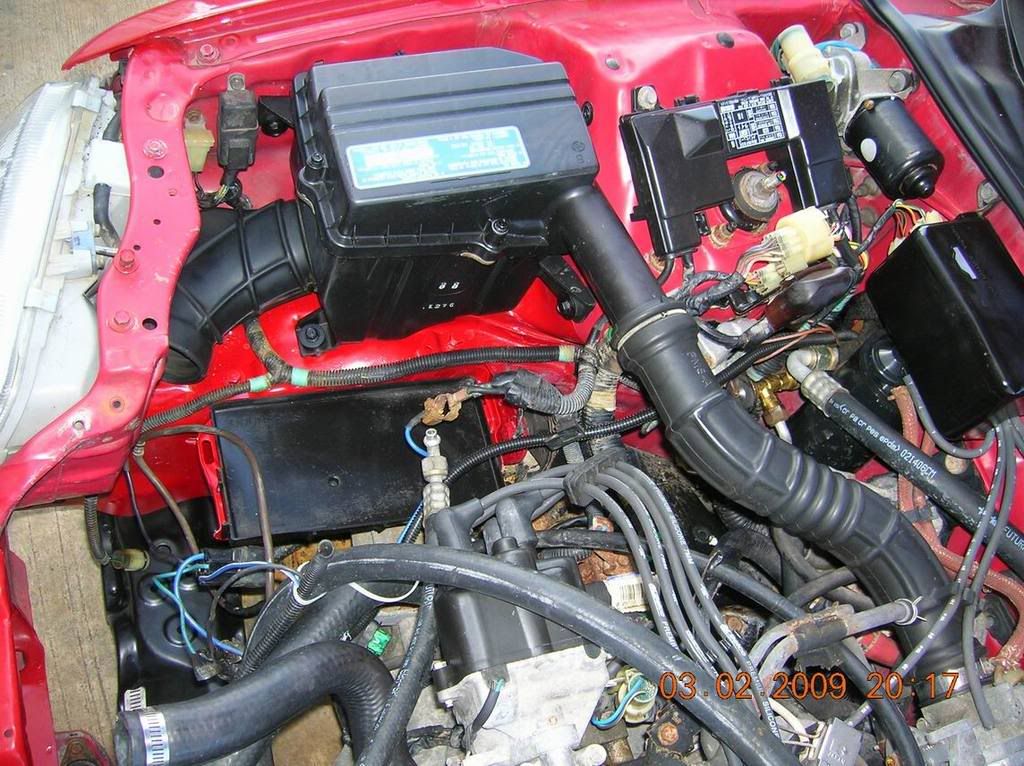
This shot of the battery tray/air filter area shows the area I painted the most obvious. (But its also the most Shiny!!)
The plastic battery tray, airbox, vacuum junction cover box, and air intake tube were all given a scrub with a gentle scotch pad and a potent but gentle degreaser, and then a gross overtreatment with my favorite exterior rubber/vinyl dressing. Fortunately, the rusted areas were limited in extent such that I could mask off a line that was mostly concealed by the airbox once it was installed. The entire panel downwards got sprayed, but the shock tower area was almost wholly untouched (just a bit around the base.)
Here is a shot from a more realistic POV; you can see that the stark color difference fades substantially with a minor shift in perspective.
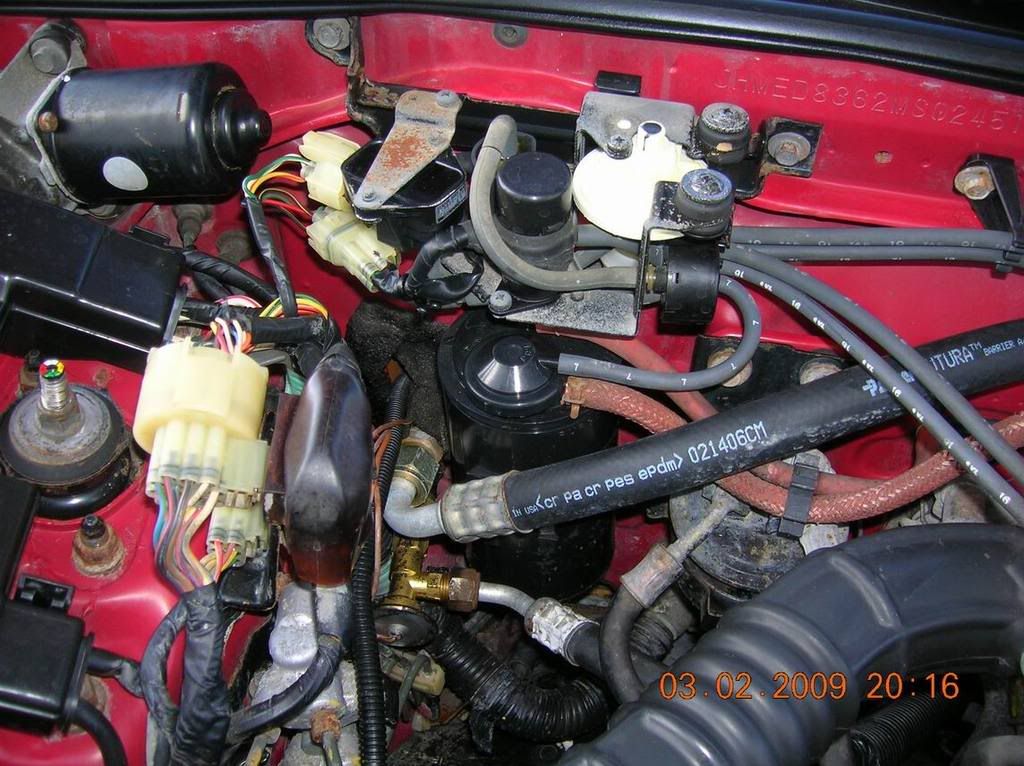
This shot shows underneath the vacuum junction box, and also shows the AC equipment installed below, and the overall fantastic condition that this vehicle is in for 389,000 miles on the chassis and wiring. The longblock was replaced, but AFAIK everything else on the car is original. One exception to that is the aforementioned adjustable Konis.
Theres a good bit of surface oxidation on the hardware in the vacuum block area. There is a good bit of surface oxidation EVERYwhere, but the valve cover and the assorted metal hardware are easy to take care of piece at a time once the car is on the road. As for the stuff under the cover.. I think I may try a half-fast attempt at getting it off with a scotch pad or something, then treat it with some oil and let it lie.
The really bad looking surface oxidation on all the aluminum surfaces irks me though. Obviously the valve cover needs to be totally redone (piece of cake) but the trans casing, the block, etc?? Any ideas PM me or hit up the feeedback thread.
So, thats it, for now!!
-
heh, I was actually being sarcastic, I thought the "elite JDM turbo drift0rrrrr" might make it clearer...
-
He is talking about adding the lever between the head of the ratchet and the socket, not the handle end.
THAT would make the difference!!! Thank you for clearing that up, I was scratching my head over how this could ever work... it seemed like the OP was completely misunderstanding what he was saying, but I never caught the fact of the extension bar being between ratchet head and socket!
-
Aww, crap, one of them long deliveries all the way to the north end.. them folks never know how to tip, the jerks
-
Got my bumper bar and miscellaneous bolts in today.
I went by a hardware store trying to get some stainless fasteners.. I need two 12mmx1.25 thread locknuts, four lockwashers that same diameter, and four washers that same diameter. I would prefer to get stainless for anyhting possible, because these bits are all going onto the front subframe crossmember, and the four bolts are in GREAT shape but they had no lockwashers and their washers are rusted nasty; the Nylock nuts from the radius rods aren't so bad, but they are nylocks, so they need to be replaced and stainless would be nice. I got stymied at the store I went to; no locknuts in the right thread, no stainless nuts, I am not loc-titing a non stainless nut onto an already rusty radius rod end. I will figure that out tomorrow.
My big issue at this juncture is minor front clip damage from the unknown accident. Basically the sheetmetal that holds the hood latch and driver headlight/corner light all into place needs to be tweaked ever so slightly. There is a super talented body/frame guy who rents space in the same shop complex as us; he has given me some pointers and is letting me use his pogo stick (super-cool tool for levering bent metal back into place) but I must confess, the sheer spacial perception needed for this kind of work is beyond me I think. When I look at the slightly bent metal, I can only analyze a single line at a time; not only can I not see in THREE dimensions, I can't visualize a "departure from nominal" analysis in TWO dimensions at once, so it just isn't my forte.
Dennis (the body guy next door) has told me that all I need to do is basically define a set of points, and measure from point to point on both my car (the minor wreck) and my brothers car and get the distances to match... but that seems like a daunting task!! I don't know, tomorrow the procrastination must end, and the sheetmetal must bend, come hell or high water!!!
I painted and installed the trim strip that goes along the top of the hatch today; the one I have is in super-crappy condition, but at least now its a smooth, satin black and doesn't draw TOO much attention to itself.
Also will have some updated pics tomorrow.. ALOT of subtle cleanup in the engine bay (painted crossmember, replaced rusted battery tray and treated rust/painted engine bay in that area, algae/scum removal in areas I hadn't gotten yet, some rubber and plastic dressing) and the front bumper coming in and getting mounted significantly alter the appearance of the car, even though I have the radiator and the driver headlight out.
So tomorrow I need to try and find my hardware, but I will just install using the crappy stuff I have for now and replace that later if needs be. Bullet list O' stuff to install in motion towards final assembly:
*frame X-member
*battery with re-conned hold-down
*radiator/fan assy
*driver headlight
At this point, I need to get my bending taken care of (actually the radiator will likely wait until after the bending) because the following need to be lined up properly at this point in assembly: front of fender, hood, hood latch support, bumper cover, corner marker and headlight.
Once that front Eyesocket is bent into place, I get to find a way to re-use my damaged bumper cover. I got to looking at it in detail today for the first time with a good bumper on the car in front of me, so I can see how it all goes together.
I can re use my bumper cover.... but I think that in the fairly near future I am going to be buying a new/junkyard/online bumper cover for the car. There are many little mounting tabs with holes in them on the plastic bumper cover. The holes are for screws to pass through and thence into thread onto the bar. Most of them are either ripped, or severely distorted... too many to ever make this bumper sit straight and hold tight again. Maybe a Pro could make it look B to B+, but I wonder if I'll get up to C territory with it; we shall see. My brother prefers the newer style front cover anyhow; maybe he would re-use mine on his car, who knows.
Will update my project thread with lots of pretty pics, and this thread with a brief rundown of the day, tomorrow night.


FWIW - Torque Multiplier (Torquewrench Extensions)
in Miscellaneous Tech
Posted
Honestly, I think alot of the blame for the misunderstanding is the widespread knowledge of cheater bar use, and the fact that we all know the physics in why and how THAT works, and nobody thought you were going any farther than that.. WE all jumped to the conclusion that YOU were misconceived and that we were like, 32093 times smarter than you. At least, thats more or less what happened to me.
I would be interested in a gearbox that you could attach to all FOUR lugnuts of a car on a free-spinning wheel, and spin something in the center that would spin the wheel and roll all four lugnuts off at once. I've thought about the gear reduction box, but thoughts of that always leap immediately to the multiple lugnuts at a time. (obviously they'd need to be broken loose before doing this)