AZGhost623
-
Posts
433 -
Joined
-
Last visited
-
Days Won
5
Content Type
Profiles
Forums
Blogs
Events
Gallery
Downloads
Store
Everything posted by AZGhost623
-
Who holds the L6 record for 1/4mile time?
AZGhost623 replied to AZGhost623's topic in Nissan L6 Forum
Well some guys I have been talking to are very interested in making a 1/4 mile record. They are drag guys big V8's top fuel cars etc, so the L series is literally foreign to them. They are all about getting records, and they still have one that remains unbeaten today. So when they saw this, they were interested in doing something with me on it. Who am I to say no? Just need to nail down whatever the official world record or even a national US record, is on an L6 so we have something to work towards. Doesnt seem to be anything from what they checked. All I could find is the youtube videos and some information on Rebellos site. 8 or 9 seconds on the L6 would be complete insane with no nos or turbo. -
Who holds the L6 record for 1/4mile time?
AZGhost623 replied to AZGhost623's topic in Nissan L6 Forum
Dave Rebellos Site has a lot of info on the Bonneville records they set, but nothing else. There are some independent places that manage to record valid times NHRA, Bonneville and some others, but of course nothing on there has a Datsun on it or specifics on the engine itself. Getting into the 10's on this engine is by far no easy thing to accomplish. I'm still curious if anyone knows a place that would have official world and/or national records. It seems that 10.72 is a pretty good start to aim for, but looking for what's officially recorded, something tangible that is recognized and respected as legit, not just a youtube video that could be open to criticism. There's more to all this questioning, but for now, just looking for the records if any exists.... Perhaps a call into Dave might shed a lot more light.... -
Currently I found a youtube link that says 10.727 @ 198km/ph on an L6. All motor, no turbo, or nos from 2013. I was curious to know what the world record is for a 1/4 mile drag on a NA L6 with no spray if such something like that exists. www.0-4factory.com Drag slip in video: R/T 1"776 60' 1"518 330' 4"353 660' 6"779 @161.65kmph 1000' 8"906 1/4 10"727 @198.40kmph R/T+E/T 12"503
-
Wheel Show! Post your pics of you wheels
AZGhost623 replied to k3werra's topic in Brakes, Wheels, Suspension and Chassis
Everyones doing it, come on!! Senza Pari has got something custom brewing for his ride as well. However, he has been open wheeling it around town for about a year now as a ratrod of sorts. I believe if I remember right from his instagram posts, he is the exact same size as me on the rears. -
very wide 17x14 wheels
AZGhost623 replied to AZGhost623's topic in Brakes, Wheels, Suspension and Chassis
Unfortunately I dont have any before pictures of the back. Thanks! Im very happy with how it turned out. My hope is to have the body work finished up here soon, and then painted in time for JCCS in September. Going to go with a metalic midnight blue, or a metalic wine red color. I actually liked the factory #611 metalic wine color they did, but since my wife said it looks brown, thats all I see now. -
Wheel Show! Post your pics of you wheels
AZGhost623 replied to k3werra's topic in Brakes, Wheels, Suspension and Chassis
Late 80's 3 piece HRE-505's | 5x114.3 bolt pattern 17x10.5 275/40/17 Front with a 5.5" lip on FUZION ZR1 17x13 345/40/17 Rear with a 9" lip -63 offset on Toyo Proxes TQ -
very wide 17x14 wheels
AZGhost623 replied to AZGhost623's topic in Brakes, Wheels, Suspension and Chassis
Well I finally got the 5 lug conversion complete this weekend. Im very happy how everything turned out, and I think it looks great with all four corners the same now. Ill probably start some small body work next weekend, but with it being fathers day Sunday not sure where Ill end up. With just white spray paint, everything, and I mean everything sticks to it, so its extremely dirty. Ill strip it all off now that I got a p paint eater, bondo in some sections, and repaint it. I hope to have the real color done in August, and and possibly, be at JCCS in September with it, if everything comes together as planned. I need to get the front driver side fender back over to ZTRIX to get them to fix trailing edge on the fender so it can be trimmed out right. But here are some final pictures. -
I gave them the specs I was looking for, but they just responded with a kit that will work on my 'legends car'. Those "LM" part numbers I dont believe cross correctly with the TIMKEN part numbers for the front bearings on a Z tho... Were you only suggesting that the bearing spacer is sufficient? 007 10529 Legends Bearing Spacer $60.00 007 10575 Legends Ultra Low Drag Seal $21.00 007 10755 Kluber Ultra Low Drag Bearing Grease Syringe $38.00 007 10585 Legends REM Bearing Kit (LM67048/LM11949) $52.00 007 10585R Legends Race Kit $40.00
-
Do performance wheel bearings exist for the 280/260/240's? I am looking for some high performance low drag wheel bearings. I have always used TIMKEN or National brand bearings before which is good for long life, but not for performance (atleast the off the shelf readily available ones). I am looking for specifics with part numbers for the fronts and rears inner and outters if anyone has those details. Thanks!
-
very wide 17x14 wheels
AZGhost623 replied to AZGhost623's topic in Brakes, Wheels, Suspension and Chassis
So I shined up the wheels real nice for this install front hub install today finally. I still cant get small hard water spots out. Im no expert at wheel cleaning, but Im definitely going to be learning on how to make these puppies really shine. The back side has years of brake dust build up. Reading online, looks like I need to get a "gel" based product as the mothers stuff just wasnt cutting it. Not bad for 20+ year old wheels tho! Wheel Specialists out in Tempe, AZ took a week to get the center bored out. But the new hubs fit very nicely, a little tough to put on but not too bad. You can see the rear of the wheel here as well. So my biggest FAIL came to be, where I thought the new 5 lug hubs would just continue to use the old rotors, I dont know why I thought this, I was more focused on the wheel side tho.... The new hubs from silvermine have a late Z31 bolt pattern on them for the rotors. So I need new rotors now, and possibly new calipers. I have the toyota 4x4 calipers on now. The late Z31 hubs are vented so they are thicker. I thought I could just run down to the parts store today and get some new rotors, but doesnt appear that way right now until I can figure out if the caliper will work or not. So everything needs to go back together so I can park it again. -
... where is the album at?
-
very wide 17x14 wheels
AZGhost623 replied to AZGhost623's topic in Brakes, Wheels, Suspension and Chassis
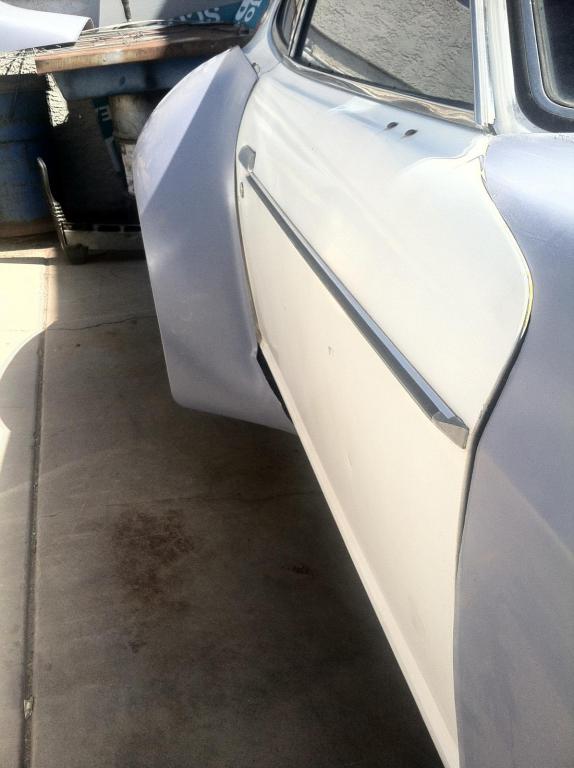
Yeah, a little. Work gets really busy so I haven't had too much time lately unfortunately... So its all put together now as far as the body goes. I have a ton of body work to work on with this car now. I have slowly been collecting stuff to complete the work thats needed. Some of it is going to be a major pain in the ass. I have to sand down the trailing edge of the front fender, use some fiber glass stock and "kitty hair" and/or bondo to then build up the edge and shape/contour it to the door so that gap looks right. You can see it in the picture below what Im talking about. Also some bondo work up on the front nose is needed. Right now its a 20ft beauty queen. Im sure im more nit picky just because I have looked at it so much to see what I need to do. I have gotten a couple quotes on paint job, dip, and wrap so I have quite a few options to chose from. Not sure if I mentioned this or not, but the rears have a 9" step lip which I really like. Some of the modern wheels are just flat all the way out. The step helps break it up in my opinion for a nicer wheel look. You can kinda see from this picture (sorry its not bigger). I figured out the offset since I kept getting asked, and its -63. Yes, I do have the original center caps too which are unobtanium if they get lost. So Ill only put them on for special pictures and such. My temp wheels I had up front got sold real quick. So I have some 14" wheels up there now, just to roll around. Its not drivable at all... I got the Silvermine motor 5 lug hubs to do the swap so I can put the HRE505 wheels back up front. Ill have proper clearance when I do that. I knew that Im going to have to have the front wheels machined (center bore opened up). The local datsun crew recommended a shop here in town that can do that, but I have been super busy with work I forget to give them a ring. The center bore is 73mm on these hubs. The center bore on the HRE505's are 58mm. So they need to be opened up. No worky... ah the joys of hot rodding I knew this was going to be an issue, but I wanted to be able to take the hub with the wheels to the machine shop so they had the actual part to work with. These are single piece billet aluminum hubs and are not very heavy at all. Should help with more weight reduction in the end when they get swapped over. It might be kinda difficult to see, but there is PLENTY of space to do this modification. Plan on sending a note to myself tomorrow to make a call to the shop so I can get this scheduled. A friend of mine is doing a swap on his Z... and then it got me all wired up to pull out this Rebello 3L and go with something else... My dream swap about be the BMW S54 motor (3.2L Inline 6 found in the M3's)... but I digress... -
very wide 17x14 wheels
AZGhost623 replied to AZGhost623's topic in Brakes, Wheels, Suspension and Chassis
Saturday work: Lots of prep work on the rear quarter fenders. Cut the top fender away showing the inner fender. Sawzall'd the inner fender into 1" widths and cleaned up the metal for welding. Interior removed/opened up to ensure nothing caught on fire and could be watched with a water bottle just in case to put out any flare ups. The driver side has an antenna line that runs over the hump. I deleted it out. The passenger side has a cable harness. Disconnected it under the passenger seat, and pulled it out through the body to the rear of the car. We tied a string onto is, so it could be easily pulled/fished back into the car after everything was welded up. The interior of my car is trashed, but it gives some good access to the inner fender to do some body sealer and/or some insulation. John at Ztrix.com did the welding, looking good for someone who claims to be an amateur welder! John rounded down the metal pieces because it was pretty sharp after we wiggled the tabs and they broke off. This way anyone working under the fender might not accidentally cut themselves. Traced the outline of the new quarter panel with a marker, and then used some wicked SEM epoxy on it to seal it to the car (30$ per 7oz bottle). It has a 90 minute cure time, so it gives time to work with the part for fitment. Used dry wall screws to screw into the panel and into the car to hold it into place while it cured. When it cures, its hard as a rock... serious industrial grade stuff! Fitted the tires, and trimmed as necessary. Took it for a short drive around the block, making it squat to see if anything rubbed, and trimmed as necessary again. That was pretty much the day which seems like simple tasks, but the prep work takes forever! I drove home on surface streets, hitting potholes and other things on purpose just to make sure if it was going to rub somewhere it could be trimmed. That was Saturdays work... 7 am until about 5-ish. Had to be home before dark, because I have no headlights! ============================ Sunday Work: Sunday was getting the front fenders rough fitted, and the imsa nose fitted. Lots of trimming work. This was the first time John ever cast this mold, so we were learning a lot of of these as to what needed to get done. Lots more measuring drilling holes, and trimming. The hardest part was lining up the fender headlight buckets to the gnose buckets and getting the headlight centered. That took A LOT of time figuring out how that was going to work. The front tires didnt work. With the adpater on it, it didnt fit and hit the corners. We felt it best to not trim the fenders as it would ruin the look. So I went back to my 16x8 tires as a temp solution. Ill get the front hubs converted to 5 lug hubs so that will remove the 2" adapter I have up under there and will suck the wheel in. It will then be right where it needs to be. Ill get some better pictures where the body doesnt blend into the floor so much later this week. Its a 20ft beauty queen right now. Lots of work still needs to be done. Im going to start getting pricing from a body/paint shop to see what its going run as well as getting a wrap done inlieu of paint. If anyone has any good suggestions for paint/body shop in greater phoenix area, please let me know! Big thanks to John Washington at Ztrix.com for all the help and assistance. This entire kit will be for sale up on his website once he gets it updated. Im sure it will include a lot pictures from this build as well as more that I didnt include up here. -
very wide 17x14 wheels
AZGhost623 replied to AZGhost623's topic in Brakes, Wheels, Suspension and Chassis
Here they be! Installing on Saturday quarter panels, front fenders and gnose.
-
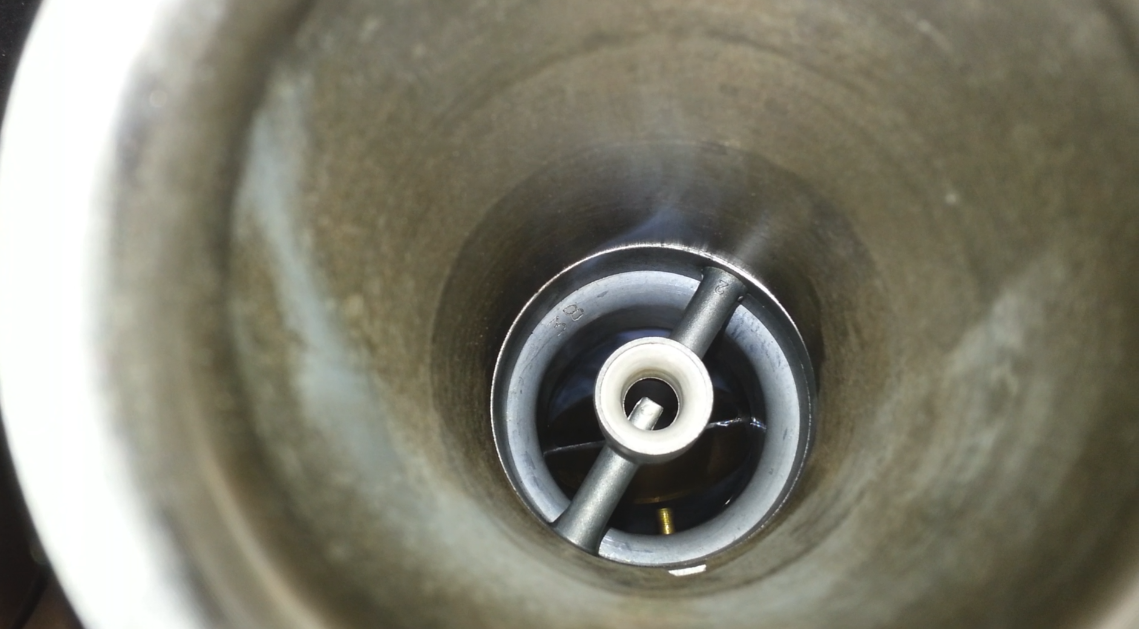
Well I am pretty sure I found my problem last night on accident while checking out something else. This was a 'full pedal press' for what was expected to be WOT on the butterfly on the carbs. It is not over rotating, as I recorded a video and got to see what it was doing, and this is just a still from it. The butterfly still has quite a ways to go before it gets completely horizontal.
-
very wide 17x14 wheels
AZGhost623 replied to AZGhost623's topic in Brakes, Wheels, Suspension and Chassis
Fresh meat from tirerack. Never used them before, but they were the most affordable, and had the best selection of tires and quickest turn around time. Nobody in town had anything this large, without going special order. So tirerack drop shipped the tires to Firestone out by me. They then called me up told me they had them, and I dropped my wheels off tonight. They were all kinda in awe on how big these tires were, and of course... they asked what car was it going on? Provided them the pictures, and they couldnt believe it was going on a Datsun. I showed them a picture of an instagram follower I have who is also running 345x40, but in an 18. I think their heads blew up at a that point. toyo proxes TQ - street/drag radial 345x40x17 -
very wide 17x14 wheels
AZGhost623 replied to AZGhost623's topic in Brakes, Wheels, Suspension and Chassis
small update. Need to figure out the gas tank area... but the shape is done. -
very wide 17x14 wheels
AZGhost623 replied to AZGhost623's topic in Brakes, Wheels, Suspension and Chassis
Looks like Senza_Pari is also doing a super wide body as well. talked to him for a bit about his project. Should be interesting to see what he comes up with, as he is quite talented as most you guys know... He has 18x11.5 up front an 18x13 in the rear. One size up on me! -
very wide 17x14 wheels
AZGhost623 replied to AZGhost623's topic in Brakes, Wheels, Suspension and Chassis
Not much to report on. Got some photos working out the shape.... Waiting on some more info, but I'll be working on a setup to make the gnose removable with some pins for easy on/off access. Just waiting on some measurements before I start making the parts. Should be installing parts on March 21st if all goes well. Instead of screwing them on the car, or using Zeus fasteners, going to be using epoxy to put them on. This stuff was recommended. -
I never did. I found the owner of the car and he said it came with the car. It had no markings.
-
Guy is out of the Dominican Republic. Hopefully they find it, its a pretty well known Z.
-
very wide 17x14 wheels
AZGhost623 replied to AZGhost623's topic in Brakes, Wheels, Suspension and Chassis
Heh... no worries you weren't the only one. never underestimate the power of hot rodding and a crazed datsun enthusiast to make it work.. =) -
very wide 17x14 wheels
AZGhost623 replied to AZGhost623's topic in Brakes, Wheels, Suspension and Chassis
New rocker panel installed too. Oddly it fixed my door issue as well. No matter what you did, it wouldnt close right. it touched up in the top left corner to the quarter panel glass. Now its got a proper gap all the way around like the drivers side. The dog leg was still rusted out where it attached to the quarter panel. Just added some metal to that area. Its not going to be seen anyways once this kit goes on. I just needed it that spot for the part to bolt to. Still need to use some body sealer, paint and clean it up a bit. But the hard part is done... it was a chore.. learned more about body work than I ever knew before doing this. -
very wide 17x14 wheels
AZGhost623 replied to AZGhost623's topic in Brakes, Wheels, Suspension and Chassis
Fabricating the panels. LH side is considered somewhat complete. Still have to rough it out a bit before it becomes a plug for the mold. Started on the right hand side after lots of templates and following the same process you saw above. Foaming out the passenger side to get a very very rough shape. Somewhat complete, but needs to continue to be roughed out, and bondo'd. Measured, and finished before it can goto a mold. But you get the idea. We are not in Kansas any more toto.... If I remember right, I believe these measured out 18" wide from the body. It adds +8" over stock fender lip edge. Oddly these look right at home. The body lines follow great, and they don't look ridiculous. They look really really good. The first thing my wife said was they look very "Porsche-ish". I heard that depending on IMSA rules/year and such they ran up to a +7" fender in the rear from stock lip, so Im not too far off actually from what someone said earlier in this thread. There wont be any updates for about 2-3 weeks while these are worked, and a mold is made to get the final part. As I understand it, these are just plugs now for the mold, and they get tossed once the mold is done. How crazy, 20-30 hours of work, and then you just toss them out. The front fenders need some work after fitting them, so they are getting some changes done to them as well. See you guys again in a few weeks! -
very wide 17x14 wheels
AZGhost623 replied to AZGhost623's topic in Brakes, Wheels, Suspension and Chassis
The car sat for 12 years out in Mesa, AZ under a pine tree. The passenger side door was completely rusted out at the bottom, and it affected the rocker greatly... it was all rusted out in the rear of the rocker near the dog leg. Good thing is we just welded scrap into that area after the new rocker was in because the new panels will hide it.