mainboyd
-
Posts
83 -
Joined
-
Last visited
-
Days Won
1
Content Type
Profiles
Forums
Blogs
Events
Gallery
Downloads
Store
Everything posted by mainboyd
-
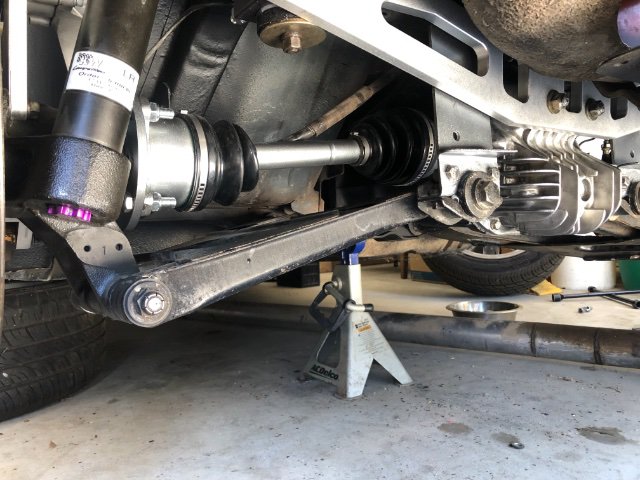
I don’t mind the extra material for strength but if it’s going to cause complications in using them and the extra material was just for a huge safety factor then I personally think it’s overkill and not necessary. Which is why I machined 4mm off of my adapters before even checking to see if they would fit first. I'm with you about how you feel about welding adapters. However, it’s definitely not because of the welds breaking. It’s how true everything will be when it comes to everything being centered.
-
The flanges I bought were from silvermine motors and I made them the same thickness as the flange from the CV axles. Which went from 12mm to 8mm. I figured if the Nissan engineers believed 8mm thick flange would be strong enough then why not the adapter flange… I probably didn’t need to grind the little stub off but I did just for safe measure. I have pictures of the before and after machining the flange adapters and a side by side pic of them next to the flange end of the CV axle in my IG page @ideation_z if you want to get a better idea of how they look like. They look very similar to the post I said I followed. The only difference is that the silvermine motors adapter is completely round, which I don’t know why they weren’t made like that in the first place because that less machining which means cost less. Anyways, like I said, it seemed to fit just fine for me. Wasn’t too long or too short and I installed them while the suspension was hanging at its lowest. I haven’t dropped the car yet but I can follow up on this thread and confirm if there were any problems or not.
-
I literally just finished installing the CLSD and CV axles from the Z31 turbo into my 1972 240z this morning. All I did was flip both cages and grinding the extra threads sticking out of the stub axle after the nut. Everything seemed to fit just fine and this was when the suspension was just hanging from the top hats. I’m just wondering how do I know if there will be no binding? It rotates fine when the suspension is hanging. I am going to jack the suspension up as much as possible to then see if it will still rotate. But if there was binding then what are the symptoms? Will it not rotate? Or making a clunking sound? I followed every step from here:

-
@mtnickel or whoever else can help me. Bringing this back because I have the Z31 turbo cv axels and the CLSD diff that I would like to swap in a 72 240z? Would following all the necessary steps provided still be ok if I were to also have the finned CLSD diff installed too? Assuming the diff is larger and wider than the others.
-
I was actually going to go with an idea similar to yours. I think they call it a hydro brake. Super simple set up and a lot cheaper than buying two parking brake calipers. But I decided to go the mechanical rout because I feel safer that it is independent of the main brake lines. Makes me “feel” a little safer on the road. Also, in wonderful California, not sure about everywhere else, requires that you have a mechanical (cable) parking brake. Maybe controlled (on/off) electronically but still using a cable. Don’t quote me on this because I only did a single search to find this out.
-
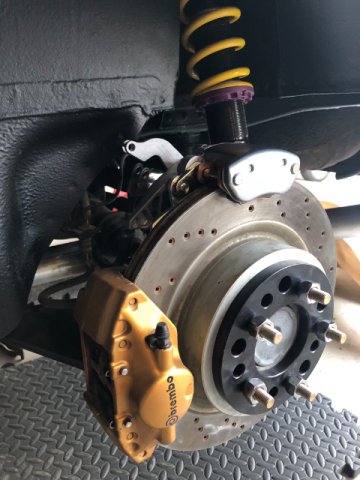
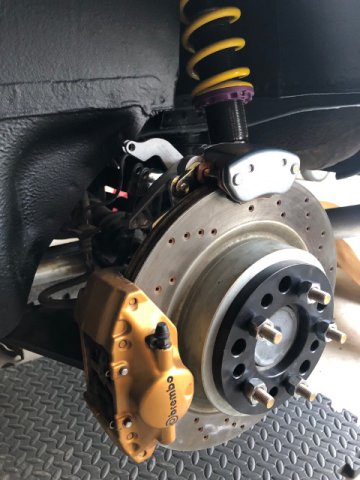
The wilwood will fit the smaller wheels. I’m not sure about the rear Brembo’s. I guess it all depends on the diameter of your rotors. My rotors are 13 inch front and rear. The front Brembo calipers barely won’t clear the smaller wheels. Maybe if I had smaller rotors and design the brackets a little shorter they might. Pictures of my custom front and rear setup are on this thread.
-
Oh yea that’s a really good point. I’m glad you mentioned that.
-
Man I really do wish I could see this in person or at least see some pictures. So the first spark plug (front one) was aligned with the front axle. So you were super close to making it a legit front mid engine Z. I think another 6 inches then that would make it possible? Not sure on the exact measurements because I’m just eyeballing it. That’s actually why I’m interested because I want to do the same. I want to just make sure I know what I’m getting myself into. I have some machining and welding experience for fabricating things. But for the things I know I will run into is the transmission tunnel clearance, ground clearance for oil pan and figuring out how to still switch gears in a manual transmission. If I’m going to move forward on this then I’ll start a new build thread but I would still like to see if anyone can provide any pictures and information on this topic.
-
Just lowered and not moved back? what made you want to drop it 20mm?
-
I guess it makes sense why I see highly modified cars have a fuel pump switch to have the pump running constantly before starting the engine.
-
I purchased the kit just last month from summit racing. So far I don’t see any leaks on the ground or any kind of smell in the garage. Hopefully I dodged a bullet. thanks for the heads up.
-
I’m very curious to how that build went. Like the placement of the shifter or transmission tunnel clearance (was there clearance for the transmission because it was lowered 2”) or how the firewall was fabricated or, what was already mentioned, clearance from the ground for the oil pan. I have so many questions. I wish there were pics of at least the final stage of it.
-
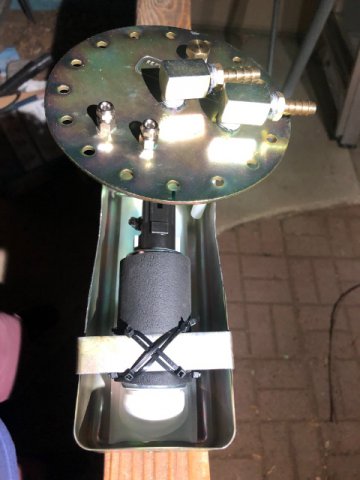
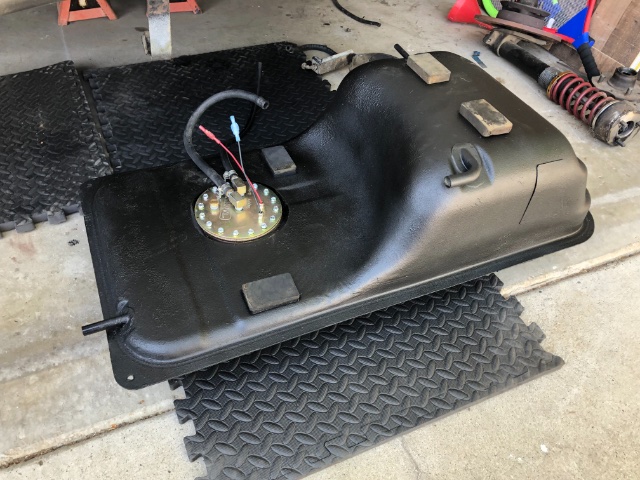
That’s how mine is currently. I haven’t really tested it yet because I’m in the process of changing out the old fuel rail and injectors. Reason why I went this route was because I was going to cut out an access hole in the spare tire section so that I can get to the fuel pump if needed rather than dropping the tank. Also, the cut out hole will not be seen since it’s in the spare tire area. The hole cut out from the spare tire section is not left open. I can close it back up with screws just like the same concept of how now the fuel pump system is mounted on the gas tank. Also, while it was all out I used POR15 to clean and seal the inside of the tank. This is also on my IG @ideation_z along with other mods I have done to the z. In the pictures, I intentionally have the fuel pump in that angle because the fuel strainer is also slightly angled. So with how the fuel pump is angled, the fuel strainer is now sitting parallel with the tray. Also, it avoids creating a 90 degree bend on the supply hose from the fuel pump. Warning!! I’m not sure if you will have an easy time finding that type of strainer. I contacted Walbro and they don’t offer it anymore. I was lucky enough to find what the guy suggested in the YouTube clip as a secondary at Napa Auto Parts (local auto parts store) but they only had one and it was at their main warehouse and I also found another one on ebay.
-
Ok NewZed, that was a really good and clear explanation from that link! Nice find and thank you very much for sharing that. I guess the aftermarket FPR are another component in your build that you can use for fine tuning if necessary? Back to the drawing board and back to the OP. To answer the OP: Long story short, I should be fine with the 11/16” ID fuel rail. As long as I have adequate fuel pressure in the fuel rails. Which is mostly determined by the fuel pump and a good FPR. Second question, what’s a good FPR?: Basically, it’s a personal preference but can possibly be based on the build. If you want a FPR to hold pressure for longer than a few seconds or possibly a few days when the fuel pump is not running then a factory FPR is the way to go. A aftermarket engine management system will also help with the air:fuel ratio adjustment. I guess that sums it up for the thread? Unless we can share what FPR are out there that would work best for the L-series engine with various hp ranges? Maybe that’s another new thread or something that has already been discussed in another thread. I can at least now go ahead and machine the fuel rail extrusion and start assembling.
-
You make a good point about not needing a FPR if I already have a aftermarket engine management. But how would the management system (I have MS2) regulate the fuel pressure on its own if the factory FPR is not adjustable? If I were to turn up the boost in the future then how would I make sure I have the ratio I am needing and know the factory FPR is not restricting my flow? I’m being honest here, I am no expert in this exact field of work.
-
Yep I read that forum a couple days back when trying to figure all this out. I assume that’s why businesses selling aftermarket fuel rails offer an option for a cold start valve on the fuel rail? Seems like there might not be an effective and cheaper way to fix this. Just going to have to crank a tad bit longer till it starts… I’ll give it a little more thought but not too much because I want my z back on the road.
-
Yea I noticed that too while posting it. I guess it’s foolish thinking to think the best of someone and simply take their word for it. At least in today’s world.
-
Does anyone happen to know if John Coffey documented his S30 build where he moved the L engine back 6 inches? He said in a post “The stock L6 engine moved back 6" and down 2" gives a 48F/52R weight distribution with a composite hood and hatch.” In this forum: When searching for it I was reminded again of the loss. I never knew him but it is still very sad to know he is gone. But his knowledge is still spread out through hybridz for us to learn from. Any info about that specific build would be greatly appreciated.
-
I got confirmation back directly from Deatsch Werks. I asked them if their product holds pressure after the pump has primed the fuel and has turned off and/or if the car has been sitting for a day. They said, “I spoke with my Tech Staff, and it’s the check valve in your pump that maintains the pressure, probably for about a day, but it holds fluid in the lines indefinitely” It makes me feel a little more confident in their product but not 100%. Maybe going the rout that NewZed shared would be the way to go.
-
Godzilla Race Works is now selling the pallnet fuel rail priced at $155. Pro Tunerz have them for $99 right now (originally $160). But the “main” difference I am seeing between the two are the ID through hole.
-
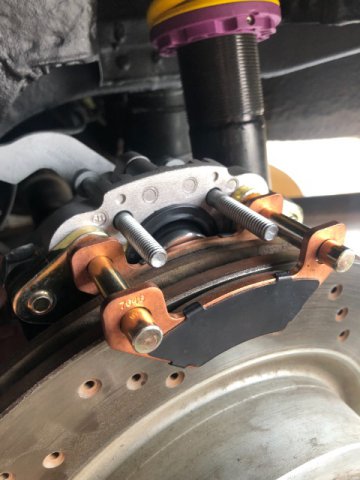
Ended up drawing making my own since I have the CAD, 3D printer and CNC machine available. Im sharing this because I have tested these parking brake calipers and they do work good as a parking brake. Not made for anything else but just for parking. I also made custom brackets for the Brembo’s too. Both are separate pieces just in case I want to swap one of them out for something else.
-
Dang… I wish I would have seen this sooner. I got a set of front and rear Brembo calipers and 13” rotors from a 350z for free and designed brackets to mount it directly to the 240z. It’s on my IG page @ideation_z. I like how mine are mounted more towards the center of the car though. Did they every convert the rears too? All four work and was easy to convert. I even still have a parking brake that I also designed a bracket for.
-
Has anyone heard of Pro Tunerz? They offer a fuel rail that looks to be the same size as mine. https://protunerz.com/collections/frontpage/products/datsun-l-series-fuel-rail Their prices are a lot better than everyone else’s on the market. They also offer, not their own, a FPR from Deatsch Werks. I emailed DW asking them if their FPR is capable of holding pressure when the fuel pump is not running after prime and if the car is off for a few days. I’ll follow up if they get back to me. I’m feeling a little more confident in the fuel rail size I currently have. Even though it’s on the larger size, I still think it will be ok with what you all have shared and what I have seen in the market from Z Car Depot and now Pro Tunerz.
-
Is a Aeromotive 13129 considered a good FPR? That’s what I currently have but haven’t installed it yet with this fuel rail setup.
-
Yea that’s what I figured I would need to do. Which is not a problem because I already do that now. I’m just not sure for the amount of time the fuel pump is priming will be enough to have it be at the pressure it needs to be at before turning the key from ON to start. Either I have the pump run longer or turn the key twice to the ON position before starting it. I rather not have to worry about that if in fact 11/16” is too large. I do a lot of my own machining so I’m debating between purchasing the pallnet fuel rail for around $155 or purchasing the same size fuel rail extrusion and machining the injector holes myself for around $50. Or use the 11/16” fuel rail that I currently have. z car depot actually sales fuel rails with a 1/2 NPT end which is basically what the 11/16” will be. That’s what’s throwing me off because there are two different through hole ID sizes that are offered for these motors and I’m not sure if both are ok to run. I also forgot to mention that I have a 3/8 feed line and a 5/16 return line for the fuel. Just thinking out loud but would of course love some good feedback.