cheesepocket
-
Posts
124 -
Joined
-
Last visited
Content Type
Profiles
Forums
Blogs
Events
Gallery
Downloads
Store
Everything posted by cheesepocket
-

LS/T56/240z Project Mentor Wanted
cheesepocket replied to RebekahsZ's topic in S30 Series - 240z, 260z, 280z
Specific experiences from builders/racers only please. Funny. Don't be afraid to use the search function, as has been referred to several times. Welcome aboard the LS train. +1 on wait4meperformance. The wire harness and PCM are not insignificant parts of the build. I had them do up the harness and PCM from a '98 Trans Am, and after some careful wiring, my car started up and ran fine on the first try. Also +1 on Tanks Inc. I know it looks to be easier to adapt your 280Z tank and I've read of people doing that on this forum. But if you want to start with all new stuff, their universal tank with in-tank 190 lph pump is pretty nice, and allows for room on both sides for serious exhaust. You would just have some fab work, including removing the spare tire well, to mount it. -
JCI AC mount alignment issues?
cheesepocket replied to rags's topic in Gen III & IV Chevy V8Z Tech Board
Yep, re-used the stock belt and all was fine. -
70z rota wheel fitment help
cheesepocket replied to datjunky's topic in Brakes, Wheels, Suspension and Chassis
Does anyone have pics of 16X8 RB +10mm? I want to order really soon, but for sure want to avoid the curved spokes, preferring the flatter style. It looks like the RB-R achieves this from my searches on this forum, but I would like to compare the two. I've see the +4mm has flatter spokes that I like, but I wonder if the shift of the rim inward would dictate more curved spokes. I tried to get an answer from Kim at Rota Wheels but got a generic answer. I'm trying to avoid the spokes that curve like a banana. That must be to clear big calipers, but that is not a concern to me. -
70z rota wheel fitment help
cheesepocket replied to datjunky's topic in Brakes, Wheels, Suspension and Chassis
Are these 16X8 gunmetal RB-R with the flat spokes, or with the curved ones? Pics? -
240z/LS1 Electrical questions
cheesepocket replied to nocones's topic in Gen III & IV Chevy V8Z Tech Board
Your PCM is only looking for two power sources: Battery power with ignition switch on, and continuous battery power. As far as I understand, your PCM doesn't need an external signal for the key in the start position. You can find your original wire that went to your Datsun starter solenoid, and connect directly to your LS starter solenoid with no modifications. I believe your PCM knows you're cranking the engine because the reluctor wheel on the crank and also cam position sensor will be sending out pulses, then it knows to time the igntion and fuel in the right sequence. Once the engine fires, the rise in oil pressure is the indication that this has occurred, and the fuel pump will then run continuously. Someone more knowledgable than me, feel free to jump in if I missed the mark here. -
240z/LS1 Electrical questions
cheesepocket replied to nocones's topic in Gen III & IV Chevy V8Z Tech Board
I can only report back in the context of the early, non-injected, 240Z. The reason you want to find the bundle where the ballast resistor is that it is the location where key-on but not start signal is found. When your car is in the run position, the battery voltage is dropped to 6 volts or so by the ballast resistor to increase the life of the ignition points. When your key is in the start position, the ballast resistor is bypassed to improve starting performance, giving the points the full battery voltage. Apply voltage to the fusebox/chassis as described above on this thread, and use a test light or voltmeter to find the correct wire. One choice on the T56 reverse lockout is to full remove the mechanism, then the lockout won't matter. Reverse is avoidable without the assistance of the PCM. As for skip shift, that should be removed along with rear O2 sensors, alarm, etc by whomever reprograms your PCM. If you have not had any reprogramming done on the PCM, I recommend it. Search the forums for discussion on who the good guys are out there to do it. If you insist on these signals, hook up the two wires for both trans solenoids, use a battery to test, and you will find the correct polarity for these two. I don't know if that signal is switched to + voltage or ground in the PCM, so your best bet if you insist on having these connected is to test. -
240z/LS1 Electrical questions
cheesepocket replied to nocones's topic in Gen III & IV Chevy V8Z Tech Board
I spent some time in the garage last night working on the final wiring connections for mine. BRRRRRR! On my '72, the wire that gives +12 VDC with the key on but not in the start position is black with white stripe. It should be bundled with the original ballast resistor wires, which I recall are green. I am editing my post above regarding the start wire. Use the original one that went to the Datsun starter solenoid, in my case it is black with yellow stripe. Again, applying + 12 VDC to the big white supply wire as described above will power your fusebox and chassis and allow you to test. The neutral switch in the trans was part of the interlock circuit that would keep your 240 from starting if you were not in neutral, or if your seatbelt was not fastened. Lawyers, you know You shouldn't sweat the existing wiring from the 240 too much. Most of these will be bypassed, capped off, and irrelevant since all the engine operation is handled separately by the GM powertrain control module. I'll head back in the garage this afternoon and check my shop manual for '73 wiring to confirm the colors remained the same from my '72. There were so many versions of the Datsun 240, 260 and 280 that no one wiring diagram would cover it. That's part of the DIY adventure and will give you that much more satisfaction when you have it running. That's what I keep telling myself. -
240z/LS1 Electrical questions
cheesepocket replied to nocones's topic in Gen III & IV Chevy V8Z Tech Board
I feel your pain, having started with a '72 that was partially disassembled and not wired at all to the engine. The big post at the starter is basically your junction for all the +12 VDC wires, that is the battery +, the alternator charging wire, and the input power to the fuse block and the rest of the body. The power wire for the fuse block on my car is a big white wire along the pass side wire harness run. A great way to test this is to simply jumper the + side of the battery here at the big white wire, put - to the frame, and confirm your headlights turn on, etc. This will also power your "key on" wire that goes to what was your original coil, and the "start" wire that I pulled from the ballast resistor (get rid of the original ballast resistor, all power on the LS is 12 volts including engine run power, no need to drop down voltage for points ignition now). You need a test light or volt meter to confirm these wires. You will have full-time power to the fuse block. You should connect battery - to the engine block or head, and then use a ground strap between the engine and unibody frame to make sure all are on a common ground. I would ordinarily recommend a factory service manual but mine was only marginally helpful as some of my wires were different colors than they should have been per the manual. I have not messed with reverse lights and can't comment on those. Way down the priority list for me. Last recommendation, go check out LS1tech.com for more LS wiring info, and Google search Datsun websites for Datsun body electrical info and explanation. Good luck. -
Wow. I gotta get on mine. I've followed this thread since it started, watching a guy start and mostly finish his project and I still haven't fired the engine in the car yet and I had a year head start. Thanks for the inspiration, I'm heading out to the garage now.
-
I can't seem to find these on their website. Anyone have a direct link? I'd rather use one of these and keep the splicer I made in the post above as a spare. Not nearly as nice as the JTR one.
-
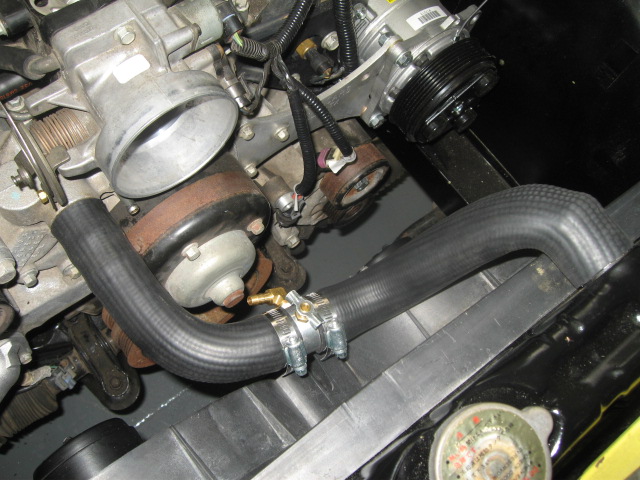
I have used this forum big-time for all my swap info, and thought I would share the results of my research. I took the part numbers off the JCI fluids kit hoses, which appear to be Prestone part numbers, and crossed them to the other major brands. The upper requires a cut, and involves using the JTR tee that allows you to vent the steam lines from under the intake, if you have em. The lower uses a 1.5" dia hose at the thermostat housing, and a 1.375" at the radiator. You might be able to find a single hose that can do this, but I couldn't, including searching this forum. To splice the two lower, different diameter hoses together, I used some beaded aluminum connectors from Northern Cooling, http://www.northernfactory.com/storefrontB2CWEB/ I had a friend familiar with welding aluminum cut and weld the two pieces together to make this ugly but functional splice. They weld together nicely since the smaller dia fits tightly inside the larger dia. Then cut the two lower hoses as appropriate to fit your car. Part numbers are as follows. Upper hose, PN 82570, crosses to Dayco 71314, Gates 21588, Goodyear 61394. Lower hose to LS1 T-stat housing, 82825, crosses to Dayco 71380, Gates 21712, and Goodyear 61457. The other half that goes to the Datsun radiator is an original for the Datsun, Gates PN 20776. The two beaded tubes I bought from hrpworld.com and have PN's Z17632 (1.375") and Z17633 (1.5"). I used double ended ones so that I would have two chances to get it right, and sure enough, needed both. Below are pics of the pieces assembled. I hopes this helps some of y'all, if you're using the original Datsun radiator.

-
Here are pics of both sides using JCI headers with MSD wires. I think I recall the JCI headers have 1.5" primaries, vs. 1.75" from JTR? That would explain the difference in clearance. Since I will be running stock for now, I'm not sweating the smaller primary tube size.
-
No problem at all using JCI headers and MSD plug wires. You can bend each plug end as required to miss the headers.
-
cost for an LSx 240Z swap
cheesepocket replied to hachikid's topic in Gen III & IV Chevy V8Z Tech Board
On the subject of strengthening the unibody, for sure when you are more than doubling the power of a car, especially this one, you should look into subframe connectors at the very least. I bought some from these guys http://www.baddogparts.com/ and I think the time saved was worth the money. It was quite a bit of labor with a dead blow hammer to get the floor pan to cooperate, and then of course the welding, but the results look to be worth it.
-
cost for an LSx 240Z swap
cheesepocket replied to hachikid's topic in Gen III & IV Chevy V8Z Tech Board
X2 on Juicy's response. The trick will be finding a solid 240-280 foundation at a reasonable cost. I'll be into mine for about $8K and alot of labor, but that's before a paint job which I suppose will be another $5K or so, and wheels/tires at another maybe $1200. Use a pullout LS1/T56 out of a Camaro/Trans-Am for lowest price of entry, unless you go with an iron block truck engine and piece together the clutch/tranny setup. -
LS1 fuel feed: cell or tank?
cheesepocket replied to auxilary's topic in Gen III & IV Chevy V8Z Tech Board
Sort of R-rated explanation of the Cheesepocket thing, I'll have to pass. So the lower outlet is the output from the pump. That goes to the Corvette filter/regulator input. That filter/regulator then sends whatever fuel is demanded out it's outlet, and the balance is sent back into the tank, via the other outlet labelled return. A Vette factory pump would have a similar configuration, though possibly more pipes coming out of it to handle the venting of the gas fumes. I chose this configuration to allow me to do an in-tank pump to reduce noise, and to allow me to run just one fuel line forward to the engine, since the filter/regulator sits back near the tank. I got all my info on the Vette filter/regulator off this site. I should point out that I'm still putting this car together, but I don't have any reason to think this won't work. I'll get to test the fuel system soon, though. -
LS1 fuel feed: cell or tank?
cheesepocket replied to auxilary's topic in Gen III & IV Chevy V8Z Tech Board
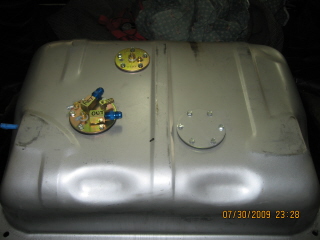
If you're referring to my post above, yes, it's a similar setup. I bought the tank and the 255 lph Walbro pump from Tanks Inc. See pics, there is out, in and vent. Bought the straps from them, also, and made my own mounts. Then I bought the sender from Summit, 0-90 ohm so I can use Autometer gauges. Using Vette C5 filter/regulator so only 1 fuel line going forward.
-
LS1 fuel feed: cell or tank?
cheesepocket replied to auxilary's topic in Gen III & IV Chevy V8Z Tech Board
I went with this universal tank http://www.tanksinc.com/index.cfm/page/ptype=product/product_id=121/category_id=69/home_id=59/mode=prod/prd121.htm which allows for in-tank pump with normal NPT to AN fittings, and is narrow enough to allow for dual exhaust. When I had put the Camaro tank in, it looked to be a compromise space-wise, and the tank in the link above is much easier to deal with. They weld in a "well" that is designed to hold a big chunk of gas in place in corners. Pricey solution but nice. -
There are more options. Best bet is do a search on the Driveline section of this forum. Great info.
-
Check out Modern Motorsports here http://www.modern-motorsports.com/catalog/product_info.php?products_id=56 What I learned from searching this forum is that the 300 ZX Turbo '84-'88 half shafts are more desireable as they are a smaller diameter and will clear a rear sway bar better. MM sells adapters that allow for room for the CV style halfshafts to fit. This is the direction I intend to take. BTW, get your wallet out if you want to find a clutch style LSD R200. Very uncommon, only in the '87-'88 300ZX Turbo, unless you go aftermarket. Same comment on the wallet, then. I am fairly new to this forum but have found nearly every piece of info I need as I proceed with a '72. Great helpful crowd here.
-
3/8 vs 5/16 return line?
cheesepocket replied to Horatio's topic in Gen III & IV Chevy V8Z Tech Board
I'd sure be interested in relieving you of what's left for the right price. I was looking at that Jeg's kit. Looks like they give you flare fittings and tools to do the job. Is this just the same as a brake line flare fitting? Are the connections adaptable to NPT or AN fittings easily? -
One more LS1 on the street.
cheesepocket replied to palosfv3's topic in Gen III & IV Chevy V8Z Tech Board
Larry, what did you use to get the factory gas filler tube attached to the Camaro tank? I found that fit to be a challenge, and had trouble finding vendors that sell soft tubing specifically for fuel, in the dimensions required. -
One more LS1 on the street.
cheesepocket replied to palosfv3's topic in Gen III & IV Chevy V8Z Tech Board
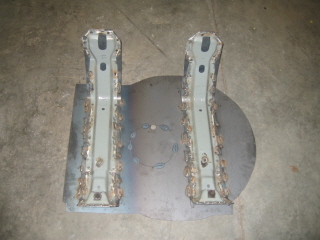
Indeed, the spare tire well had to go. Used a steel sawzall to cut around. Then use sheet steel to patch in. I got this far on putting in the T/A tank before deciding to use a new tank. I spent a bunch of time removing the original tank strap mounting plates from the T/A, one spot weld at a time. Then I welded them onto the bottom of the spare tire hole plate. Turned out really heavy, but sturdy. I'm hoping the new tank helps out the exhaust issue. I'm looking into oval cross-section pipe for the part that goes under the rear suspension. BTW, I won't be teaching welding school anytime soon
-
One more LS1 on the street.
cheesepocket replied to palosfv3's topic in Gen III & IV Chevy V8Z Tech Board
Speaking of the Camaro tank...I am still just partway through my LS1 build and after welding up a fairly substantial setup for the stock Camaro tank, I abandoned it because of the lack of room for exhaust pipes or mufflers. Now I have this http://www.tanksinc.com/index.cfm/page/ptype=product/product_id=121/category_id=69/home_id=59/mode=prod/prd121.htm and it appears to be a much better fit. I'll be welding up mounts this week and will post pics when I get er in. Lots of room, and uses a factory style in-tank pump. I hope it works out well so that I can contribute something useful back to this forum. -
Ls1 Custom Air Filter Housing
cheesepocket replied to palosfv3's topic in Gen III & IV Chevy V8Z Tech Board
Check out the rest of his Picasa slideshow on this car. Great detailed work, and an inspiration to get out to the garage!