
SHO-Z
-
Posts
710 -
Joined
-
Last visited
-
Days Won
3
Content Type
Profiles
Forums
Blogs
Events
Gallery
Downloads
Store
Everything posted by SHO-Z
-
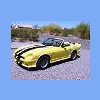
The Trunk area profile turned out as one off my better body working accomplishments. Here is the detail on how the reinforcement was layed out. Shape of the around back of the seats. Where it is now installing MSA ground effects, modified Trans Am spoiler and side vents. I am planning on changing the side lights. I have yet to find glue that will hold the upholstery around the top of the windshield in the Arizona heat. Everything seems to break down after a couple of months. One of these Z project are never completed only is another stage of transition!
-
http://cgi.ebay.com/ebaymotors/ws/eBayISAPI.dll?ViewItem&category=6472&item=2479570044&rd=1
-
I bought a set simular to those on Ebay, carbon fiber look. Do you have any Pictures of how you mounted them? I am planning on installing them on mz Z convertible after I get it painted. I also think the hood looks neat and like the mirrors.
-
welding, piping tools, and etc info on what tools to get...
SHO-Z replied to a topic in Miscellaneous Tech
If you are really interested in welding and all, you might want to check into becoming an pipefitter or evan an electrician apprentice. I worked as a pipefitter for almost 20 years and enjoyed it until a career ending back injury. Check with the local unions and sign up with thier programs if you can. -
74 Big Bumper 260Z Convertible. This conversion was done similar to the Z Therapy conversion. I collected through the internet and several Kit Car Magazine articles my plan of attack on the conversion. First I would not do this to a real clean Z, there are enough ones out there with minimal rust and body damage around. This is a general summery of how I constructed my project. Step One Sit down with a couple of beers and think this project out, once you get to Step Two there is no turning back. Remove the entire interior from the doors back and the head liner. Jack the z up level and put the stands on the suspension points. Evan though the car is still a coupe I wanted to make sure that when I added the reinforcement the car was still square. Install the 2†x 1†x 1/8†tube stock under the car, behind the seats and through the floor. The use of a protractor square helps in laying out the angle cuts. I added additional welded tabs tying the tube stock into the existing uni-body frame rails. This does limit the seat travel for some one well over 6 ft. Evan with this there is still some torsional deflection in the car. I am planning in installing an X brace between the frame rails to elevate the problem. After doing this conversion I do not believe anyone who says that no reinforcement is required. Remove the rear hatch and side rear windows, Step Two Now comes the lump in your stomach. Layout a line about 1-1/2†back from the top of the windshield. Then another line from the back corner each of the rear windows to the around 2†from the back of the car. I used both a sawsall and a 4†grinder with a thin wheel to do the cutting. Basically cut on the lines lines, some blocking is required to keep things from binding. Once the top is removed cut the top again just off of where the top and the hatch hinges box section. Trim all of the excess metal from the sides of the hatch area. Remembering to leave enough metal to weld too. I set hatch hinge box section directly over the rear strut towers, leaving just enough room to get a box end wrench on the strut nuts. This will get you the length of the trunk and a hard point for the rear shape of the Z. This is the first section of the car that I welded in place. Welding the box section onto the strut towers is like adding a strut brace and I feel really helps stiffen the car. At this point the edges of the trunk were basically installed. This gives a basic arch across the back of the car. I cut out cardboard templates of all of the three sections that need to be filled in. Two for each side and one for behind the driver compartment. I used 10 gauge sheet steel for my added body work. This is trial and error situation but with the cardboard templates it just takes time. I added ¼†angle iron around the rear lip of the driver’s compartment for stiffness. The radius was bent around a piece of plywood after I heated the angle iron. After all of the basic sheet metal was installed and welded in I fabricated and installed a piece of sheet steel for the bulkhead between the driver’s compartment and the trunk. On both the lower lip I installed ¼†angle and one across the center. The upper end had extended 1†tabs every 5†that were bent over. Holes drilled through the sheet metal behind the driver’s compartment were used to weld the upper end of the trunk bulkhead in place. The rear hatch was cut and shortened in the widow section. I used a 1x2 piece of wood inside of each side to align the hatch and welded it back together. The widow section was filled with sheet steel from the original top with and added angle iron brace from below. The latch end of the hatch lid needs to be modified to clear the back edge off truck. I used a remote trunk latch from a Lancer mounted under the drivers seat. On the windshield header I cut slots about every inch or so with a grinder. These are bent down and tack welded to the windshield frame. Square cut and cap off the ends of the windshield posts. This gives a flat top to the windshield and will make fitting a soft too easier. This will basically finish all of the metal work. Now comes the pain of the body work. Looking back if I did this again I would use some of the new fillers with glass in it. One trick I did learn is using a long board sander to flatten and shape the trunk. I used a 2x12 that I cut to fit long board sander paper, glued on some old rubber sheet that I had and just stapled the sandpaper to end ends. It worked great flatting and smoothing the trunk and large surfaces. I have a top frame for a TR7 convertible that I need to modify to fit my Z. The design that I used does not allow for the top to be folded down. John Washington makes a fiberglass top that could probably be modified to work. Seat belts are from an Acura Integra, 3 point using bolt points on the inside body panel. This is the basics for building z convertible. Lessons learned: I would fiberglass the rear trunk lid instead of adding the steel window filler section, I was never happy about how this worked out. Use fiber filled body filler and less Bondo. Start with a Z that was in a little better shape than I had, found more rust around the rear edge of the hatch on both sides. Use a quality MIG welder. The one I used was borrowed and I fought the thing from day one. One weld would be great the next looked like shit. Maybe I should have had a few more beers put my money into more HP, GTO kit, instead of no top. Trial fit everything at least two the three times to avoid mistakes. Do not hit a truck tire carcass on the freeway on your first day out, it can do a number on the front fender if hit just right. Would I do it again, I really do not know. This is a good exercise in fabrication to lead to bigger projects. Reinforment Welding in the trunk area Painted [/img]
-
With wires getting harder to find, the Cobra Kit Car rims would look neat and would be peroid correct.
-
I can put together some pictures and sketches on my convertible build, it is simular to the ztherapy design. I will be in about a week or so after I get back from Alaska to Arizona. I have never figured out how to put pictures under forum topics, so maybe someone else could help here. There are a couple of pictures of my Z in my photo album on Hybridz.
-
Well I must have one of the only ones around on HybridZ. I was really expecting to see some other ones.
-
I have seen a lot of general fabrication topics spread though out the forums, how to weld SS and etc. It might be and idea to add a new index for general fabrication questions. It could reduce the time looking for help on fabrication questions that pertain to several indexes.
-
When welding on SS with TIG to get a quality weld you need purge gas, argon, inside of the pipe/tubing. If not you will get what welders call sugar inside the weld, not good. On thin tubing all that is needed is to fuse the tubing together. If you watch the puddle real close you will see the silicon dot in the puddle. If it is swirling you are getting full penetration. I would not weld on SS tubing without a purge on any intake pieces.. For exhaust you can use a product called Solar Flux. Paint this on the inside of the tubing and it will form a glass cover on the SS to keep it from sugaring. When I used this product we found that water worked better than alcohol to mix with. I welded brew piping on a couple of Budweiser Breweries.
-
When I was living in WA, I had no front bumper on the car and used tie-wraps to attach tie front plate to the grill. I never overheated and was never stopped. I do not think there is anything about where it mounted.
-
How many convertible Z have been built and what types?
-
The small jack points/bumpers that are used on the Cobra kits might work. You can buy them crome plated and could be presumed to be bumpers. Anouther would be short vertical pieces of 3/4" pipe that the ends are welded shut and welded to a plate on the side. These were popular on sports cars back in the 60s.
-
Contact the manufactures of shock and strut cartriges. They should give you what they need. Part of your engineering project is to do the research on these matters. Ask to talk ot there engineering department, they will probibly give you more info than you need. And document all input from them. Your professor will probibly expect at lease 2 or 3 sources on your data. I am a mechanical engineer and welcome you to the field.
-
I1 have built a 260z convertible and there is some flex in the body even with added reinforsement steel. I installed 1x2" tube stock the length of the cockpit next to the existing frame rails. I reinforced this with angel braces through the floor. As road car it is fine but when I push it you can feel the difference. I am planning to install an X brace between the new tube stock to stiffen it up torsionally. It seams like the T-top Zs would have additional reinforcement from the factory to allow for the loss of steel in the roof and the fact that there is one center box section on the targa connected to the center of the windshield and 2 box sections on the coupe tied directly into the main windshield columns. This would affect the car torsionally more than lateral stiffness. One ting to remember add all of your reinforcement before you do any cutting.
-
You might want to pick up the latest Kit Car Mag. The have a artical on buildiing a 400+ Hp 302 using stock pistons and lower end. I was and interesting read.
-
I had to use fiberglass installed on the under side on the rear bumper between the body and the bumper because of the louzy fit, over 3/8" gaps. Had to install small couter sunk screws through the side pods along with body tape to get the twist out of them, around 3/4" from end to end. These were full of spider webs in tie jell coat. But the front bumper was a great fit. So far I have spent more hrs on these to make them fit, you would think for what they charge all of the pieced would fit like the front bumper. I do not know how anyone could just paint and install them.
-
Here is a cheap fix. Take a cooler and install several copper loops back and forth in the cooler. Go into the through the side near the top and out near the bottom with the piping going down hill. Install a tee looking down just outside of the cooler to pick up the water or a water bleed/ filter. Dump a bunch of ice in the cooler when you are painting. Plus this gives you a place to keep your beer when working on the project. I have a hose from my compressor to a 10 length of ½” copper pipe mounted on the wall that is up steam of my regulator/filter. The pipe is graded to the filter. I also considered buying some copper baseboard heat sections with fins for extra heat transfer. But what I have has sufficient heat transfer to drop out the moisture. This worked for me in Washington with all of the moisture up there.
-
Is cutting the springs a "no no" around here.
SHO-Z replied to Phyte's topic in Brakes, Wheels, Suspension and Chassis
Slow cooling will allow pearlite to form. The transission form austenite to pearlite is around 1350 °F. To keep in the austenite grain stucture, Austempering The steel is brought above 1350 °F and then quenched to 800 °F. Then allowed to cool slowly to room temp. No martensite is formed. The is from a mechanical engineering materials book. -
Any Civil, Structural, or Mechanical engineers out there?
SHO-Z replied to a topic in Non Tech Board
I did a quick look W12x63 or W12x 58 should work using the beam size program that I have. I am a mechanical engineer and do not design bridges. -
A mechanic was removing a cylinder head from the motor of a Harley motorcycle when he spotted a well-known heart surgeon in his shop. The surgeon was waiting for the service manager to take a look at his bike. The mechanic shouted across the garage, "Hey Doc, can I ask you a question?" The surgeon, a bit surprised, walked over to the mechanic working on the motorcycle. The mechanic straightened up, wiped his hands on a rag and asked, "So Doc, look at this engine. I open its 'heart', take valves out, fix'em, put'em back in; and when I finish, it works just like new. So how come I get such a measly salary and you get the really big bucks when you and I are doing basically the same kind of work?" The surgeon paused, smiled and leaned over, and whispered to the mechanic, "Try doing it with the engine running."
-
Have Acura interga seats in my z. had to cut the bases to narrow them significantly to fit, and they are still tight. There are a lot of seats out there, but most are for FWD cars with narrow tunnels and wide seat bases. So check the base dimensions first to see if it will fit.
-
I went through some of this looking to find coilovers for a cheap price. I found out the BMWs have larger strut diameters, but after buying a set for a 325 found out that the struts are only on one end and are just enough smaller to not work. I ended up making a set of adjusters out of pipe nipples that worked for now using the springs in the kit. There is no reason why you cannot take the strut tubes from one of the new generation cars and slide them inside of the z strut cartridges and weld them in. The weigh characteristics of the car take them off of should be taken into consideration as well as the top mount on the struts. There are a lot of junkyards out there to check things out.
-
Bottoming out, and staying there..
SHO-Z replied to a topic in Brakes, Wheels, Suspension and Chassis
Some of the discount auto parts stores and rental places have spring compressors that you can rent. I bought mine from harbor freight tools, a cheap one. It works ok. I did mine without removing it from the car completely. Made one several years ago of all thread rod, nuts and steel plate I think all of the 240 are the same, the 260 have 2 different models, 240 type and 280 type. The 280 is all alike. -
I have never attempted what you are doing but have some experience with layout. First you need to set some control points, I would snap a chock line down the center of the car and one a 90° angle at the axel locations. Off of these lines I would lay out the edges of where I want the edges of my frame rails to be and snap another line there. You can use clear spray paint on the lines to keep them from rubbing off. This way you can drop a plum bob down or a laser level to get your alignment. I would also make sure that the car is level. You might want to drop a plum bob down and get some other control points off of the body to see of everything is staying in line. I do not know how much flex you will get if the body when you cut the floor to remove the old rails, temporary cross bracing bight good idea. I added 1x2” tube stock down my frame rails when I built my convertible Z. A good protractor square was well worth the money on that project for laying out angles. Just don’t get in a hurry, take your time and think everything out before you proceed.