
sonomaz
-
Posts
111 -
Joined
-
Last visited
Content Type
Profiles
Forums
Blogs
Events
Gallery
Downloads
Store
Everything posted by sonomaz
-
The turbo and the PCV into the intake manifold should not be a big problem becuse the PCV is designed to close in the event of a backfire in the intake manifold. Most repair manuals have a cross section of a PCV valve. The valve is spring loaded to force it closed. The vacuum in the intake manifold pulls it open and any pressure in the manifold will close the valve. I agree with you that venting to the exhaust collector sounds like a brilliant idea. If it is angled is should draw a slight vacuum and let all that crud burn in the exhaust pipe. Installing a PCV valve in line (far away from heat) Would prevent any pressure getting into the engine. If you start acuumulating oil and junk near your engine vent (remember you need to have a vent to get flow through the crank case and into the exhaust) you know t is not drawing enough vacuum. Let us know how it works? Paul
-
My Crane cam did not have a plug in the end. Fortunatly for me I was reading this forum and figured out to install it. Obviously the cam is drilled and I am running the spray bar also. I followed the tip in "Hot to Modify your Datsun Engine" and had the head feed oil port drilled to 1/8 inch. My concern is I have to many holes with the cam and the spray bar and that oil is basicly missing everything. But I don't know anything yet. I prey to God not to hear that "Squeeky Sound"!!! By the By my rockers sound like a desiel engine. I adjusted them and they are quieter but still noisy. Any thoughts?
-
The PCV valve was designed to burn the blow by oil and gas from your pistons into the crankcase. It allows the intake to draw the air from the crankcase into the combustion chambers. If you simply plug it at the manifold you should not have any problems in performance that I have ever heard of. If you plug the other end at the case under the front of the manifolds, that should not be to much issue either. However, if you do the only vent in the engine now is the breather on the Cam cover and you will blow out air, and oil, and gas fumes, and any other crap in your engine. If you plu that, your gaskets and seals will start oozing. If you are going to vent to air, use the pipe under the front of the manifolds becasue there is a pack of screens in the block that seperate the oil from the air. (you did put those screens back during yur rebuild, diidn't you?) thats why there is a bulge on the front, left side of the block. Let us know what you do. Paul
-
It is the total number of qaurts of oil in a Datsun L2X motor. Paul. What is 4 or 5 if you change the filter?
-
Lets assume money and time are no problem, but you want to spend as little as possible to get it running. To run you need Coompresion, fuel, and spark. Believe it not, none of them needs to be great for the engine to run. Don't guess or blindly change parts. Just make sure you have all three before you try to start. FI is more challenging and others can give tips on how to ensure it is working (remember your not looking for perfect here just good enough). Start by makeing sure that fuel is getting to the fuel rail at the manifold and call it good for now. Compresioin. Pull the little lead on the starter solenoid and jump the solenoid to hot (12V, and not the wire, the little blade connector on the solenoid). You'll get a nice fat spark and the starter wil engage to crank the engine. You need two things here. First the motor should turn over and not be frozen. Second the engine should make a chugga chugga sound like the starter is working against the comnpression of the engine. OK? good for now. Spark. Note where the number one spark plug wire comes into the distibuter and pull off your distributer cap. If the roter is not pointing to the number one wire, use the jumper trick from above to crank the engine over until it is close. What you want to do is stop the engine with the TDC mark on the crank damper aligned with the pointer on the front cover and at the same time the rotor pointing to number one. Once all these planets have aligned remove your oil filler cap and shine a flash light in the hole. Straight down is the Cylinder No. 1 intake cam lobe. it should be near the top. It will not be straight up but most likely on the spark plug side near the top. If it isn't write back for now lets say it is. Now. As best you can turn the engine (you can use the jumper trick here by tapping the hot source to "bump" the engine) put the damper timing mark between 5 and 10 degrees Before TDC. Reattache the distributer cap and loosen the distributer adjusting screw. Pull the coil wire from the distributer cap and placer it close to ground where it can spark. About a 1/4 inch from ground. turn on the ignition just to run. twist the distributer CCW the distance between two spark wire terminals on the cap. Slowly twist CW until the coil wire snaps with a bright spark. pull the cap and make sure the rotor points to number one. reattach the cap, plug in the coil wire, hook up the solenoid wire, replace the oil filler cap. Sit down and give it a start!!! If it does start, imediatly check for oil pressure. If after 30 seconds you don't have pressure, shut it down and find out why. You have to have each part before you try to start. Fix what you find as you go. Once one thing is fixed don't try to start until you finish the process. When it runs then start tunning and upgrading. Keep coming back here, there are alot of smart people with lots of Z experience. Good Luck
-
For what its worth? My 72 went 200K miles with the damned carb thermostat pluged and when the head was rebuilt it looked beautiful!!! OK 1 incident in 2 million engines.
-
My two cents worth. In my opinion, the external cooling line from the waterpump inlet (bottom radiator hose) to the back of the engine over to the carbs through the carb thermostat through both carbs and back to the underside of the thermostat housing is NOT a coolant return line for block circulation when the engine thermostat is closed. The purpose of the line is to heat the carbs to more effeiciently atomize the fuel to reduce unburned fuel out the exhaust pipe therefore reduceing tailpipe hydrocarbons. Something the EPA was very woried about in the 70's. Early Z's (69-70?) did not have them. Check Ztherapies web site. The thermostate at the back of the Carb's CLOSES at 170 degrees (boy, if I'm wrong I'm sure I'll hear about it). It closes so the carbs will cool to around 170. the reason Nissan spent so much money on these little items was so they could sell cars in the United States that met the EPA requirments. (ZTherapies sells Euro ballance tubes that have no smog fittings, so why in the US but not Euro? EPA!!!) Paul
-
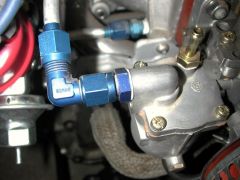
Wow. Glad I checked. The fitting size is 6 AN to M12 X 1.25. What I said before was wrong. Here is a picture of what the fitting looks like. Sorry for the large picture size. Paul
-
-
-
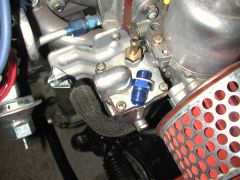
Yeah I did it. I think I used the Delorto carb adapter from Aeroquip. It is a straight thread on the carb bowl, not tappered pipe. I think is is something like M12 X 1.00 or close to that. Pull your Banjo bolt of your carb and use an open end wrench over the threads to measure it.
-
Ooohhh Yeeeaaahhhh baby!!! How sweet that sound! Open headers, semi hot cam, unfiltered carbs!!! My baby's running!! Had two more "oh, I know what's wrong" and then found the distributer was out of alignment by 180 degrees (explains all that popping out the carbs). Dropped the oil pump, reset the shaft, reset the distributor and timing and,,, VVrrrroooommm, pppawwwww. IT RUNS!!!! So yeah I cleared my calendar and I'll bring it to the Travis meet and greet!!! Stay tuned for pictures. Paul
-
I'll be there but I need details about when.
-
I spent three days this weekend burning up my battery and overheating my starter trying to get my baby running. I think I said six times "Oh, I know what's wrong"!! On the bright side I fixed my frozen distibuter (Mallory, seized in the mount), got the fuel pressure set (added a regulator and holley pump), removed the capacitor from my points (MSD 6AL), checked my firing order (three times), and set the static timing (four times). I had a strange thing happen. The regulator was set to five pounds at the factory (SU's should run three) and during adjustment I spiked it to seven. The adjustment wouldn't respound and after awhile the carbs were spewing gas out on to the ground. I lifted up a carb piston and gas sprayed everywhere. I removed the adjusting screw from the regulator and nothing happened. I discovered that I had not removed the caps from the fuel bowl vents so when pressure built it was not vented through the top but pushed the gas out the jets of the carbs. Pretty strange, huh? Only took me an hour to find.
-
I haven't run the track but I have been a few times. They got a lot going on and I have been to see the historic races. Great cars, very few people, just the way I like it. Check out their site. http://www.infineonraceway.com/
-

Help me diagnose my problem! 240z stalling!
sonomaz replied to Jonas240z's topic in Trouble Shooting / General Engine
I'm surprised you all missed this. (boy don't I sound cocky!!!) Your fuel filter is plugged. Pull it out and try to blow through it. You should be able to blow though it like it is just a short piece of hose. If it feels like you can't move any air at all, it's plugged. What happens is the fuel dribbles though the filter to the carbs and the bowls act as a resevoir until you stand on the throttle for a while and the filter won't flow that much. Chugga chugga. Let it sit for a moment and the filter alows the bowles to fill up again and off you go for a few minutes. Good luck! -
I wanted to take a moment and thank all you guys and gals (?) who post on Hybrid Z for your inspiration, motivation, and wisdom. No seriously, I've owned my baby since '84 and lived perty much in my own shell with MSA as my only other contact until the internet and you folks at Hybrid Z. Tomorrow, wether permitting, I'm rolling my baby, a '72, out of the garage and starting it for the first time in 6 years. I parked it 17 years ago "for six months" because it needed a new clutch. It also needed struts, tires, diferential, all new U-joints, AC, seats, stereo, carpets, glass, paint,... on and on. Well now the suspension is done, engine is rebuilt, 5 speed, struts and shocks, tires, wheels, carpets, seats, roll bar, one set of seat belt harnesses... much much more and soon it will be my daily driver. Seriously, thanks to all of you! I've been taking lots of pics and I will definatley get some of her starting up!! Stay tuned and I'll post on this thread.
-
Customers Custom Intake Indivudual Throttle Bodys.
sonomaz replied to 1 fast z's topic in Nissan L6 Forum
Wow!! definatly a ten on the cool'o meter. Seriously it seems long. Is this for a stock engine bay? And obviously others are going to ask how much to get one -
I don't buy the booger worm thing, clearly it's a GPS tracking chip that is activated by heat. The CIA used them back in the 70's before the military let people know they had GPS! They were used to monitor the Z's for oil fiascoe during the Nixon Admin. Seriously though . Did it come frome the head or the block? I tlooks like a piece of core from the casting process. Hate to think of that thing in your H2O pump during a 1/4 mile run. It could make things real exciting.
-
Gauging interest in Custom Hood................
sonomaz replied to Poundz9oh9's topic in Body Kits & Paint
Vinny, Do you have a link to pictures of the final product? I'm interested in aquireing one. Paul -
Tokico Illumina Struts and Springs Kit
sonomaz replied to sonomaz's topic in Brakes, Wheels, Suspension and Chassis
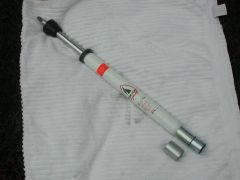
I put a call into Tokico and spoke with Ken Watanabe in Technical Support. He determined the spacers on the struts were incorrect and sent me new spacers. The top shows the strut with the shortend spacer plus the piece I cut off it. The bottom is one of the spacers I recieved from Tokico. So it appears somewhere along the line the incorrect spacers where placed on the struts. So the preliminary result is the struts should be bolt in from the factory. If you have a problem, call Tokico, they will help. I know there is a lot of questions about how much drop comes from the springs. When I get the car on the ground I'll follow up with another post to this thread. Expect that to be sometime late in December or early January. Thanks to all of you for help. Paul -
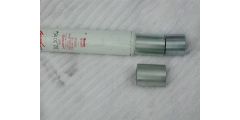 What I cut off and what was supposed to be on it
 -
-
Tokico Illumina Struts and Springs Kit
sonomaz replied to sonomaz's topic in Brakes, Wheels, Suspension and Chassis
Thanks, Mr. Mortensen. If you look above you will see I can be taught!!! Also thanks for your vote of confidence in my instalation. I think it will be just fine I just can't figure out why I had to cut the spacer. I guess I'll put a call in to Tokico on Monday and see what they say. -
Tokico Illumina Struts and Springs Kit
sonomaz replied to sonomaz's topic in Brakes, Wheels, Suspension and Chassis
OK I'm working on how to paste images . If you look at the picture you see the gap between the gland nut and the strut housing (strut tube). What I want to know is why I had to cut the spacer to make this fit. Also has anyone else had to do this. By searching through HybridZ it is obvious these struts are very popular, so someone has experience putting them in a stock 240. By the way the springs have the number 5020-F and 5020-R printed on them.