

JMortensen
-
Posts
13742 -
Joined
-
Last visited
-
Days Won
68
Content Type
Profiles
Forums
Blogs
Events
Gallery
Downloads
Store
Everything posted by JMortensen
-
Louvers are used to EXTRACT air. When they're put on a fender, they extract air from the fenderwell. On a hood, they extract air from the engine compartment. When you put them on the decklid, they can't actually extract air out of the hatch, so they just create turbulence and a low pressure area over the louvers. I don't know for sure, but I'm thinking that will increase drag and perform no useful function whatsoever.
-
Maybe I'm influenced by the huge hp numbers thrown around here, but it doesn't seem like you need to be all that careful when trying to get 200 whp out of an L28. I would think that you could get very close if not reach your 200 whp goal by installing an N42 and going with a larger cam (something in the .500/300 range). You'll need to do some modifications to run a cam that big, like installing aftermarket springs and retainers and shorter valve stem seals, but the bigger cam would be worth the effort. If that didn't quite get you there, triples certainly would. My opinion on triples is forget about the 40s, and go with the 44's or 45's. I think you'll be really close to your goal without them though. Ported SU's are another option, but I think the triples will ultimately make more power although they're harder to tune.
-
Buy the How to Modify Your Nissan/Datsun OHC Engine book and search here and on the web. You'll find a ton of info in each to help you with these decisions. I've seen several sites that specifically deal with these questions as well. Dished pistons will give you a lower compression ratio. If you want a lower compression ratio, then you should go with them. It will probably depend on which head you end up using. Before you ask which head you should use, spend some serious time searching and reading. Rods are going to have to be L24 length if you plan on doing the "standard" stroker build. You can alternatively move the pin height in the piston and use a longer rod. Again, this is something that has been discussed before, and you will find info on it if you search. Things to search for: stroker L31 3.1 3.2 rod/stroke ratio r/s ratio pin height compression ratio You're going to spend some cash getting this engine built. Spend some time now researching what you're doing.
-

Jon's 2 year roll cage saga...
JMortensen replied to JMortensen's topic in Brakes, Wheels, Suspension and Chassis
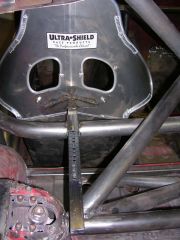
The plate is .060". The seat itself is thicker than 1/8", I think it is .134". I certainly don't want to be impaled by my seat brace, but I could find no specs on what is acceptable or preferred for this particular part, so I'm at a bit of a loss. I could fairly easily double up the plate to 1/8" if that was deemed necessary. -
Jon's 2 year roll cage saga...
JMortensen replied to JMortensen's topic in Brakes, Wheels, Suspension and Chassis
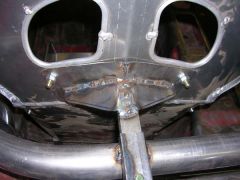
Thanks for the compliment Pete. No, I haven't been driving anything else. In fact, I sold my Toyota P/U (my only other stick shift vehicle) about a year ago, so I'll be super rusty with a big badass car to try and figure out. Needless to say its going to be at least a full season of autox before I try any big track stuff... Got the seat back brace pretty well finished. Just need to cut the excess off the back of the tube and paint it, although I don't think I'm going to paint the tube itself, as that would last about one seat adjustment. I had to make the tube that got welded to the shoulder bar, I think I made it a little on the tight side. Oh well, it works. I've never used a seat brace before. Is that tube attached to the shoulder bar securely enough? I was thinking I could weld in some little gussets if the two 1" long beads weren't enough. -
-
-
-
Jeff I think he might have moved on a bit from July of 2001 when this post was last used.
-
Cheap Source for Velocity Stacks?!
JMortensen replied to proxlamus©'s topic in Fabrication / Welding
I did 3/4" aluminum with a 3/8" carbide router bit. Worked like a charm. I think I have pics in my gallery. -
Jon's 2 year roll cage saga...
JMortensen replied to JMortensen's topic in Brakes, Wheels, Suspension and Chassis
Yeah, you can sort of tell which projects I started first. I think mine is a 2005. When I'm doing bodywork like patching the fenders I use 3 on the voltage and about 20 or 25 on the wire speed. When I'm doing the .060 plate to the rockers, or the welding to the strut towers or anything else to the slightly thicker metal on the frame rails or suspension bits I do 6 on the voltage and 50 on the wirespeed. The trick is to start your bead on the thick stuff and then pull the puddle into the Datsun metal. On the roll bar tubing I've been doing 9.75 (when I turned it to 10 it didn't like it at all) on the voltage and somewhere in the 6 range for wire speed. I was going with a slower wire speed but I found it difficult to get a consistently smooth bead. Turning the wire speed up really helped. EDIT-thought of another project that I need to complete too. I need a seat back brace. I've got some 1 x .5 x .065 rectangle tubing, so I think I'm going to use that, but I'll need some slightly larger tube to weld to the shoulder bar. The seat is adjustable so there will be a series of holes with a lynch pin type of arrangement for the seat back brace. -
Jon's 2 year roll cage saga...
JMortensen replied to JMortensen's topic in Brakes, Wheels, Suspension and Chassis
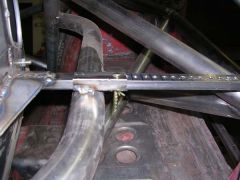
I'll have to make a tool to stick in the hole (basically another tube with a little box on the end), but the idea is that you can jack up a seriously low car without having to struggle to get the jack underneath the car or use ramps. Used to be that I had to lift on the fenders and have someone else push the jack under the front crossmember, and in the rear the jack would BARELY slide under the diff. I actually have a creased fender from trying to get the jack under the front at an autox. I didn't do any front to rear balance checking, but I expect this to lift the whole side of the car, at which point I can change ride height or a tire or do what I need to do. -
That is a good idea. I guess the "special" part of the bolt is some sort of wear surface?
-
Jon's 2 year roll cage saga...
JMortensen replied to JMortensen's topic in Brakes, Wheels, Suspension and Chassis
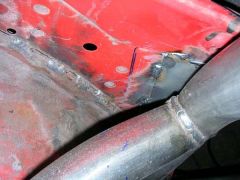
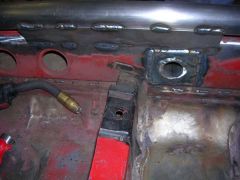
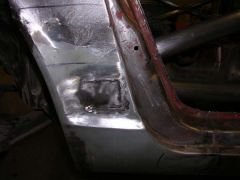
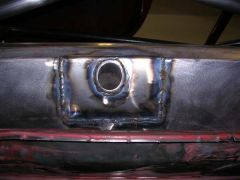
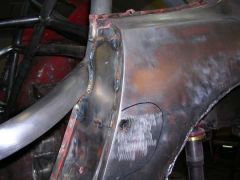
Some finishing touches. Gusset/patch for the door jamb: The interior patch was welded to the bar inside the jamb: Jack point with 1.5 x .095 tube and .060 plates inside and outside of rocker. This will get a cap on the tube in the inside too. Patched holes in fenders: -

-
-
-
-
-
-
Fender vents should be functional without a duct to the engine compartment. They'll vent pressure from inside the fender well. The vent would be better placed directly above the tire, but the way the Z fender is shaped they should still be functional where you have them. My take: vent the fenderwells out the fenders, vent the engine compartment out the hood. Limit the air going into the engine compartment, limit the air going under the car.
-
Jon's 2 year roll cage saga...
JMortensen replied to JMortensen's topic in Brakes, Wheels, Suspension and Chassis
It will not be painted next week. I think you guys might be surprised at how quickly it gets done though. Besides, it's not like all I was doing in the last two years was figuring out the cage... Oh, and guys... use your imagination: -
The knurl size on the stud you linked to is too large. You could redrill to fit those. The Camaro 12x1.5 is the right one. I want to say knurl is .509" or so, but it's been a while since I've looked at the specs. A quick search should bring up more posts. I know ScottieGNZ has posted the ARP stock number quite a few times.
-
Jon's 2 year roll cage saga...
JMortensen replied to JMortensen's topic in Brakes, Wheels, Suspension and Chassis
12 ga sheet in my case which is .103" thick. SCCA rules say you can use .080, but I couldn't find that thickness anywhere. Everything was welded with a Millermatic 135 mig. -
You call THAT removing rust??? Congrats for having a Z that is that rust free. As to removing the sound deadener, you see how it only rusted around the edges of where that crap was? Well, if you leave it in, where do you think it's going to rust next time? I'd take it out and use Zero Rust or POR15 to lock out the rust.