

JMortensen
-
Posts
13742 -
Joined
-
Last visited
-
Days Won
68
Content Type
Profiles
Forums
Blogs
Events
Gallery
Downloads
Store
Everything posted by JMortensen
-

Nhra Cage Base Plates
JMortensen replied to JustinOlson's topic in Brakes, Wheels, Suspension and Chassis
Option 1 for sure. The rocker where you'd be attaching to is much stronger than the floor. I originally had my hoop and down tubes attached ONLY to the rocker and not the floor, and ended up putting boxes under the tubes only to satisfy the potential nervous nelly tech inspector. I think it would have been absolutely fine the way it was. Option 2 might allow you to weld the side of the tube to the rocker, but then the connection to the rocker is purely in shear and the compression loads are going mostly to the floor. The floor is weak. The rocker is much stronger. -
Or pull the cover and compare to the pics that you'll find all over this site if you search for CLSD, LSD, Nismo LSD, Nissan LSD, R200 LSD, clutch LSD, etc.
-
Nhra Cage Base Plates
JMortensen replied to JustinOlson's topic in Brakes, Wheels, Suspension and Chassis
Pretty easy to make a little box to set the bottom of the hoop on. That's what I did. -
Do you really need the 3.5" shell Mat? Seems overkill. Can't you just call the ducks in closer?
-
I don't think anyone has gotten a real significant gain out of those carbs. I remember Dan Baldwin tried them out, but then he switched to triples. You might PM or email Dan. Might try over at http://www.classiczcars.com too.
-
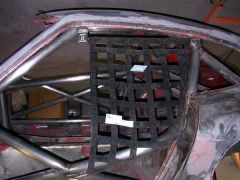
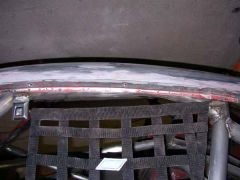
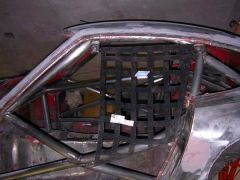
Need window net installation pictures
JMortensen replied to JMortensen's topic in Fabrication / Welding
I measured the dimensions, then cut out of a piece of cardboard and held that up to the cage to double check. I recommend this step, because I screwed up the angles the first time and it would have been wrong. Figured it as close as I could and measured the angles with my digital protractor, then ordered up the Stroud net a week ago and it showed today. Fit right out of the box was nearly perfect. I had to move my anchor points just a hair and now it's dead on. Thanks John for the tip. This one would have been a real hassle without a custom net. Now I gotta go back out there and weld on a washer and drill the bottom rod for cotter pins. -
-
-

-
-
That answers another question I had. I was using 150 on my 5" DA and thinking, how much better does this really need to be before I can paint it? It looks pretty damn smooth as it is.Apparently the surface finish is pretty close already... On that link you sent, the Turbo 2K info is dead. Any idea what the difference is between the 2K and the Turbo 2K? Faster drying or builds faster, I'm guessing. Does it seem weird that I'll spend 5x as much on primer as paint??? Makes me want to try microballoons with the Rustoleum primer.
-
Yeah, I've been doing a bit of research (probably should have done that before posting) and it appears Rustoleum makes a spray can primer and also one that you can buy by the quart. I think I'm going to try the quart, and if it's not thick enough I'll add some microballoons to it to give it some depth, then go from there. All in all, this was a pretty stupid post...
-
Some of this might be a bit basic, but since this is my first paint job please bear with me. Since I stripped my car all the way down I'm a bit concerned about repainting with Rustoleum direct to the bare metal. I filled some dents with a quality marine grade filler straight on the bare metal, but I know that it's not absolutely totally smooth yet. I don't care too much about getting it perfect, but I also don't want it to look completely crappy. Bottom line is it will need to be better than it is now for me to be happy. The idea I'm getting from reading tech info online is that I really need to add filler primer so that I can sand it and look for high and low spots, and then maybe do some more small filler areas on top of the primer to get it reasonably flat. I just want to know that the primer I use will work with the Rustoleum. I had found Transtar 6464 http://www.shopforpaint.net/cart.php?target=product&product_id=570&category_id=73 and it is a roll-on primer, which sounds perfect. I also found a different website which said that you can add microballoons to the primer to make it a deeper fill. I have microballoons that I used for filler, so I could do that as well if it would help. I'm not sure if that's a safe thing to do on ALL primers though. Also one of the really nice things about the Rustoleum for me was the lack of isocyanates. I don't have any rebreather gear, nor do I have one of those full suits, so I'd rather just avoid that crap if I can. I guess the questions are: 1. What primer can I use safely with Rustoleum? Transtar 6464? 2. Does primer have isocyanates? Is there one that doesn't? 3. Can you add microballoons to any primer? 4. Should I just keep adding Rustoleum and wetsanding? (This one seems like a no, but I thought I'd ask...)
-
Near Zero Front Suspension Droop
JMortensen replied to 260DET's topic in Brakes, Wheels, Suspension and Chassis
I thought a soft rear suspension (particularly low roll stiffness) had a higher likelihood of lifting the inside front under power. -
If you guys drove hard enough to break things you probably wouldn't like the idea of replacements getting exponentially more expensive
-
You need to put a title on your threads that lets people know what is in the thread before they open it.
-
You can also check http://www.timken.com. In the R200 it's the ball bearing at the front of the pinion shaft that always goes bad. It's a Nissan specific bearing and I think it's NLA. Hopefully they used a "standard" bearing for the R180. Before you dump a bunch of cash in bearings, consider the cost of buying a good used diff.
-
Front diff crossmember no longer necessary
JMortensen replied to JMortensen's topic in Brakes, Wheels, Suspension and Chassis
Hmm... interesting point. Hopefully the ES mount will take that kind of abuse... -
R180s and R200 longnose diffs don't use crush sleeves. They use shims to set the distance between the cone and cup pinion bearings and this determines the preload.
-
You might be able to download the FSM from http://www.carfiche.com. Above and beyond that, I'm wondering why you're bothering. You should be able to find an R180 that doesn't need rebuilding for less than 1/2 of what the bearings will cost you, and if you're building a badass bowtie you probably want an R200.
-
Front diff crossmember no longer necessary
JMortensen replied to JMortensen's topic in Brakes, Wheels, Suspension and Chassis
Its just like you said, the mount is only pulled on in reverse. You'd have to do quite a few Rockfords to get into trouble, and I think it would be nearly impossible to tear it apart if you used the interlocking poly mount like I will. -
Front diff crossmember no longer necessary
JMortensen replied to JMortensen's topic in Brakes, Wheels, Suspension and Chassis
Alrighty then. I'll just leave it as is, weld in the diff mount and see what happens. If I feel there is a problem I can always reinstall the stock piece. Glad I asked! Thanks John and Cary. -
I wish I could say I never make mistakes. If the parts aren't defective, just the wrong length, then I'd say that anyone using them just needs to make sure they measure the shafts before installing them.
-
DAW left us after getting in too many pissing matches. You might see if you can email him by clicking on his username, but I doubt he'll be seeing this post.
-
Front diff crossmember no longer necessary
JMortensen replied to JMortensen's topic in Brakes, Wheels, Suspension and Chassis
I'm just thinking if I left it as is I could do back to back tests with the crossmember installed and not installed...