Jethoncho
-
Posts
95 -
Joined
-
Last visited
Content Type
Profiles
Forums
Blogs
Events
Gallery
Downloads
Store
Everything posted by Jethoncho
-
1978 Datsun 280Z RB25 Restomod
Jethoncho replied to Jethoncho's topic in S30 Series - 240z, 260z, 280z
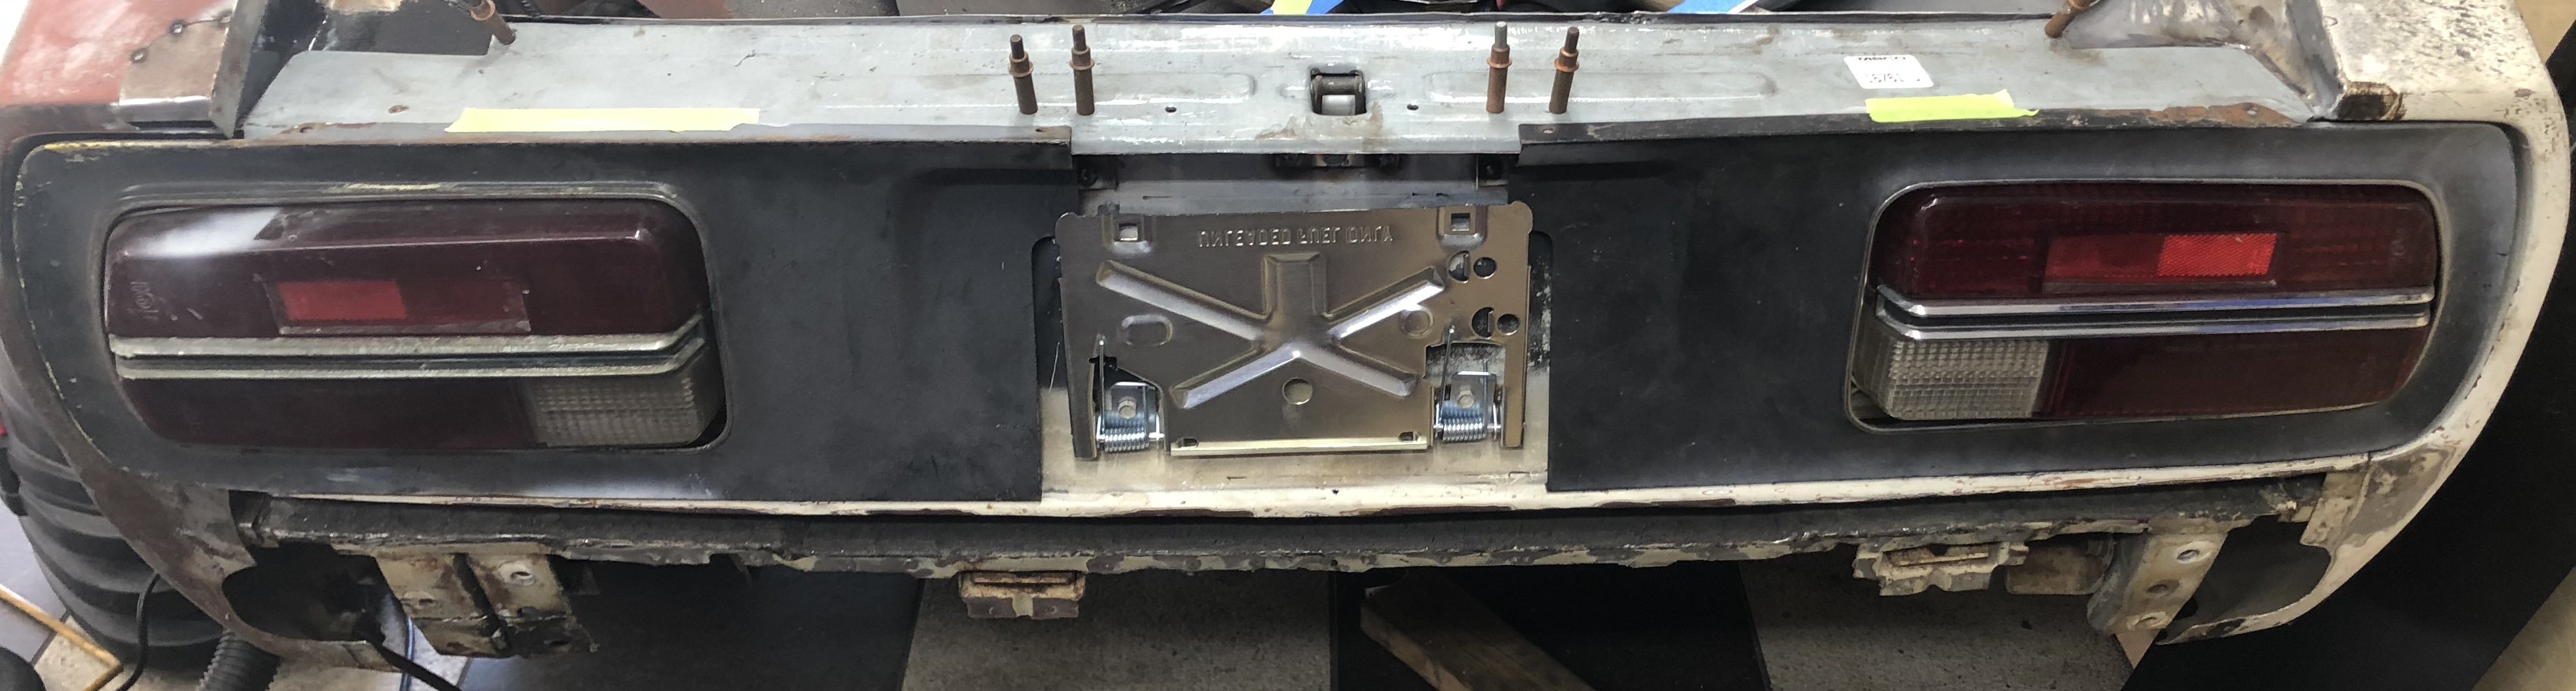
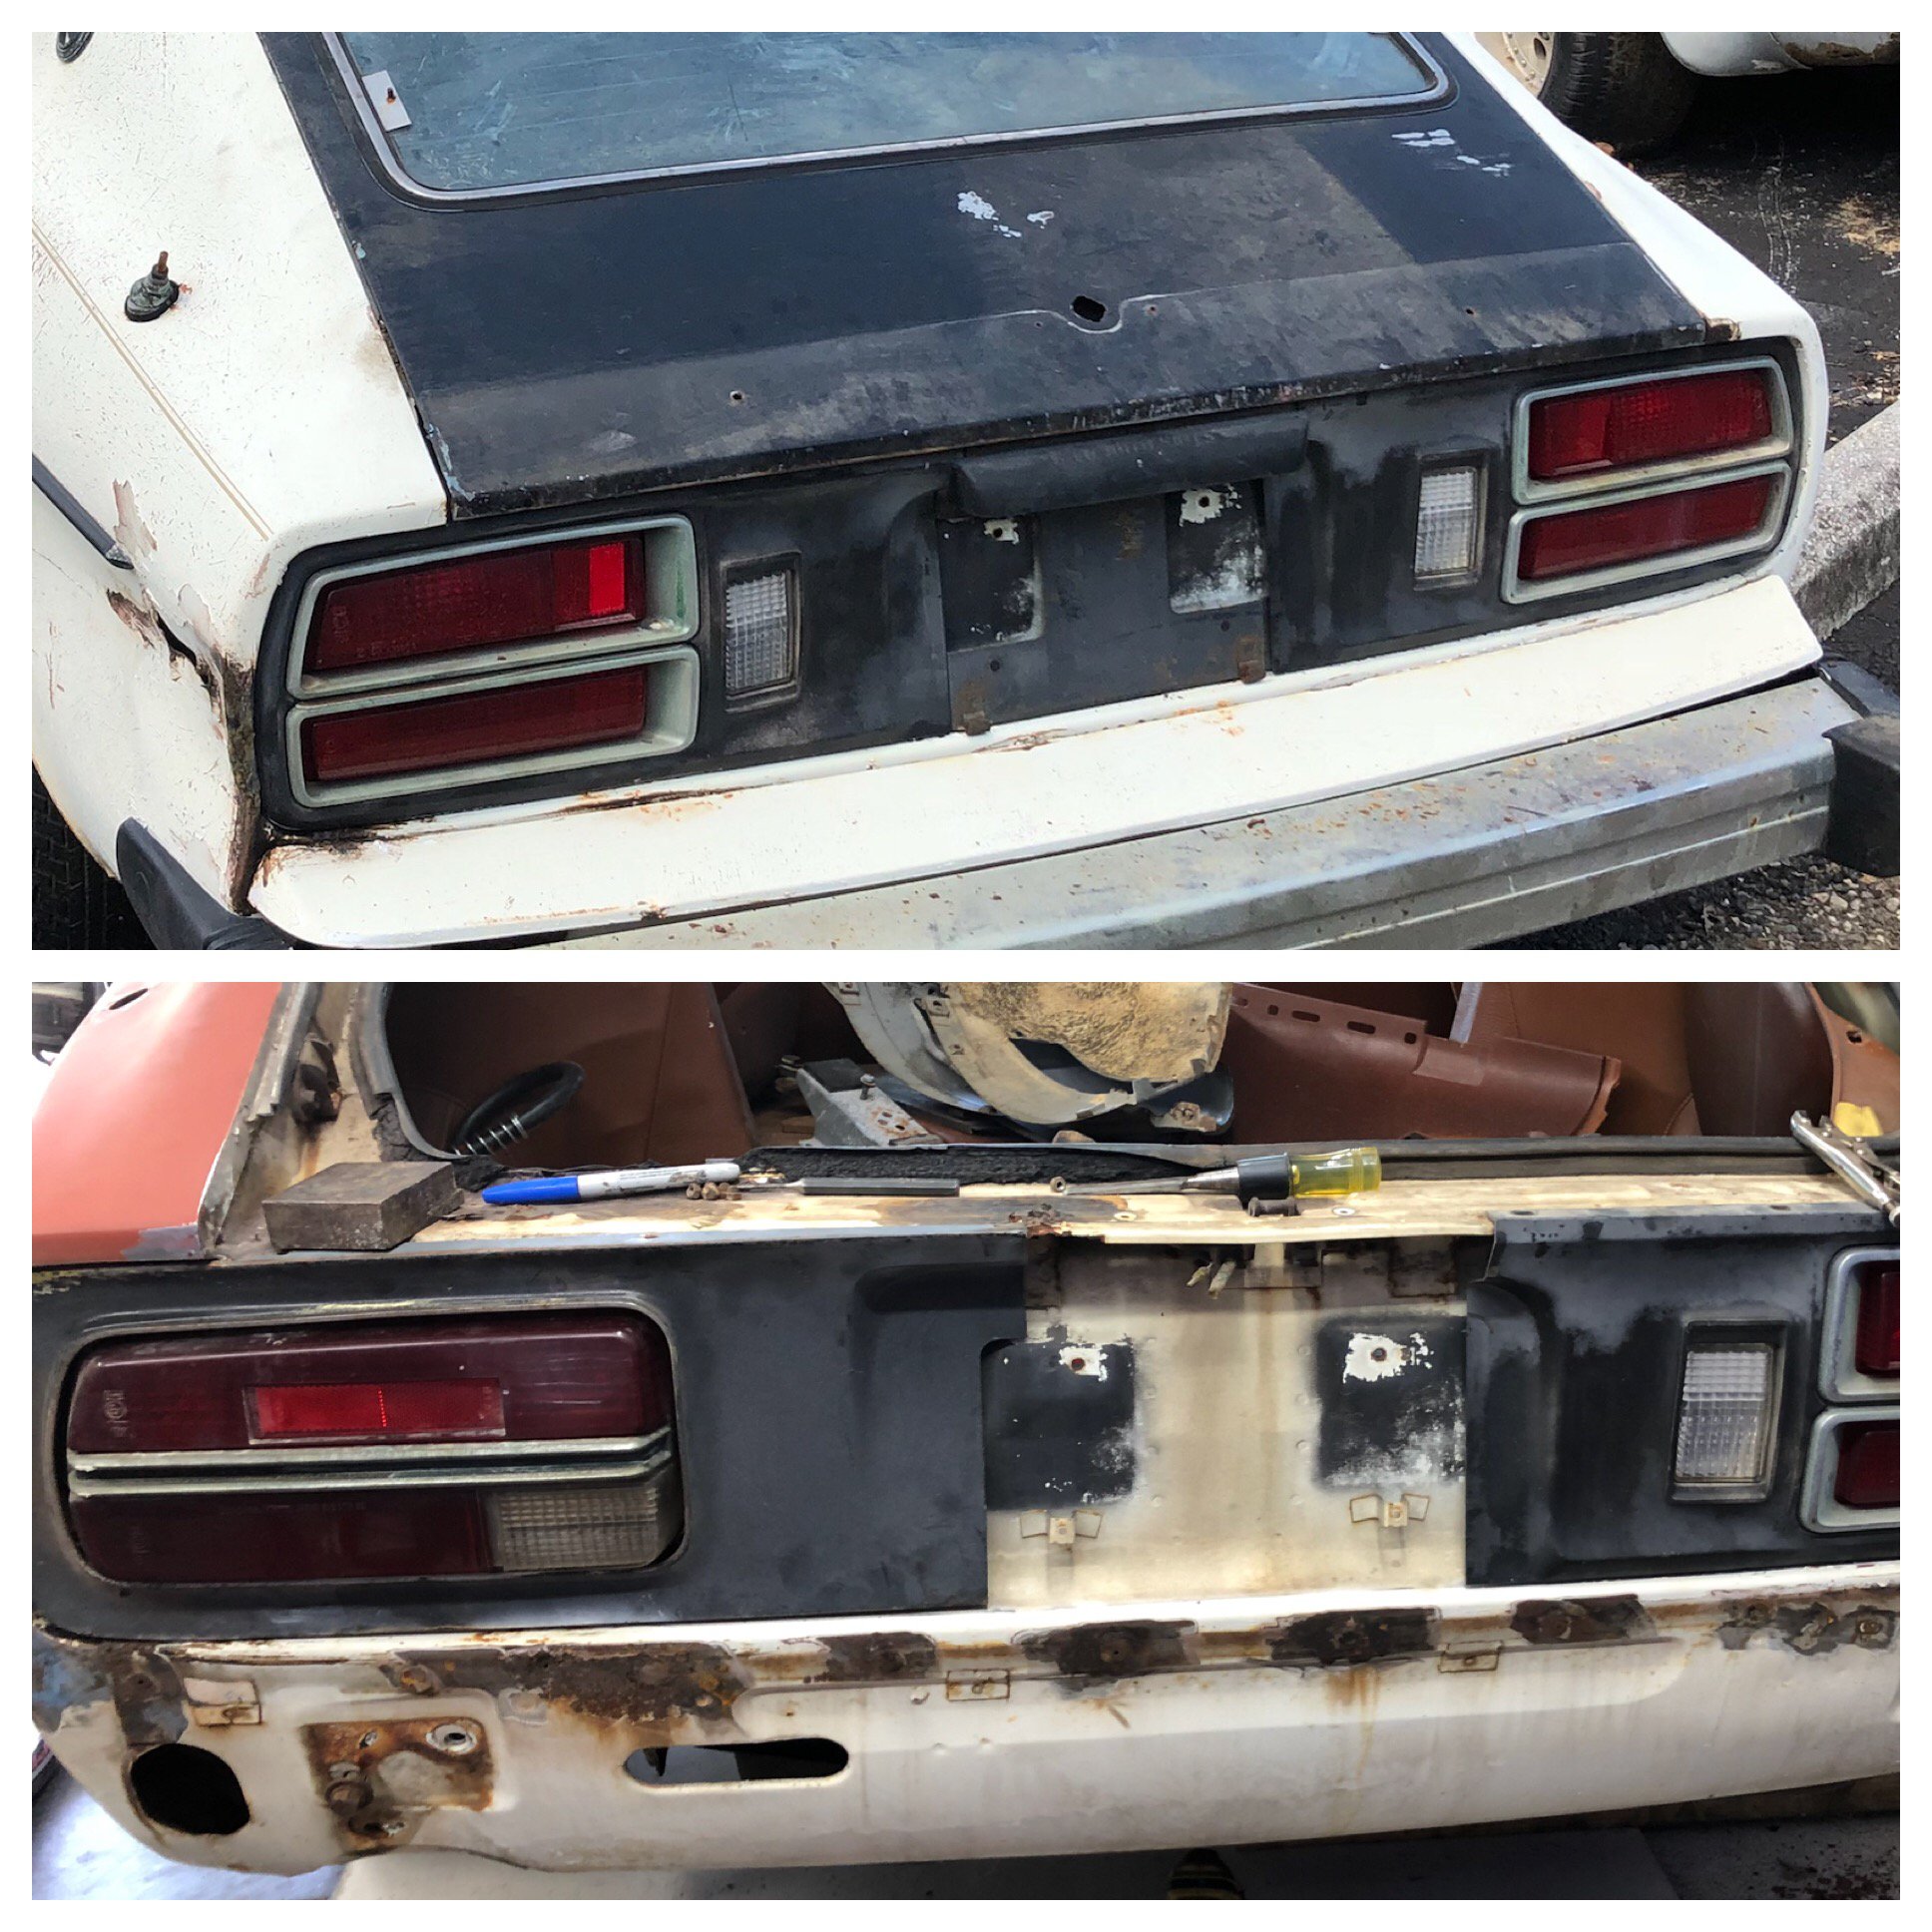
Latest project was to start the rust and panel repairs to the rear of the Z as well as making permenant panels to go from the 280 to 240 rear lights. I started by removing the upper panel under the rear hatch (known rust area), I found the areas above the tail lights also had rust so these areas were cut out and new patch panel are yet to be fabricated. I can’t reinstall the upper panel till the rust repair panels are fabricated so this remain a work in progress...upper panel installed on 28 October, I decided to bond it in with 3M panel adhesive to prevent moisture ingress which likely caused the original rust issues. I then removed the rear lower valence...not due to rust but more due to damage caused by the removal process of the 280’s body to bumper filler panel that was removed to facilitate installation of the 240 bumpers. I also want to replace the rear valance with the 240 valence to permit the installation of a twin pipe exhaust (taller exhaust cutout in the 240 valence) further along in the project. The replacement valence arrived and to my surprise (not really surprised) the panel was completely straight from left to right even though the car has a slightly round feature across the back. I took the replacement out to the airport where I have access to a shrinker/stretcher and shrank the upper flange to create a slight radius on the panel. I haven’t completed fitting it so this also remains a work in progress. Next, I cut the body out around the left rear tail light then fabricated a replacement panel specifically fitted and shaped to accept the installation of the 240 tail light while closing the areas from the back up light portion of the 280. I’ve welded in the left side and I have to say I’m pretty pleased with the outcome, next I’ll tackle the right side and the project will be fully converted to use 240z tail lights. Sorry, I didn’t get any photos, had to go make the doughnuts, Friday I flew from Ft Lauderdale to LA then Honolulu, Saturday back to LA now here till Tuesday then home on Tuesday. I’ll be back on the project on Wednesday and get some photos up then.
-
1978 Datsun 280Z RB25 Restomod
Jethoncho replied to Jethoncho's topic in S30 Series - 240z, 260z, 280z
Yesterday’s project was removing the structure that the 280Z front bumper shocks bolted to and fitting a 240Z grill. Took the existing grill attachment brackets off the removed bumper shock mount structure, relocated to the removed brackets to the remaining structure that was under the 280Z bumper shock structure which appears to be the same as the 240Z. Fabricated two upper grill mounts, welded the four mount brackets in place then installed the grill for mock up confirmation. Haven’t decided if I’m gonna restore this 240 grill that I pick up or go with the Skillard billet grill. I’m leaning toward restoring this grill since it’s in pretty decent shape and I already spent money acquiring it. I realize it doesn’t look like much but it was a fair amount of work. Still have some welding to do to repair the holes left behind after the spot welds were drilled out to remove the 280 bumper mounts.
-
1978 Datsun 280Z RB25 Restomod
Jethoncho replied to Jethoncho's topic in S30 Series - 240z, 260z, 280z
Thanks for your kind words, I’ll be updating this thread as progress continues... -
1978 Datsun 280Z RB25 Restomod
Jethoncho replied to Jethoncho's topic in S30 Series - 240z, 260z, 280z
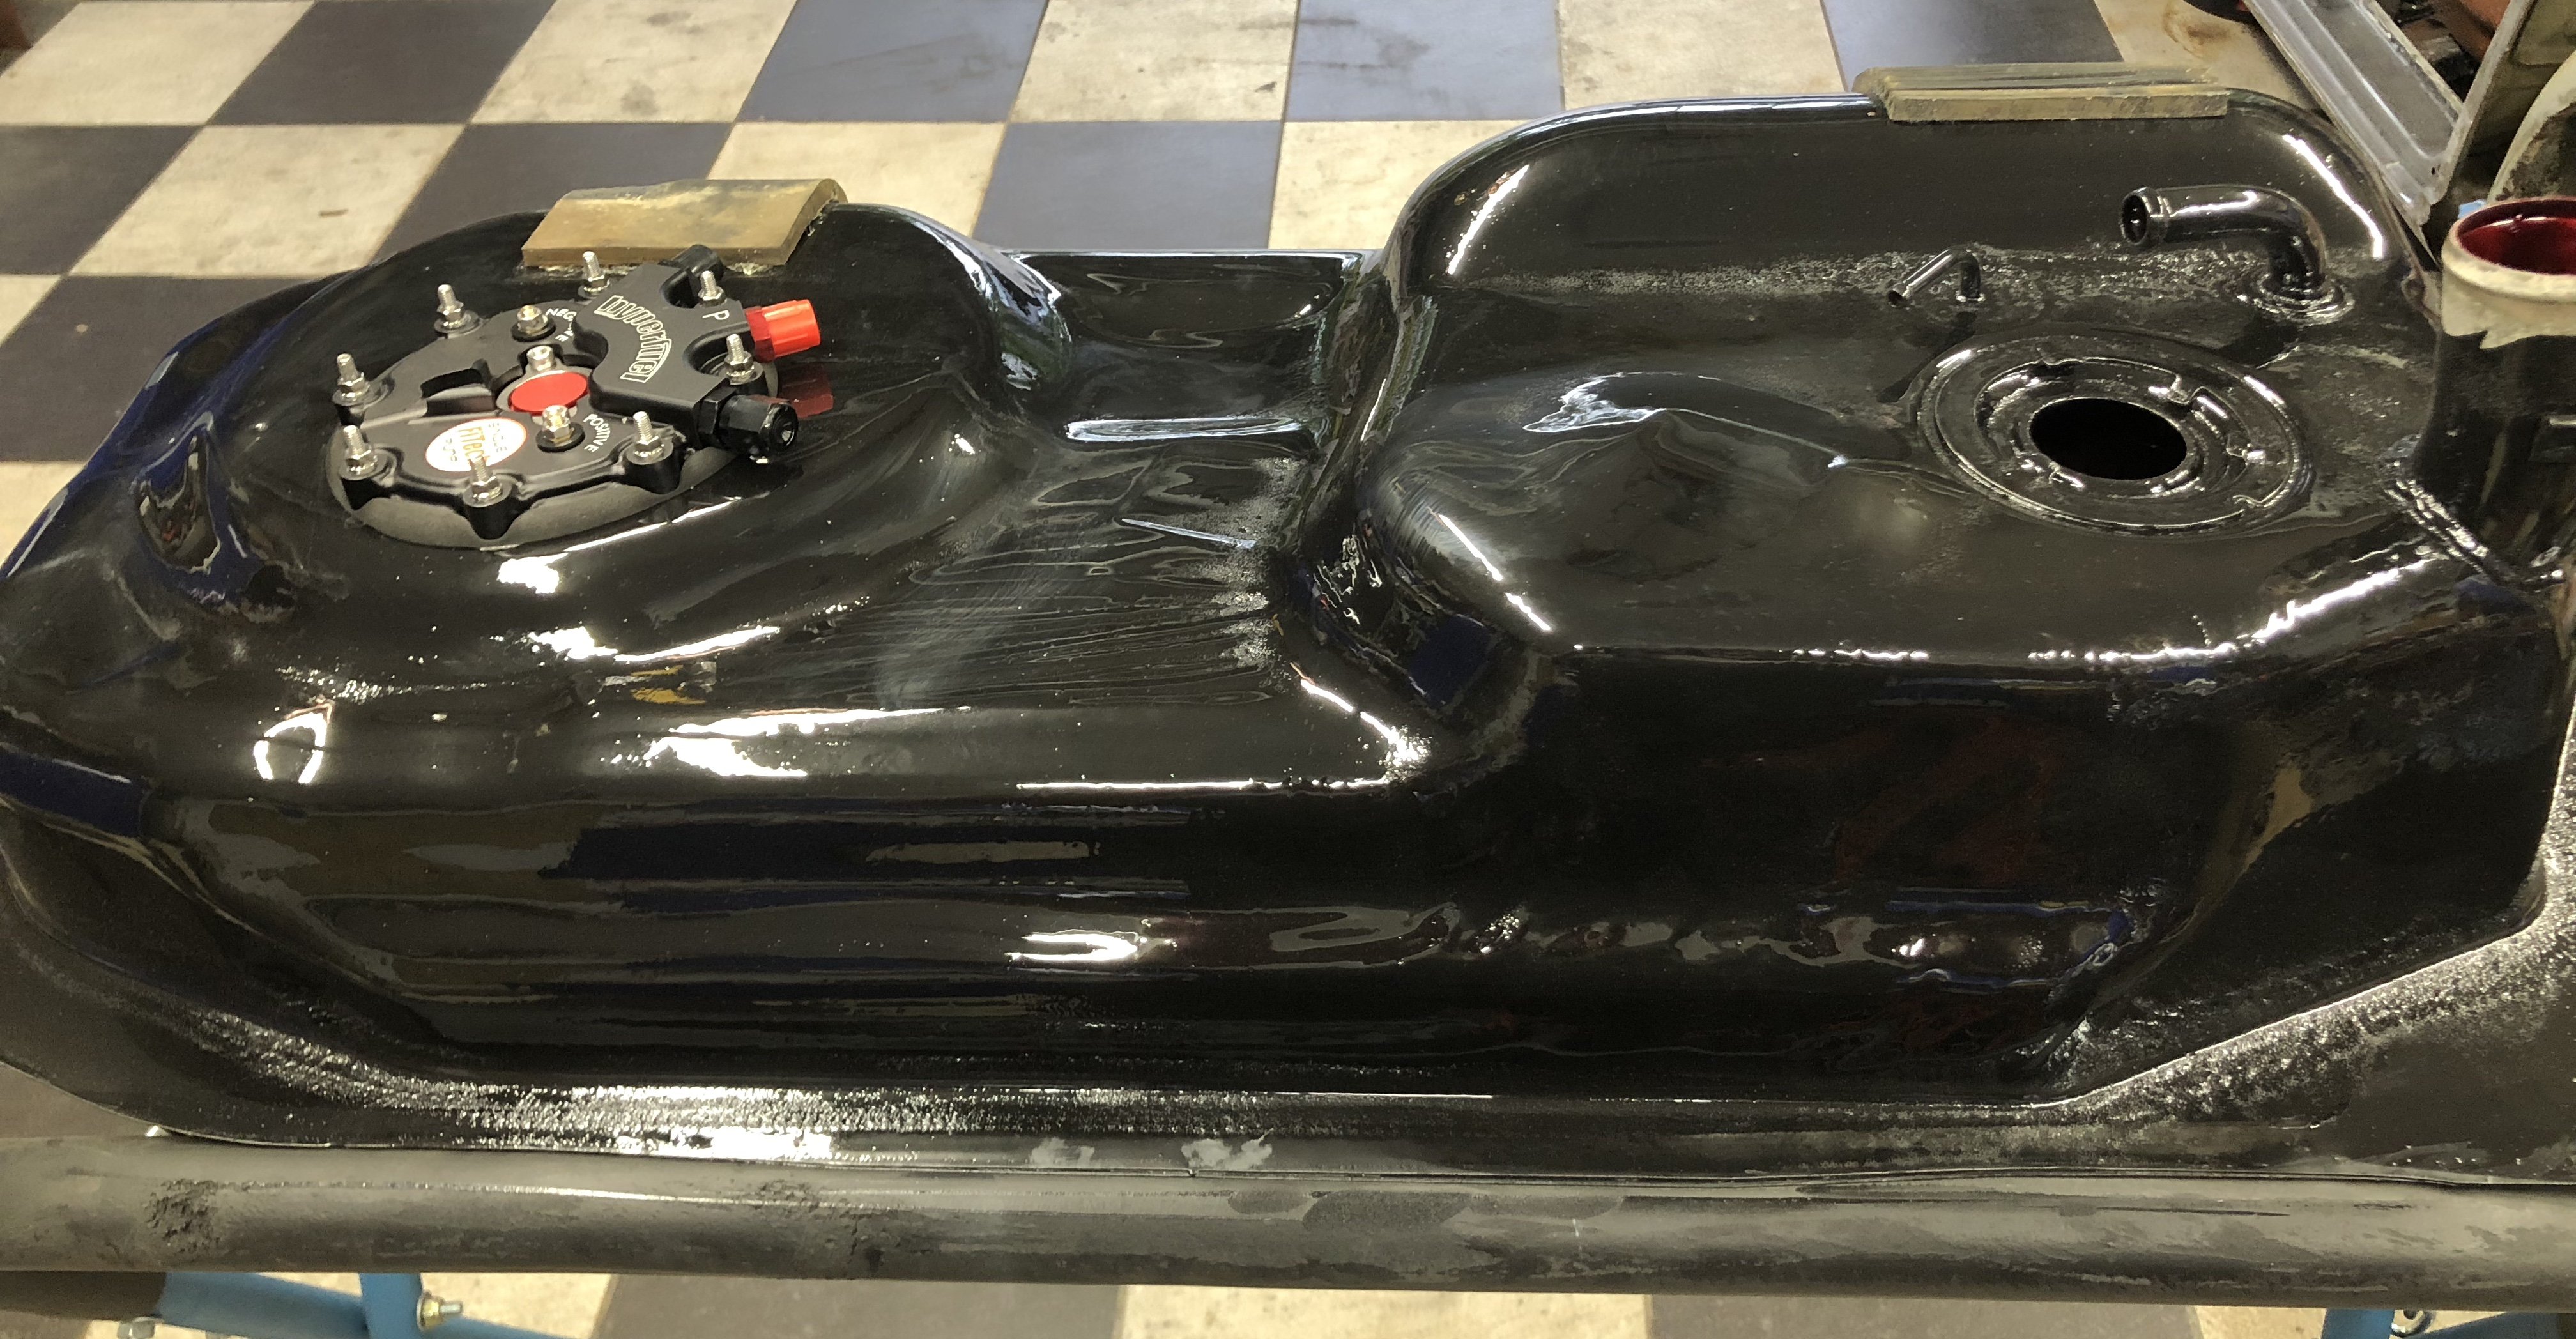
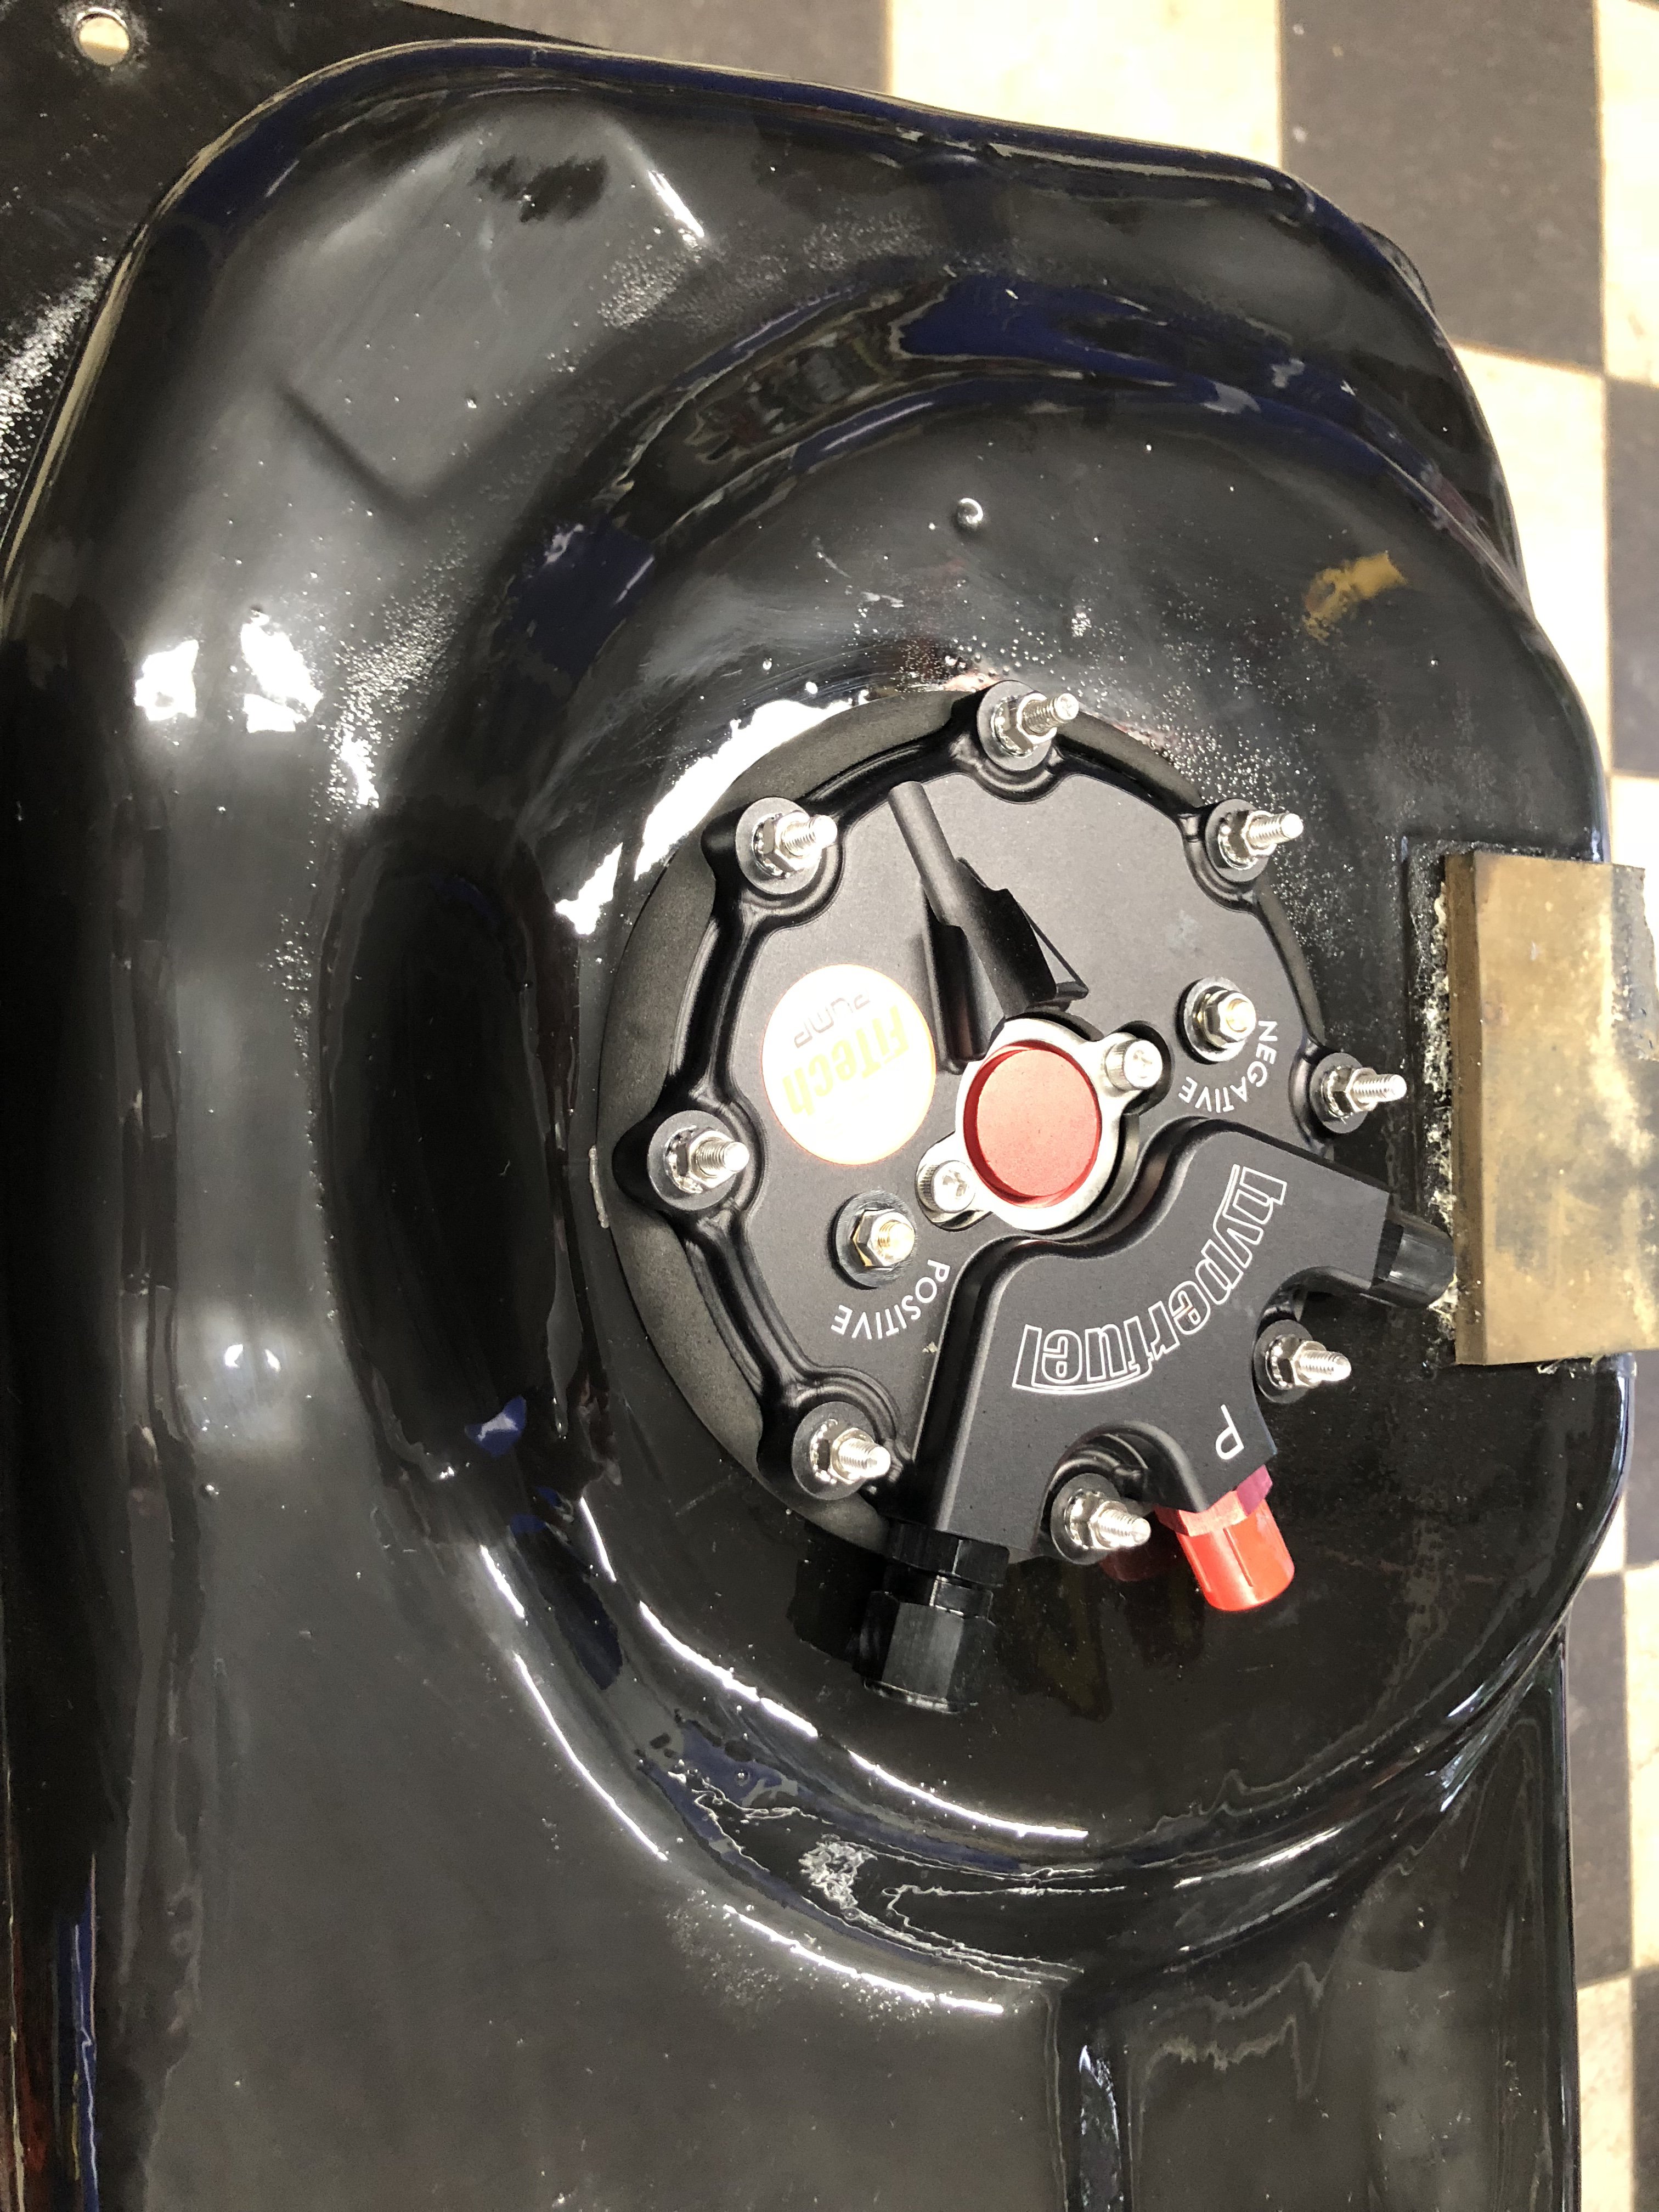
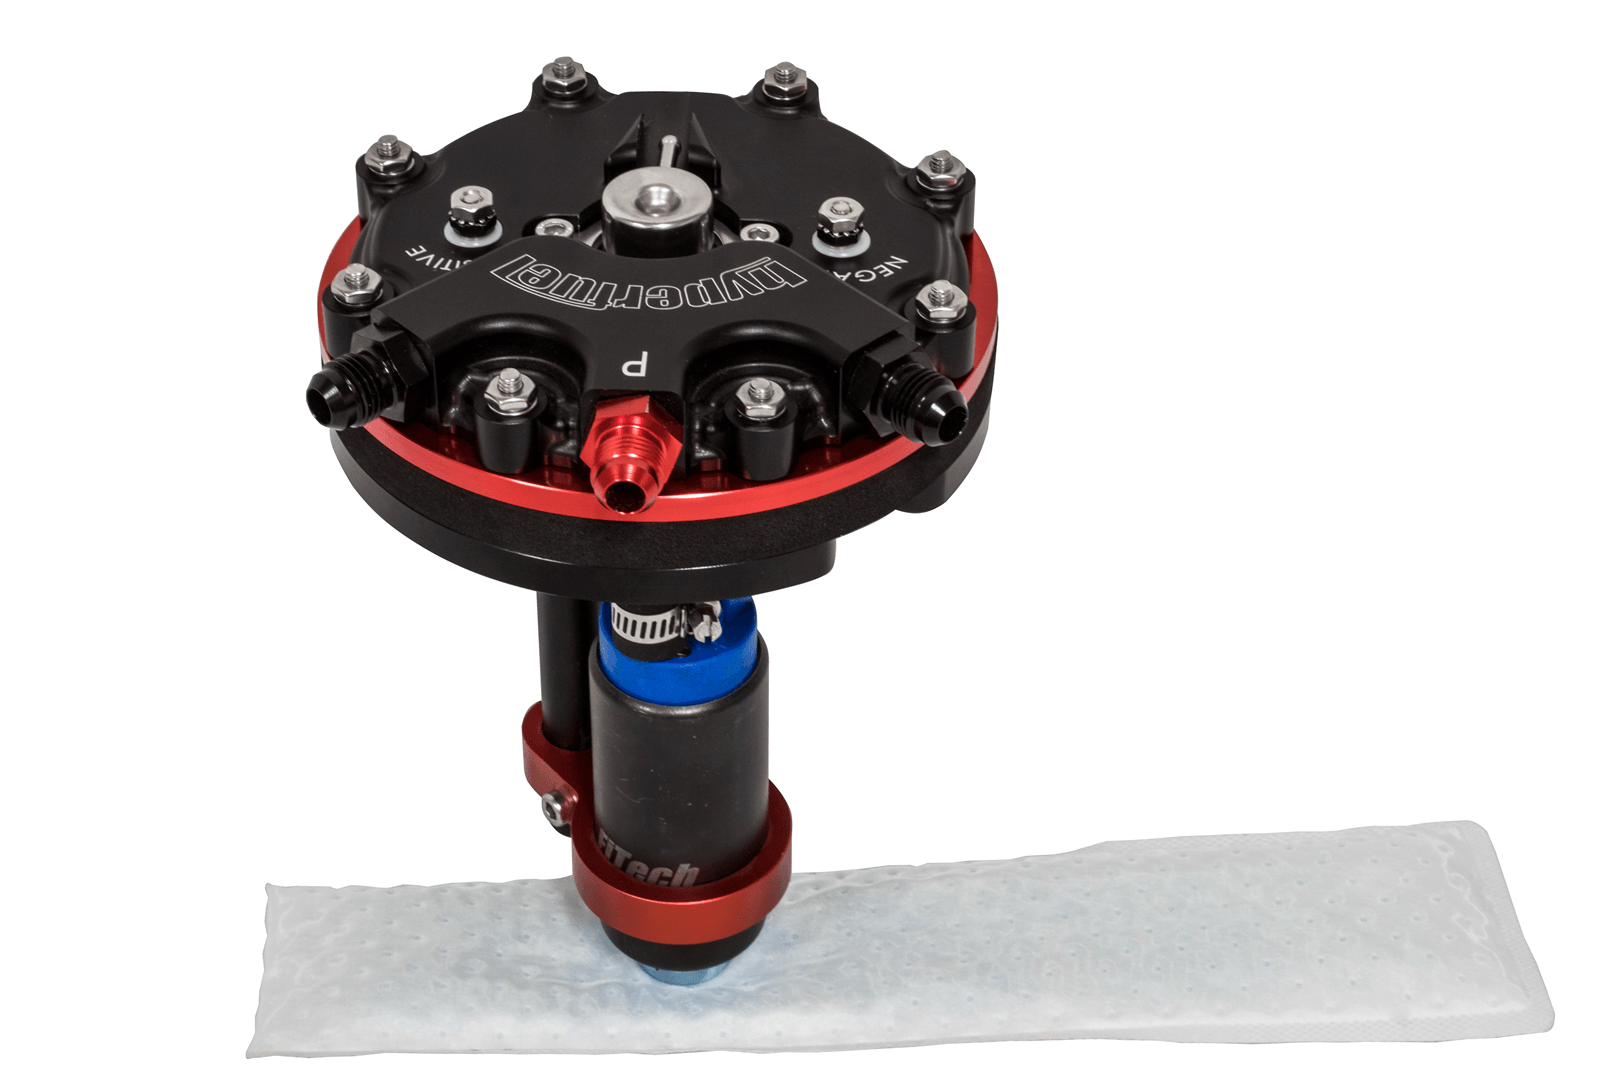
Removed the gas tank to inspect and modify to accept an in-tank EFI pump for the RB swap, upon inspection of the tank’s interior it confirmed what I already knew...the car sat for many years. The car appears to have been parked with nearly 1/2 a tank of fuel given then level of the gum/varnish in the tank. I cut the hole for the EFI pump in the area near the center of the spare tire relief. This gave me a 4 1/2” hole to access the tank’s interior. I moved the fuel filler port (more on this later) and removed the existing fuel pick up, feed and return lines from the tank’s interior. I cleaned the varnish I was able to reach then took the tank to a local radiator shop, he cleaned the balance of the varnish and the surface rust that was in the tank then coated the tank’s interior with a sealer called Red Kote. Now the tank’s interior is super clean and ready to continue service. I brought the tank home removed all exterior paint and surface rust then recoated with POR-15 to emulate the original factory coating (this was my first time working with this product and I applied it a little too heavy in a few areas so it almost looks like a crinkle finish in a few areas, fortunately, this is on the top of the tank where it can’t be seen once installed.). I then installed a FITech retrofit in-tank EFI fuel pump. The tank is now restored and ready to install except for the sending unit which I am still restoring and the mods to the sparewell that will be necessary to allow the routing of the new fuel supply and return lines.
-
1978 Datsun 280Z RB25 Restomod
Jethoncho replied to Jethoncho's topic in S30 Series - 240z, 260z, 280z
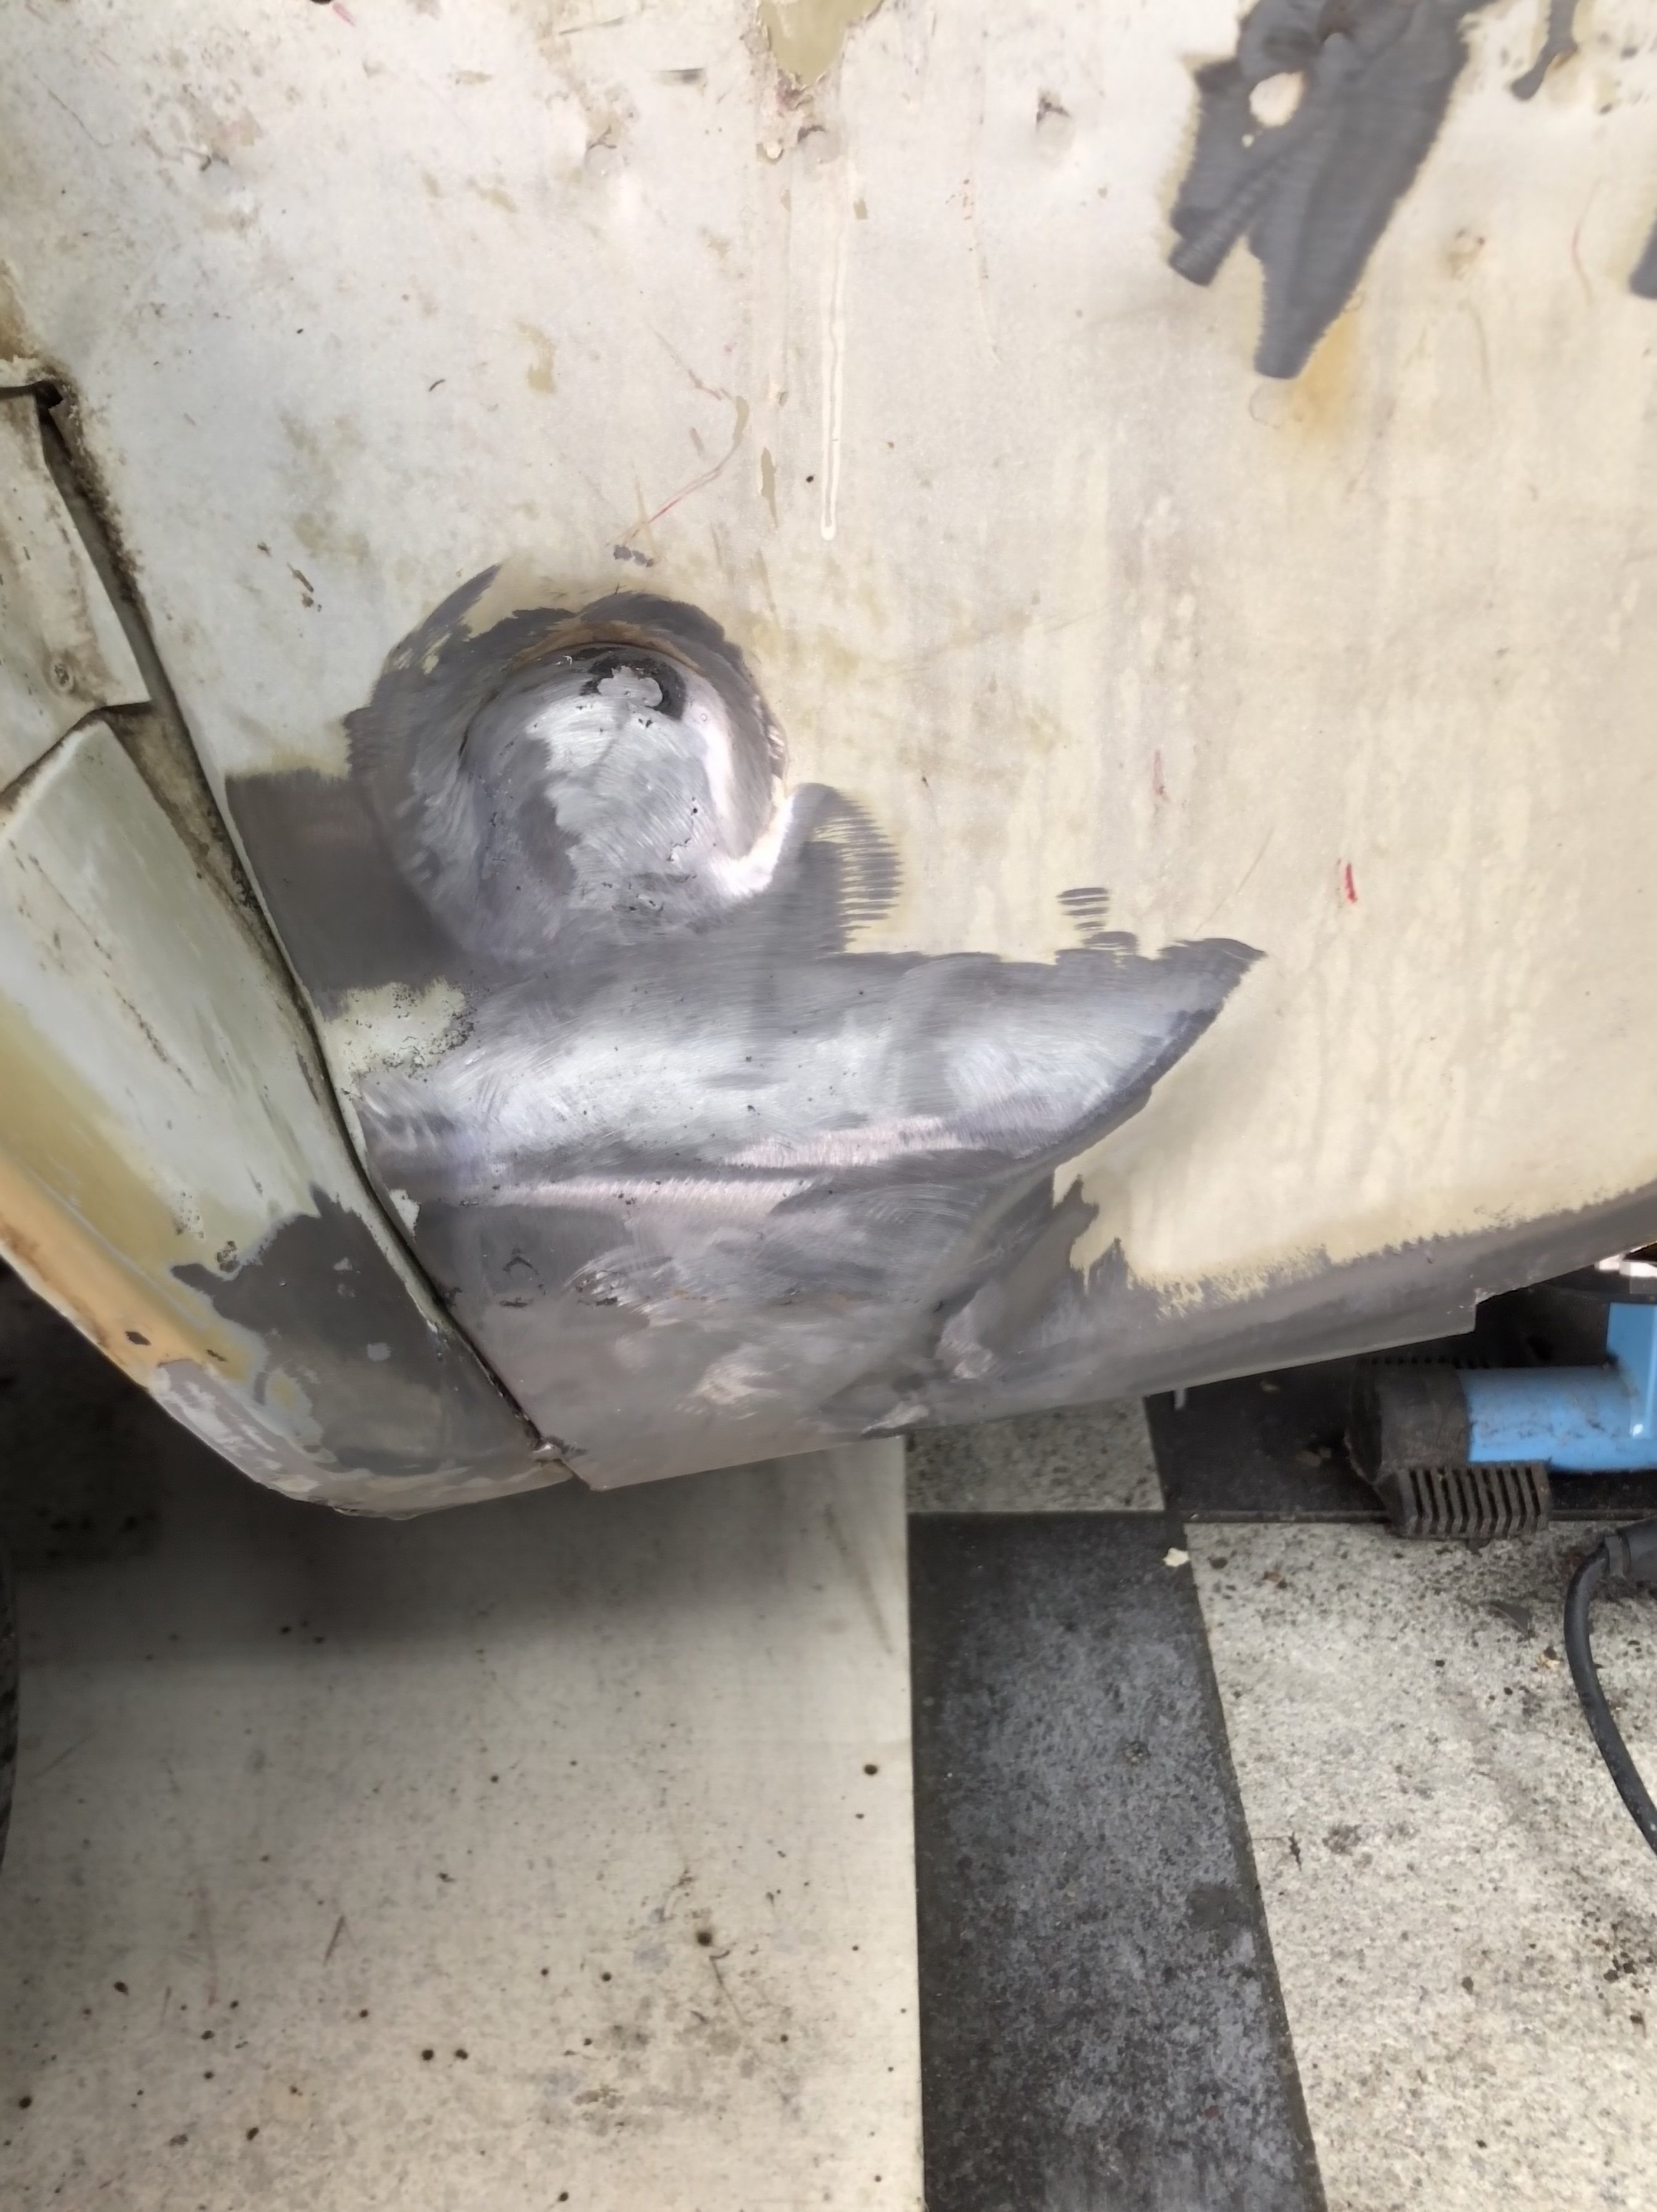
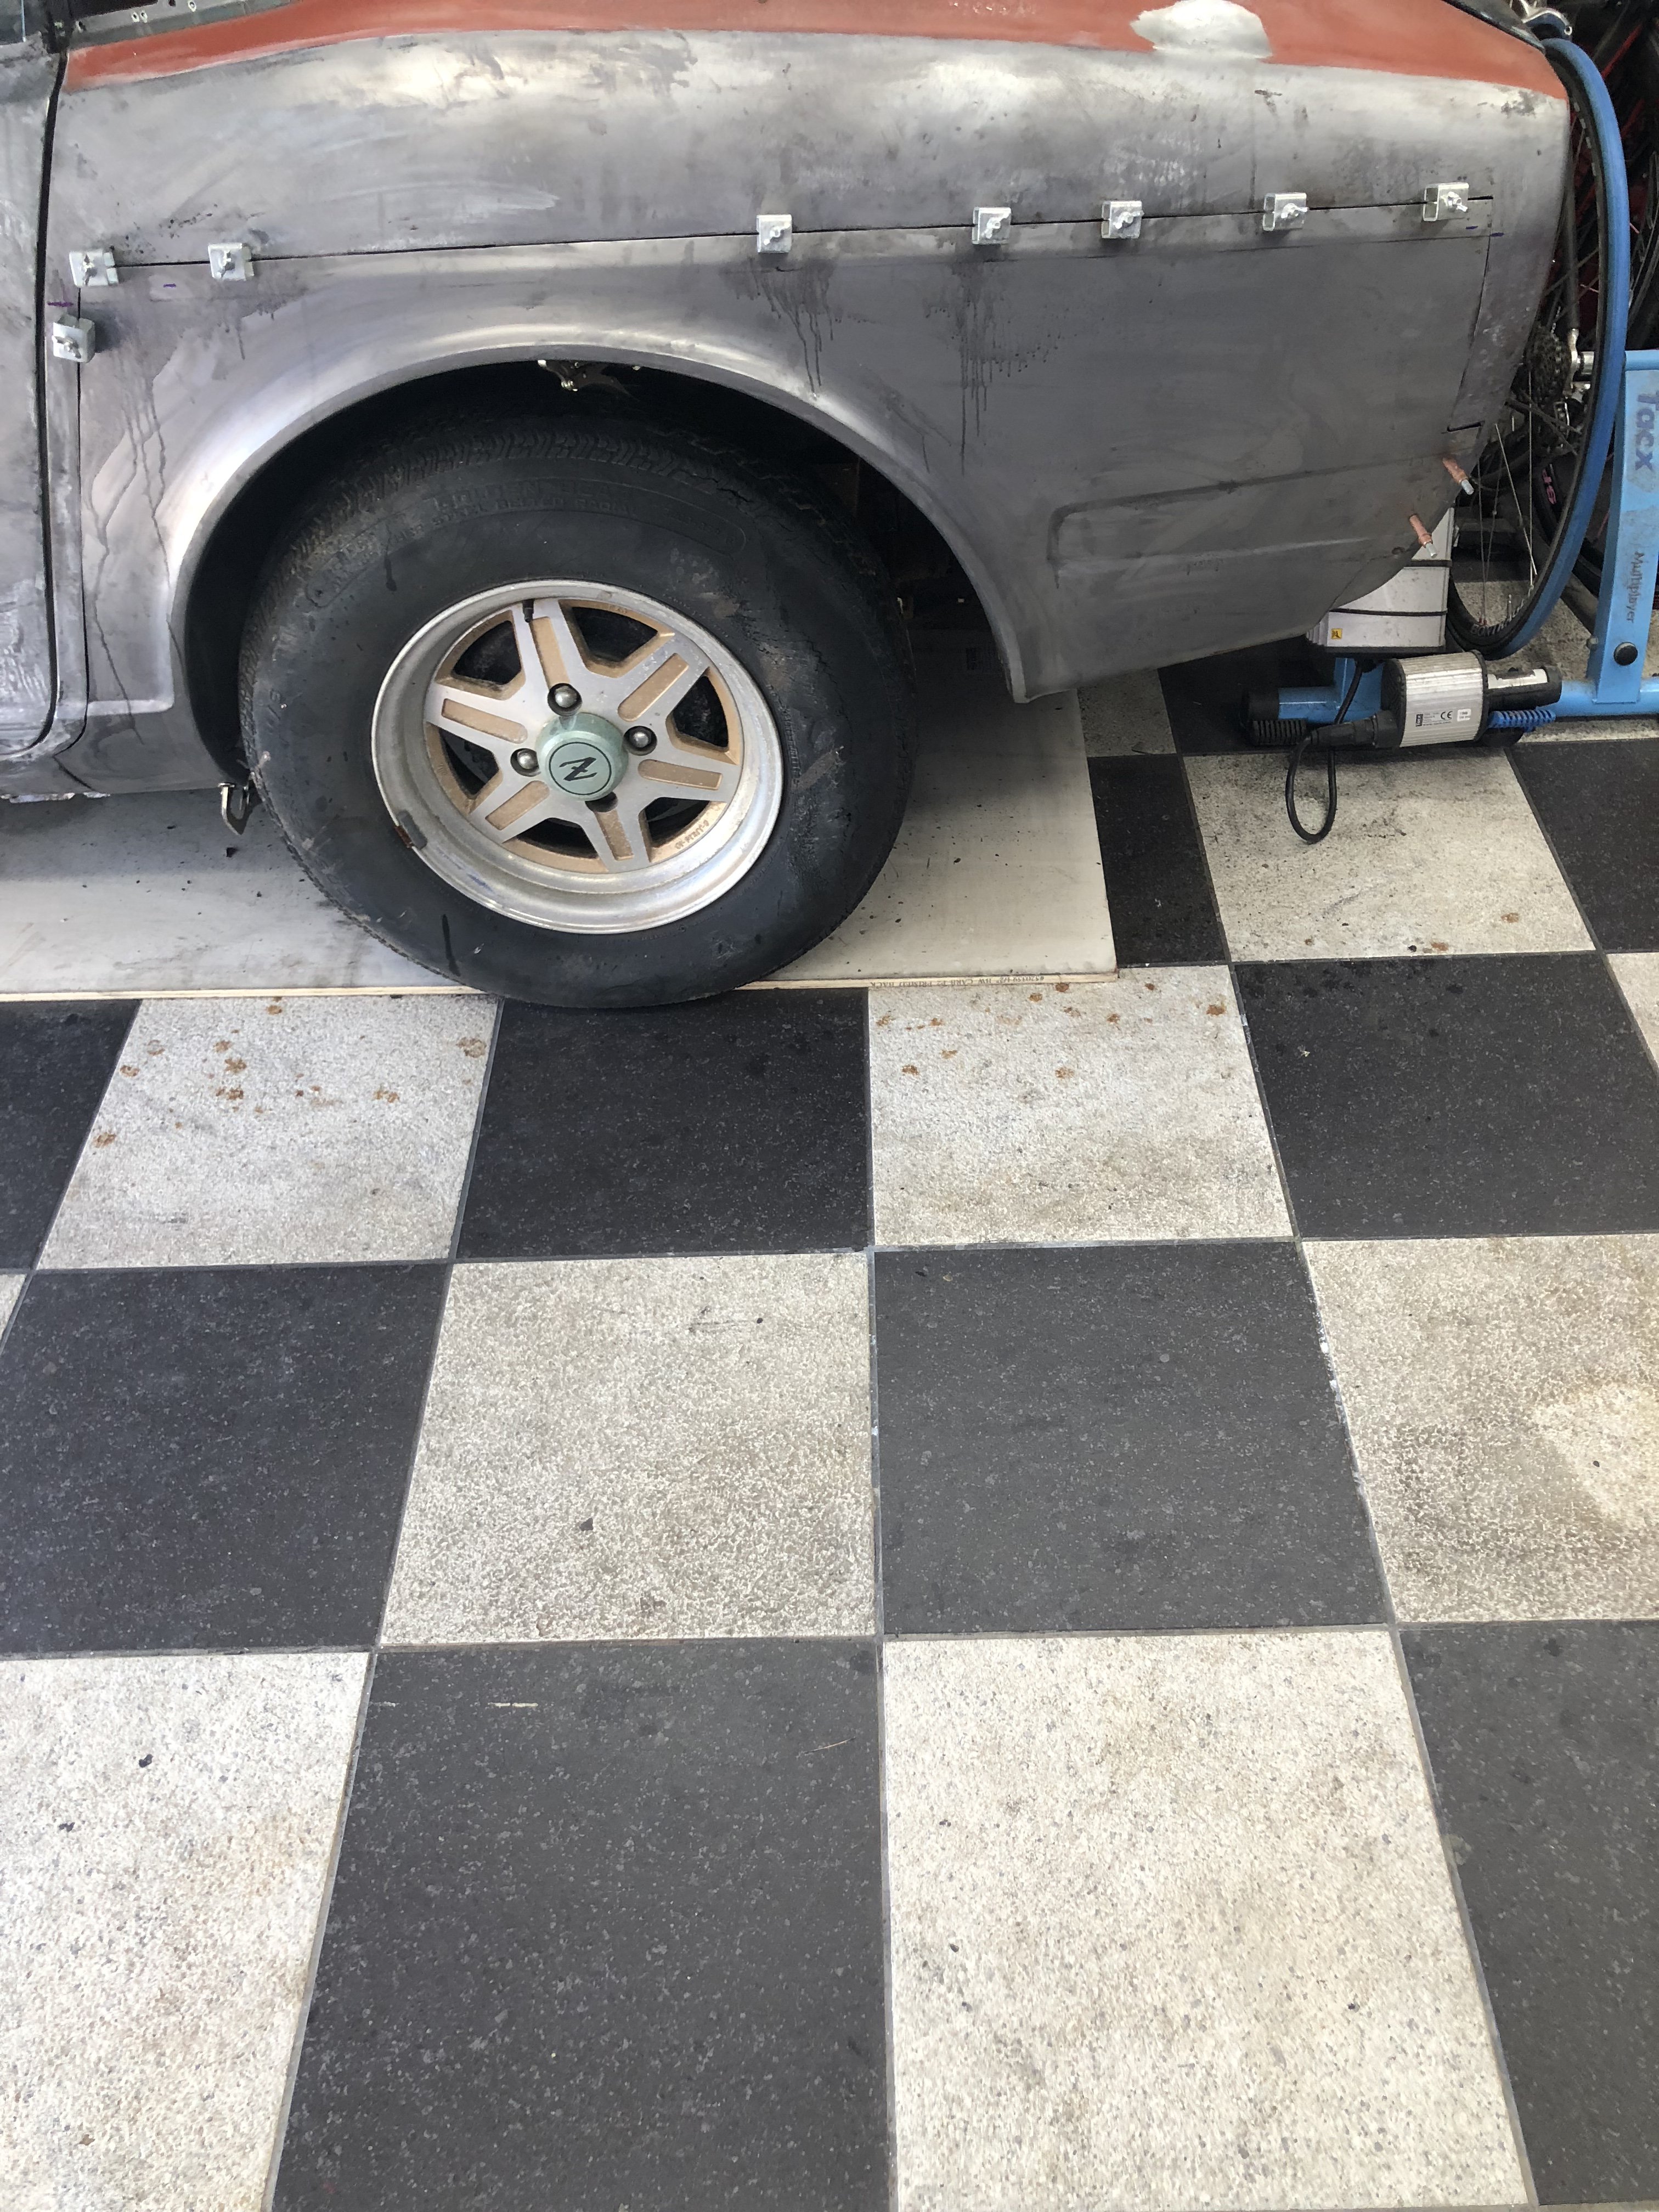
Hey, thanks for the kind words and support. No, I shaved the antenna hole as well but I’m talking about a hole that existed behind the rear quarter (in the structure that faces the fuel tank), if you look at the photos it the one the shows a couple bare metal spots with an area that I need a smaller sanding wheel to finish dressing the weld. The rubber boot/grommet looked like it was meant to allow a small harness to pass through, since none existed I shaved the opening. Yes, I bought the car from the guy in Georgia that bought someone’s collection...some of what he has is total junk others are worthy of resurrection. Mine was a pretty solid base with some what I would call minor rust here and there but certainly not a basket case...it was fairly unmolested and what I consider a good base for a project like mine. I have stripped the left side of the car of its rather horrible paint and it now sits in bare metal awaiting a good coat of sealer.
-
1978 Datsun 280Z RB25 Restomod
Jethoncho replied to Jethoncho's topic in S30 Series - 240z, 260z, 280z
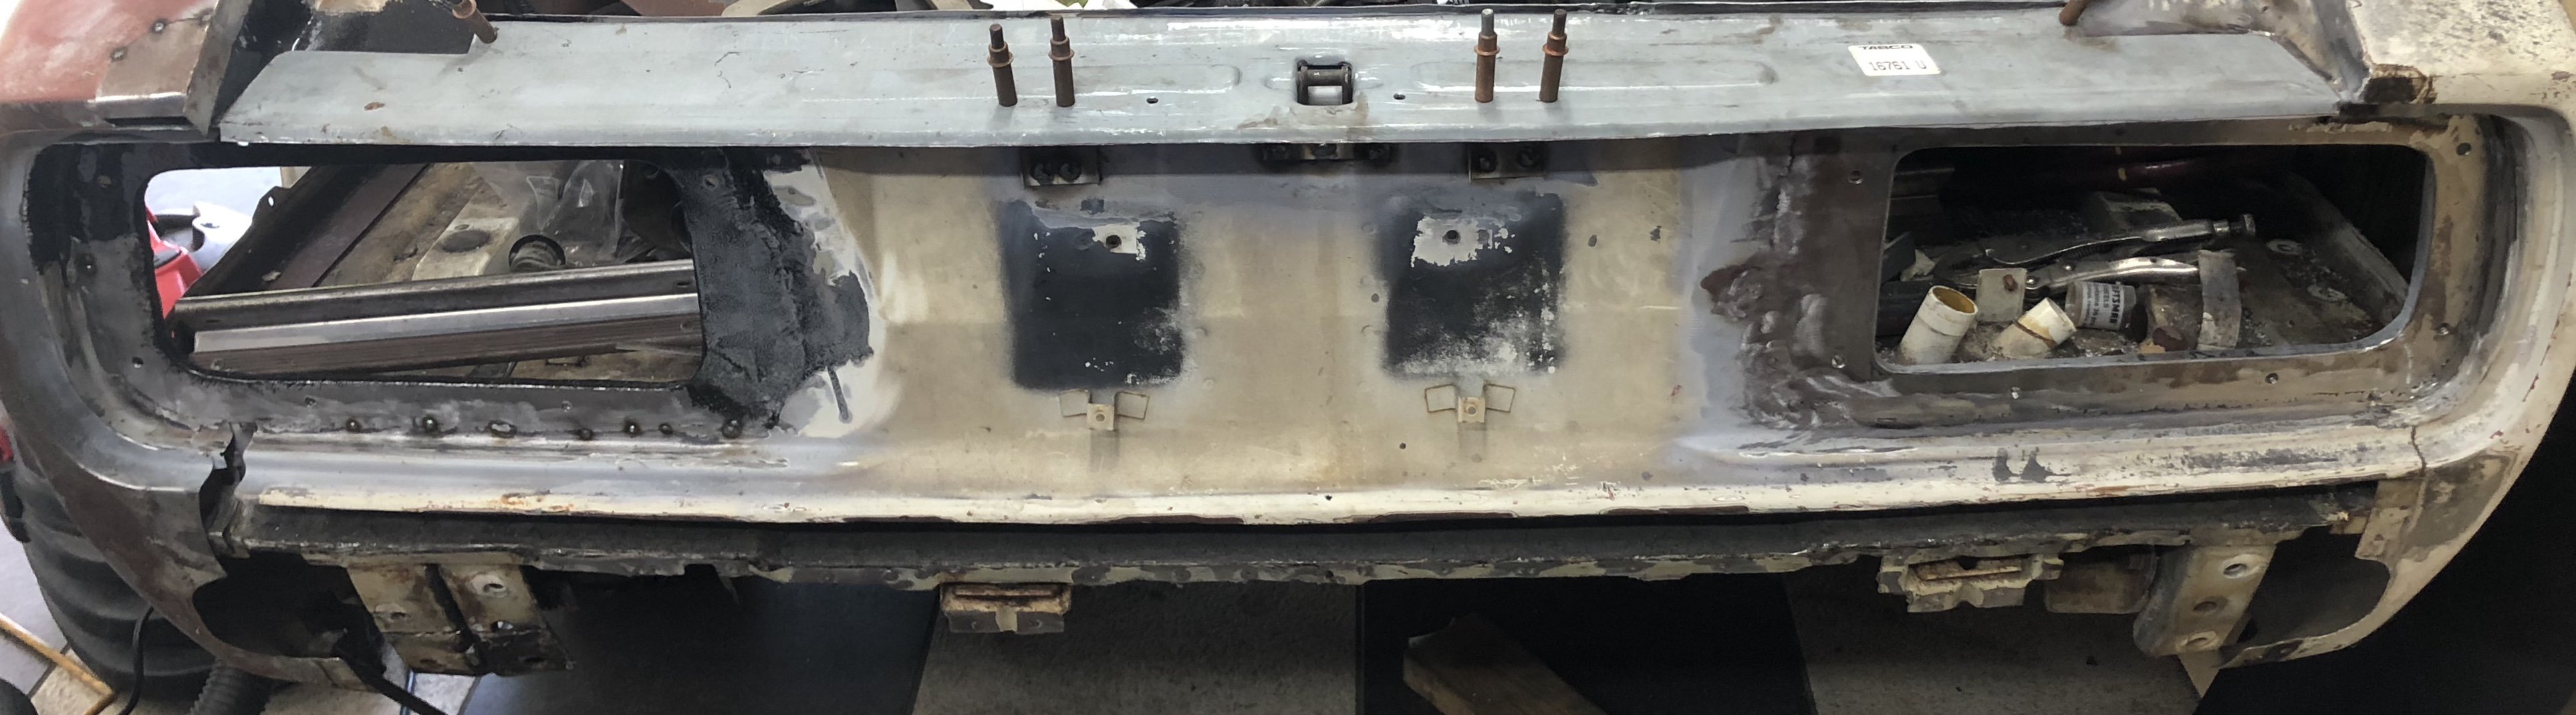
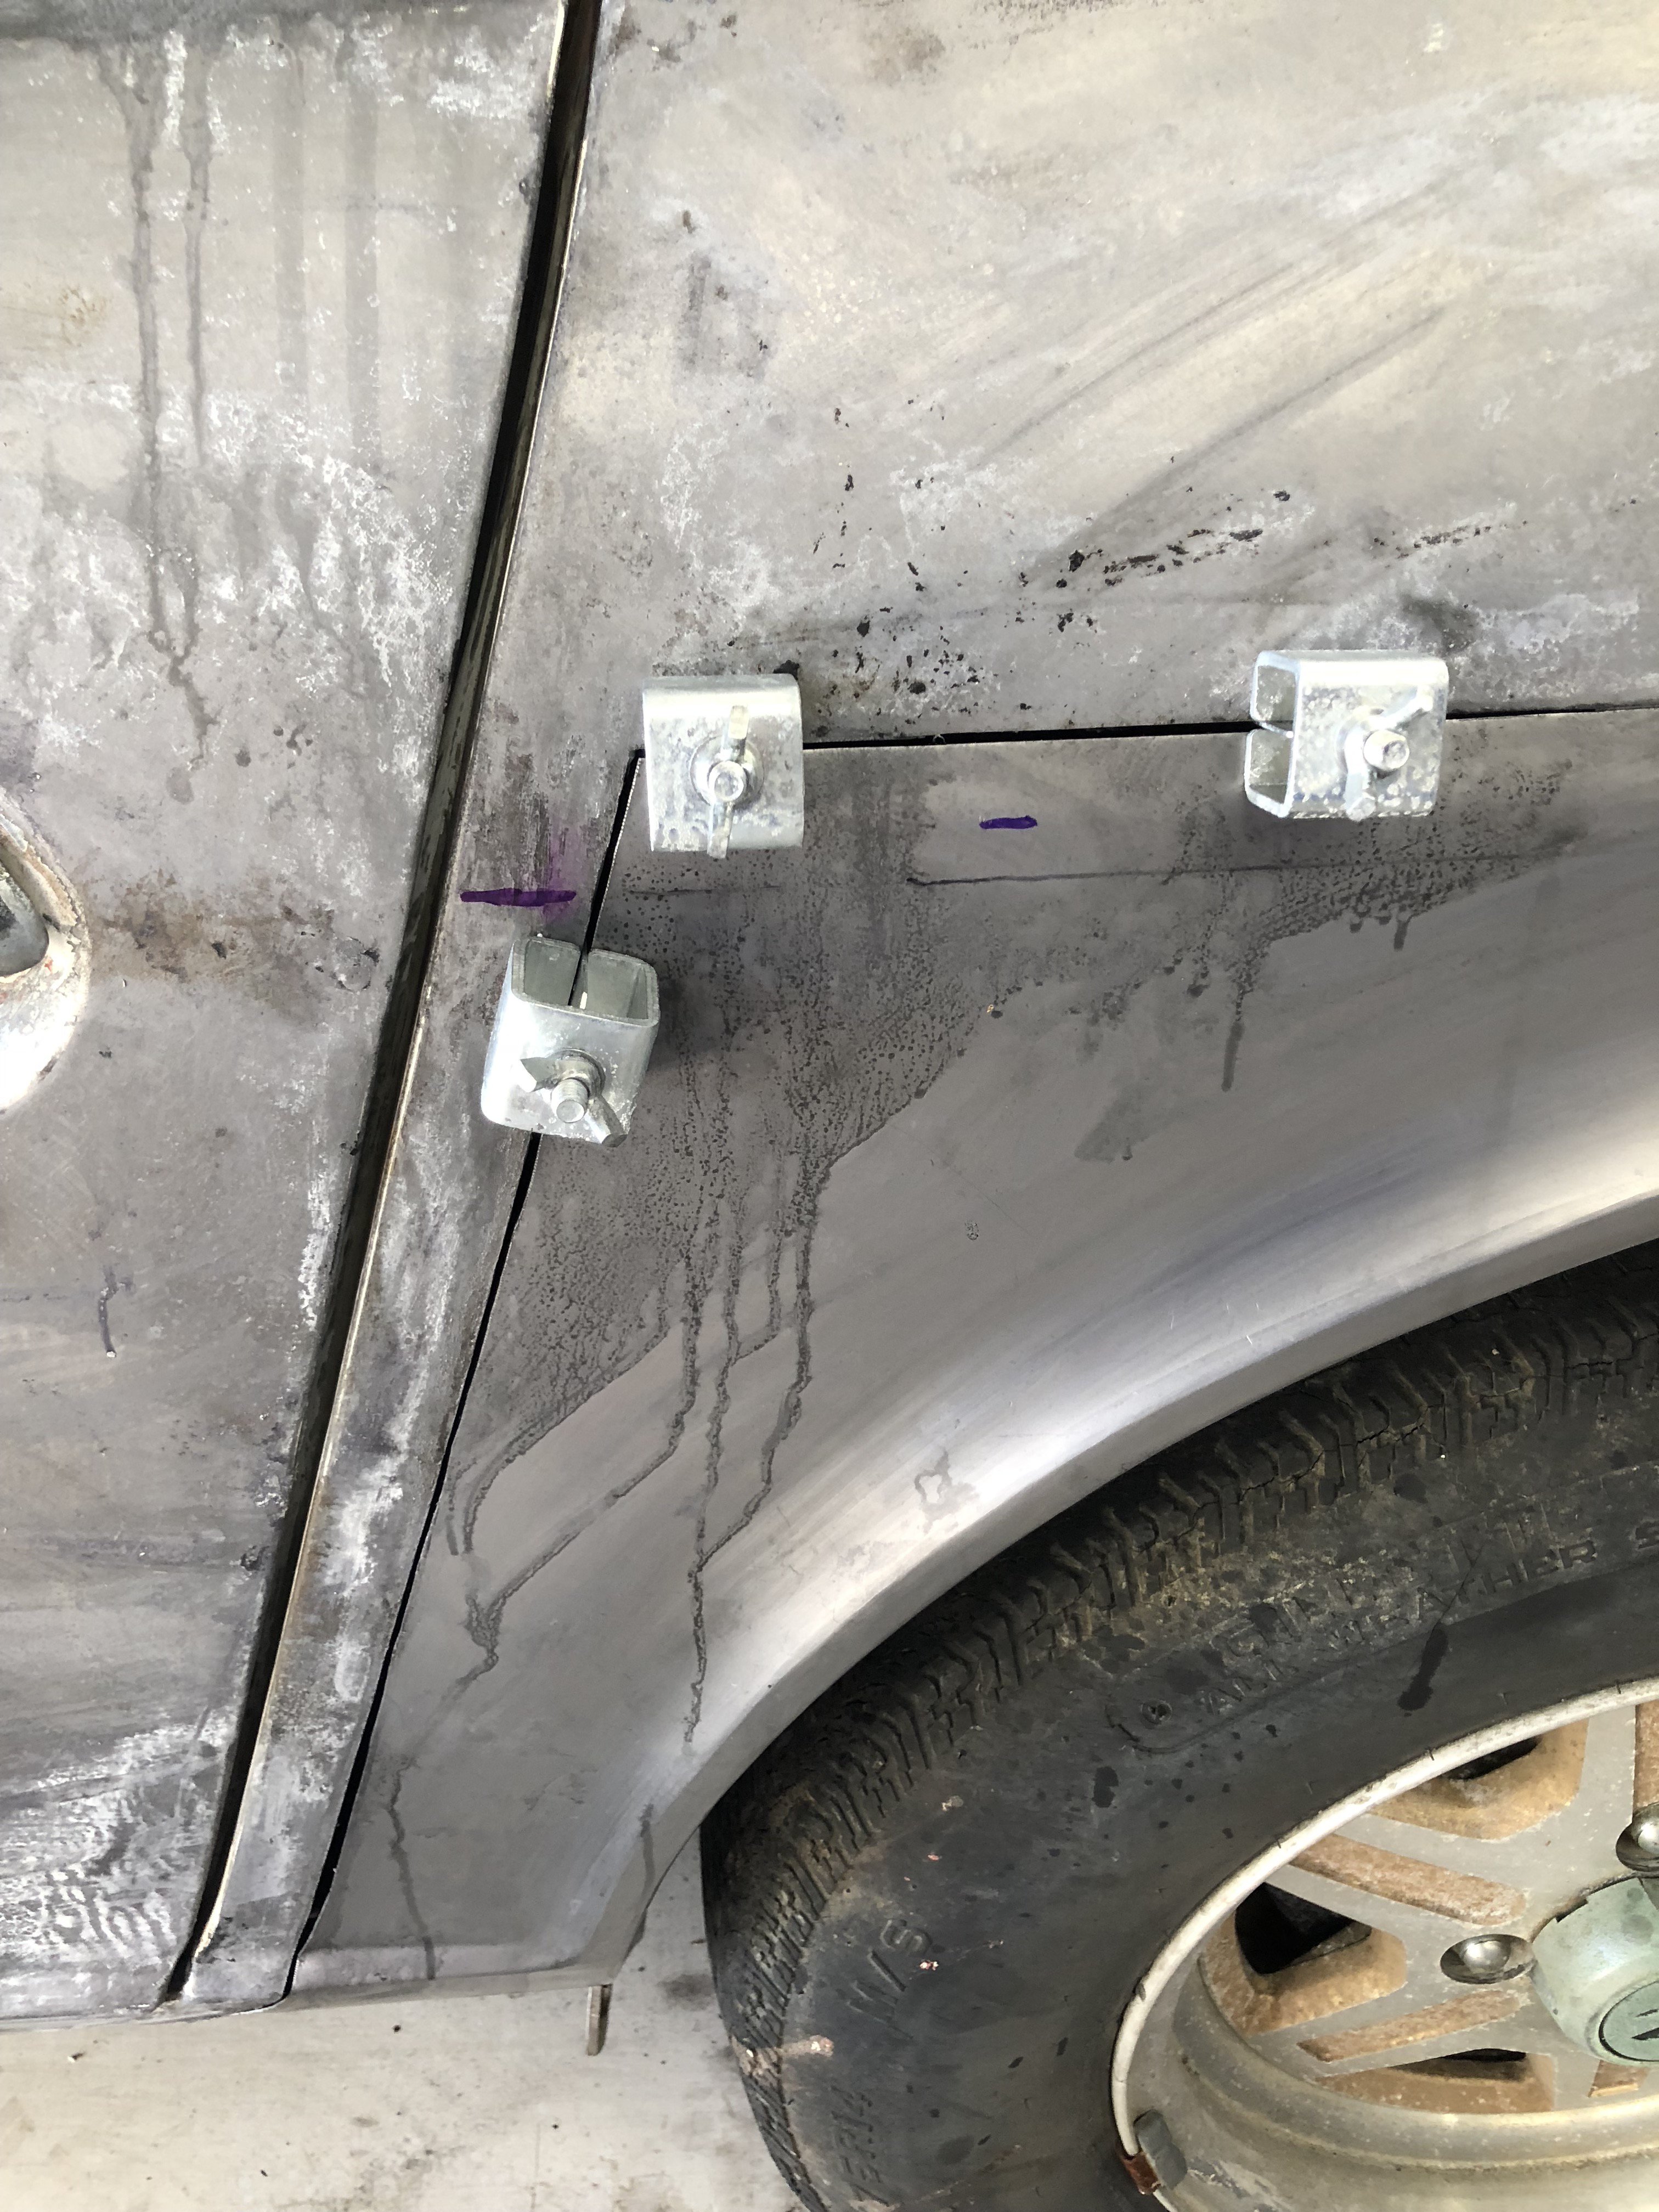
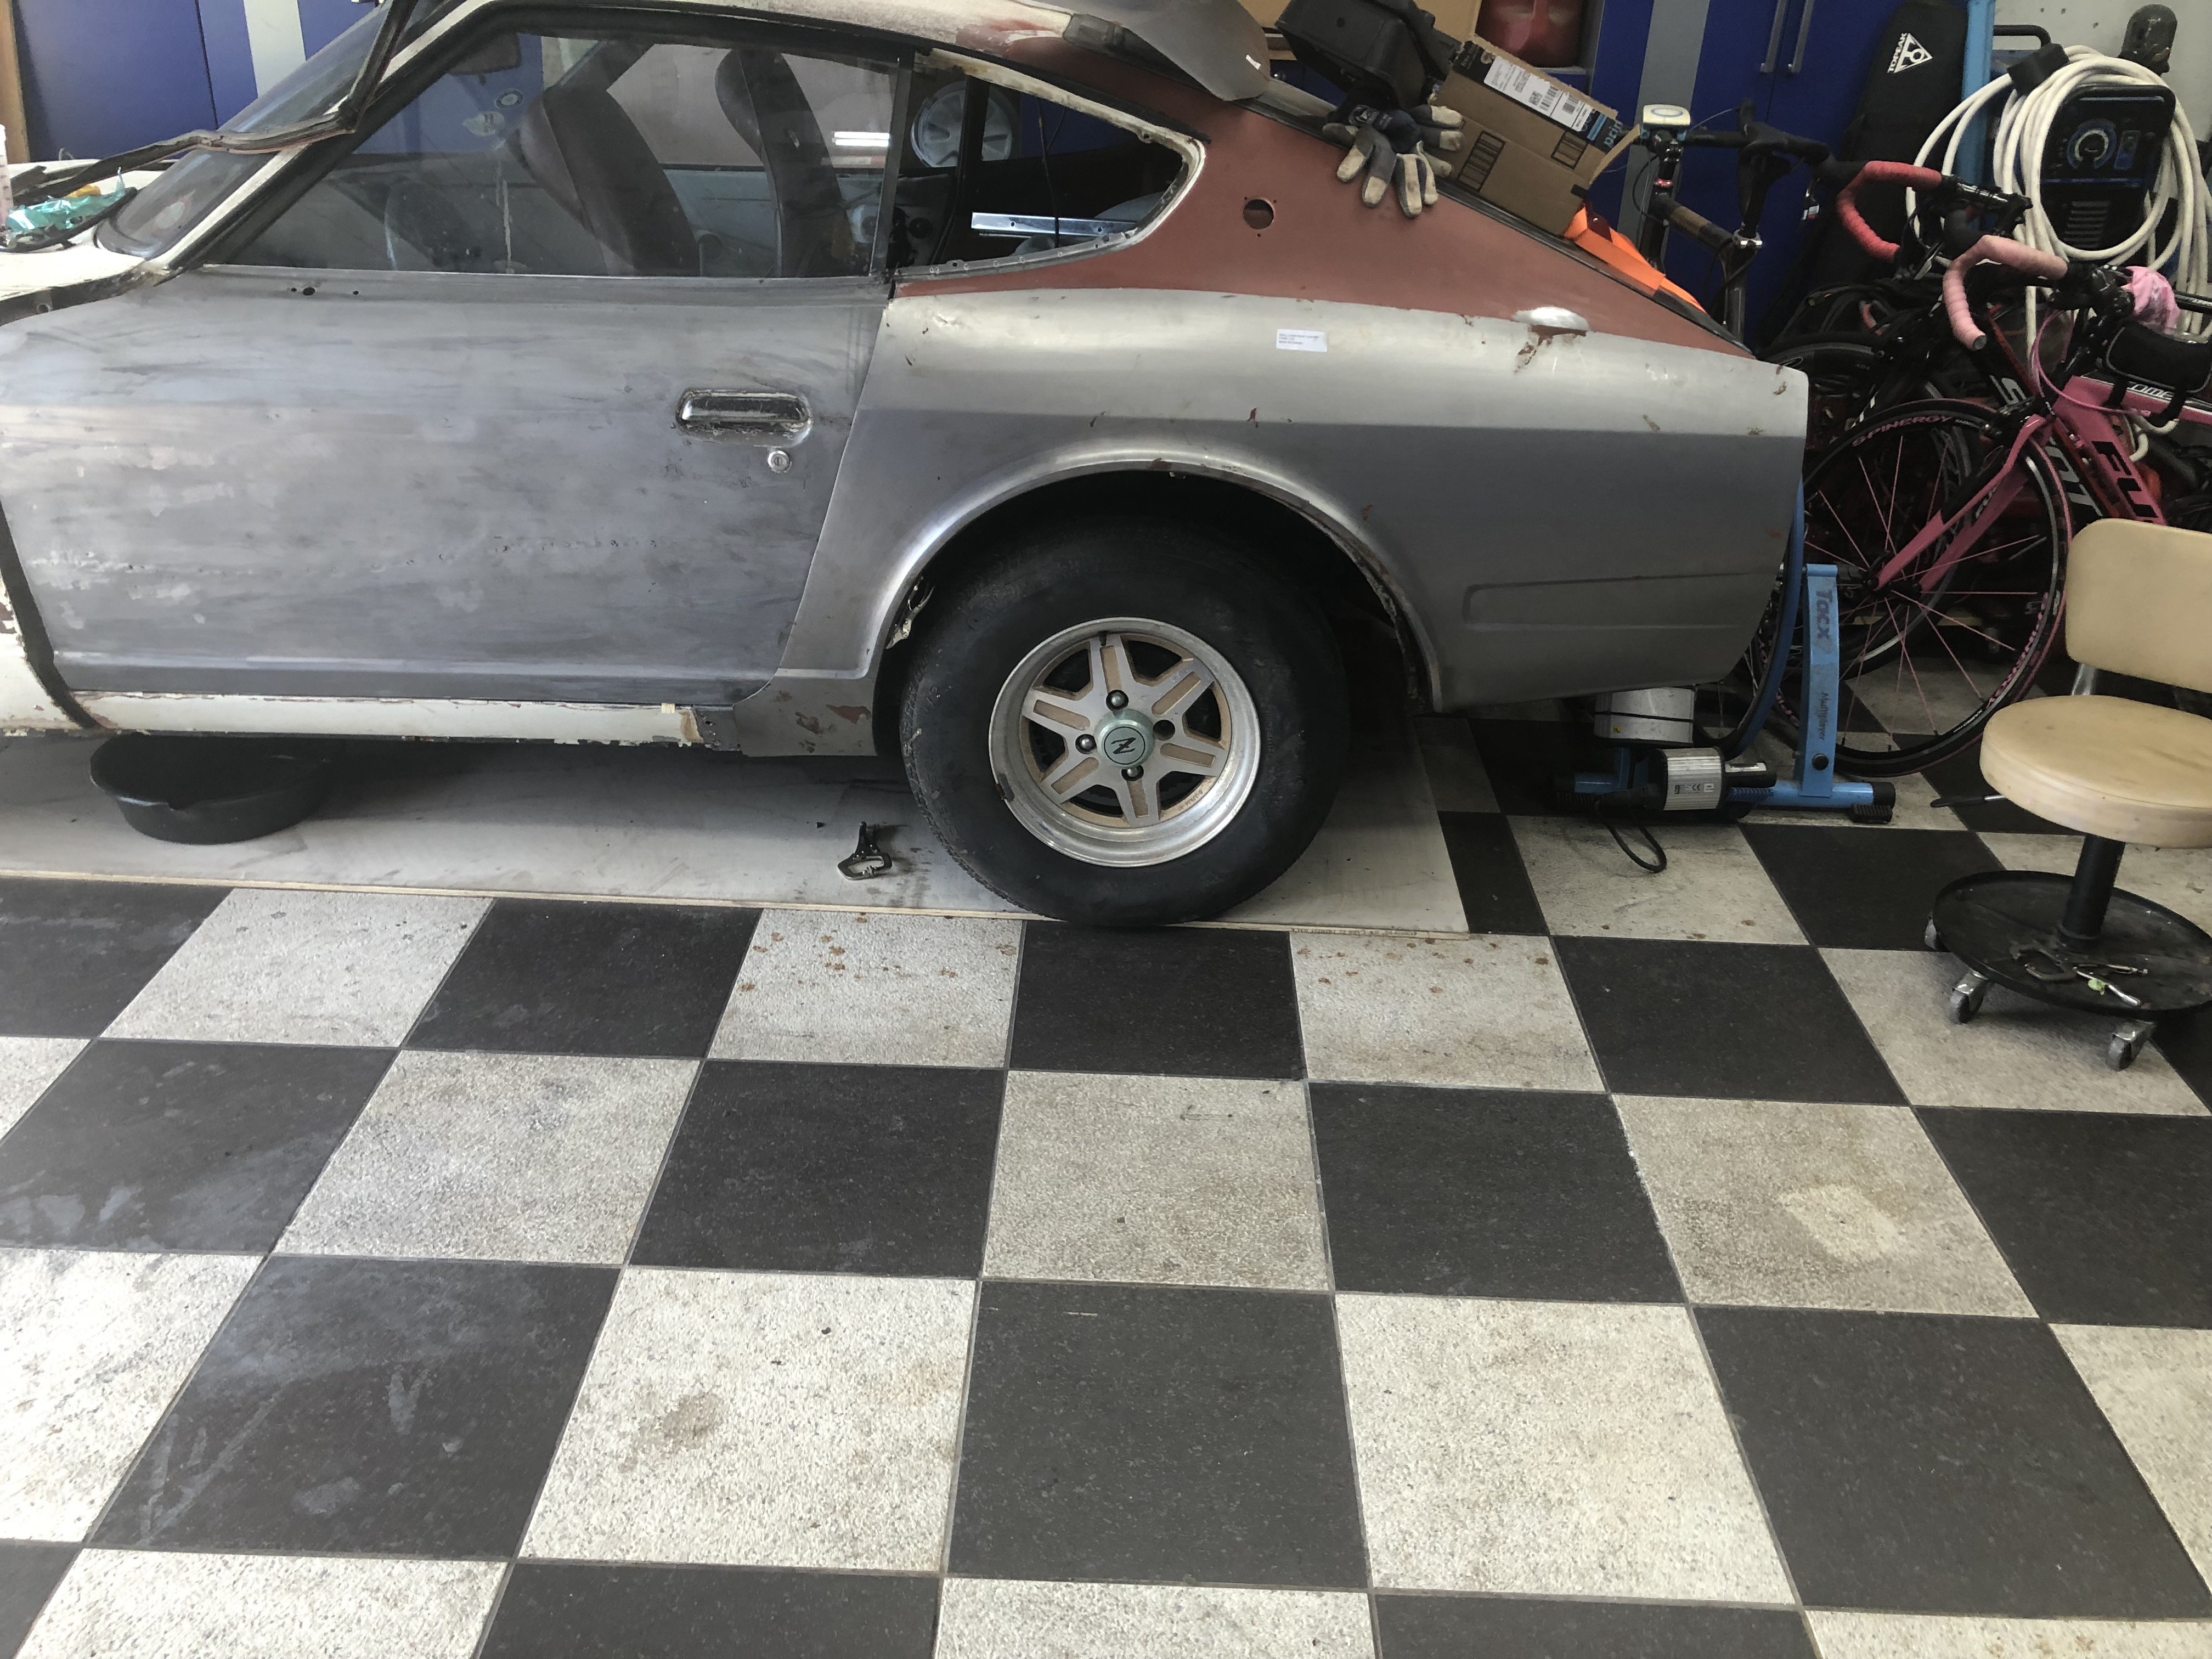
Okay, I been bouncing all over the place. Here are some of the issues I have been addressing. 1. Since my rear quarters had some previous minor collision damage that was poorly repairs I attempted to massage out this damage and was fairly happy with the result. That being said they had some minor rust too so I switched gears and decided to replace both rear quarters with replacements from Wolf Steel, I've cut the left quarter off and fitted the new panel. This too some work but ultimately I think I am going to be much happier with the final result especially since I intend to go back with 240Z bumpers and the new quarters have recesses for these bumpers. I am still working on the inner structure behind the left rear wheel as there was a two small areas of rust, one has been repaired by cutting out the damaged area an butt welded a patch panel in place, I also shaved the existing hole in this structure that had an existing rubber grommet in it. I can't think of what this hole's function might have been but its now sealed with a but welded patch panel. I have attached a couple of photos of this work in progress. 2. Cut out left door skin where mirror mounted and but welded in a new patch panel I intend to go back with factory 240Z mirrors and there were extra holes due to the variety of mirrors that have likely been installed over the years. Now I have a fresh surface to mount the factory mirror to. Didn't take a photo of this yet. 3. Driver's floor pan had some rust under the rear seat mount structure. I removed the rear seat mount and cut out an area approximately 6"X16", now I have to form the beads in the patch panel, then butt weld back into place...this is still a work in progress, photos to follow. 4. Rear panel above tail lights...know rust area and my 280 is no exception. Just ordered the replacement panel should arrive today. I started removing the old damaged panel and found so rust in the structure above the tail lights as well. This is fine cuz I am replacing this structure anyway to accommodate my 240Z tail lights that I have mocked up in place. Gonna try and get this area cut out over the weekend to assess it further and get a plan to repair the structure so I can weld in the new panel I got from Tabco. Photos and update to follow. 5. There is a small area of rust under the wiper cowl where the inner mount of the front left wing/fender bolts in place. Cut the area out about the size of a quarter but decided to go a little further to ensure all corrosion was removed. Started fabrication of a patch panel once completed it will be butt welded into place. My goal is to get all metal repairs addressed on the left side then turn her around in the garage and take care of the right side. I'll keep this thread updated from time to time.
-
Hello, i just read read through this thread, I am doing a RB25 swap into my 280z, wanted to retain the stock instruments but looks like I’d have to cobble together a bunch of adapters and run multiple sending units so I am forced to consider other options. I see a lot of people are running speedhut instruments, is this a best option that closely emulates the OEM instrument? thanks, Robert
-
Do you still have the black 280 interior stuff, if so what do you have? I’m looking to change colors from butterscotch to black so I need all plastic parts.
Thanks,
Robert
-
Hello, i am am looking for a Series 2 240Z Steering Wheel, like to find something in restorable condition to install in my ‘78 280. I’d prefer a complete setup with a good condition horn buttom but i’m Open to options. thanks, Robert
-
The short answer is; as long as your oil pickup can remain submerged in oil then, no your not going to blow it up. The windage tray is designed to keep the oil supply in the sump and aid in its return to the sump. Most of the info in the links you referenced have to do with race cars or cars subjected to extreme loads. Since my car will be a nice restomod and note intended for drifting or track use there is absolutely no reason to build such an elaborate pan. I’m no expert but I know many cars that do road rallies or other track events and they have stock engines...they do blow engines due to oil starvation. Hope this is of some help...
-
Great info, I am likely going to recreate the windage tray in the original style just reversed to account for the crank rotation and new location of modified oil pickup. I don’t plan on racing so I think I can get away without a specially designed hi capacity oil pan.
-
Hello, I got a little sidetracked - started a little body restoration on the car (fitted a new left rear quarter). I did make a template for a new baffle/windage tray. I’m away till Friday in Europe for work, I’ll get the new tray made up and installed when I return.
-
Good question ZT-R, I haven’t mocked it up in the chassis yet. To be continued...
-
1978 Datsun 280Z RB25 Restomod
Jethoncho replied to Jethoncho's topic in S30 Series - 240z, 260z, 280z
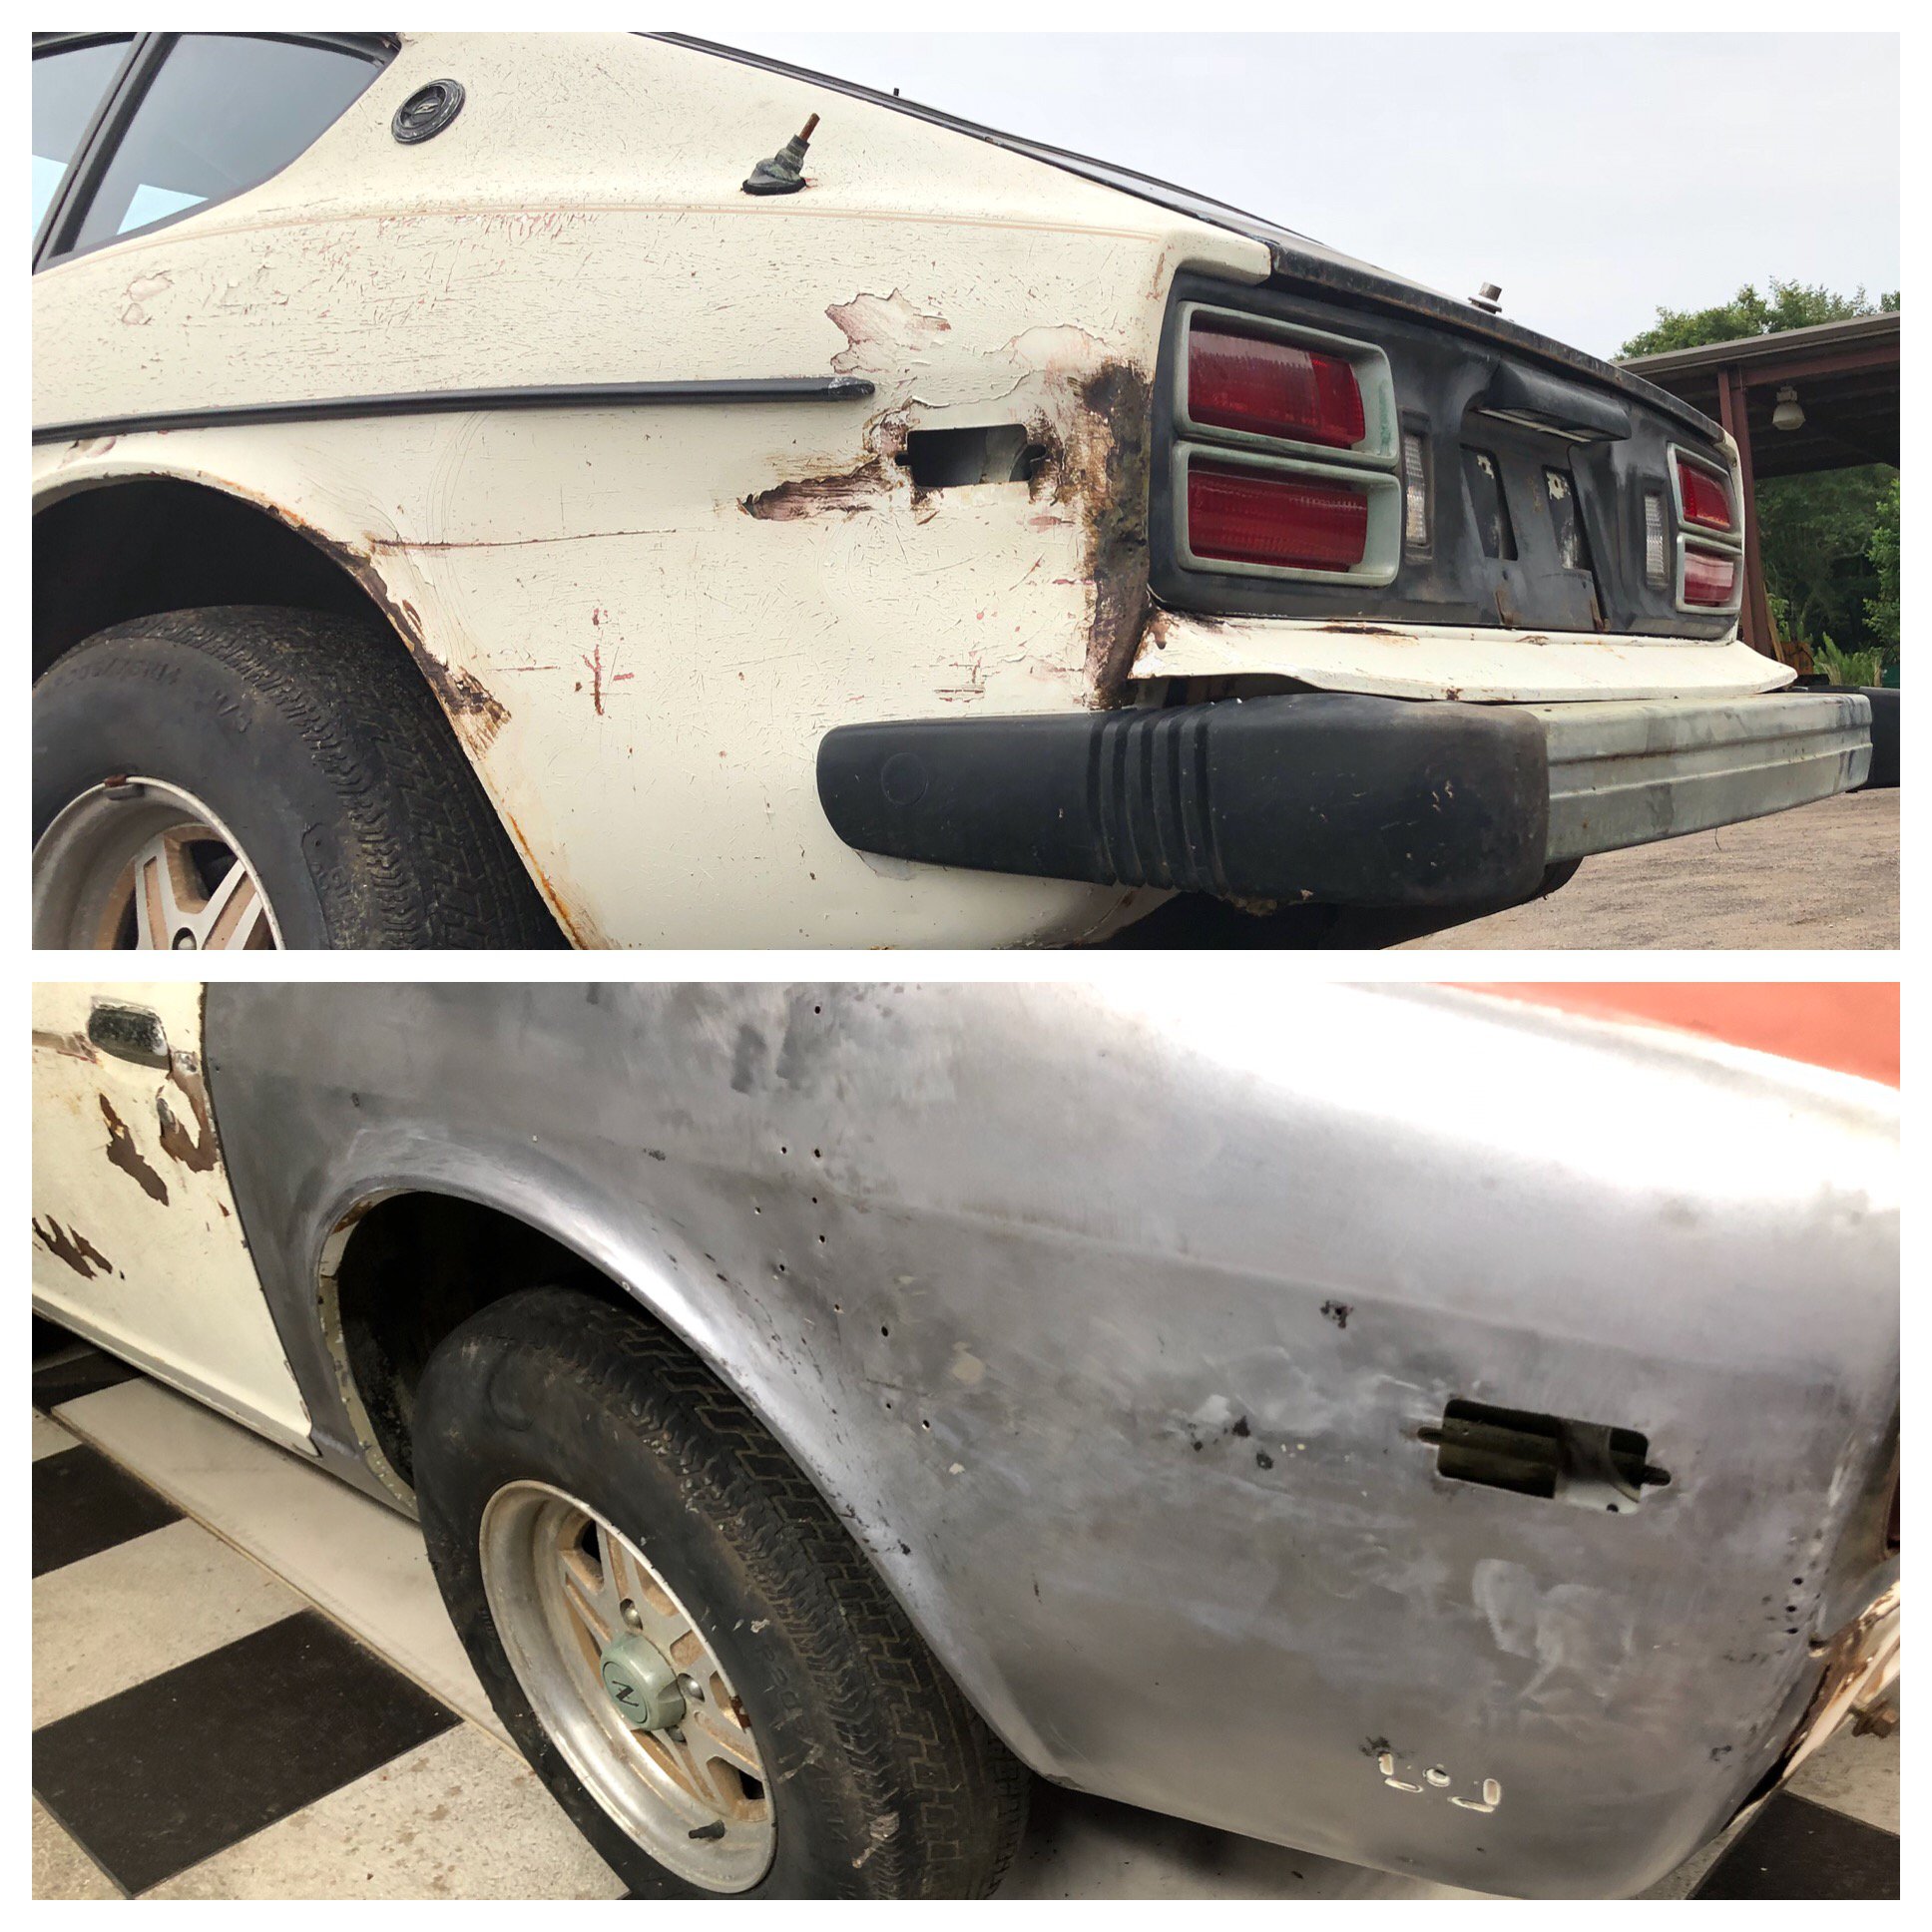
So I started a couple repairs/mods to the body. Removed the 280Z tail lights and modified body to mock up 240Z tail lights. Still have loads of metal work on this item. I intent to cut out the old 280 tail light mounts and fabricate new mounts to properly accomadate the 240Z lights but they look so much better. The 240 light in the photo is just for mock up purposes as I intend to go with JDM lights with amber turn signals. stripped the left rear quarter, found an old body damage repair completed in true hack fashion, holes drilled in the panel when there is pretty good access to the reverse side, this damage was in addition to the crease that is visible in the before photos. Spent a couple hours massaging it and it’s starting to take shape. Rust damage to the left side of the upper core support was cut out and new part fabricated, just waint to get my MIG machine home from the airport to install.
-
Thank jboogs, I’ll get some interior photos as soon as I get it welded up and removed from the base plate I have it bolted to. I also started a thread for the restomod of my ‘78 280Z, here’s a link if anyone is interested. http://forums.hybridz.org/discover/content-started/
-
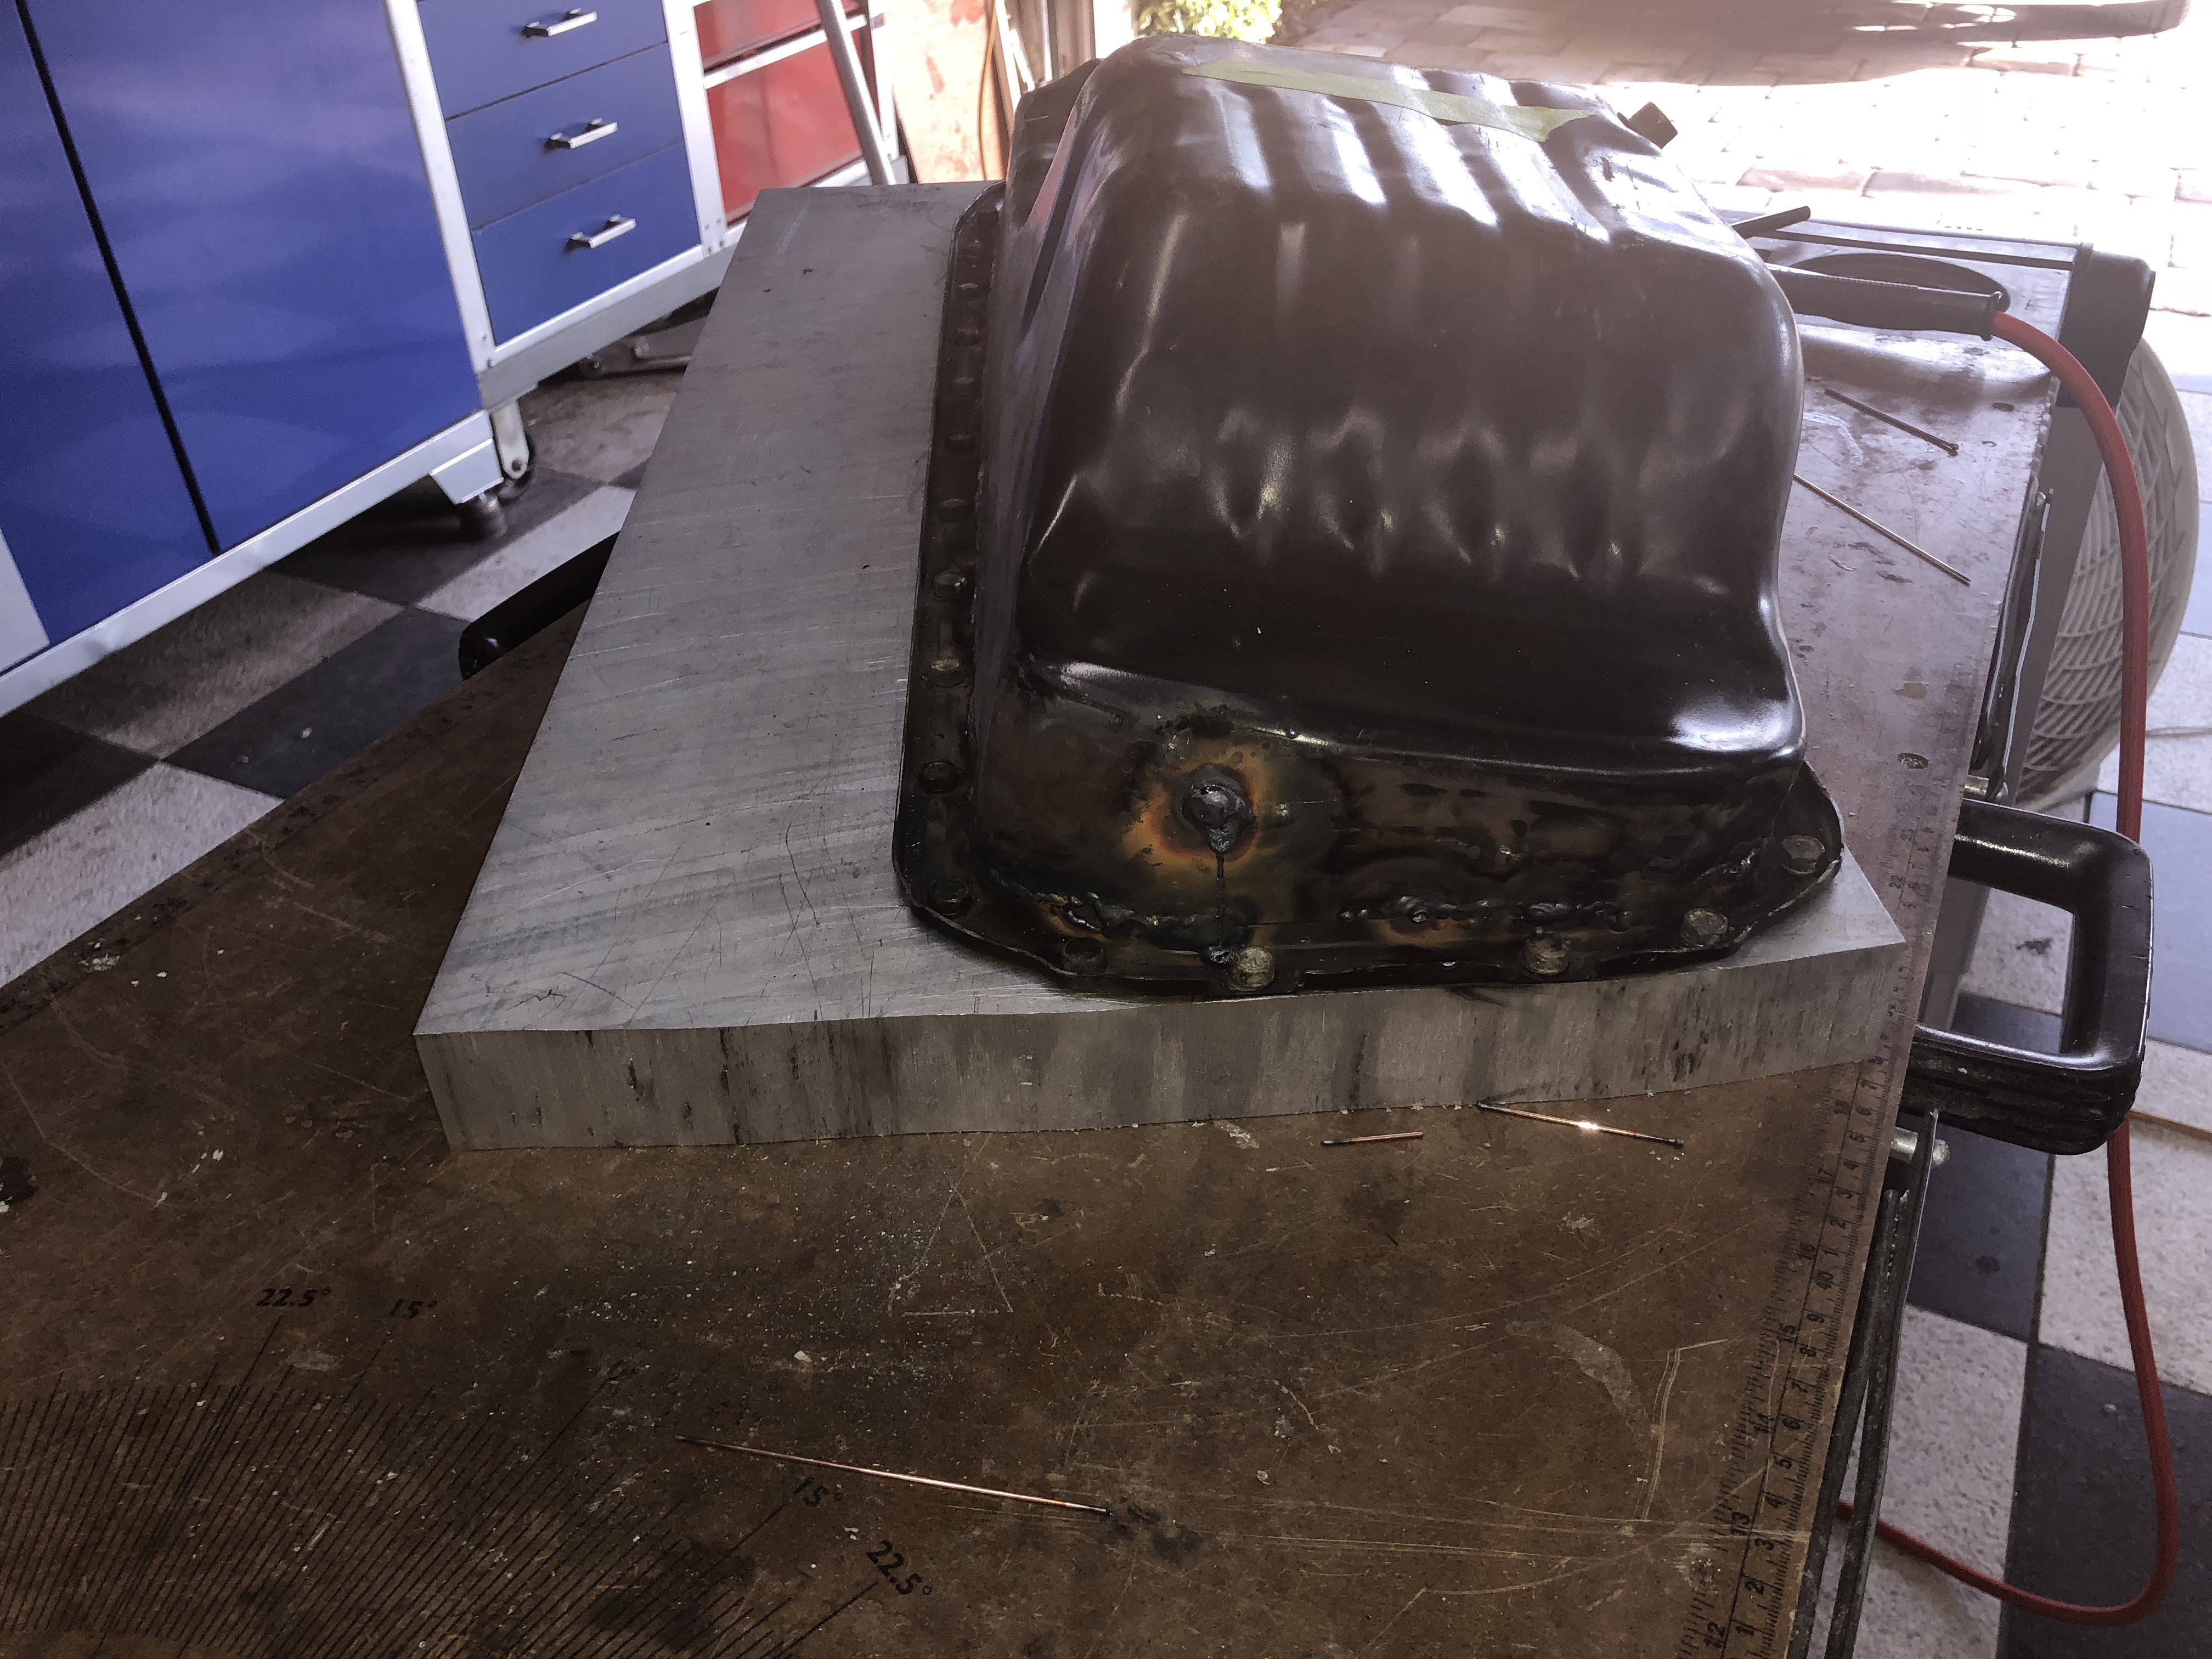
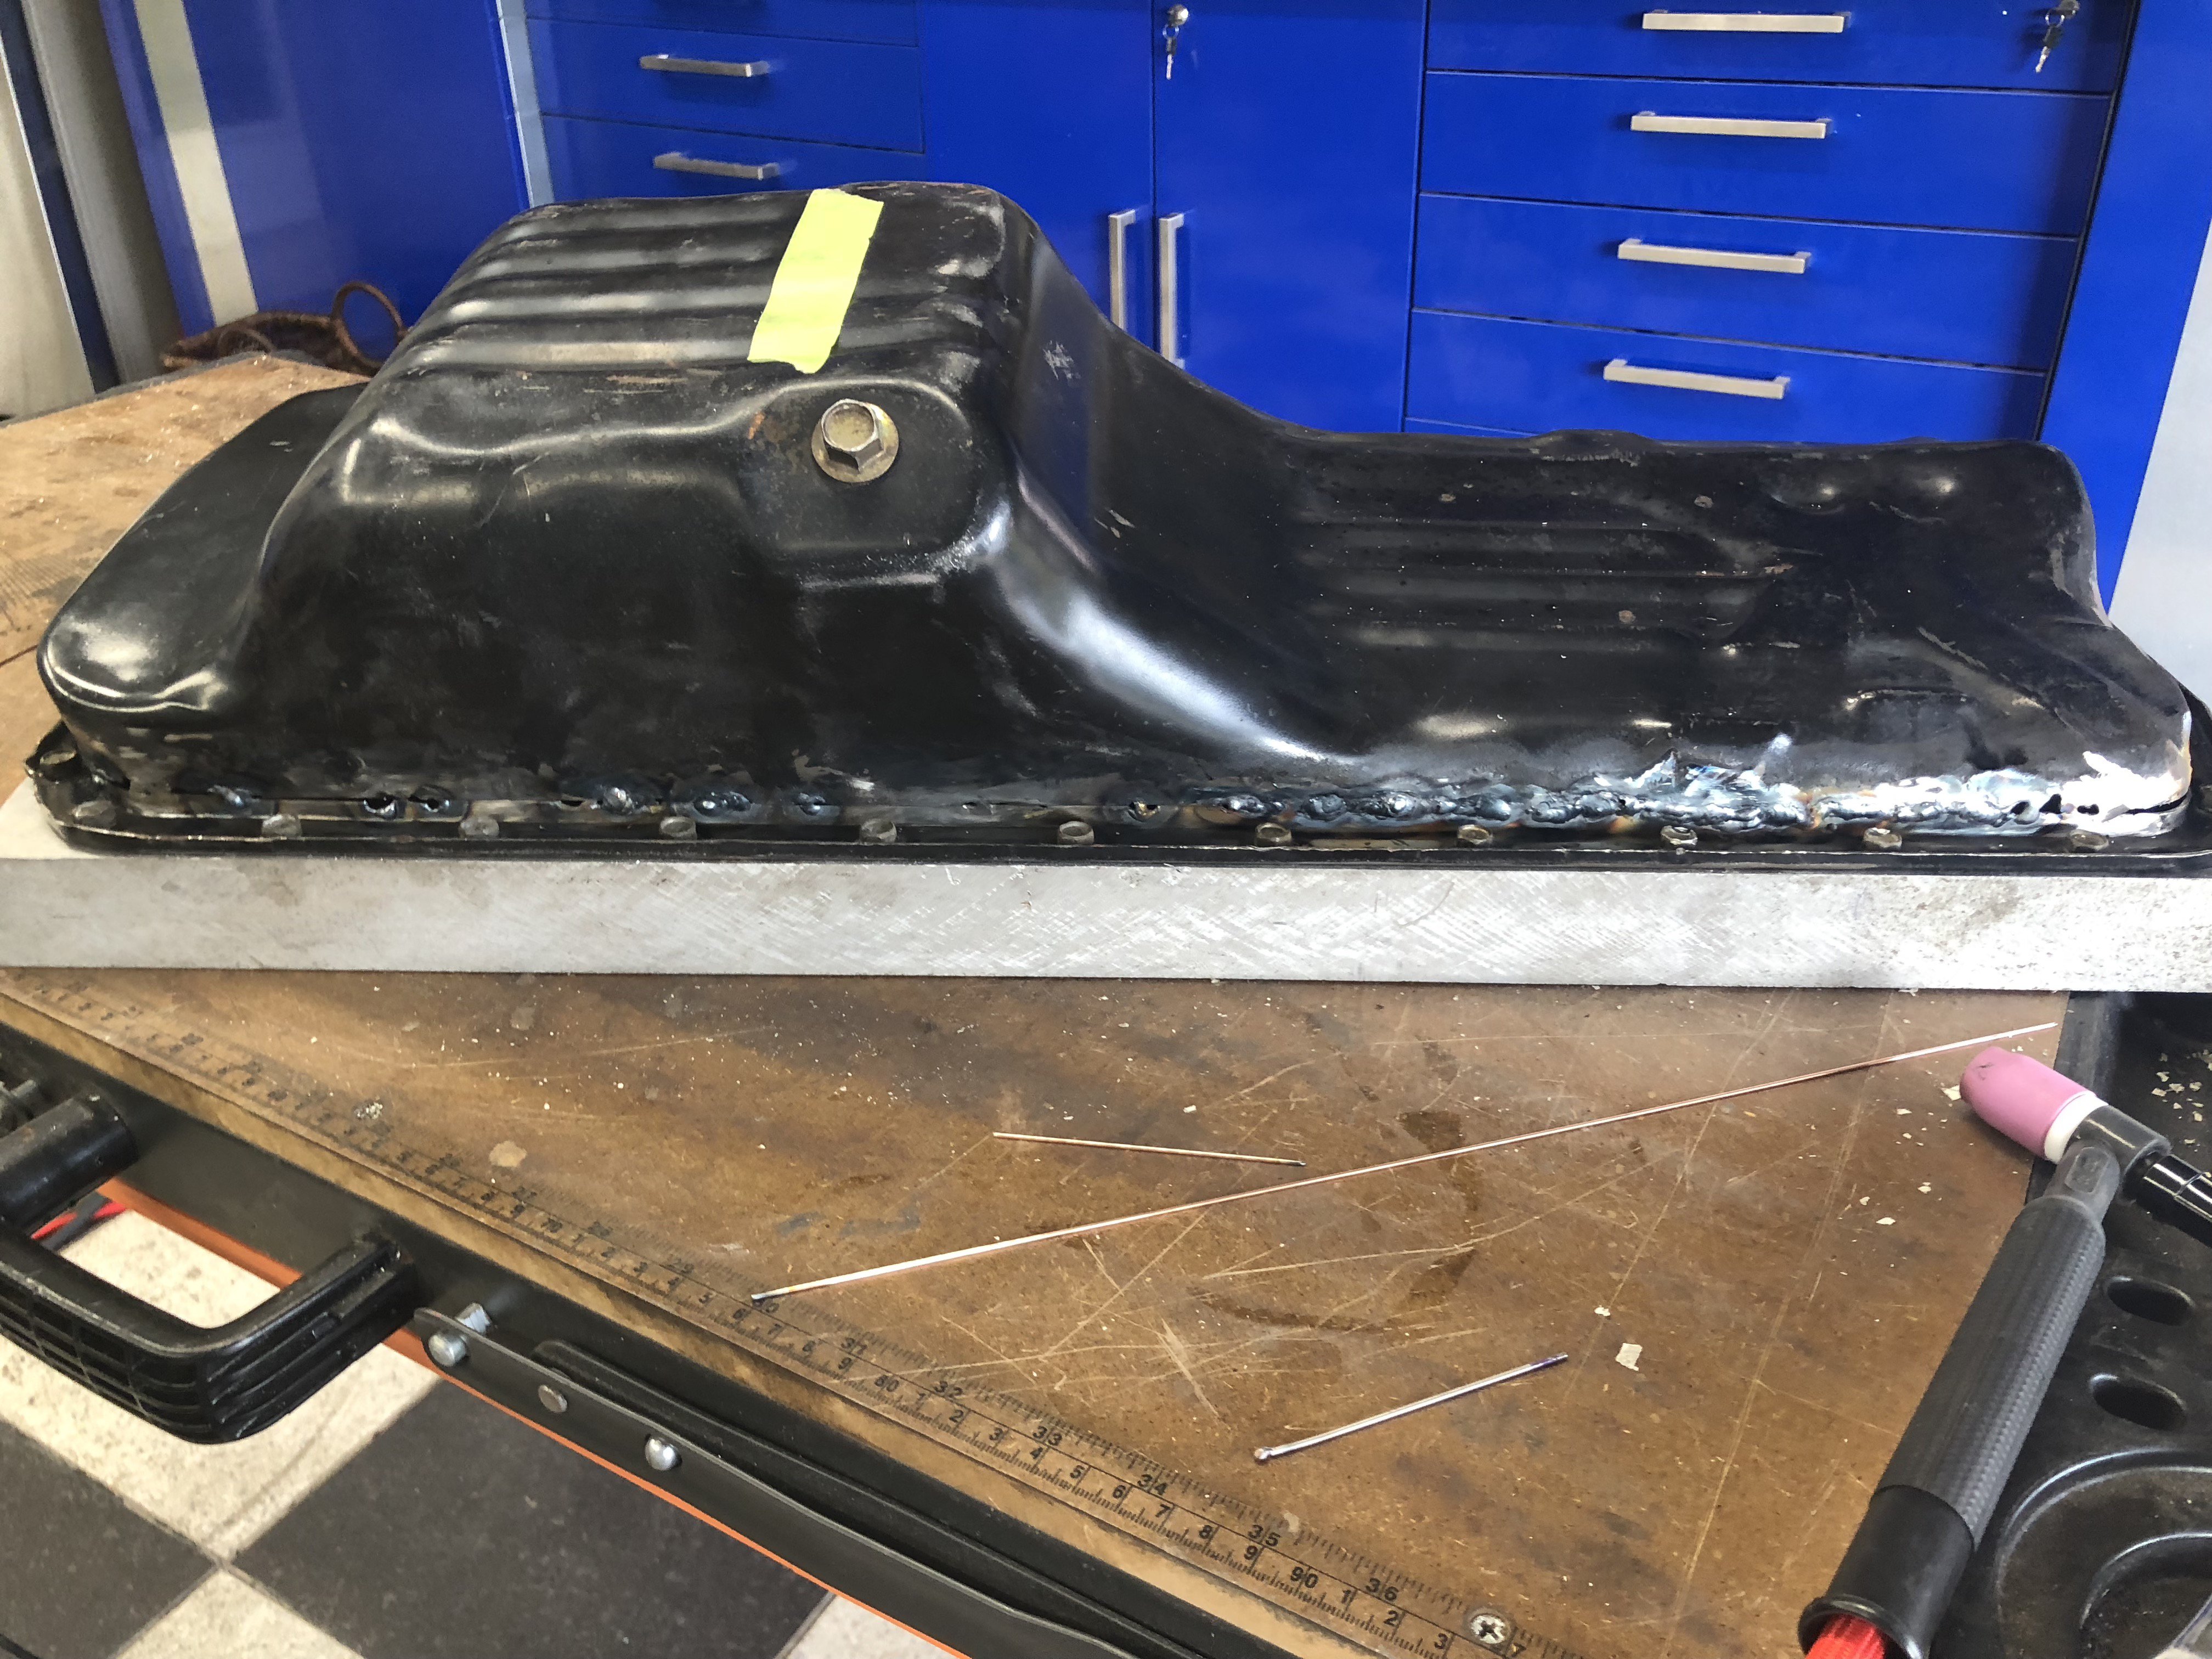
Okay, so I have mode some progress, thanks to Jboogs I was ready to start welding on a pan that at minimum wouldn't have worked and at worst might have starved my engine and blew it up. I originally cut the flange off and started to get ready to weld it back on to reverse the sump, I have since added a 1 3/4" filler to the right side of the pan and tacked the sump in place. This gives the bottom of the sump a 1 or 2 degree tilt toward the drain plug side of the sump when installed on the engine (assuming a 13 degree tilt of the engine toward the driver's (left) side. Try not to be too critical of my TIG skills, its a work in progress as are my welding abilities.
-
The RB is destined for my 280Z project. Gonna be a while though as the Z needs a full restoration.
-
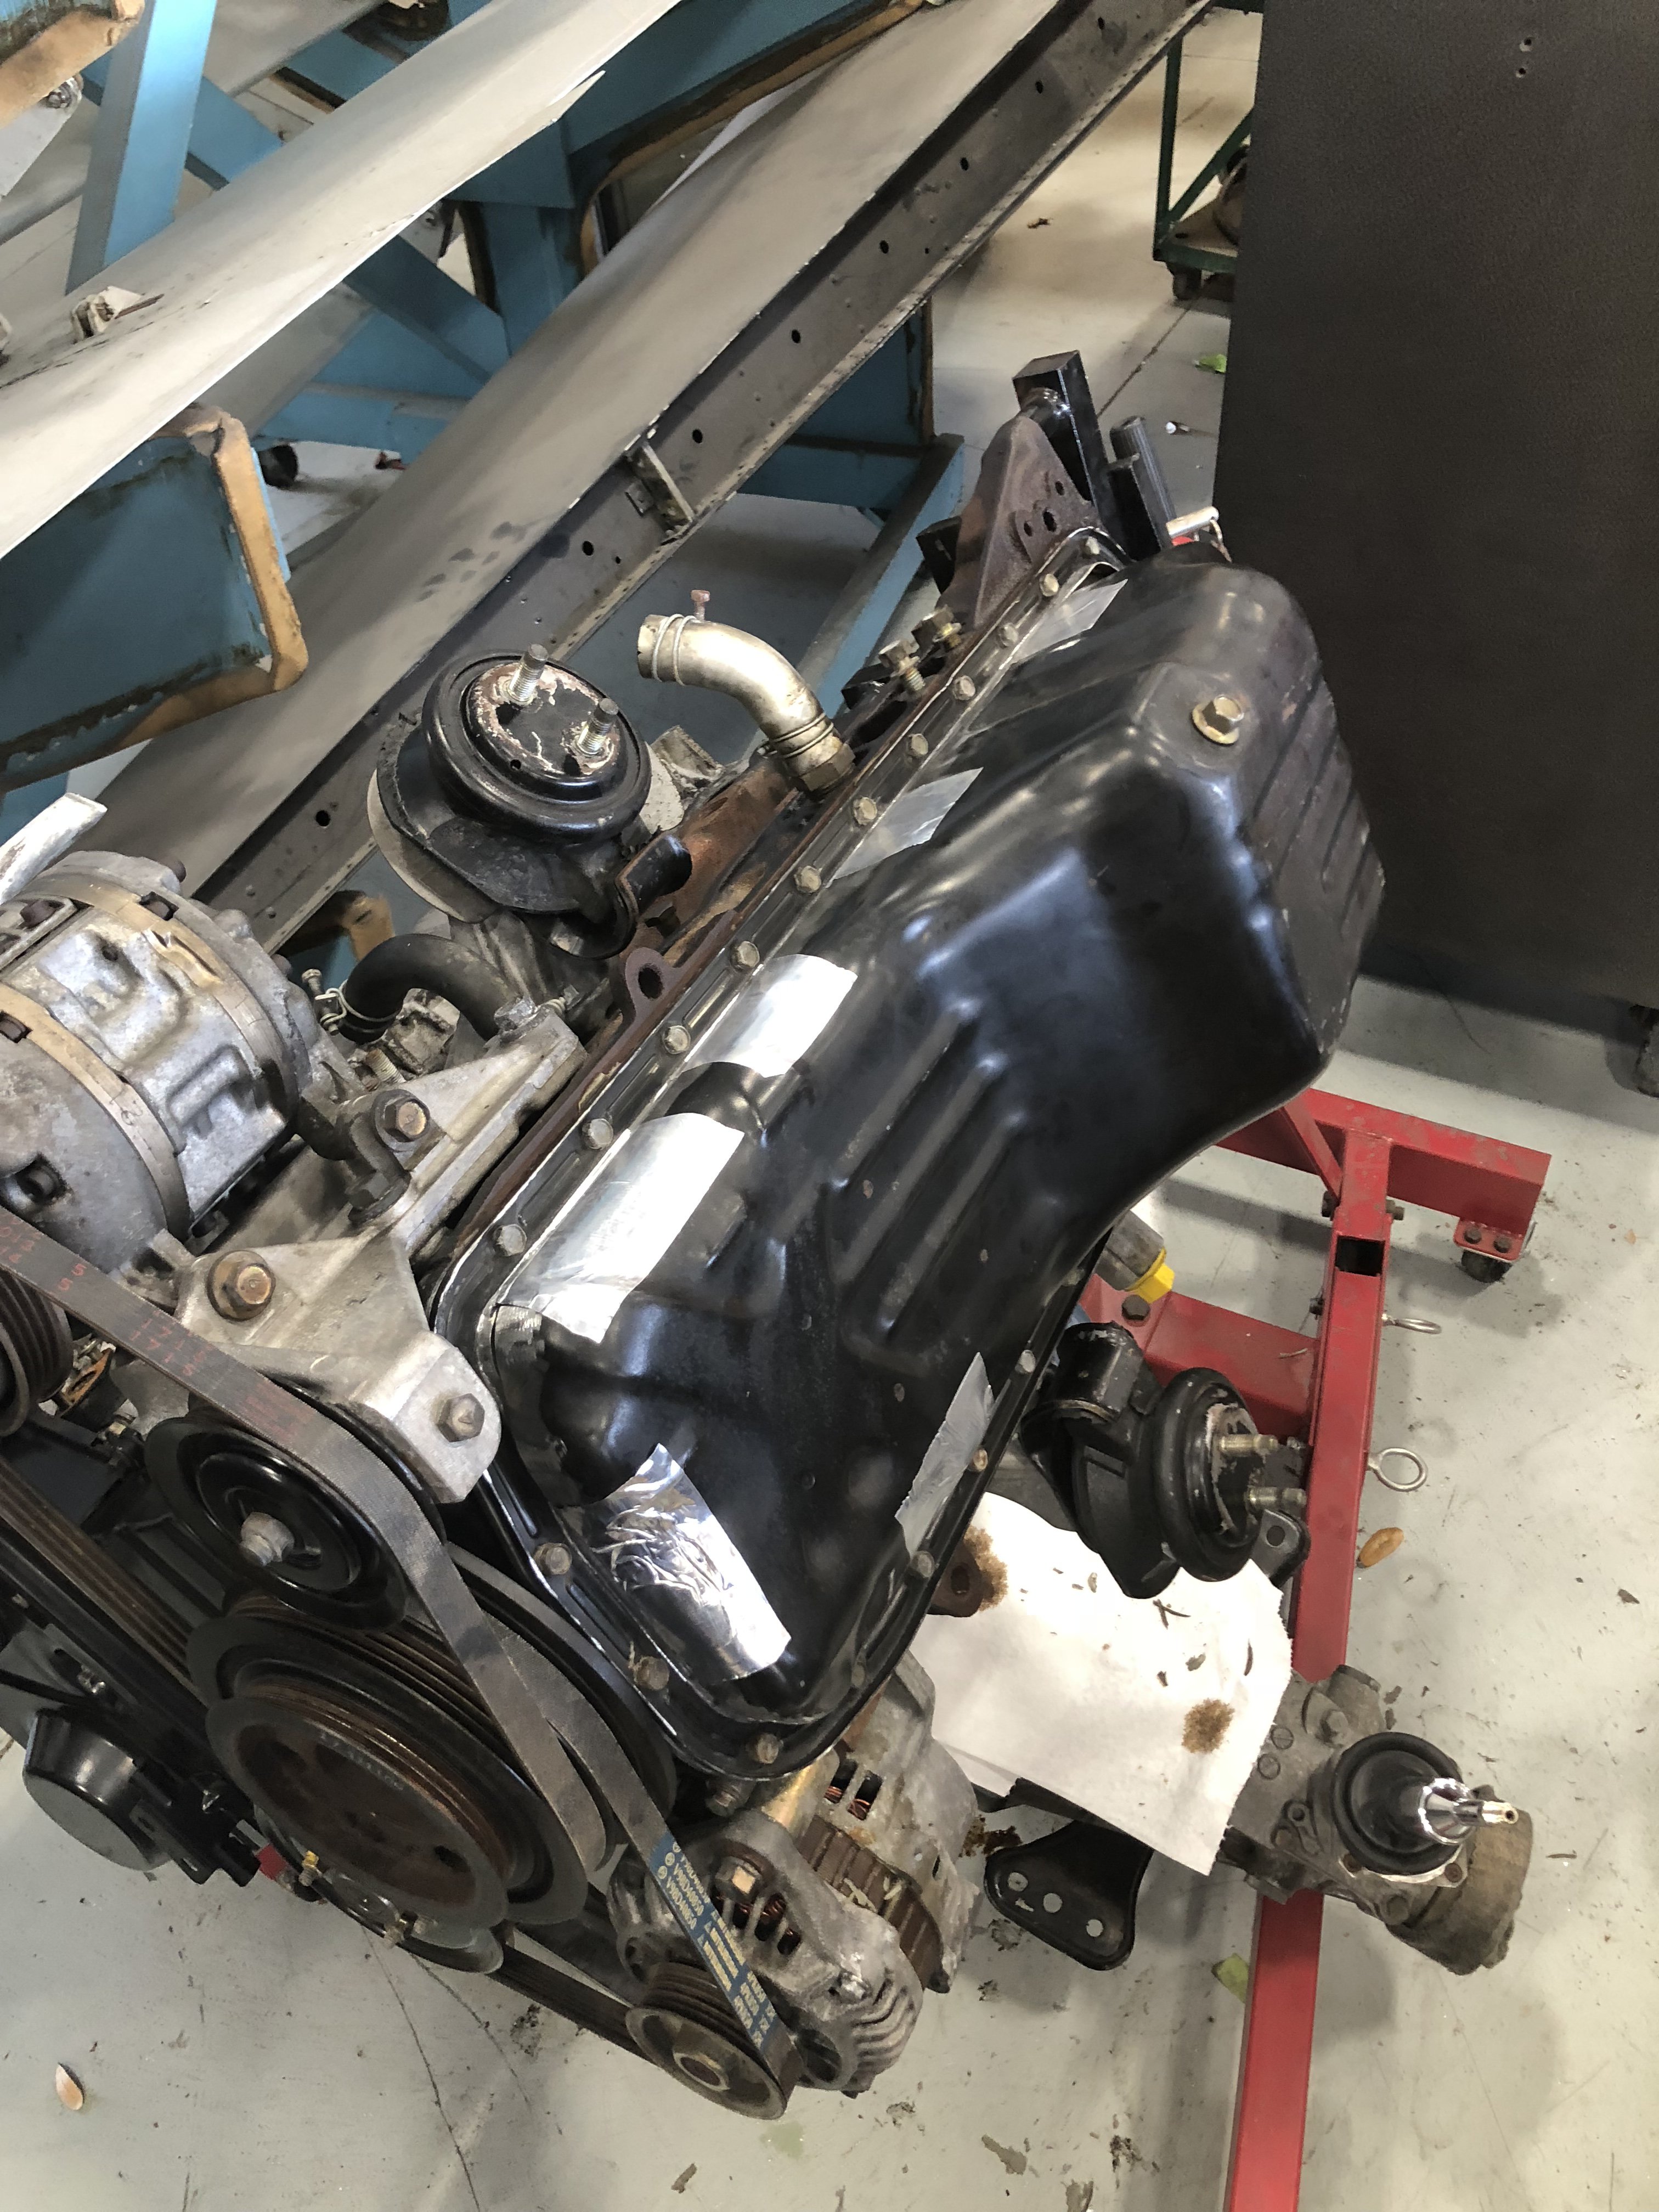
Hello, I haven’t given the pickup tube any attention yet. I would really like to figure out what the tube is constructed from so I could just reform an entirely new tube instead of cutting and welding jboogsthethug gave me some useful information regarding proper angle of the pan after sump reversal...I mocked it up and it appears I will trim one inch off the driver’s side (left) of the pan while adding 1.75” to the passenger side of the pan. This will account for the 13 degree angle the engine tilts toward the drivers side of the car resulting in the sump having a nearly level bottom (about 1-2 degree tilt toward drain plug location). I started welding on it on the past Friday...I added the 1.75” metal filler strip to the pan, I will likely continue by fitting and welding to flange tomorrow. I’ll get some photos up once it’s cobbled together.
-
Thanks Jboobsthethug! I appreciate the heads up. I was aware the engine mounted on a slight tilt but I didn’t account for this in the pan modification. I’ll have to do a little more research before I start welding.
-
Billet Cnc Triple Carb Intake development.
Jethoncho replied to DuffyMahoney's topic in Fuel Delivery
Personally, I think it looks great. If I were designing it, I would put the vacuum ports and balance tube on the bottom to improve aesthetics. Love to see the finished product. -
Hello All, And so begins the epic journey to go from rough unloved 280Z to a resto-modded RB25 equipped super car. I realize I’m not blazing any trails that haven’t been traversed so I will benefit from anyone’s input as this project progresses. I’m starting with a ‘78 280Z and a series 2 RB25. With the size of the project I’m sure I’ll be all over the place in the beginning until I can get a solid plan worked out. My initial plan is to get the current L28 running so I can sell it and the 5-speed tranny as operational component. Once I have the engine running I’ll pull the engine, all associated wiring and ECU and transmission to make room for the RB25. I have already acquired the RB and started the process to convert the forward sump oil pan to a rear sump. Once the rear sump conversion is complete I’ll drop her in to mock up mounts. I know there are kits out there for this but I prefer to utilize factory RB mounts so I’ll mock up new engine stands for my subframe. If possible, I’ll also look to move and modify the existing transmission tunnel/rear body mounted structure aft to permit a more symmetrical rear crossmember/mount. Once the RB is mocked up in the body I will switch my focus to restoration of the body. I plan to go with retro-spec Carbon Fiber front fenders, headlight buckets, hood, BRE style front spoiler, cowl, rear hatch and BRE style rear spoiler. I will also retrofit 240z bumpers with no rubber or overrides. I have no illusion, this is a huge project but with support I hope to get through it. When I purchased the 280 it appears to have been sitting for at least 25 years and it’s mostly unmolested. It has some rust in the usually spots but is not a total rust bucket. I believe I am starting with a base car that is worthy of this project. I’ll post a couple pics and try to do regular updates but I travel a lot for work so I’m sure there will be times when updates are further apart. For now here are some baseline photos. I look forward to loads of input from experts here!
-
I’m in the process of making my own. I cut the stock steel RWD pan all the way around the perimeter just below the mounting flange. I mocked the pan up on the bench and found with just a few minor changes, massaging and a fair amount of TIG work I am going to be able to turn the forward sump pan into a rear sump pan. The oil pick up will need to be clocked and rewelded to adjust for the rear sump...I haven’t mocked that up yet. I remounted the mounting flange to the block then mocked up the sump in the rear position (currently held in place with foil tape in preparation for tach welding) I’ll get some other photos up as the process progresses.