
qwik240z
-
Posts
825 -
Joined
-
Last visited
-
Days Won
1
Content Type
Profiles
Forums
Blogs
Events
Gallery
Downloads
Store
Everything posted by qwik240z
-

Project Silver Bullet: LS1 240Z Update: Exhaust
qwik240z replied to qwik240z's topic in Gen I & II Chevy V8 Tech Board
-
This was on a 510 list. Thought some of you might like to check it out: Here's a gadget that's sure to meet some people's needs -- a creative option for that next rotisserie restoration project: http://www.liqui-technik.com/kipp2_e.html Might also be the solution for storing 3 cars in a 2-car garage.
-
I did a search but no luck. Please help! I am so close to getting my 240Z back on the road and need help with the A/C. My car never had A/C but I picked up the components needed to install it. I am having fitment issues with the evaporator unit that mounts under the dash on the passenger side. Does anyone have a drawing or pictures to show how it is supposed to mount and hook up to the stock fan and vents? Is there a special blower motor that needs to be used or do you just use the stock one? The blower motor on my car seems too big to allow the unit to mount and I can't figure out how the unit ties in with the blower motor. Any help would be greatly appreciated. Thanks, David
-
Project Silver Bullet: LS1 240Z Update: Exhaust
qwik240z replied to qwik240z's topic in Gen I & II Chevy V8 Tech Board
I will keep an eye on that. -
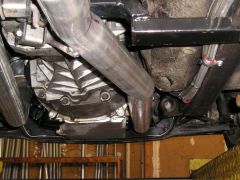
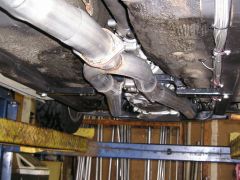
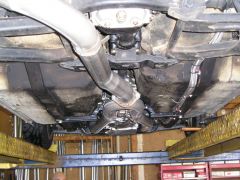
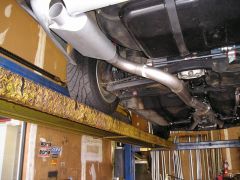
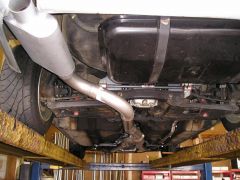
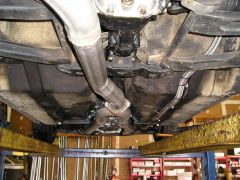
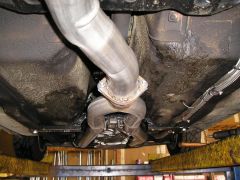
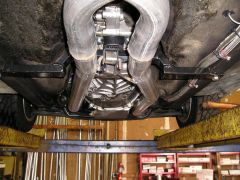
So I went up to the new exhaust shop this morning to check out the progress. After they had tried to make the 2 1/2" duals all the way back, they were not happy with the way it was looking. They called me up for a look and it was ok but not as clean as I wanted. We decided to go back to the original plan of 2 1/2" pipes to a Y pipe behind the trans and then 3" the rest of the way back. I tell you I was getting very frustrated with the whole thing. The exhaust should be the easy part. So now we have killed almost a week on the exhaust. So I go back this afternoon and they have it most of the way together. They hook up a few different mufflers for me to listen to and most of them are too loud, even at idle. I finally decided on a 14" long 3" in 3" out muffler made by Impco. I have never heard of it before but it sounded the best to me. It is still too loud to be a sleeper but at idle it sounds about the same as a C5 vette that I heard at a red light today on the way over there. When you rev it up it wakes up but it is still quieter then my V8 510 with the dual flowmasters. They finished up the welds and checked it for leaks and it is a solid system. No leaks, no rattles, etc. I posted some pics in my album. Check it out. http://album.hybridz.org/showgallery.php?cat=500&ppuser=9509 It is going back to the Hot Rod shop in the morning so they can finish it up. They say they need 2 more days but the way it has been going, I can't count on that. They are only 10 days past the deadline I gave them but I am getting very impatient. I really would like to drive it to Mike Kelley's Shindig on Saturday. I guess I have to keep my fingers crossed.
-

-
-
-
-
-

-
-
-
-
-
Looks good Dale. Keep up the posts.
-
Project Silver Bullet: 240Z LS1 update
qwik240z replied to qwik240z's topic in Gen III & IV Chevy V8Z Tech Board
It looks like the 1st exhaust shop isn't qualified to do a good job so the car has been picked up from them and towed to a "Better" Shop. The 1st guys didn't do a clean job and there wasn't any ground clearance. They had a mandrel bender but only for up to 2 1/2" pipe. All the 3 inch was being done on the regular bender. It looked like crap. The welds were not clean at all and the part that went under the rear suspension was 1 1/2" off the ground. They used to do nice work, I have seen some of their past jobs, but the guy that did them doesn't work there anymore and we were not aware of this when we dropped off the car. The new shop does lots of custom work. They stock lots of performance mufflers, X pipes, Y pipes, etc. and are known to the racing community around here as the exhaust guys to go to. Hopefully, they will be able to do it right. They will mock it all up tomorrow and then I am going up there on Monday to check it out and make sure it is nice before they weld it all together. I will also get them to try out different mufflers so I can hear what it will sound like. We will be going with dual 2 1/2" pipes to an X pipe behind the trans and then 2 1/2" pipes all the way back to the stock location where a 2 in/1 out muffler will be mounted. The waiting is killing me but hopefully I will get it back by mid week next week. Keeping my fingers crossed. -
How to convert trans-axle LS1 tranny
qwik240z replied to VinhZXT's topic in Gen III & IV Chevy V8Z Tech Board
Vinh, I agree with Tim. As I said in our PM, I have the 4L60E from the 2002 Camaro SS that came with my motor. 20,000 miles on it. The motor runs strong and the trans should too. The trans fluid was very clean upon inspection. If you don't want the TCI converter (still have the stock one too) we can negotiate the price. I also have a brand new in the box B & M Trans Cooler kit that I would include. -
Project Silver Bullet: 240Z LS1 update
qwik240z replied to qwik240z's topic in Gen III & IV Chevy V8Z Tech Board
-
Project Silver Bullet: 240Z LS1 update
qwik240z replied to qwik240z's topic in Gen III & IV Chevy V8Z Tech Board
-
Project Silver Bullet: 240Z LS1 update
qwik240z replied to qwik240z's topic in Gen III & IV Chevy V8Z Tech Board
Those were awsome bikes for the day. Super fast! I am old enough to remember. -
My LS1 240Z is very low. It was set up by the PO with MSA camber plates, coil overs w/ eibach springs and tokiko 5 ways and ST sway bars. The front crossmember sits about 3" off the ground and the oil pan is 3/4" below that. I need to raise it up a bit. I am going to switch to 16" wheels and that should get me almost one inch (I have 14's now) but I was looking at the car on the lift and the adjustable lower spring perch is almost all the way at the top of the 4" threaded collar of the coilover. This leaves no room for adjustment. It seems that when the did the coilover conversion, they welded a stop on the strut tube and it was placed too low. I was wondering if there were any measurements out there that could help place the threaded collar in the proper location. I am planning to unscrew the lower perch down about 2 1/2" and then lift up the threaded collar about 1 1/2" and use 2 muffler clamps with bolts as a temporary way to find the best location for the new lower strut stops that the threaded collar will sit on. Any better ideas
-
The car was towed to the exhaust shop today. I met the driver there and watched as the car was driven (under it's own power) into the bay and onto the lift. So cool to hear it run with open headers. Pretty quiet at idle but as it cracks 3000 rpms you need ear plugs if you are close by. I am so excited. They will have the exhaust finished up by lunchtime tomorrow then it goes back to the Hot Rod shop so they can hook up the A/C, finish up all the little BS stuff and hopefully get it back to me by Saturday Morning. I can't even sleep at night. I just lay in bed thinking about the 1st drive. I can't wait!
-
I got the JTR style headers. 1 3/4" Primaries. They are made by Sanderson. The John's Cars (JCI) headers are made by Sanderson too. The JCI headers are 1 1/2" For your info, the JTR style headers are really nice. I had ordered the JCI headers directly from Sanderson but I had some fitment issues by the starter and the drvers side motor mount so I sent them back and had them send me a set of the coated JTR Style headers. When I first test fit them I thought I was going to have to trim the drivers side motor mount near the back a little to get them to fit right but the fit without any mods. Sanderson made a Jig for them after they made Joeys set so the price came down.
-
We re-routed the passenger side brake line on my car so it ran under the car along side of the front crossmember to keep it away from the heat of the header. We will be wrapping the wiring harness in a heat shield to help protect it. Like Joey's car, my fuel lines go up across the firewall to the drivers side where the brake and clutch master cylinders are. We mounted the FPR on the inner fender well next to the washer fluid bottle under the access panel.