Boy from Oz Posted April 3, 2008 Share Posted April 3, 2008 I've yet to determine who was the manufacturer of my kit. Can you identify it from the front end?Duke I can only suggest it's neither an Eagle nor an Alpha for a couple of reasons. Firstly the leading edge of the bonnet (hood) starts too far back from the triple vents, and secondly the door handle area is not recessed for a Datsun door handle - unless you or a previous owner have modified them. Likewise I don't think it's a Rhino as they appear to also have the longer bonnet. A better photo of the nose might help narrow down the possible make. Also the tail-light configuration might help. My guess is it's a McBurnie (see new link) I might add that I'm more than a little displeased with you, Duke. You know how badly I suffer from procrastination, yet just as I'm about to buy a set of 6" front and 7" rear Daytons you show us a photo of that awesome wheel setup. Thanks ... now I'm again undecided and back on medication! http://www.zparts.com/history/articles/kit_history/articles/3calGTOs2.html Quote Link to comment Share on other sites More sharing options...
staledale Posted April 3, 2008 Share Posted April 3, 2008 DUKE your front end looks exactly like mine which is a Stable. Can't say about the rest of the car since mine has the back and doors of a VR, cut and modified for a coupe. Hope this helps, a picture of the rear tail light area will help identify the rear. Quote Link to comment Share on other sites More sharing options...
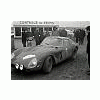
Duke Posted April 4, 2008 Author Share Posted April 4, 2008 Hey - thanks for the feedback guys. Here are some additional shots in case it helps anyone better identify this kit. Anyone else have an idea? The Duke Quote Link to comment Share on other sites More sharing options...
Boy from Oz Posted April 4, 2008 Share Posted April 4, 2008 This is reportedly a McBurnie rear. While the number plate area is similar, the rest the Kamm depression and the spoiler are different. The lights seem a little further spaced as well. Also your kit does not have the faux vents in the panel next to the door windows like a McBurnie. Looks like it's getting narrowed down to a Stable Autowork (Isabella). Anyone got a rear shot of one? My own kit has Eagle/Alpha front but has the large (100mm/4") horizontal twin rear lights. Does anyone know where that configuration originated? I plan on modifying it to the smaller vertical setup. Quote Link to comment Share on other sites More sharing options...
staledale Posted April 4, 2008 Share Posted April 4, 2008 Hi Boy From Oz, I believe that all the kits came with the back tail light panel blank, that is no holes cut in it. This left the tail lights up to the builders discretion. Quote Link to comment Share on other sites More sharing options...
Boy from Oz Posted April 4, 2008 Share Posted April 4, 2008 I believe that all the kits came with the back tail light panel blank, that is no holes cut in it. This left the tail lights up to the builders discretion. I would agree with that in the case of flat panels and vertical lights. Mine however, has some fairly involved shaping, none of which is to my personal liking and will be modified to a more 250 GTO style. I'm guessing that the larger lights may have had something to do with vehicle regulations rather than merely design preference. I'm just interested to know where mine may have originated. I think a member here, 'Y-Not', has or had a yellow replica with this rear section, and it may be from Thunder Ranch. Quote Link to comment Share on other sites More sharing options...
Here comes trouble Posted April 5, 2008 Share Posted April 5, 2008 I have not posted in some time and have gone either nuts or full circle on my 250 GTO project by switching to another doner car. I bought the car for $450.00 last year because it was an incomplete restoration with a lot of parts and a complete $500.00 exhaust system beginning with a Motor Sport ceramic coated header. I have mounted an Arizona Z manifold and the 390 CFM Holley topped by low profile B&M aluminum air filters that have the square weber style filters on each side. The car will have an overdrive Maxima transmission that I bought for $250.00 and transfered that engine to an even cheaper Maxima with a 5 speed. The beater Maxima requires the cv joints and R 200 diff from a ZXT parts car now. Try to find a R 180 diff out of a Maxima that has cv joints. I will take the air conditioning system and water radiator from a ZXT parts car. It should fit. The dash is out of the ZXT and the dash is out of the 250 Project which should make the plumbing easier. The after market air conditioner is held together with a prayer and hose clamps. I will pick and choose the air conditioning parts and there is probably some of the interior ZX air parts that will not fit the interior of the Z project. I will lay up a Rod Simpson dash in a mold made when Mark Wagner loaned me his VR dash as the "buck" model for the Rod Simpson styled dash to splash and make my mold. I will have photos later.................. Quote Link to comment Share on other sites More sharing options...
Zerrari GTO Posted April 6, 2008 Share Posted April 6, 2008 I have not posted in some time and have gone either nuts or full circle on my 250 GTO project by switching to another doner car. I bought the car for $450.00 last year because it was an incomplete restoration with a lot of parts and a complete $500.00 exhaust system beginning with a Motor Sport ceramic coated header. I have mounted an Arizona Z manifold and the 390 CFM Holley topped by low profile B&M aluminum air filters that have the square weber style filters on each side. The car will have an overdrive Maxima transmission that I bought for $250.00 and transfered that engine to an even cheaper Maxima with a 5 speed. The beater Maxima requires the cv joints and R 200 diff from a ZXT parts car now. Try to find a R 180 diff out of a Maxima that has cv joints. I will take the air conditioning system and water radiator from a ZXT parts car. It should fit. The dash is out of the ZXT and the dash is out of the 250 Project which should make the plumbing easier. The after market air conditioner is held together with a prayer and hose clamps. I will pick and choose the air conditioning parts and there is probably some of the interior ZX air parts that will not fit the interior of the Z project. I will lay up a Rod Simpson dash in a mold made when Mark Wagner loaned me his VR dash as the "buck" model for the Rod Simpson styled dash to splash and make my mold. I will have photos later.................. I'm glad your back....can't wait to hear the "new donor" story. How did your headlight cover trim rings turn-out? Please post pics of how you fabricated them. Looking forward to seeing pics of your project. Quote Link to comment Share on other sites More sharing options...
Con Brio Posted April 6, 2008 Share Posted April 6, 2008 Htc...Welcome back. Looking forward to seeing the progress you've been making. Quote Link to comment Share on other sites More sharing options...
Con Brio Posted April 6, 2008 Share Posted April 6, 2008 Oz Boy... I've been told my car started life as an Alpha One. Can you, or anyone, confirm or deny this ?? Seperate note Oz...I was in Melbourne for the F1 race last month. Then took in the KISS concert. Beautiful country you have. Quote Link to comment Share on other sites More sharing options...
Boy from Oz Posted April 6, 2008 Share Posted April 6, 2008 "...I've been told my car started life as an Alpha One. Can you, or anyone, confirm or deny this ??..." From merely observing photos the rear looks to me like an original Eagle/Alpha, but there are plenty of experts (Speedracer, etc) who would know far more than me. http://www.eaglegt.com/pic.php?picid=eaglegto/AutoLogic_Kit_Car_Guide_83_.gif "Beautiful country you have" - Thanks, but I can't take all the credit! If ever any of you folks are in Sydney I would be offended if you didn't contact me. Quote Link to comment Share on other sites More sharing options...
chelle Posted April 30, 2008 Share Posted April 30, 2008 Hi guys! Nice to see everyone is getting things done on their toys!! I haven't been on much and have been making changes too So who was at Knotts? I saw a few pics and it looks like Mr Washington's tent had quite a few GTO's out front of it I wanted to be there but nothing seemed to work out to make it this year. We made big changes to the red car and Kim's white GTO is also getting a lot of progress. The white car is almost done with a Simpson dash and Vintage air. After that some mods to the nose and Kim wants it red (No more posing with the three in "red white and blue" order *pouting*) We are installing Vintage-Air in both cars. The recess in the firewall on the red car needed big mods to get the vintage air to fit, so we also changed the engine side of the firewall to make room for a new intake. That required doing away with the factory wiper setup and switching to a system with a cable and worm style gears more like the original GTO's had. Finally I'm totally rewiring the red car, with lotsa help from Kim as I hated the huge mass of wiring visible under the dash. I used a painless wiring 12 circuit panel and am trying to do much nicer wire management this time. That said.. here's some pics: The firewall recess looked like this and the engine side like this: so, we removed the dash and wiring/computer/etc.. Removed the nose and wiper motor/fuel and brake lines and cut away the middle of the cowl area Installed the new wiper drive using the stock bases bored out large enough to use them as the mounting brackets for the gear drive bases Then weld in the new section of the firewall inside that clears the A/C, cover that with Dynamat, test fit the A/C with ECU in place, fill in hole where wiring used to come in, cover the rest with Dynamat, make a panel to mount the new fuse panel cable management and terminal blocks to, mount that, etc.. Then pull the AC out and begin the fun of rewiring it Mount and test new wiper motor inside to the left kickpanel And now with the nose back on the car and a little metal welded in the area that was cut out making the recess go up to the bodywork now leaving lots more room for the new intake as well as better access to the back of the engine. I still need to replace the fuel return line and brake lines, but it's getting there!! Next I will modify the left and right sides at the back of the engine compartment to allow the the vents in the hood to bring outside air into the vents inside the passenger compartment.. Quote Link to comment Share on other sites More sharing options...
chelle Posted April 30, 2008 Share Posted April 30, 2008 Next I'll get pics of the white car's simpson dash install Quote Link to comment Share on other sites More sharing options...
Zerrari GTO Posted April 30, 2008 Share Posted April 30, 2008 Hi Chelle, I was wondering what you've been up to! Clean, beautiful work as usual. I think that is the most factory Vintage Air install I've ever seen. Which model did you use and did you use the compressor and condensor from Vintage Air? Quote Link to comment Share on other sites More sharing options...
chelle Posted April 30, 2008 Share Posted April 30, 2008 Hi Chelle, I was wondering what you've been up to! Clean, beautiful work as usual. I think that is the most factory Vintage Air install I've ever seen. Which model did you use and did you use the compressor and condensor from Vintage Air? Thanks!! I hope you are well The red car got the Gen II Compac and the white one got the Compac Mini (which is only like an inch smaller in each direction) Using the BMW compressor and the Vintage air condensor and dryer. I don't have lines on it yet, but the idea is to try and have this thing livable when driving in the summer. A/C seems so wrong in a "race" car, but last year when we would go off to an event by the time we got there it was practically an impromptu wet t-shirt contest.. lol I actually melted the side of my boot against the dead pedal..(they were cheap pleather boots) so I felt some better heat blocking and ventilation were a good idea. Chelle Quote Link to comment Share on other sites More sharing options...
staledale Posted April 30, 2008 Share Posted April 30, 2008 Hi Chelle, Have to ask, what's the new intake? When I talked to you at Carlisle you were interested in the fuel injection system that looked like Weber's. Any hints or pictures of what it will be? Will you be making Carlisle this year? Import and kit car May 16 - 18 for those who might want to go. Quote Link to comment Share on other sites More sharing options...
chelle Posted April 30, 2008 Share Posted April 30, 2008 Hi Chelle, Have to ask, what's the new intake? When I talked to you at Carlisle you were interested in the fuel injection system that looked like Weber's. Any hints or pictures of what it will be? Will you be making Carlisle this year? Import and kit car May 16 - 18 for those who might want to go. Hiya let's see, more pics below, not the intake that looks like real webers too much to fabricate the intakes to make it work with this available... Can't make it to Carlisle too much to do .. but here's a pic from knotts, not taken be me and two shots of the dash for Kims white gto under construction..showing metal reinforcements before pouring foam Quote Link to comment Share on other sites More sharing options...
Dan Juday Posted April 30, 2008 Share Posted April 30, 2008 Hey Chelle, Who took that picture of J.W.'s row? My wife and I were there. Quote Link to comment Share on other sites More sharing options...
chelle Posted April 30, 2008 Share Posted April 30, 2008 Hey Chelle, Who took that picture of J.W.'s row? My wife and I were there. I honestly don't know.. sorry.. saw it online will post the url if I can find it again Chelle Quote Link to comment Share on other sites More sharing options...
Duke Posted April 30, 2008 Author Share Posted April 30, 2008 Looking Good Chelle. I'm looking forward to seeing pics of Kims car as well. And for any of you not going to Carlyle on the 16-18, head up to Portland OR for the Oregon Trail Rally. http://www.oregontrailrally.com/ It's going to be a banner year. (And make noise for Car 33, the Alfa GTV6.) Quote Link to comment Share on other sites More sharing options...
Recommended Posts
Join the conversation
You can post now and register later. If you have an account, sign in now to post with your account.