v8dats Posted September 5, 2008 Share Posted September 5, 2008 it never ends does it? love the car. cant wait to see more! Quote Link to comment Share on other sites More sharing options...
240hoke Posted September 5, 2008 Share Posted September 5, 2008 Yea I forgot to mention there are many other electrical things that you need to get from the guy if you haven't already!! These electrical parts are hard to come buy and are VERY expensive in the wrecking yards. You need: - ECU - BCM - Gas Pedal - Engine Harness - Engine Room Harness - Dash Harness - Ignition Switch w/ NATS module - Security Light (on dashboard) - Fuel Temperature Sensor. I think thats it. As far as I am aware YOU HAVE TO HAVE THE BCM AND NATS system to operated the factory ecu. It requires the chipped key to be read and recognized before the ECU will operate. Everything must be right or the car will not run over 2K rpms and will have to be taken to the dealership to get it out of "limp home" mode. You'll also have to have a Nissan Consult on the first start up to get everything initialized correctly. As far as I am aware only one person has made the factory harness work without splicing the entire system into the car. I was lucky enough to work with him and get all the information, however I respect the work that he put into it, he is a very knowledgeable nissan master tech. There for I wont be doing any type of write-up without full permission. I will say though that with the proper schematics and some electrical know how you should be able to figure it out, and Im not sure why people haven't yet! Hopefully he will be selling harnesses soon to do the swap with the factory stuff. He has a vq swapped 240sx that is quite a sleeper...last time i talked to him he was working on getting 240sx kits made. That being said if you have the cash and are planning on taking the motor to High Horsepower (over 600hp) I would prolly recommend Haltec. Its completely standalone and can control the cam timing. You can even get them preprogrammed from Accurate Injection. I talked with them a good bit and they seem to be a nice company to work with. I will be going that route if Things don't work out with the factory stuff. Whew and with all that being said I should be starting on the wiring in a week or two!! Quote Link to comment Share on other sites More sharing options...
EMWHYR0HEN Posted September 10, 2008 Author Share Posted September 10, 2008 Just a little update: Made some mounts out of 1/8'' plate that connects to the frame. I used the stock aluminum engine mounts and ditched the insulators. Instead I used a thin polyurethane bushing. I still don't know what to do with the intake manifold and where i'm going to route my intake. back towards the cowl? up? any sugestions welcome... Trans mount coming soon. Quote Link to comment Share on other sites More sharing options...
jeffneal66 Posted September 10, 2008 Share Posted September 10, 2008 Looks great! I've always liked the idea of going back into the cowl for the intake. Keep us posted. Quote Link to comment Share on other sites More sharing options...
BayAreaZT Posted September 10, 2008 Share Posted September 10, 2008 Nice work. I was a little worried when I saw it open in the first two pictures . Don't really see any obvious clean solution to the intake routing. Quote Link to comment Share on other sites More sharing options...
JustinOlson Posted September 10, 2008 Share Posted September 10, 2008 Does the VQ35 use a MAF? Could you fit it and a filter in the cowl? Justin Quote Link to comment Share on other sites More sharing options...
240hoke Posted September 10, 2008 Share Posted September 10, 2008 Nice, Looks like you have the engine in almost the identical spot that I do. I personally think that those mounts will preform fine...although it might as well be solid mounted! You still run into the same issue as me with putting a torque stress on the frame rails. With such a short lever arm I don't see it being an issue but never the less something to think about. I like the idea of routing the intake into the cowl since its a nice high pressure area. I saw one guys setup with a vq in a 240z and he laid a filter element under the entire cowl and make the entire wiper box the air box. He modified the intake manifold so that it went straight back and the throttle body literally opened into the cowl. I choose to use the stock manifold and route the piping to the front. its long but i think works well...helps fill up the engine bay and is easy to service etc. Quote Link to comment Share on other sites More sharing options...
MoNkEyT88 Posted September 10, 2008 Share Posted September 10, 2008 I like the idea of routing the intake into the cowl since its a nice high pressure area. I saw one guys setup with a vq in a 240z and he laid a filter element under the entire cowl and make the entire wiper box the air box. He modified the intake manifold so that it went straight back and the throttle body literally opened into the cowl. These were from a link posted on page 1. Thought I'd help. Quote Link to comment Share on other sites More sharing options...
240hoke Posted September 10, 2008 Share Posted September 10, 2008 LOL yea I was trying to remember where I saw it...dhurrrr . Very slick setup. Quote Link to comment Share on other sites More sharing options...
jerryb Posted September 10, 2008 Share Posted September 10, 2008 Backward!?? Its obvious.....angle or move the corner braces down the firewall and run the intake forward. Am I being too simple? Quote Link to comment Share on other sites More sharing options...
thehelix112 Posted September 11, 2008 Share Posted September 11, 2008 I vote for backward. But I'd open up the cowl to let the air flow into it more easily. That way you end up with a (relatively?) high pressure zone at the entrance to the intake tract, and a short intake tract meaning less weight? I wonder though, is the manifold geared towards accepting air from that location? Would moving the input mean the air has to stop and do a 180 at some point? Dave Quote Link to comment Share on other sites More sharing options...
jerryb Posted September 11, 2008 Share Posted September 11, 2008 So if you go backward were do you place the MAF...the wiper mechanism....how about the air filter? I vote for backward. But I'd open up the cowl to let the air flow into it more easily.That way you end up with a (relatively?) high pressure zone at the entrance to the intake tract, and a short intake tract meaning less weight? I wonder though, is the manifold geared towards accepting air from that location? Would moving the input mean the air has to stop and do a 180 at some point? Dave Quote Link to comment Share on other sites More sharing options...
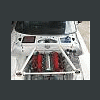
EMWHYR0HEN Posted September 11, 2008 Author Share Posted September 11, 2008 I think i'm either going to go back into the cowl or maybe some funky shaped piping to fit between the strut tower bracing. If I go to the cowl I think I can get away with cutting the stock throttle body/ inlet part and just welding a straight peice go right into the cowl. Although I do have to use a MAF I think i'll have the room even for a small filter with the wipers gone. Only thing i'm unsure about is where to cut. There is a coolant passage that runs through the bend. Don't know why it's there.... Maybe I can ditch it. Here's what the intake manifold looks like. Top view of the lower half of the manifold. The runners look impressive! Bottom view of lower half. bottom view of top half. Top The coolant passage Quote Link to comment Share on other sites More sharing options...
garvice Posted September 11, 2008 Share Posted September 11, 2008 This could very well be a stupid suggestion as I have very little exposure to this engine so feel free to Vito it without a second thought. Or ignore it altogether. Have you thought about spinning the intake 180deg? From the Bottom half photo it looks almost symetrical front to back, well at least the ports anyway. If it's not symetrical perhaps it would be possible to just spin the top half 180deg? Can someone superimpose in photoshop? or better yet, do you want to trace a template and show us what it looks like Myron? If that is possible it would make turbos in front of the engine that much nicer/cleaner. Quote Link to comment Share on other sites More sharing options...
240hoke Posted September 11, 2008 Share Posted September 11, 2008 Another benifit to leaving the manifold in the stock position is that it allows you to use after-market plenums. This may not be a big deal for you since you may want to fabricate something yourself..but i thought it would be nice to throw on a kinetix plenum if I wanted. Course what you really should do is just got ITB Quote Link to comment Share on other sites More sharing options...
thehelix112 Posted September 11, 2008 Share Posted September 11, 2008 I'm not sure how big the MAF is, but Myron is not welder-shy, I'm sure he could make it fit, and his first post on this talked about the air filter, and its a race car.. wiper mechanism comes in a small bottle labeled RainX. Dave So if you go backward were do you place the MAF...the wiper mechanism....how about the air filter? Quote Link to comment Share on other sites More sharing options...
EMWHYR0HEN Posted September 11, 2008 Author Share Posted September 11, 2008 This could very well be a stupid suggestion as I have very little exposure to this engine so feel free to Vito it without a second thought. Or ignore it altogether. Have you thought about spinning the intake 180deg? From the Bottom half photo it looks almost symetrical front to back, well at least the ports anyway. If it's not symetrical perhaps it would be possible to just spin the top half 180deg? Can someone superimpose in photoshop? or better yet, do you want to trace a template and show us what it looks like Myron? If that is possible it would make turbos in front of the engine that much nicer/cleaner. This is actually a clever idea. I'll have to look into it. Quote Link to comment Share on other sites More sharing options...
EMWHYR0HEN Posted September 11, 2008 Author Share Posted September 11, 2008 Course what you really should do is just got ITB Maybe some time in the future. Another big plus if I do go with a standalone system. Mmmmmm.... Quote Link to comment Share on other sites More sharing options...
EMWHYR0HEN Posted September 11, 2008 Author Share Posted September 11, 2008 Build Update: I trimed the cross member to clear th oil pan then welded it shut. It's a tight fit. I think ther's only 1/4'' of clearence around the pan but with minimal movement from the engine I think It'l be fine. I also decieded not to add any additional bracing on the cross member simply because I didn't think it was needed since I only cut off the lip. I slapped on the rack and pinion in hopes of getting the steering shaft on with out any problems.... I finally got snagged. The engine mount is clearly in the way. I think i'm going to have to get another shaft. Quote Link to comment Share on other sites More sharing options...
EMWHYR0HEN Posted September 11, 2008 Author Share Posted September 11, 2008 Trans mount: After experiencing a straight pipe with my previous setup I plan on going with a Y pipe to a single exit exhaust at the rear. That's why I went a trans mount similar to Austin's design. Everything is made from 1/8'' plate and I also used the stock rubber insulator. Quote Link to comment Share on other sites More sharing options...
Recommended Posts
Join the conversation
You can post now and register later. If you have an account, sign in now to post with your account.