mrcheeze36 Posted October 17, 2008 Share Posted October 17, 2008 I still think that you should do something like this....http://my350z.com/forum/shop-builds/389322-g35-na-stroker-itbs.html he's going to use the 350z stock electronics and DBW Quote Link to comment Share on other sites More sharing options...
EMWHYR0HEN Posted October 17, 2008 Author Share Posted October 17, 2008 I still think that you should do something like this....http://my350z.com/forum/shop-builds/389322-g35-na-stroker-itbs.html As of rignt now that's just bling that I can't afford. I need to get this thing going so I can get some seat time on the track. It's been a while... Quote Link to comment Share on other sites More sharing options...
EMWHYR0HEN Posted October 20, 2008 Author Share Posted October 20, 2008 I got almost everything mounted with the car on the ground...only to be removed right after for paint. Everthing feels good in the driver seat. The shifter is closer within reach and the throws are short and crisp, very go-cart-ish I might ad. At first I wasn't too happy about adding the electronic gas pedal but, it's travel is fairly long (which is great for modulation) and the spring tension feels good so maybe its not so bad. I got everything to clear under the hood but, I forgot about the STB which might not let me make a front mounted TB. So all I have left is paint, fuel plumbing, manifold, and wiring and this thing should be running again! Quote Link to comment Share on other sites More sharing options...
EMWHYR0HEN Posted October 23, 2008 Author Share Posted October 23, 2008 I hate to be such a flip flopper but I'm sticking with my original design and making the intake manifold go back into the cowl. After sizing everything up I found out I can't make a front mounted TB because of hood and strut brace clearence. There isnt enough room to turn the TB down and back towards the passenger side battery area and, I cant fit a large enough tube to go in the original location. After much thought about going back into the cowl I realized the advantages outweighed the disadvantages. Hear me out. 1. The entire intake system will only consist of 2 90 degree bends BEFORE the TB and will only be about 2' in length. 2. The entire system will be outside of the hood meaning lower temps. 3. The filter will be placed on top of a sealed box in front of the windshield (high pressure area) and will take air directly from outside of the engine compartment. 4. It will look much cleaner because everything will be under the cowl and dash so no hose clamps, tubes, hoses, couplers, MAF can be seen, only a 5'' stright peice of aluminum tube. 6. and if you really want to get crazy, better weight distribution. The disadventeges would be: 1. Cutting 3 holes in the cowl. However, 2 of them will be welded up to the steel intake tubing so hardly any ridgidity lost there. 2. I have to extend the MAF wiring into the cabin and extend the TB wires a couples inches. That's all I can think of. I just wanted to run it by everyone just in case i'm not seeing something. Quote Link to comment Share on other sites More sharing options...
jeffer949 Posted October 23, 2008 Share Posted October 23, 2008 Just a thought that im sure you have thought of. Make sure that there is some give betwen the intake and the cowl so that it can give some when the engine torque's over. Its pretty solidly mounted but there will be some give Quote Link to comment Share on other sites More sharing options...
EMWHYR0HEN Posted October 23, 2008 Author Share Posted October 23, 2008 Definately. The TB will be solidly mounted to the manifold but will be attached to the intake pipe with a rubber or silicon hose. And of course i'm going to trim enough on the firewall for the TB to move a little. Quote Link to comment Share on other sites More sharing options...
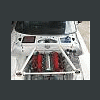
EMWHYR0HEN Posted October 27, 2008 Author Share Posted October 27, 2008 Update: Finished cutting/welding the holes and tubes for the intake routing. However, i'm still going to add 2 90 degree bends which are on their way. I'm going to complete the 2 walls of the airbox with some aluminum sheets and then seam seal everything tight. I'm hoping that this will be my last engine swap so I figured I finish everything off with the same paint as my body exterior. Quote Link to comment Share on other sites More sharing options...
rturbo 930 Posted October 27, 2008 Share Posted October 27, 2008 Excellent work Myron. I'm impressed with how quickly you work as well. Just one quick question - Is this thing that looks like a tow hook welded to your strut tower a tow hook? Quote Link to comment Share on other sites More sharing options...
EMWHYR0HEN Posted October 27, 2008 Author Share Posted October 27, 2008 Thanks. Yeah, I just posted a pic if it here http://forums.hybridz.org/showthread.php?p=948698#post948698post948698 Quote Link to comment Share on other sites More sharing options...
garvice Posted October 27, 2008 Share Posted October 27, 2008 You know, I was going to post a question today, but you have already answered it. I was going to say, how will you fit a cone filter in there (I took off my cowl this weekend and realised there wasn't much space. Quote Link to comment Share on other sites More sharing options...
EMWHYR0HEN Posted October 29, 2008 Author Share Posted October 29, 2008 Now all I have to do is extend the TB flange and seal the airbox and the intake routing will be finished. I'm happy the way it turned out. I think i'm going to take the slits on the driver side of the cowl and place them next to the passenger side ones so that more air can be drawn in the box easier. Also probably going to remove the center slits and close up the wiper holes. Quote Link to comment Share on other sites More sharing options...
thehelix112 Posted October 29, 2008 Share Posted October 29, 2008 Definitely unique, but should work well. How did you paint the bay? Do you have a spray gun etc lying around or? Dave Quote Link to comment Share on other sites More sharing options...
Daeron Posted October 29, 2008 Share Posted October 29, 2008 Wow.. I've waited until the end to say anything, but I think this is great. I have always wanted to see someone use that "dead" space, and while I am sure I have seen it used in some capacity beyond wipers, I cannot recall. This build will definitely stick out in the memory. Quote Link to comment Share on other sites More sharing options...
X64v Posted October 29, 2008 Share Posted October 29, 2008 Wow, absolutely brilliant placement of the MAF in this situation. Hopefully you can come spectate at Willow Springs on the 14th so we can tell you in person how bad ass your car is. Quote Link to comment Share on other sites More sharing options...
ft280dats Posted October 30, 2008 Share Posted October 30, 2008 I'm sorry but I'm a little concerned about what would happen if it rained. I know this is a track car but it can still get soaked at a track day. Factory air boxes have a cover over that filter with piping to inside a fender. Are you going to incorporate a water bypass in your piping. By the way I love your build and think it's going to be a great race car when your done. Quote Link to comment Share on other sites More sharing options...
EMWHYR0HEN Posted November 3, 2008 Author Share Posted November 3, 2008 Just a little update. The car is back on the ground. I don't know if it's the new engine placement or weight but the front end is about 1/4 '' higher than before. I didnt realize how low the engine was placed until now. The lower oil pan is about 2'' lower than the cross member and is about 3'' from the ground which kind of worries me... I had to redo my front brake lines because of the steering shaft and relocated the clutch line from passenger to driver side. Also got most of the wiring installed. It's a mess compared to what I had before but the dash covers most of it pretty well. Quote Link to comment Share on other sites More sharing options...
Comrade_Charlie Posted November 3, 2008 Share Posted November 3, 2008 everything looks top notch , and no dash pictures? Quote Link to comment Share on other sites More sharing options...
EMWHYR0HEN Posted November 4, 2008 Author Share Posted November 4, 2008 Wasnt planning on sharing these but since you asked.. Here you can see I mounted the ECU on the kickpanel The BCM & fuse block mounted on the trans tunnel and relay boxes mounted on the floor. Quote Link to comment Share on other sites More sharing options...
Comrade_Charlie Posted November 4, 2008 Share Posted November 4, 2008 looks awesome, love those kind of dashes. Quote Link to comment Share on other sites More sharing options...
Supra510 Posted November 4, 2008 Share Posted November 4, 2008 Great work. Quote Link to comment Share on other sites More sharing options...
Recommended Posts
Join the conversation
You can post now and register later. If you have an account, sign in now to post with your account.