EMWHYR0HEN Posted September 22, 2007 Share Posted September 22, 2007 Well finally decided to retire my car as my "Daily Driver" to my track day/weekend car. Stripped the interior and found more rust as I went along. Places with rust: firewall under battery tray, driver side floor, passenger side floor + frame rail under seat. I already have my new floorpans and i'm going to start cutting out the old floors along with the old seat mounts. Before I weld in the new floors heres what I have planned and need some opinions: 1. remove old frame rail under front section of floor pan. 2. make a new frame out of rectangular tubing starting at the t/c location all the way to the rear subframe. However, I want to run the new frame rail higher than most people have done it. i'm thinking of running the new frame rail the same height from the ground as the rocker pannels because I want to weld in some square tubing from one side of the rocker to the frame rail, then from the rail through the trans tunnel, connecting to the other side of the frame rail, to the other rocker. This square tube will also be used as my seat mount and done twice across the car. 3. weld up a square tube connecting both sides of frames and rockers used as my new trans mount ( i'm going to be shifting my engine and tranny rearward) 4. Lastly, I want to weld up the floor panels outside of the frame and tubes ( frame will be seen from inside, I know sounds weird) so the bottom of the floors wiill be totally flat. Does this sound do-able? I'm REALLY trying to be able to actually tie the entire center frame section together. I don't see how I can do that if the new frame rails run below the rockers and floor pannels. Quote Link to comment Share on other sites More sharing options...
johnc Posted September 22, 2007 Share Posted September 22, 2007 The square tube you want to run laterally across the car doen't have to be continuous to be strong enough for seat mounting and chassis reinforcement. Instead of going to all the work of raising the frame rails into the chassis, just buy some Bad Dog frame rails and weld them in. The lateral seat tube can then be welded to the bottom of the rockers, notched and welded to the Bad Dog frame rails, and then across the chassis. Or, weld the square seat tube on top of the floor pan in the interior like the rest of us do. Quote Link to comment Share on other sites More sharing options...
JMortensen Posted September 22, 2007 Share Posted September 22, 2007 To me it sounds like a complicated aero project probably with the intent of getting a flat bottom car. Am I on the right track? If so, I'd say make your life easier and use a smaller less effective diffuser in back and just put a bigger more effective wing on. I don't like the idea of having a large frame rail running between my feet inside the car, especially not if its entirely within the cabin. If you do end up going for the flat floor it will be an interesting experiment. I hope you're short though. From memory I think if you went with a flat floor from the rocker across you'd lose about 3-4" of headroom. I suppose another benefit might be that if you dry sumped the engine and did something to raise the front crossmember you might be able to lower the car a lot further. It would be A HELL OF A LOT OF WORK though. I'd take a really close look at the underside of your car before you start, and try to think through all the complications you're going to run into. And as an alternative you could just run side skirts that hang down and run your flat floor off of them, connected to the frame rails underneath. Quote Link to comment Share on other sites More sharing options...
EMWHYR0HEN Posted September 22, 2007 Author Share Posted September 22, 2007 JohnC, Thanks for the tip. I have my floor out now and its looks to be a PITA to bring the frame rail up. I'll tack up the new floor and go from there. JonM, I wasn't going for an aero project that's just what I cam up with after thinking of my chassis plans. After looking at it really hard, I realized I was getting ahead of myself. I know you have installed the Bad Dog rails on your car already, my question is would you have rather made you own rails out out of steel tube? I can get my own metal cheap and I like to fab stuff so would it still be worth it to get the Bad Dogs? Quote Link to comment Share on other sites More sharing options...
JMortensen Posted September 22, 2007 Share Posted September 22, 2007 I have enough other crap to do that I feel that the Bad Dog parts were worth it for me. I don't think it would be too hard to make up your own, so if you like doing that then maybe that's a better route for you. The thing that I liked about them was that my car is going to be really low and they don't take up anything more than maybe an extra 1/8" of ground clearance. Most of the ones that you see either protrude into the floor which seems bothersome to me, or they cut down ground clearance quite a bit. Quote Link to comment Share on other sites More sharing options...
johnc Posted September 22, 2007 Share Posted September 22, 2007 I can get my own metal cheap and I like to fab stuff so would it still be worth it to get the Bad Dogs? I fab for a living and my cost to make those frame rails isn't close to what John at Bad Dog charges. They are formed correctly, straight, flat, and strong. I use them as guides to straighten the floor pans. Worth every penny. Quote Link to comment Share on other sites More sharing options...
EMWHYR0HEN Posted September 30, 2007 Author Share Posted September 30, 2007 I made up my mind to make my own floor rails and made it out of 1 X 3" 14 gauge steel tube. I already finished my driver side rail which connects from the T/C to the bottom firewall/floor then back up to the rear subframe. When I started to make the frame rail on the passenger side I noticed that my stock FRONT frame rail was seriously bent, dented, and mangled. (see pics) So before I weld on the floor rails I wanted to replace or rapair the front frame rail. Should I just replace it with a stock frame rail, or use 2.5'' square tubing? How can I make sure I keep the exact same loaction for my cross member and t/c bracket? anything else I should be aware of before I attemt this? Quote Link to comment Share on other sites More sharing options...
LLave Posted October 1, 2007 Share Posted October 1, 2007 Jeeze what wall thickness is that tube? Quote Link to comment Share on other sites More sharing options...
JMortensen Posted October 1, 2007 Share Posted October 1, 2007 Should I just replace it with a stock frame rail, or use 2.5'' square tubing?How can I make sure I keep the exact same loaction for my cross member and t/c bracket? anything else I should be aware of before I attemt this? I'd use the Zedd Findings frame rails. Their stuff is thicker than stock, but fits right and you won't spend as much time trying to figure out how to get it installed. I guess the next question is do you install one frame rail or both. I'd probably go with just the one if the other is perfect. I'd definitely do one at a time, regardless. As far as the TC bracket, just measure it from as many different places as you can, tack it in place, measure again. Measure a 3rd time, then when everything is square weld it in. I had measurements from the front of the frame rail, the top of the rail, diagonally from the opposite front corner, and from the inside of the frame rail. Also keep in mind that these cars weren't put together terribly accurately in the first place so if you take your time you'll probably end up with something better than stock. There is a chassis dimensions thread with measurements too, not sure if this will help you out or not: http://forums.hybridz.org/showthread.php?t=100401 I think your subframe connectors are thicker than is required. Not sure if you care about excess weight, but that's the price you'll pay for the extra thickness. Quote Link to comment Share on other sites More sharing options...
EMWHYR0HEN Posted October 1, 2007 Author Share Posted October 1, 2007 I'd use the Zedd Findings frame rails. Their stuff is thicker than stock, but fits right and you won't spend as much time trying to figure out how to get it installed. I guess the next question is do you install one frame rail or both. I'd probably go with just the one if the other is perfect. I'd definitely do one at a time, regardless. As far as the TC bracket, just measure it from as many different places as you can, tack it in place, measure again. Measure a 3rd time, then when everything is square weld it in. I had measurements from the front of the frame rail, the top of the rail, diagonally from the opposite front corner, and from the inside of the frame rail. Also keep in mind that these cars weren't put together terribly accurately in the first place so if you take your time you'll probably end up with something better than stock. There is a chassis dimensions thread with measurements too, not sure if this will help you out or not: http://forums.hybridz.org/showthread.php?t=100401 I think your subframe connectors are thicker than is required. Not sure if you care about excess weight, but that's the price you'll pay for the extra thickness. Thanks Jon. I guess my only problem is if I can buy the rails individually. I either had a choice of 16 ga. or 14 steel tube. I wanted the rails to also serve a proper jacking point from the side with out bending the floor, frame or anything else. I don't think it's that much over kill considering most guys are using 2 x 3'' .085 wall ( ~ 14 gauge) In your experience, which method seems to be the most affective when removing metal from a uni body: 1. drill out factory spot welds and use a chisel to separate peices or 2. cut out with cutoff wheel and use plyers and chisel to "peel" off remainder of metal or what other tecniques have you used that work? Quote Link to comment Share on other sites More sharing options...
JMortensen Posted October 1, 2007 Share Posted October 1, 2007 I guess those tubes look thicker than they are. I thought they were like .134 or something. As far as removing spotwelds, my experience is that #1 doesn't work at all, and #2 works pretty well. I'd suggest that you not use the chisel like a chisel though. Just keep using the cutoff wheel until you grind all the way through. Maybe a light prying with the chisel, but you shouldn't have to try and cut the metal with the chisel. Another option is a spot weld cutter: http://www.harborfreight.com/cpi/ctaf/displayitem.taf?Itemnumber=95343 Haven't tried a spot weld cutter myself, but others seem to like them. Quote Link to comment Share on other sites More sharing options...
johnc Posted October 1, 2007 Share Posted October 1, 2007 Chisels don't work on the 240Z seams. They tend to cut into the base metal and leave the spot welds intact. A 135 degree drill bit or a spot weld bit works well. Quote Link to comment Share on other sites More sharing options...
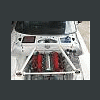
EMWHYR0HEN Posted November 5, 2007 Author Share Posted November 5, 2007 It's been hard to get my buddies to give me some input on all the work iv'e been doing so i'll post some pix, maybe I can get some here. I replaced the entire frame rail with .120 sq. tube (I know, but that's all i could get.) I left the stock cross menber mounting points on the outer fender well and cut a hole in the new frame rail and welded it all together. Then I used 1'' x 1'' x 16 gauge angle to connect the rails with the fenderwells. I don't plan on enclosing the area between the t/c mount, SFC, and firewall with sheet metal. I braced the t/c mount from the back, will the mount flex under hard braking? also, in general when welding sheets, ex) floor pannels, firewall panel, is it necessary to put a full on bead, or is a bunch of tack welds sufficient enough? I hanv't seen many pictures of the TTT suspension parts here. I just got some and installed the camber plates, check it out I have some close ups to share. Quote Link to comment Share on other sites More sharing options...
JMortensen Posted November 5, 2007 Share Posted November 5, 2007 I think what you've got there looks great. As to the panel welding question, I think there are different ways of finishing it. You can seam weld the whole thing, or you can just stitch it and use seam sealer to seal it up. If you think about it, none of these panels were seam welded from the factory. As to the TC mount flexing, the area where the rod goes through the mount can still flex, but the way you've got it set up there should be a big improvement from stock. I'd fill in the sides with some sheet, but you don't have to if you don't want to. Quote Link to comment Share on other sites More sharing options...
v8dats Posted November 5, 2007 Share Posted November 5, 2007 looking good! i am replacing my rails,floors,battery tray and patching the firewall too! i hope mine turns out the same. where can i find seam sealer? Quote Link to comment Share on other sites More sharing options...
mikeatrpi Posted November 5, 2007 Share Posted November 5, 2007 Looks like you're doing fantastic work. You're skilled with a welder too! Keep at it. You can buy seam sealer at the auto paint store. It comes in a caulk tube and costs around $10. I think you can even find it at Autozone. Quote Link to comment Share on other sites More sharing options...
EMWHYR0HEN Posted November 6, 2007 Author Share Posted November 6, 2007 Thanks for the support! I'll have more pictures soon with more progress. paint first then seam seal? or seam then paint? Quote Link to comment Share on other sites More sharing options...
poortecher Posted November 6, 2007 Share Posted November 6, 2007 seam sealer then paint. Most if not all modern automotive seam sealers take paint very well. Quote Link to comment Share on other sites More sharing options...
zmaster Posted November 6, 2007 Share Posted November 6, 2007 i heard of like a rock...but like a tank danm those frame rails are thick Quote Link to comment Share on other sites More sharing options...
Synlubes Posted November 6, 2007 Share Posted November 6, 2007 Nice work! Keep the pics coming Quote Link to comment Share on other sites More sharing options...
Recommended Posts
Join the conversation
You can post now and register later. If you have an account, sign in now to post with your account.