

zgeezer
-
Posts
772 -
Joined
-
Last visited
-
Days Won
3
Content Type
Profiles
Forums
Blogs
Events
Gallery
Downloads
Store
Everything posted by zgeezer
-
500 hours, over 450 in a 1939 AirKnocker Chief... ceconite, no radio, no starter no flaps, VFR ALL the way, wood prop, and a tail dragger. Tie down the tail, throw down the chocks, walk around, pull the prop through four holes, two pumps of primer, magnetos, crack the throttle, pull prop down and step back as it fires up. Walk under wing, keeping a grip on struts, open door, hold on to fuselage, pull throttle back to idle. Pull chocks out from main gear with rope and store behind seat. Keep hands on fuselage and walk to tail gear. With one hand on Fin, untie rope securing tail wheel and pull it clear of the tie down ring on ground. Secure rope with one hand and walk to cabin...... do not let go of craft. Hold fin, hold elevator, stay close to fuselage and mount into cabin. Service ceiling about 13000 feet. This was a real floater, on a hot day it would fly at 18 inches off the deck in ground effect with throttle at idle. I took out about 4 taxi way lights at Sonoma once.... slow and easy... also embarassing before it stalled and dropped. God, I loved that plane. Flew out of a grass field in Dixon, CA. Low and slow over the delta islands... saw Juday country up close from slightly more than 500 feet. Dodged and lived in fear hitting the wake of one of the hundreds of Starlifters flying out of Travis AFB... flying out to 'Nam with my generation and coming back with bodies, some alive and some dead, dope, and JDM parts for Datsun 510 SSS conversions in the Bay Area. I never mastered the simple act of landing under power on the main gear: all my landings were full stall. I never did ground loop it, but the airframe log showed it's previous owner performed that rite of passage twice. G G
-
My local JY has 12 Smart Car bucket seats. The are very basic buckets with a metal back and seat pan. These will fit into a 240Z for width. The mount appears to be boxed... very close to the Z rails. Another option to look at. g
-
This has been such a great site: good usable information and a disciplined forum. This site is younger than my Z "jack stand racer" by about 4 years. The really dirty little secret about this site is it creates and encourages the "while I'm there I might as well......." syndrome. There is nothing about my project that hasn't been redone three times. CSB... great easy swap...Wow, here's a line about LT1 (damn good looking engine)....Oh Oh, that Ls1 engine mounts look simple and yep, that LM7 truck engine & transmission only has 19000 miles..... Whats that you say: $1500 with bill of sale... SOLD. I also collect all sorts of CV joints: lets do a 28zxT... Ok that's done. What's this "How to put in 300ZT CV joints.... hey, I've got one of those in that pic a part...... the beat goes on. Thanks Hybridz for five great years. I'm looking forward to the next five, when I might be able to fire up my toy. z
-
The one in the middle with the fuel line on the end is a 240z. Just like my '71 Series 1. The other one on the end with the circle pressed into it looks like an early FI 280Z tank. There are two outlets located in the middle of the forward edge of the tank. The tank you pulled out of your Z and is marked "70 - 73 Z" does not have the I have no idea what the other might be, perhaps a 260 or a modified 240z. Look at my photos here on hybridz albums. I have several photos that might help. zgeezer
-
Hey Hoov100: Yeah, the Miata is a tough differential with Torsen as a option on many models; but, the Monster Miatas and that ILK who stuff LS1 & 302Windsors into a perfectly good roadster also have a cradle that mounts the Ford 8.8 IRS. The Ford has lots of aftermarket support and if you're into fabrication, then here's another option. g
-
Just downloaded both CAD files. I know nothing about CAD, but I sure like this design. Anyone here ready to talk to the designer and begin producing a few of these. If the price were "right", I jump to my PayPal right now. If the price were really "riiiiiight" I'd grab three. One variation on a theme would be to drop the cuts for the stock HVAC and provide a finisher for Vintage Air HVAC cable controls. HeliArc small spacers on the back and be ready to go. G
-
Smog legal LS1 conversion into a 1978 280z
zgeezer replied to 1978_280z's topic in Gen III & IV Chevy V8Z Tech Board
This should not be a real problem. I sold a 97 LT1 to a buddy to install into a Jaguar XS to replace the v-12. John's Broken Kitty in Texas provided the swap material, including, I believe, reworking the CPU. The CA referee station in San Bernardino provided him with a list of what was required from the 97 LT1 and from the Jaguar. The referee station was helpful in terms of what was needed, but pretty inflexible on some other issues. For example, the LT1 was fitted with early GM manifolds with the AIR injector's in place. The referee accepted these late '60's or so exhaust manifolds as being the functional equivalent for the LT1 manifolds. However, there was a smog related valve that interfered with the Jaguar's chassis: my buddy purchased a '97 Corvette unit that mounted (stock) in a remote location and would clear the Jag's chassis. This was not accepted: he had to cut the frame and mount the valve for the original LT1 (this was out of a sedan and the referee was quite anal that all smog parts must be OE for the sedan.... not mixed and matched between different models of the same year and make). Both the Jag and the LT1 were equipted with converters: the referee allowed the use of the converters originally for the Jaguar. This was a break because the Jag converters were smaller than the LT1 sedan. It took him three visits over about 30 days, but it was approved and is running today. It is a really nice car. Unlike many of our swaps, this one is salable and should hold its relative value quite well. The moral to this post is that it can be done and the best way to do it is to plan well in advance which engine you will use. If my friend had purchased an LT1 out of a 96 Camaro or Firebird or Corvette he could have made the installation w/o cutting the frame. In my case, I screwed up by grabbing a "real good deal" LM7 truck engine with all accessories and looms. The problem is truck engines CAN NOT be legally swapped into a passenger car in California. Nevertheless, I'll prepare it as if I could smog it. Ls1's can be pretty simple smog legal swaps, just remember everything has to be present and work. g -
I have one with horizontal lines. They look good, but it's been years since it was in use. You will have to pull it out of the hatch. This is out of a Series 1 240Z. I'm replacing it with one out of an earlier Series 1 with vertical lines. If interested send me a PM. Trade or cash: $100 as is, you pull it out. Break it and it is still yours. I expect to have a 280z hatch in the next 10 days; if the glass fits, I'll sell you the entire hatch and you can have your glass guy take it out. g Of course, you must pick it up. I'm outside Palm Springs.
-
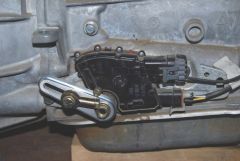
I have a GM LM7 2004 5.3 Gen III engine and automatic transmission. I'm in the process of modifying my 24z shifter to use a rod actuated shift... just like stock. My transmission has 7 detent positions. I'm not sure what each of them might be. Can someone check this post for me. I think the order is as follows: 1st detent... is all the way back is Park. 2nd detent... is Reverse 3rd detent ... is Neutral 4th detent ... is D-4 (and all shift points from 1-4 and OD) 5th detent ... is D-3 (and all shift points from 1-3) 6th detent ... is D-2 (and all shift points from 1-2) 7th detent ... is D-1 (D1 and no other shift: true "low") All of the detents, other than the detent for Park to Reverse are equally spaced. The Park to Reverse seems to be many degrees more rotation than any of the other detents. Here's what I call the detent selector: In this photo the gear selection lever is all the way forward an is in the 7th position. Do GM trucks have a gear selection for four forward speeds? I hope the "LUCAS" cast into this electrical piece is not the same "LUCAS" that I had for lights and engine management on my Fiat124 Sport Coupe. G
-
The 280Z a/c condenser is "ambidextrous". You can rotate it 180 degrees and it fits in both locations. The benefit for a Series I S30 is that the radiator support has holes punched in that will allow you to run your a/c compressor lines to either side and still maintain the correct lines to the top and bottom of the condenser. You can mount the a/c compressor on the right or the left side and then rotate the condenser. This is important because the a/c compressor pressure line must enter at the top or the bottom of the condenser [i don't recall which is which]. You are covered either way. It is clean and neat.
-
-
What program can I use to open this CAD file. Windows reports that it can not open. Any help. g
-
-
-
I think you might be well off by purchasing one from a parts house. They are not expensive (I paid $28.00 some time ago.). g
-
Actually it is a Kellison j6 panther from around 1963- 1970 or so. Google "Kellison" for more details. Is that car for sale? g
-
Look at your thermostat housing. It sits just below your thermostat and it will be a bitch to remove. g
-
I think that is a Kellison body of about 1971 or so. Speedometer looks like a '60s GM product. g
-
Ohhhh, I like this attitude. z
-
Do it. Consider it another investment in your ability to defend your self in life. Small claims court can be a great civic's lesson. Record whatever judgment you receive in his county and the state (depends upon your local rules). Don't sweat the lack of precise written agreements: show the court that you paid $x.000 for the work; show the court the photos (great photos, by the way), bring in your machinist to testify (might not be necessary, some small claims court will accept a written declaration), argue that the reasonable value of the work was .99 cents. Check out the internet for publications by NOLO PRESS: they have a good handbook for small claims court.... focused pretty much on California law, but the preparation will be pretty much the same for any court in any state. Go get him! I wish you luck and I think you might find it very satisfying: make him defend his shoddy work. Even if the judge is this guy's brother in law and rules against you, you should take some satisfaction in forcing him to respond to you. G
-
What holds the front of the console down on an S30?
zgeezer replied to Nickanicus's topic in Interior
Here you go. My console is a Series I. It bolts to the top of the transmission tunnel with one screw under the "ashtray" and to the brackets up front with two screws. The brackets that it bolts to are two vertical brackets on the side of the tunnel: not those others on top of the tunnel. -
-
Long, sad story of half-assery...I really do need advice
zgeezer replied to Konish's topic in Body Kits & Paint
Well, Exactly my thoughts too. G -
A question for those of you who have stripped the undercoating
zgeezer replied to SoCalJack's topic in Body Kits & Paint
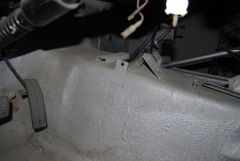
Sandblasted to bare metal. POR, on top & bottom; POR Tie Coat, 3M Undercoat (the version you spray on with a simple air gun) and final color coat on bottom. Applied 4 years ago and rust free. Stock undercoating inside the car not a problem: Freeze it and bang it off with a single jack and wide masonry chisle. If you live in Minnesota, two Winter days parked outside and a hammer will do it. Other wise, use dry ice. Three hour job..... includes beer. -
Long, sad story of half-assery...I really do need advice
zgeezer replied to Konish's topic in Body Kits & Paint
Don't beat yourself up. We all learn by doing. I think you'll be allright. If you are worried, the real cure would be to sand to metal and then lay on the POR15 and forget about rust. POR 15 adheres well to bare metal, to bare metal prepped with Phosphoric Acid, and to metal with flash or any rust that can't be metal brushed off. It also will cure in a wet climate. In fact it cures faster with high humidity than in a dry climate. It will cure in a rainstorm. There are a number of websites that discuss POR 15, if you are interested in redoing the interior. g