

zgeezer
-
Posts
772 -
Joined
-
Last visited
-
Days Won
3
Content Type
Profiles
Forums
Blogs
Events
Gallery
Downloads
Store
Everything posted by zgeezer
-
RT Diff Mount - Necessary to notch lower diff mount?
zgeezer replied to The Woj's topic in Drivetrain
I have the RT mount in my Series 1 240z, Mounted it with the bolt head on the bottom, washers on both ends of the bolt and no clearance problem with the stock xmember. I also ground down the poly to fit the R200 nose as was described above. G -
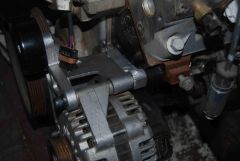
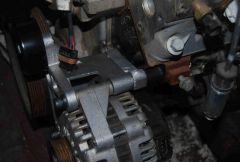
CORRECTION CORRECTION CORRECTION The 130/140 amp truck alternator fits just fine with minimum and easily curable interference with the rack and pinion adjustment "screws". The key is to install the lower bolt first and, then clock the alternator and mount counterclockwise to install the top bolt. At this point the bottom of the alternator may have slight interference with the point of the large hex threaded lock ring on the rack and pinion. I just touched the one point of the hex and the body of the Alternator with an angle grinder. By "Touched", I mean a very slight cut. The power post in the back of the alternator will now clear the motor mount......, but, just barely. I used the grinder to knock off the unthreaded nut guide back down to the beginning of the threads. It is now still close, but I can install a ring connection and a then nut without moving/removing the alternator. I understand that a close fit for the alternator is is pretty standard for JCI LS1 kits. G
-
This works very well IF you are not using the 140 amp Delphi alternator that is common on the 6.0 and 5.3 trucks. The 140 amp alternator fits nicely in the F body mount, but it is 4.8 inches deep and 6.3 inches in diameter. There are two points of interference: 1. the power post in the back makes contact with the Datsun motor mount post and 2. the bottom of the alternator rests on the large flat adjustment "screws" on the rack.. Using the top bolt as a pivot point, the alternator will just barely clear the Datsun driver's side rail (about 1/4 inch) as it arcs down. However, the alternator bottoms out on the rack before the arc is completed. The bottom bolt holes will need about .5 inch more arc before it lines up with the tapped lower hole in the LM7 block. The cure is to use the smaller Ls1 alternator. But, I'm too cheap to buy one and I really like the idea of having 140 amps for all my planned electronic toys. I think the long cure to this would be to cut a spacer /plate that would allow for the following: 1. drill the plate for the top bolt as Cable states. 2. drill the plate for the lower existing tapped hole in the truck block, but counter sink the hole in the plate allowing you to use a short allen headed screw that would be flush with the plate. This fastener will stabilize the plate. Install the alternator using the upper bolt and clock the alternator up until it clears the rack and the power post clears the Datsun motor mount post. Mark, drill, and tap the plate to use a another short allen headed screw. I'll try to post photos, but I've not had much luck doing that since the program change of a year or so ago. G
-
I have a 2001 Chevrolet electric cruise control consisting of a black box with pinouts that are wired into the donor vehicle's loom. This is not a DBW unit. My engine is a GENIII Lm7 truck engine with VSS off the automatic transmission. My loom is an older one made by/sold by Street and Performance out of Mena Ak. Can anyone here identify the pin outs on the cruise control box? The engine loom does not provide a VSS source for an electrical tach. I need a good VSS signal for both a tach and this cruise control. Is there any plug that would split the VSS signal at the a/t? Please do not refer me to AutoVox's cruise.... I've used them; they also need a clean VSS signal. Regards. G
-
$25,000 nothing to show for on my 280zx
zgeezer replied to neousmcswim's topic in S130 Series - 280ZX
Count me in on that, I'll volunteer an email, a personal letter (On letterhead), and a telephone call to both the media and the shop. G -
Yes, it is very much a "love it" or "hate it" look. There are a few out there, but you probably stand a better chance of finding a 3:36 R200 or a CLSD in the JY. I looked for two years before finding mine: swapped a member of this forum a complete R200 CLSD with CV shafts complete for it. We were both happy as hell with the trade. In my case, I am running a tall truck intake manifold and this scoop will cover the large hole needed for clearance. I expect it will also allow my engine to run cooler without blocking my view or overtly inviting the constabulary to come on over and take a look. The piece is laid up with fiberglass fabric and does not appear to be difficult to duplicate. If you wish to "eyeball" the dimensions, take a look at my album on this website, look for the photos of it on different hoods. G
-
I need the new aluminum radiator mounting brackets by JTR. These mount a Chevrolet Camaro radiator. How much shipped to 92201. 240-280Z Will pay by paypal or cash. Thanks G
-
240 Z total new rewire relay relay base flashers
zgeezer replied to zgeezer's topic in Ignition and Electrical
Thanks, just what I needed. G:D -
Yes, the adaptor you want is a simple brass fitting that goes metric on the block side to 1/8th (might be 1/4 inch) inch pipe thread on top. This is a standard piece for autometer gauges into LS1. I paid $8.00 from Summit and I think Nook and Tranny also stocks it. I purchased an early Datsun oil pressure sender from Kragen ($18.00), wrapped it in teflon and screwed it in. There is a difference between the Datsun sender threads and the adaptor are small and, according to Mike Knell's book, there is no leakage problem if you use teflon. This assembly clears my intake manifold and my firewall. Bear in mind that I am running the tall LM7 (5.2) intake manifold. An Ls1 or Ls6 may or may not have the same clearance in the back. If there is a clearance problem, I think it could be cured by using a threaded brass extension of about 4 inches long with a bend to clear the manifold. EDIT: This matter is well covered on Ls1tech.com and on Ls1.com... search on autolight or autometer oil gauge installations. G
-
I stripped my Series 240Z to metal and pulled all wire looms except for loom to the back tail lights, side lights, and fuel pump. I will rewire from scratch using an older Ron Francis Long Wires fuse box and package. It has one relay wired for a fuel pump. However, I wish to use relays for my lights, fog lights, driving lights, a/c compressor clutch, and Taurus speed fan. Has anyone here rewired using OE relays and "relay Base" from an existing vehicle? If so, what did you use and where did you mount it? I have seen a number of relay boxes from Toyotas that are complete with modern fuses, several flashers, and a number of relays with the circuits they serve cleanly identified. But, they do not appear to use a standard "Bosche" terminal patterns. G
-
10 years. Still going strong. Small delamination of paint off of the tie coat. Not a POR problem..... more of my poor surface prep after Tie Coat. Applied over sandblasted surface. G
-
I'm about to rewire my Z from scratch using an old Ron Francis kit and will have to fabricate a loom extension for my Delphi alternator. In my search for "how to do it" I found this gem. This website is for those folks that like to create hybrids that fly... the experimental Oshkosh crowd. The best discourse on how to do crimp and solder joints I've read. Pictures and comparisons. Go here. and then go over to this Aeroelectric.com is the home page. G
-
When at the Pick and Pull, I'm always on the lookout for Datsun plastic connectors. Mine are white plastic and very brittle. Here's a website that sells OEM style connectors. http://vintageconnections.com/ g
-
I moved my 5.3 Delphi 130 amp alternator down to the F body (Camaro/Firebird) Ls1 location. Now, I need to extend the alternator plug from its stock location down about 10 inches to mate with the relocated alternator. I really don't wish to cut the alternator loom and splice on an extension. I would prefer a ten inch extension loom with a female 4 prong oval female GM fitting on one end and the appropriate oval male 4 prong fitting at the other for the Alternator. Does anyone have any idea where I can buy such an animal or who sells the appropriate female plug end? G
-
How to remove heater control knobs?
zgeezer replied to takayuki's topic in S30 Series - 240z, 260z, 280z
260's are odd ducks. Early ones are more akin to 240's, later in the year they are more like a 280. I just looked at an early 260z and those knobs have the small screws on the bottom. g -
I'm cheap and wouldn't spend the $25K when I can buy a very limited production MazdaSpeed Mx5 (Miata) for around 10K with a hard top. Another 6K in upgrades for tires, fuel management, and such will put 250hp down at the wheels (Big Enchilada from Flying Miatas) and still have change to buy wax, full body length mirrors, and pay to attend about 100 shows. They are reliable, great handling, and hold value. One billion or so spec racers can't all be wrong. Otherwise, just drop the coins on any P-car in good shape. Or if really basic "cheap" thrills of the highest order is your game just buy the Atom and be done with it. g
-
Photos of the mistakes I've made.
-
-
From the album: zgeezer II
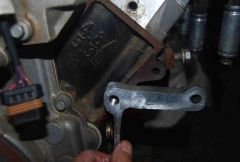
Note that only one bore is threaded. There is no pad on the LM7 block behind this bore. -
From the album: zgeezer II
Note that only one bore is threaded. There is no pad on the LM7 block behind this bore. -
From the album: zgeezer II
Note that only one bore is threaded. There is no pad on the LM7 block behind this bore. -
From the album: zgeezer II
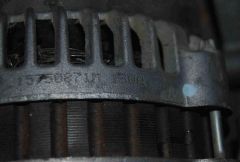
The standard alternator for the 5.3 in 2004 is a Delphi 130 amp unit. -
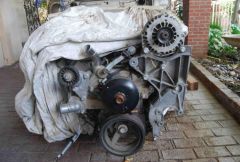
From the album: zgeezer II
This is the truck mount for power steering and alternator. -
Alternator clearance on an LM7
zgeezer replied to phocion's topic in Gen III & IV Chevy V8Z Tech Board
I followed Cable's instructions, but used a piece of .75 aluminum plate. Used a press to drill three holes in the plate to match the F-body mount. Threaded the plate to accept the stock bolt under the idler (There is no boss on the truck engines to tap into for this bolt) . Used this .75 plate as a drilling guide to drill and tap the blank pad. Worked like a charm. Carved up the plate to match the F-body mount: looks like an angled "L". Locating the 140mm long allen head cap screws took more time. Fastenal had them in stock: about $5.00 each one. If you use the truck intake manifold, you can use either the 240 or 280Z oil pressure sensor mounted on a brass adaptor from JEGs. Lots of clearance. Furthermore, with the alternator mounted down low, it looks as if the JCI A/C kit is now usable (Still have to space if forward, but that d/n look to be a problem) One item, when you tap the block, don't use the small diameter tap and tap wrench available from Kragen or such. Buy a .25 inch tap and a quality wrench. Look for a wrench that uses two "v" notched blocks: avoid those that have four slotted "fingers" that are clamped by a threaded collar. G:D Thanks, Cable g -
Not sure what you really mean by a middle ground; but, I opted out for the later 280z 3 point lap belt and "over the shoulder" shoulder belt. Not a race quality harness, but, it has inertia reels and is much more convenient than the original lap/shoulder belt of the early model. Did require light welding. Look at my album (zgeezer) on this site for photos. G
-
If I understand your questions, you have four wires on the 240z chassis: two are clips for the fuel tank gauge; the other two are actually a negative and positive lines for JDM electric fuel pump. They were not used until the 260Z. You will also have two threaded blind nuts on your 240Z chassis on the passenger side up above the mustache bar that were used to mount the electric fuel pump. The 280Z fuel tank gauge sender terminates in a plastic female fitting. That plastic plug should have four (if my memory is correct) female pins. Two of these are for the fuel tank gauge and the other two are for the low tank signal. You know that yellow or red light that comes on when you a getting low on fuel. The 240z fuel tank gauge sender will replace the 280z sender without modification. Be sure you have a good, if not fresh, "O" ring. G