

zgeezer
-
Posts
772 -
Joined
-
Last visited
-
Days Won
3
Content Type
Profiles
Forums
Blogs
Events
Gallery
Downloads
Store
Everything posted by zgeezer
-
If your filler is that thick, I would think that, at some time, your Z's roof was tin canned. Mine was because the previous owner had stored a bag of Z parts on the roof. The rust is a problem because you don't know how extensive it is. Some fillers and primers absorb water from the atmosphere (rain/washing) unless protected with a "sealer" of some sort. There are a number of "right" repairs that you might consider: all of which labor intensive. I addressed the same problem -rust and all- by removing paint, primer, and bondo off the roof down to bare metal. I treated the metal with POR 15 metal prep to remove all rust and then "shrunk" the metal using a torch and wet rag [i traded services with an old school led sled kind of guy, who oversaw and helped correct my errors). I skimmed the roof with "bondo" and worked it down until there were no low spots. Covered it with POR 15 and I will paint it in another year. Some separation of the POR 15 because of incorrect preparation, but no more rust in the last two years. If this is going to be a learning exercise for you then a stop gap measure would be to simply sand to metal, feather edge the existing paint out three or four inches, bondo and spray a seal primer. I worked 9 months part time on my roof, learned new swear words, and developed a real respect for the skills of old school bodymen. After all the work, would I do it again? You betcha. g
-
If you want the "WOW" "What in hell IS that" response when you pop the hood, take a look at this on ebay: http://cgi.ebay.com/ebaymotors/LATHAM-axial-supercharger-SBC-chevy-gasser-hot-rod-rat_W0QQcmdZViewItemQQ_trkparmsZ72Q3a1205Q7c39Q3a1Q7c66Q3a2Q7c65Q3a12Q7c240Q3a1318QQ_trksidZp3286Q2ec0Q2em14QQhashZitem330276493879QQitemZ330276493879 Dual weber side draft carbs and real old school appeal. g
-
5.4 Triton Eaton Lightning Identification Supercharger
zgeezer replied to zgeezer's topic in Miscellaneous Tech
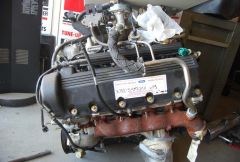
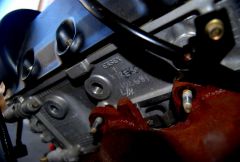
Thanks for the information; it confirms that at least some of the parts are Lightning related. Here is a clearer photograph of the engine serial number. This number is repeated on the heads by hand etching. I've googled this number and posted it on other Ford sites, but no one has any information. G -
-

-

-
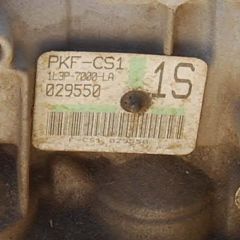
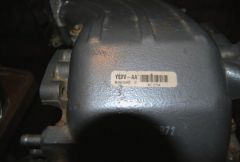
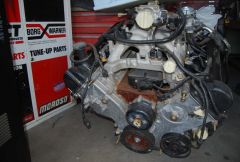
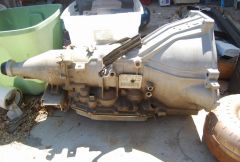
I acquired these Ford parts and I cannot make a firm identification. I've been told that the engine is a 5.4 Prototype Lightning Triton with "head work" by the factory. The intake and exhaust, I'm told, are off a Mustang as the previous owner was preparing the engine for installation into his 90 something Mustang. The transmission is represented as being a high performance truck at. Both heads do have the same serial number inscribed by hand on both heads. I think this supercharger is an Eaton, but I don't know what size or if it even came off a Ford Lightning. The only Ford logo is on the throttle body mounted to the J tube. Included in the package is a box of wiring looms which also include these two CPUs. Again, the tech guy at my small Ford agency could not id these computers [i didn't believe him either.] This is the bar code on the back of the J tube. I would appreciate any information you might have.
-
-

-
-
-
-
-
-
I have acquired a supercharger off a 2002-2004 Ford Lightning truck. It is complete on the intake side, including intake tube, MAS, and throttle body. Although it is not marked in any manner, my research indicates that it is an Eaton twin screw helix. I don't know which model. I wish to use it on my 5.3 Gen III truck engine. Does any one know of a manifold that I could use. I'm told a number of aftermarket supercharger kits use the Eaton as the basic core. So my question is: does anyone have information as to which Eaton model Ford used and whether or not there are any aftermarket manifolds for GEN III truck engines that would accept this supercharger. g
-
The 280 is an early year. It can be pretty much bolted into any 240z, but the hanger strap or one J bolt must be a bit longer. But for the absence of the driver's side horizontal vent pipe, the X tank is a dead ringer for my '71 series I 240 Z. The horizontal vent out of the end of the driver's side vents up into the passenger compartment and over to the vapor separator. This, I thought, was standard for all 240Zs. Your other tank d/n have that vent tube. Was it removed? I think X wil "fit" into all 240 Z, but, without a driver's side vent, you would have to block the corresponding nipple on the vapor separator. Look at my photo album, I have several photos relating to the differences between my original tank (71) and an early 280. g
-
Air conditioning bracket specifically for trucks. Uses Sanden compressor and mounts high on passenger side. Fairly priced. Look here: http://kwikperf.com/lsx_ac.html z
-
I have one....somewhere. I'll look for it this weekend. your's for shipping. g
-
Thanks for the ideas and, particularly, the photographs. g
-
Finally fitted my 5.3 into the 240. Used JC's kit. Now to wire the engine. I have a custom loom sold a few years ago by Street & Performance. For chassis wiring, I have a Ron Francis "long wires" 21 circuit kit looks nice. Now, where are you folks been locating the ls1 or lt1 engine management module? I've searched, but I haven't had any hits. Has anyone located it in the engine compartment? I really need some ideas. Pictures will help. g
-
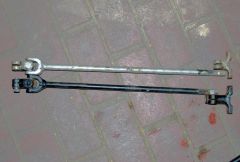
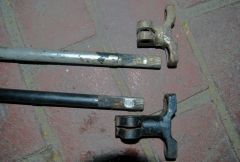
Although the 240 through 280 z have the same length steering rod from the frabric universal (hocky puck) to the rack universal. There are some differences that may help make for cleaner subaru rack swaps. Take a look at this photo: Note the differences: the 240 rod (on the top) is thicker, it is longer, and it shares the same spline count and pitch. The "T" shaped piece that attaches the rod to the fabric universal is much shorter on the 240 than on the 280. The effective ength of the rod can be shortened or lengthened by about an inch in either direction simply by swapping the rod or the T piece. There is additional adjustment available by milling out the slot across the splines to allow the collar with the bolt to slide up and down the splines. Note that the 240 milled point is narrow.. slightly wider that the collar bolt. The 280 is already milled with a modicum of additional adjustibility. Now how does this help the subaru rack swappers? When I measure the trunnion of the subaru rack universal, it is very close to both the 240 and 280 z, raising the posibility that the datsun steering shaft yoke might mate to the subaru trunnion creating a hybrid universal joint...subaru to connect to the subaru rack and datsun to finish the connection. I have read, I think on this site, that someone has mated the two. So, does anyone have any information: has anyone actually mated the two? g
-
-
-
Here is a photograph of my 240z cross member with a subaru rack from an early '90's sedan ("WRX" type of sedan). Two right hand inner tie rods from a 280zx power steering rack are installed into the subaru rack. This required either turning and threading the stock datsun inners or drilling and taping the subaru rack. I don't recall which modification my machinist performed. Stock datsun outer tie rods from the right hand side bolt onto the inner rods. With this set up and stock datsun out tie rods, I could not adjust the toe out.... out far enough. The direct approach to solve this problem appears to be to cut the inner tie rods 9/16 of an inch off each side and then use the stock datsun outers. Here's a photo of the difference in width between a stock 280Z rack and my version on the subaru swap: The passenger side of the rack is supported by a stock 280Z rack bushing that has a circular hole in the center, but fits into the eliptical rack holder on the crossmember. I used a hard high performance bushing and then cut out the hole to fit the larger diameter subaru rack. It centers the rack nicely and looks OEM. The bushing on the driver's side is the stock subaru square bushing. However, the subaru rack is rotated forming a diamond shape. The driver's side rack bracket is modified to fit this "diamond". G
-
I recently purchased the JCI kit to install LS1 into early 240Z. I, also, purchased a set of poly bushings for the T/C rods. Here are my problems: 1) I installed the poly bushings on the passenger's side T/C. The rounded edge to the outside and the square edges in both front and back cups. Veeeery dificult to install because the rod extends only about one thread outside the large washer. There is no "give" at all to poly. I have the 17 mm nut attached, but I can only get 1 thread outside the nut. With my old bushings I had 4 threads. I've put 45# torque on the nut, but it's solid. I don't like driving without at least 3 threads showing. Is this normal for the installation of poly bushings? Problem #2 is that with JC's kit, there driver's side mount is on a beam that is secured at one end by a bolt though the Datsun motor mount stands and at the "aft" end by the body's T/C mount. The stack on the driver's side consists of the t/c rod, the welded "washer" on the t/c rod, one poly bushing, a cup riveted to the body mount, the JC mount, the cup, the bushing, the washer, and the 17mm nut. Note that the JCI instructions require that the back side cup be cut loose and reused on top of the JCI mount. The threaded end of the T/C rod simply does not clear the heavy washer enough to get the 17mm nut started. After the search and reading about poly and broken t/c rods, I now have real misgivings about my current t/c set up and I think, maybe, using poly is not what I want to do. So here are my noobie questions: 1. This is not a race car, but I like crisp steering/braking responses. Should I simply dump the poly and go with new stock bushings? 2. Have any of you with the JCI kit had difficulty in installing the driver's side T/C rod? 3. Finally, is there any magic tool that would compress the poly to the point that I could install the T/C nut and get 3 threads. Are having 3 thread showing (lesson from shop teacher years ago) simply not important in the age of blue/red locktite? Finally, other posts in this forum have suggested that poly could be used upfront and the stock pliable bushings used in the rear. What are your thoughts? I don't want to go though this any more than once in 60,000 miles. thanks, g