
SpeedRacer
-
Posts
757 -
Joined
-
Last visited
-
Days Won
1
Content Type
Profiles
Forums
Blogs
Events
Gallery
Downloads
Store
Everything posted by SpeedRacer
-
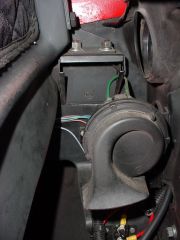
It's difficult to see but that is a very hard piece of sponge padding you see glued to the front of the hinge bracket. It serves as a soft stop when the bonnet (hood) is fully opened.
-
Peter - here are the links to two photos of my hood hinge setup. http://album.hybridz.org/showphoto.php?photo=13474&cat=500 http://album.hybridz.org/showphoto.php?photo=13475&cat=500
-

Right Hand Corvette Hood Hinge Mounting Plate on Ferrari GTO Kit
SpeedRacer posted a gallery image in Members Albums
-
Right Hand Corvette Hood Hinge on Ferrari GTO Kit
SpeedRacer posted a gallery image in Members Albums
-
Pete - I don't know what that thing on the right is but yes, the two hood hinges shown in the left are the ones you need. The larger pad bolts to the hood and the smaller side on the fender bracket. I'll have some pictures for you later today. I'll do my best but my engine compartment is painted black and they are in a difficult place.
-
Mike, The original Alpha 1 GTO kit had horrible fit problems with the front end and hood. Unless you did a huge amount of work the fit was pretty poor. When Tom McBurnie got the kit from Joe Alphabet he redesigned the whole front end. To help solve the fitment problems he moved the hood back and used Corvette hood hinges attached to the radiator core support. John Washington http://www.reactionresearch.com/automotive.html solved the problem by converting the Alpha nose to a clam shell design so there was no nose, fender, hood alignment problems. I do know quite a few guys who went from the VR tilt type nose to the Alpha & McBurnie front end so it shouldn't be to hard to go the other way. Tom over at Scorpion Z Cars http://www.scorpionzcars.com did one a little while ago. Sorry but I have to ask, why do you want the tilt front end?
-
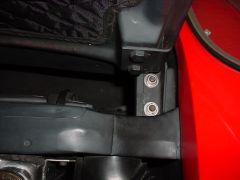
Hi Peter, It looks like your kit is based on the original Alpha 1 GTO. The hood hinges (if you want to call them that) for it are really poor. They are comprised of a piece of channel iron with a tab welded to it on the top. There are two holes in the channel iron to mount it where the stock Datsun hood hinge mounted on the inside of the front fender well. There is also a hole drilled in the tab on top of the channel iron and in that tab of fiberglass hanging down from the hood. You simply run a bolt w/locknut through the two holes. I had a pair but I’m pretty sure they went to the junkyard a long time ago. Instead, I used mid 60's Corvette hinges on mine as they are very simple and easy to find, at least in the USA. I built up a supporting block on the underside of the hood and captured a drilled and tapped metal plate inside. I then built a triangulated pad that bolted to the front inner fender where the original hinge bolted. The pad has two bolts welded that point upwards so the hinge slides down over them and they are held in place buy standard nuts and lock washers. Now the hood hinges are precise, adjustable and the hood stays aligned. If you decide to try my way I’ll take some pictures for you. Speed
-
WANTED: Ferrari Badges, Buttons, Cloisenne Fenders Shields +++++
SpeedRacer replied to a topic in Body Kits & Paint
Hi Mike, As usual always keep an eye on eBay. Jim Simpson http://www.simpsondesign.net used to build the GTO kit and is a purveyor of used Ferrari parts and emblems as he often attends shows that have swap meets with used Ferrari parts. Here are a few more: New - Black Barts http://www.black-barts.com/ Brian Riley http://www.image-homes.com/Adv.html New & Used - Ferrari Parts Exchange http://www.ferraripartsexchange.com/ Dennis McCann http://www.allferrariparts.com/home.html Hope this helps. -
Admins - I think the last "Here comes trouble" post (and this post) should be moved to the "250 GTO Door Buttons" thread as they are both related to that subject. I agree with Peter and I think the Honda lock is a much more elegant solution that more closely replicates the original GTO door button than the MG version does. The fabricated door mechanism seems to have a few people confused but it is really quite simple. There is a bracket that holds it to the door using the original door handle bolt holes. On one end of that bracket is a round sleeve that the Honda door button cylinder slides in to. The only moving part changes the horizontal motion from the Honda door button plunger to the vertical motion required to operate the original Datsun door latch by connecting to the stock Datsun adjustable push rod. BTW, thanks for the great pictures Here comes trouble and they will help explain my modifications. Please note that on the pictures you can see a long rectangular raised boss on the side of the Honda door lock. The Honda lock cylinder slides in the round part of the fabricated bracket and is held in by a standard door lock clip. I ground a square notch in the round retaining tube on the bracket so this boss on the cylinder will slide into the notch and prevent the cylinder for rotating. Check out the pictures of original GTO's and you will see that some have the finger pull pointing down and other ones have them pointing rearward. So it's your choice where to put the notch. I also filed that same rectangular boss on the cylinder down with a small round file next to the head. I then picked up a couple of black "O" rings at the local hardware store that would just slide over the cylinder. These O-rings act as a compression point to keep the clips tight, take up any irregularities in the door panel, seal the lock to door area and provides a finished look. And last, you can use the stock door lock clips but they are very hard to install. I fabricated my own clips out of 1/8†piano wire. This allowed me to slide the clips down over the cylinder from the back side instead of trying to slip the clip in sideways. When complete, it looks great and functions very well.
-
Looks like I've been around since February of 2000 also. Like many I was tired of being flamed and ridiculed by the likes of Ron Stoy, etc. over at ZCar.com. It was bad enough that I put a Chevy V8 in my car but I ruined a perfectly good Z body too!!!! This has been (and still is) a great site with lots of very good info. Thanks to Owen who started it and Super Dan (and all the admins.) for keeping it going. Happy New Year!
-
Per your request - and to help make this the "Official GTO Owners" thread - here are a couple of pictures of my car. Speed PS - Thank you for your support! Seriously, it's been great to watch each of you develop your own versions of the ultimate classic. Please let me know if I can help.
-
OK, I thought you guys would be tired of seeing pictures of my car by now but I'll post a photo or two over on the "GTO Owner's" thread if that will help make it official.
-
This is our first fall in east Tennessee so, along with my wife, we decide to go for a ride and see the fall colors. We drive a few miles Southwest and get on the Cherohala Skyway http://www.cherohala.com/ Great road, lots of mountains and gorgeous scenery. To complete the loop back home we get on Route 129 which contains a road known throughout the world as the "Tail of the Dragon." 318 turns in 11 miles AND THEY ARE ALL BANKED!!!! Absolutely amazing road!!!! You have to watch out for the hoards of motorcycles but it is an absolute blast to drive. If you are ever in the area you have to drive this strip of highway - and please give me a call. http://www.tailofthedragon.com/
-
I have to believe that you can get one locally but if not give Roger at the Z Barn a call http://www.zbarn.com/
-
Here ya go Duke This is a picture of the Honda type door button installed on my GTO replica. I routed out a small part of the fiberglass door panel using a rounded tip and then picked up an O-ring from the hardware store. Slide the O-Ring over the lock mechanism and push tight against the door panel while installing the retaining clip from behind. This keeps the button from marking the door panel paint and keeps it tight so it doesn't rattle. Also, the Honda door button is manufactured with a rectangular boss running down its length. I ground a square notch in the circular retainer so the button would not rotate. BTW, if you study the original GTO pictures you will see some of the cars had the finger pull facing downward and some had it facing towards the back of the car.
-
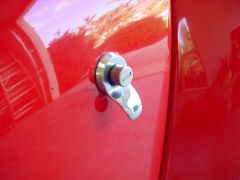 Ferrari 250 GTO replica door button using the Honda type button.
 -
Hi Grumpy, It is not unusual for a battery to slowly discharge. A normal battery will discharge just sitting on the shelf plus it's fairly common for the clock and/or ECM to slowly drain it. I would highly recommend you consider using an Optima battery - probably the red top version http://www.optimabatteries.com/publish/optima/americas0/en/config/product_info/technology.html I use it in my car because it rarely gets driven in the winter (when I lived in Michigan). I usually hit it with a slow charge once in January sometime and the car would always start right up in April or May.
-
I agree with Chelle that the MG ones are too large plus they turn and not push. The Honda button is a more elegant and accurate solution. Sorry, the diagram that Chelle posted was the only information I got from Joe Alphabet when I bought my kit. I wish I had taken pictures of them and the installation when I built and installed them. I bought my lock cylinders off the web from a Honda dealer. I think there were two part numbers that would work. I have the receipt somewhere but I am currently living in a rented home while we build our new house. Almost everything garage/car related is packed up and in storage so I can't dig it out right now. I think either Honda changed their part numbering system or there was a replacement part (or different part number) for the lock cylinder. I would call or visit a Honda dealer and see what they can do. If you know the exact model Honda, and the years it was produced, I would think that the chances of finding them in a junk yard are quite good - but don't forget you need the keys too! Sorry I can’t be more help this time.
-
INTMD8 - If you decide to build your 250 Ferrari GTO based on a Z car chassis then Tom at Scorpion Z Cars http://www.scorpionzcars.com/ or Jeff at Stable Autoworks http://www.zcarkits.com/ can probably help you out with the body kit and other needed parts.
-
Most of the "3XX" series engines were made for mid-engine cars so adapting them to a front engine/transmission car might be a challenge. If you are going to do a V8 why don't you just do a small block Chevy, make it look like a Ferrari engine, and save a bunch of money. The original 250 GTO was a 3 litre V12 (250cc per cylinder X 12) so you might want to consider a Jag or BMW V12 both of which have been done before. Of course you could always install a real Ferrari Colombo V12 (which has also been done before) but most of them cost big bucks. It's not a Colombo V12 but you might be able to pick up a Ferrari 400i pretty cheap and use that V12. I have seen a 250 Ferrari GTO tube frame replicas but not based on a Z car. Most were converted Ferrari 330 GT's or the like which have the similar engine. I think it was Arizona Z Car that used to make the tube chassis for the Z car but I haven't seen one in ages and have never seen one with a GTO body on it. The stock Z car chassis handles quite well and with some minor mods it can handle extremely well. The R200 rear can handle significant torque/horsepower. Good luck with your project.
-
Ferrari GTO wheel and tire info
SpeedRacer replied to Duke's topic in Brakes, Wheels, Suspension and Chassis
The original GTO Borrani wire wheels were 72 spoke nickel plated steel wheels. Keep in mind that they require almost constant polishing. Also, they will not handle tubeless tires so you need to insure that the tire you select is capable of running a tube with chewing it up. The Dayton wires are also 72 spoke but more practical because they are chrome plated. Although the Borrani spinner says "Borrani" and not "Ferrari" I had the Ferrari prancing stallion (cavallino rampante) engraved in mine. I am pretty sure that my front wheels are 8 inches wide and the rears are 10 inches wide. Jim Simpson used to own Blue Ray Engineering and sold the Ferrari kit as a "Rhino." Jim special ordered the wheels for my car and I think his price was pretty good but that was a few years ago. I think Jim can still get them. Here is Jim's web site. http://www.simpsondesign.net/ -
Block sanding and prep work usually costs quite a bit so you can help by doing it yourself. Since most of it is fiberglass I would use the "guide coat" method. Buff and polish is pretty easy to do yourself as long as you are careful. You don't have to go through the expensive process of base coat/clear coat. I used DuPont Duretane Ultra on my car and it doesn't have a clear coat. One big advantage of not using the clear coat is I can touch up small stone chips and you can't even see them.
-
Crate Motor Question for grumpyvette & others
SpeedRacer replied to a topic in Gen I & II Chevy V8 Tech Board
IMHO torque rules for street use. Since it will be a daily driver you might want to consider a real "crate" motor from the factory and not a rebuilt. GM offers a wide range of crate motors and most come with a 12 month/12,000 mile warranty. You can get them at almost any GM dealer or on line at Pace Performance http://paceperformance.com/index.asp?PageAction=VIEWCATS&Category=132 -
SBC drive shaft application question
SpeedRacer replied to Forces's topic in Gen I & II Chevy V8 Tech Board
Motorsport Auto http://www.zcarparts.com/ sells a brand new driveshaft for the conversion in two different lengths. They will make up a custom length driveshaft if you ask them too. -
The T-5 is an excellent choice for a V8 Z car. Depending on the torque of your engine you may want to consider using a “World Class†(WC) version which is a bit beefier. Some Camaro versions tilt the trans over at a 14 degree angle. You can use a 1984 and later Corvette bellhousing to "straighten" the trans up. A plus to using the Corvette bellhousing is that it has a much better hydraulic slave cylinder. You will have to make a wedge shaped adapter or slightly change the design of the transmission mount as well. Using the JTR conversion method you will find that the T-5 shift lever ends up right where the old Z car shifter was. For obvious reasons I wanted the look of the tall shifter but it has quite a long throw. You may want to consider a shorter shift level and/or short throw shift kit.