bryan01
-
Posts
206 -
Joined
-
Last visited
Content Type
Profiles
Forums
Blogs
Events
Gallery
Downloads
Store
Everything posted by bryan01
-
We'll have to get together though, I might have some compainion flanges for you... If you see a spare r230 lsd text me, I may go that route to get the car back on the road quickly when I get back
-
Steve? I seem to remember tony i-can-tig-weld-anything smith talking about a buddy of his into z's as well, is this you? Thank you so much for detailed reply!, I'll walk thru it this evening "Take it off any sweet jumps?" Thats what i was imagining i might need, but it seems a bit excessive. I mean i've got some tq, but not THAT much. It seems that would only be needed for rock crawlers and the like, but maybe not. Is this normal for higher tq guys to have to do things simiar to this? It seems to be masking my issue of hopping down the track, but once that is fixed <how?>, if the case is still considered too weak and a failure point then i'll still have to do something... trade out for the flat r200 longnose cover? I'm not looking forward to having to beef it up like that. Shupee! ... The car doesnt hop on the street, it spins the tires (again, the same dot slicks) ... Your silver one is a 280z right? Isnt that a lot heavier and have a much stiffer chassis? Maybe that has something to do with it? I won't be back til the end of august, i'll let you know
-
i guess the first step is to check the setting next time i'm back in town, what shocks do you recommend above 250? but i'll look into it, thanks
-
I've got a spare open r200, assuming the gears are ok i can either use that cover or if there are other issues with this case now i can swap the carrier, but i'll let you know how it goes... i'm was debating on switching to an r230 setup ... still weighing the pros/cons
-
nix - this happened a few weeks ago at the greer track ... are you in SC?
-
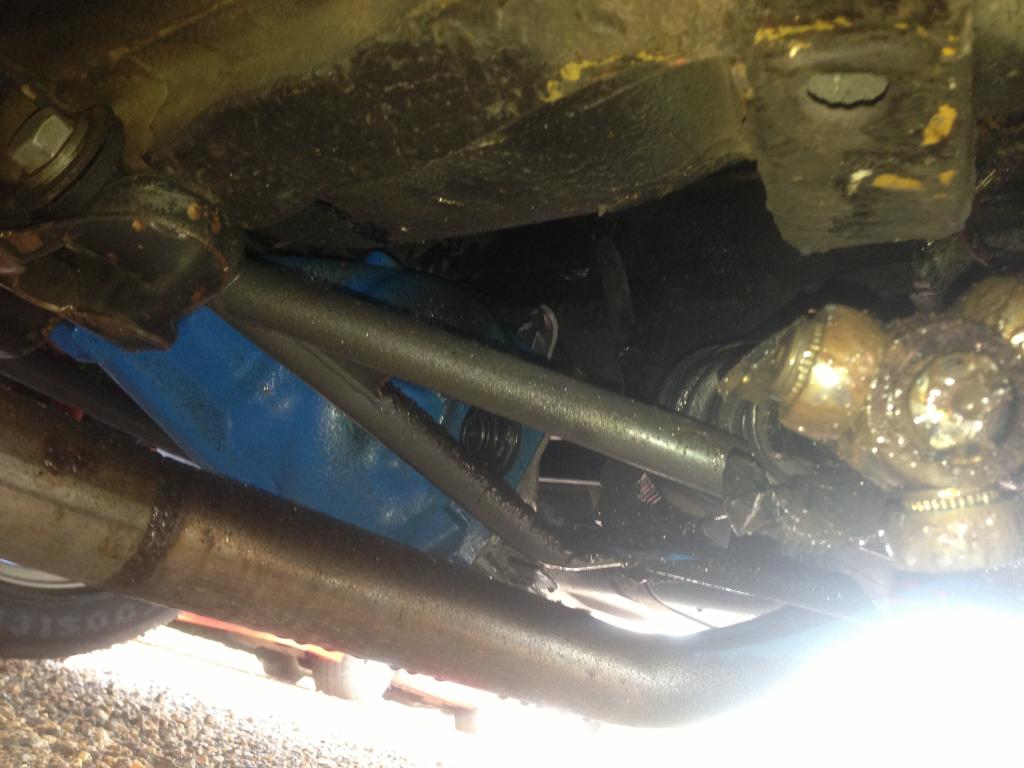
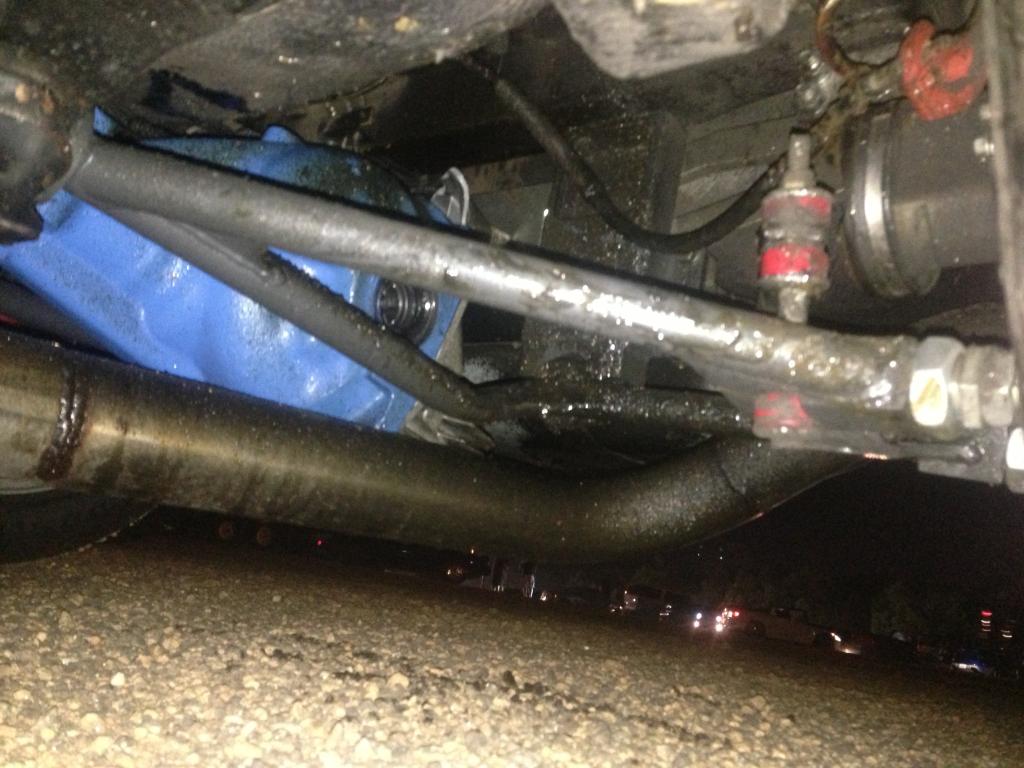
i haven't pulled the diff yet, it was litterally hanging from the front mount mount, still attached to the cradle, so i'm assuming it's not cracked, otherwise it would no longer be supported up front ... i would have to check to be 1oo% sure thou, i *guess* the diff could be just resting up front and against the driverside halfshaft, which *is* currently sitting on the passenger side rcla... but from what i remember it was still attached, twisting the cradle down, meaning the front mount is still instact
-
wow, that's interesting, thanks for the info, i'll check it out, let me know if you find it first... maybe switching back to the solid cover will hold it in the future, assuming i can stop the wicked wheel hop
-
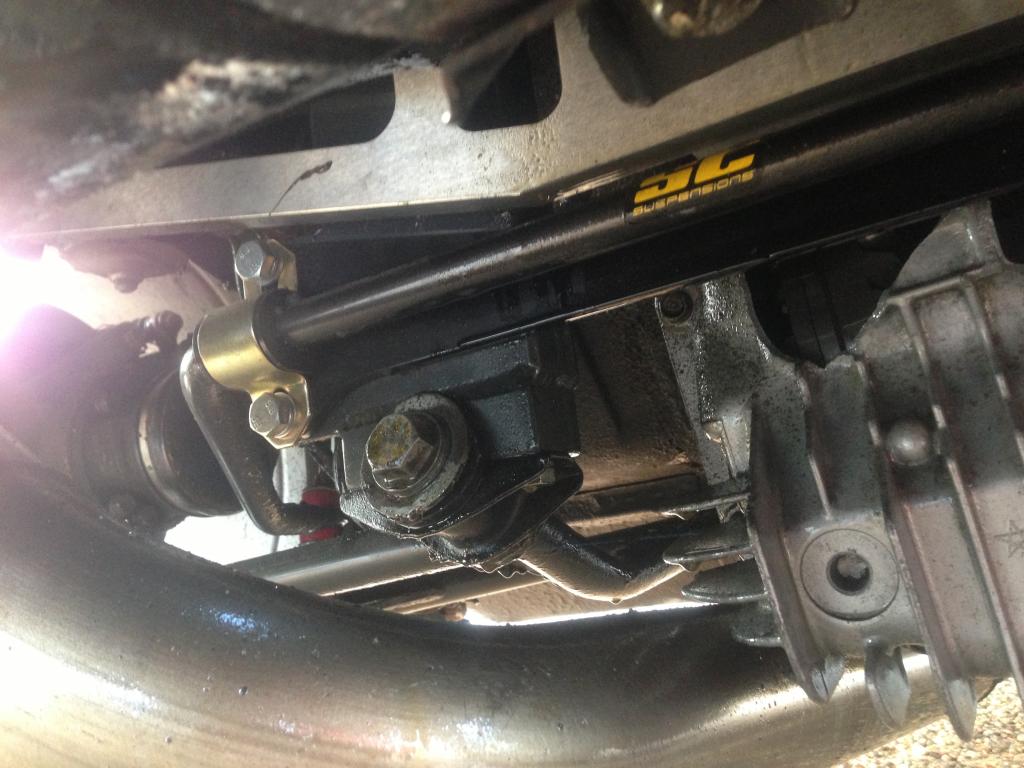
front mount is the simple solid arizona z mount, rear mount is poly bushed alum t3 mustache bar
-
http://ziptiedz.blogspot.co.uk/2013/07/r2oo-lsd-ripped-apart.html <--blog link for more description and pictures i've got a 240z with an RB. She's got an r200 lsd from a z31 300zxt, 280zxt halfshafts, the old style welded modern motorsports companion flanges, and 240z stub axles. The entire rear end was replaced with techno toy tuning RCLA's, drop mounts, cross bar, mustache bar, 3/4" swaybar, gc coil over kit, sectioned housings, 400# springs in the rear, all new poly bushings, and 5way tokico's. i'm running under 400 wtq with hoosier r6 dot slicks, 255's/45's in the rear on 9.5/17's. it seems that the pretty finned differential cover failed, causing the diff and associated halfshafts to slam into the pretty adjustable RCLA's, taco'ing the entire suspension, shifting everything foward, finally pulling the driver's side shaft out of socket, and then out of the diff. i *think* it's ultimately because of the massive amount of wheelhop i was experiencing during the run. first of all, do you think this reasoning makes sence as far as root cause? I initially thought the shaft or stub axle broke first as the 240z stubs are the smallest of the options (i do have 280 stubs ready to go in, but i'd need new flanges etc, it was on the list that seems to have grown) and the shafts would be the next in line as far as weak links, but the shaft seems to be in one piece, maybe slightly bent. I haven't pulled the stub yet thou, it may be bent via eyeballing it, but the wheel is still solidly attached to the car, not even wobbley while being towed at 5mph or so by the track support atv. that and the RCLA's bent forward, not inward, causing me to believe it was the diff that went first. secondly, if the above is correct, how do you prevent wheelhop without moving suspension points and building in anti-squat? I did some digging and to let you know, I *think* the tokico's were set on the stiffest settings, but i would have to go back and verify (won't be able to for a while as i'm traveling). I know I always joke about it, but would wider /stickier tires help with the car being as light, or as un-stiff, as it may be (it's stripped down to 2 seats and a steering wheel)? What I have seems to work on the street OK, but based on what happened, the tires were probably loosing traction on the street during boost and instead hopped on the track because of more than adequate track prep. As a side note, the chassis has no body stiffening, and i *think* this may have added to the wheelhop. I'm imagining a floppy chassis driving down the track like a wet noodle with 4x more torque than it was designed for. Would strengthening (over-frame rails, rear connectors, half or whole cage etc) make a difference with the lack of squat, traction, or amt of hop? I'm afraid of getting a flat cover for the r200, replaceing everything that was potato-chipped, and having the same wheelhop cause ... Help.... Thanks

-
rawr first start vid dyno 28o z rb25 dyno vid bam.
-
wetsu fun welding vid
-
i've got a stock q45 tb if you want it, can ship tomorrow, whatever the going rate is, pm me
-
fuel tank pickups, braided lines/-an fittings, filter/pump mountings xmas planning hoarding, all aeroquip starlite lines and socketless fittings, -8 an aeromotive a1ooo fpr fuel tank removal stock vent hoses in trunk underside one strap two strap off spill out messy night fuel tank inside one oem off general idea, walbro 255 hp and summit 1o m FI filter pickup before trimming bulkheads -an lines teaser fuel tank inside two back to fuel pickups installing new pickup with bulkhead -an fittings without cutting an access port difficult and time consuming but amazingly clean results. bulkheads filter, pump, 2x walbro mounting kits, note flow directions lines assembled fuel tank outside new fill hose it looks worse than it is carefully remove vent adapter seal all connections with rtv new grommets on -an vent hoses sneak peak of rear tire clearances back to fuel old v new rtv utters -8, -1o, -12 respectively run front vent line thru sub frame fuel level sender again, rtv everything fitting to connect soft return, saving main hardlines, fuel rail, and fpr mods for later
-
Rota Grid's, 17x9 front, 17x9.5 rear, et+12 as said above, you will NEED fender rollings, coilovers, camberplates, possibly adjustable control arms, but not necessarily stretching although it might help. I also have brake upgrades which change the location of the mounting flange from OEM. The fronts hit the spring coilover when first installed, but they fit great with a hubcentric/wheelcentric 1o mm spacer because I did not have adjustable LCA's at the time. you can get the same affect by adjusting the LCA's out a bit, but this will cause more camber as well, so there's a limit. if you don't want it to touch lock to lock you'll also need to scallop the pinch weld where the lower fender well meets the engine frame rail, i'm going to do this soon and will post info. the rears will touch the lower adjustable pearch if you don't have 8" springs that are short enough to clear and give a low ride height. for kicks i just got them all around. my coilovers are adjusted very high in the back so that the pearch sits ABOVE the tire. I also sectioned my housings for short throw shocks. my tires are not stretched, they fit well, snugly on the rim so to speak. i've got 245 in the front, 255 in the rear, but they are r-comp's which i've been told run about 1o mm larger than normal. I'm still working through the fender rolling bit, there is some rubbing in the rear when the car squats during hard acceleration. I'm confirming, adjusting, and thinking about even stiffer springs but they're 35o/4oo# already. 240z/rb blog
-
full rear suspension by techno toy tuning second half twilight zone diff removed, suspension columns ready spindle pin fell right out! (with a bit of convincing) second one was another story, as it usually is should have known when i saw the lack of bushing and so it begins but the center section DID NOT hammer out take a break. originally the baby press did not work (12T) man-up press did not work either (20T) do it your damn self approach weakening the mushrooming effect by drilling the spindle pin, or at least directing it inward the 12T press worked in the end using a socket and a few extensions finishing inner hole about 1/2", 2" deep, taking the entire set of drill bits and an extra evening late night success clean up. living room antics yes, back in the living room greasing bushings helper. techno toy tuning is amazing, they marked the high/low sides of the bore not matched example matched example more grease assembly won't seat yet because the bushing actually seals with the block holding air, took vice to squeeze out cleaning squeaky antiseize, copper assembled with washers, measured to center wheel, or at least symmetric to the other side. x2, even replaced ebrake hardware outside again i love this shot close ups new spindle bolts greased poly bushings all new hardware yup, still not getting old rear top hat options short and not so short one more time before install old v new old v new installed, but the mount was actually backwards (facing forward), long story mustache bar spacer break. can't stop taking suspension pictures short top hats and springs installed close up 4oo #'s in the rear STOP IT before during after approved. gel locktite. installed. painted. and finned. suspension lift drop mounts first (but don't tighten the bolts all the way until ALL bushings are aligned and bolts started) ready for lift put big id washers on top of mustache bar bushings, ask me how i know they're different push into position align studs front solid diff mount correctly positioned rearward this time assembly together, without halfshafts 28o zxt cv halfshafts not where they're supposed to be lowered columns, which incidentally clear fenders without unbolting inner RLCA bushings back together dogbone above finned lsd cover cleaned RLCA inner bushing bolts wow. bedtime. coil threading ZERO droop adjusting coils ALL the way up. back on all four's and yes, that's the maximum number of images you can insert into a single reply on HZ
-
full rear suspension by techno toy tuning first half rear end removal pull beefy tires and wheels and start disassembling everything just fit above to go further pull exhaust. underside and suspension, everything's coming out RLCA mounts removed Drop mounts removed driveshaft removed front diff and front RLCA mounts removed remember to remove the cv halfshafts remove mustache bar mounts lower assembly, note suspension columns are still attached to the car, as are RLCA's 3oo zx r2oo lsd random fmic shot! xmas pile of parts including rear suspension (and front, and fuel, keep watching) RLCA's drop mounts and dogbone for finned diff r2oo longnose mustache bar azc solid r2oo longnose front diff mount arp studs installed above with non-marring socket that doesnt exactly fit between the lug nuts and wheels do to added thickness parts staged, yes, in the kitchen tide over parts staging moved outside sneak peak!
-
extended studs, disc brakes, spindles, bearings, and caps what a stud start. everything off. prying between oem wheel studs to remove back rotor studs. these. scalloped 24o z flange with spacer attached. disassembled. removing oem studs with hammer. pulling new studs thru. extended studs, m12x1.5 arp. reassembled. x2 more grease. everything assembled, including new cotter pins. almost done. x2. more studs time to do the rears. knock them out with a hammer as with the fronts. pull new studs on with same nuts. man up! add new lug nuts i tried to order steel, but they sent me aluminum ones by mistake. oh wells. x2. when in doubt, bring it inside the kitchen and put it on the counter. rotors calipers bearings covers wheels and lugs note next time don't thread the entire lug nut on, it takes forever to remove x8 install rotor and caliper and wheel. in this picture the car is in the air on stands. the droop is significantly reduced by the shortened strut casings/shocks. front cotter pins and grease new bearing covers, make sure to start them evenly use a rubber mallet to tap into place install front wheels. future project borrow press to remove stub axles from 28o z rear suspension remove drum outer housings make fixture press out stub axle (remember to take inner nut off) half way there hammer and pry the second drum housing off, no need to pry the dust cover as attempted before close up. done. save the stub axles for a future project.
-
suspension including strut sectioning, coilovers, camber plate install, parts from techno toy tuning tuck slam scrap techno toy tuning ground control kit, 4oo#/35o# rear to front, 8" eibach race springs, camber plates, roller bearing front top hats 7" collars to be positioned at top of sectioned strut casing idea of how they work assembled. wheel and tire fitment without coils installed. short tokico illumania 5 way's one of four was a tight fit and needed some persuasion, for future reference, 24o casings are smaller dia than 28o's front fitment removed lower perches to test fit corners sectioning 1o1 tig welding sections and lower perches in place as measured, shortest possible for specific shocks all done. cut casing at oem perch point, put shock in, mark height. remove shock and put top end into upper oem section with gland nut and washers installed, mark height measure distance between two marks and remove this much from the strut casings, front and rear place lower perch and threaded collar over casing and pull collar to gland nut, positioning perch below it, remove collar and weld. note, use front and rear shocks to measure fronts and rears respectively camber plate welding. align camber plates with straight edge across the car thru center slot. trace pattern onto suspension column and cut about 1/4" smaller, trimming to test fit making sure bearing insert moves unrestricted repeat for the rears, peeling back oem vinyl and cleaning paint surfaces. welded on all sides until gap was too large to span some bend the corner down, but this wasn't going to be accurately possible in my garage, the plates were too thick but the final result was amazing, bending it would not have made me happy anyways as it would not be exact I'd rather have the plates flat, it's not like these welds are going anywhere anytime soon heavy clear coat over all welded and bare metal surfaces, including strut casings ftw. before install after install, apologies for late night phone pictures
-
a 24o z, post strut sectioning/coils overs/camber plates one sunny day
-
tires, wheels, spacers, lugs new sticky rollers hoosier r6's 255/45/zr17 (rear's), 245/45/zr17 (front's) rota grid's 9.5x17et12 (rear's), 9.0x17et12 (front's) mounted. bam. spaced clearance, or lack there of fine tweaking 1o mm hub centric, wheel centric spacers (front only) wax off... wax on. clearance dropped suspension. surprisingly, the coilovers are only adjusted 1/2 way pinch may need to be scalloped nuts the prettiest they'll ever look. nrg's. aluminum, extended, matte black
-
rb25 hoists, engine/transmission/isolator fabrication final some of you may recognize this manifold, and yes it's still in use! series1 rb25, precision sc61 t3/t4 neo transmission, series1 bellhousing (push clutch) engine mounts, 1/4" steel cut/milled from 1x1' plates, stick welded driver side installed passenger side installed engine isolators installed, drilled out stock opening engine isolators trimmed after several test fittings final engine drop close final fit may need oil filter relocation kit shifter location still great suspension/turbo peeking thru bonus trimmed transmission isolators, easier to pour correctly the first time but better thick to be able to adjust back one of two transmission tabs to create cradle lots more adjusting final transmission mount using oem car side tabs (with precisely milled holes instead of approximate slots), 1" dia tube, o.12o" wall pre assembly mid assembly final assembly mounts in the raw turns out the clear coat wasn't sufficient mid stripping cleared, again installed, again
-
Moving forward as if my previous HZ thread was practice, I'm going to group sections of my build here, by subject. I don't want to re-hash my detailed blog text ziptiedz.blogspot.com, or re-post my extremely consolidated daily build thread photo's 240z/rb blog. Both are useful in their own way, but I thought it might be helpful to try something new. Let me know what you think or if there's something you want to see, or see more of. Obviously no one wants to see less 240z build photo's, so the plan is to keep this less wordy with lots of photo's. I'll try to post the most relevant, possibly different than my build thread but definitely much more, all while keeping the size small so there shouldn't be loading issues (with respect to photo size, no promises about quantity). I'll also include the post links to keep things interesting if you want to see more about that day's work. So to get things started > motorset position, engine mount templates, and vibration isolators mounted like a rockstar rb mounted in the 28o z, fairly high and forward. action shot of rb going into the 24o z rb mounted in the 24o z, much lower and aft. but transmission hole and shifter still aligned perfectly initial blank template wood and hoist helping align engine for mount templates engine as far aft as logistically possible oil pan almost touching the cross member, and you can see the engine mount templates in this picture being tested lower shot of how far oil pan hangs below crossmember (the jack stands and wood are directly under the xmember) transmission squeezing between oem mounts manifold clearance to steering shaft lower mounted wg clearance alternator clearance oil filter clearance, or lack there of passenger mount template driver mount template, below manifold, above steering shaft mount templates (there will be 2 vertical connectors positioned at the test fit lines as marked, the cylinders represent the isolators) rough cuts, milling angles and holes of templates in 1/4" steel final welded engine mounts homemaid hockey pucks 4" m12 studs, grade 8 hardware for multiple contact surfaces when in use (anti-rotation, and isolation considerations) large end washers to be used during install, but also to hang stud in flexane mix so that center assembly is in the center of the isolator first pair of isolators, 2" diameter, 2" height, messy extraction second pair of isolators, use tape at lower mold hole, much cleaner and easier to extract final set of (4) fully assembled isolators, solid in tension via the stud, isolating in compression via the flexane94
-
i'm catching up on your entire thread, but barring that... 2 - full bushing kit, sway bar, standard lowering springs/shocks and you'll feel a world of difference. I may be able to sell you my new/used bushing kit and save you some money. i also have the front msa sway bar up for grabs. 3 - i'd recommend an r200 lsd long nose from a 300zx tt. those can get expensive though, so if you're just looking for a stronger replacement to the r180 you could go with an r200 open long nose (from a 280z). i've got 2 spare ones with mustache bars and halfshafts we can work a deal on if you dont mind shipping it. you won't get traction like an lsd but it'll hold up to the abuse and you can always put an lsd in it later. if you get #6 you may not need #5. on a side note, i'm running a blow thru maf and a tial bov with a great tune. my iac is wired and bolted to the plenum, but the port that used to go from it to vacuum (pre-turbo/post maf) is now plugged off. my air regulator is wired and plumed like oem, inline between the iac and the intake plenum. because the feed line is plugged, neither are doing anything, but they're connected and not throwing any codes and i didn't have to worry about making block off plates. a wideband and a good tune does wonders and can control idle just fine. i've ran my rb with an open bov without any issues. i was running an open bov even when i had an oem suck thru maf setup and it ran fine with the iac/regulator routing above and a basic tune. since switching to a blow thru maf on the throttle body side, my bov is now on the turbo side of the intake track and is no longer venting metered air, thus you don't get any ill effects at all, measured or apparent. #1 is a good idea in general.
-
I think it's me! I just stumbled across this while catching up on builds. We should meet up! I have been revamping my build all year and am almost back on the road.
-
anyone have the link to the thread where there are pics of a rb25 and rb20 trans next to each other? i can't seem to find it, thanks .... edit http://forums.nicoclub.com/zerothread/192792 it's possible what i'm thinking of is on another forum ... i'm slowly losing my mind ... .... ...