
hughdogz
-
Posts
757 -
Joined
-
Last visited
-
Days Won
2
Content Type
Profiles
Forums
Blogs
Events
Gallery
Downloads
Store
Everything posted by hughdogz
-
Hey thanks for the article John. I know a local Z-guy with one of those. I wonder how difficult it would be to get new decals for it. After 28 years, that stuff starts to crack and crumble.
-
Edit: Thanks Jon, you're golden (and right on ). Nice modeling cygnusx1! How long did it take you to whip that baby out? I know how challenging it is to get swoopy shapes just right without using a $20-80k modeling package. Is it a surface model? kewl...
-
Hey thanks for the Re: Vinh! I agree, the steering is a LOT heavier than regular manual (compared to my 260). I might take your suggestion and get a manual rack, they run$250-300 through black dragon, but I may be able to get it cheaper somewhere else... What still puzzles me is that the steering was lighter when the pump was connected, but idle. This leads me to believe there is still something not right with the way I just looped it. There seems to be SIX places where hoses / tubes connect to the column part of the rack...I need to find fittings that will work for looping the tubes at the ends of the rack, not just the pump / reservior.
-
 I know that Sparco made the brackets for my seat. For MSA's "garage sale" they had a ton that fits these wide seats (Brides, Corbeau, Sparcos) Once you get them mounted, mostl likely you'll find that they seem too wide (the door hits the shoulder part of the seat. Also, for my Sparco, the recliner knob interferes with the door threshold. That is why MSA is stopped selling the brackets for the BIG seats!! If you move the seats inward, now you're not centered in front of the steering wheel anymore. If you've already bought the seats, I'd call MSA. They might have some left for CHEAP!! Good luck!
 -
It has been asked before but no good posts: http://forums.hybridz.org/showthread.php?t=85745&highlight=power+steering+loop I searched for quite awhile and came up empty. Does anyone know how to "properly" remove the power steering assist from the rack and pinion to go manual? Or has someone looped theirs without any problems? I already removed the pump and reservoir line going to the rack. Is it safe to just loop it? I already found they DEFINATELY shouldn't be plugged!! I ended up looping it and it seems like might be fighting more pressure than with the pump connected but idle. Is it necesary to remove the rotary valve or also loop the fluid lines? This is for an 82 280ZXT GL. Thanks for any insights!! Edit: Now that I pressed the post button it dawned on me...loop the fluid lines with each other and plug the four holes in the rack. That should take the "power" out of the equation and return fluid from one side of the rack to the other??? I'm still kind of puzzled how it all works, but this this helped me a bit: http://auto.howstuffworks.com/steering4.htm
-
I'll call powerforce tomorrow and see what they say... I called Professional Products today and spoke with John. He was really nice and understanding and said they'll replace it if I send it back. Spec ID is 34.95 mm so even with that you'd think it would be hard to turn on the crank snout?? The only slightly negative thing they had to say was they never heard of this problem with the L-series dampers, but since I got one of the first batch (sent to MSA) then anything is possible. More importantly they wanted to check mine out if in case there was a problem, they'll sure to know about it. I'm sending it off right now, I just wanted to let you guys know that they stand behind their product and (at least) I'm happy with their customer service!
-
Cygnusx, I took your advice and here is what I found: Crank OD = 35.00 mm 280ZX damper ID = 34.99 mm Powerforce ID = 34.79 mm (and yes, I am going bonkers!!) Z-ya, I think you hit the damper on the head!! I can slip my OEM damper on and off all day like butter (by hand) by comparison. I put a spare 280zx damper on with ONE HAND...took me ten seconds. I even pulled it back off (took me two hands & some wiggling) to make sure the key didn't slip out. The damper is 0.20mm (EIGHT thousandths) too small. I probably (stupidly) lost sixteen hours of my life fighting it. I was so stupid because in the instructions they say if the fit is tight, it must be you, because we machine these perfectly...doh!! I like the way the 280zx dampers have a small tapered portion to make sure you're getting it lined up correctly. I'll call powerforce tomorrow and see what they say... If they flip me the bird, I guess I'll have to get it enlarged somehow... 76s30, I think just about everyone who's ever removed a damper before cracked one trying to get it back on (me and half my Z-buddies) I tell ya, this has been one LONG stressful learning experience for me!! Now back to getting the rest of the engine together by tomorrow for PIR... ps: I hope the batch that Bubbles is planning doesn't have this problem.
-
8$ + Hours of Drilling and Grinding = 240sx Throttlebody Spacer
hughdogz replied to Yorgee's topic in Fabrication / Welding
How did you get the hole to end up round?? -
does engine braking use more fuel ? (noob)
hughdogz replied to nbesheer's topic in Miscellaneous Tech
If you have the stock EFI, then the answer is it depends. If you are off accel and above 3500 RPM, then the fuel is cut to the engine. I heard this eats a lot of oil through the PCV, but I'm not sure about that. -
Hey, thanks for the Re: Cody...at least I don't feel alone now..hehe Well, the installer at Napa didn't come in the M16x1.5 size so I didn't buy it (luckily I brought the bolt to make sure) I made my own installer using a longer bolt and a few damper washers from the various engines laying around. STILL NO LUCK!! even after a hours of trying I can't get the sucker to line up perfectly. Usually, the key comes out of the circular pocket in the crank right away if the keyway isn't clocked perfect. One time I got it lined up just right, but the key still rotated its way out of the pocket almost 45 degrees and got smashed. Luckily I stopped in time so I didn't crack the damper. I even tried gluing the key in!! I still think the ID of the damper is still too small, it won't rotate on the crank at all. I'll give it another whirl, but if I can't get it then I'm going to an OEM one...bah!!
-
Same thing happened to me (althought I didn't upgrade the refrigerant still the old R-22 or R12). I can't believe how much oil was everywere!! Did that happen to you? I thought one of the components went bad so I pulled the A/C system in favor of weight savings and space. In Oregon, we hardly need A/C except for a few weeks a year. I wish I still had mine installed since we're supposed to get up to 105F this week...I kept all my old components so maybe just the valve blew and my system is okay.
-
WOW! No replies yet...I guess I'm the only one having trouble with these?! Thanks for the views...lol
-
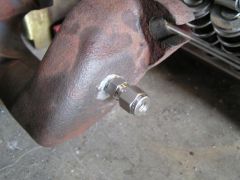
Hi Paul, you ask some good questions. Right now the plan is to just keep the one without a switch. I like the way others installed them in the collector, but you might get temps that may be hundreds of degrees below actual. That is why I chose the runner. However, the collector would give a better average temp than just one cylinder. I wonder which would location gets a more accurate reading: 1) In a single runner, where it is closest to the combustion chamber, yet you only get 1/6th the exhaust pulses to read. You'd think that this would give more time for the probe to cool down between pulses. 2) In the collector, where you get cooler gasses since it is further from the combustion, but there is less sensor cooldown time between pulses. I KNEW there was a reason why I posted here to get feedback before I drilled into the cermaic manifold I got from Ron. Be honest, do you think I made a poor choice in the location? Multiple EGT's and a rotary switch would be nice, but with the price of EGT's (and FITTINGS) I'd probably be better off with multiple WBO2 sensors. Warren-I appreciate the pics. Thank you. That is a REALLY clean install. I might have to plug the hole in runner 6 and go your route. Tony D, thanks for listing those other fitting choices. I had no idea they were available. If for some crazy reason I need to do multiple EGTs, I'll definately source those "knockoffs". If I only knew 1/1000 of the stuff you know, I might be twice as knowledgeable as I am now and I'd probably be four times as "dangerous"...lol [Edit] Okay, now that I re-read this, you can still go with the swagelock...and the compression "sleeve" still fits too?
-
I finally got around to installing mine. I had to take the manifold off because of a leaky gasket so this was the perfect chance for the EGT probe install. Like others mentioned, the bungs that came with the Autometer EGT probe are a joke. They loosely fit the 3/16" probe and used a set screw lol. This would leak worse than the gasket I was replacing!! Thanks to this post, I found that they make a compression fitting. I found one, but the list price of the compression bung was $78...I found for $38. There has to be a cheaper piece other than welding in the bung. It is reccomended to install 1-2 inches from the head, so the best place I could come up with is in the cylinder 6 runner. I never tapped an NPT thread before, to tap the hole you need a "Q" drill bit (I suppose that is a tapered bit?) or 21/64" drill and a reamer. It really wasn't that difficult once you figure out how to do it. I hope this might help out others wondering how to do the install.
-
 Autometer EGT 1/8" NPT tapped in 6th runner
 -
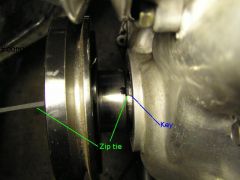
Does anyone know if there is a trick to get these suckers on? I've done about 1/2 hour of searching and I'm still puzzled... They seem to fit MUCH tighter than the OEM ones and I've about had it. I tried the usual stuff...emery cloth, heating the damper, lubricant, etc. and it still won't go on even with a block and rubber mallet (which I HATE to do since it could ruin the bottom end:bonk:) I've installed dampers from 240's 260's and 280zx's and never had this much trouble. I'm finally giving up and buying an installer tomorrow (~$65 from Napa). The frustrating part is that I'd always end up moving the key out of its socket from it sitting too high somehow or not lining up perfectly tapping the damper on. I would turn the crank if I tried to clock the keyway (the tinyest bit) to line it up since the damper has so much interference with the crank, even if the damper was on just a little bit (like 1/8"). I did discover a good way to line up the keyway to the key before you start pressing on the damper using a zip tie. The bigger ones are a perfect fit in the keyway width-wise. I hope Napa is open tomorrow on the 4th so I can pick up the installer. I sure hope I don't end up cracking the damper or find out that I messed up the bottom end!! I'm sure someone has installed one of these already...did you need an installer? This is for an '82 L28ET but you'd think they should fit any L-series engine the same.
-
 powerforce damper install
 -
Lookin' Awesome KTM!! It won't be long now until the real fun starts. That's quite the setup for your coilpacks...are they completely mounted? Great job.
-
Here's mine: 1982 280ZXT I'll edit the post with the mods later... Engine: Not much yet. Need to install an IC and Wolf3D -Home-made manual boost controller -Bosch fuel pump for Porsche 944T -Pallnet fuel Rail -Aeromotive AFPR -Aeromotive stainless braided fuel lines -K&N cone filter and mandrel bent intake pipe -K&N fuel filter -Removed A/C, power steering, etc. -HUGE aluminum radiator (from Ron Tyler / Paul Ruschman) barely fits between frame rails -Cusco oil catch can Interior: -Converted to Black -All panels custom black diamond-tuck -Sparco Seats -4-point Schroth seat belts -EGT and Boost gage in dual A-pillar pod for a Miata Suspension: -Tokico Blues struts -Tokiko lowering springs -Suspension Techniques front and rear sway bars -Techno Toy Tuning roll center adjusters -Cusco front and rear strut tower braces -Poly bushing all around Brakes: -Power-slot rotors -Stainless braided lines (& clutch too) Exterior: -MSA body kit (airdam, sides and rear plus California wing) -New paint (Acura electron blue pearl) -R32 Skyline fog lights -Magnaflow knockoff muffler (2.5" in, dual 2.5" out) -Hella H4 headlights with PIAA arctic blue bulbs
-
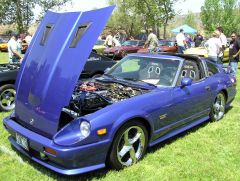 This is my 1982 280zx Turbo
 -
Ehh...its probably low 13's in the 1/8 mile.
-
Holy C.F.!!!
-
I guess you could say the same thing about "What's the worst?" e.g. What's the worst year of the 240z's? What's the worst model of the Z? I guess most of us are more interested in the best than the worst.
-
Lots of options. T-top or slicktop, automatic or manual, two different five speeds, digital dash or analog, power or manual steering, turbo or n/a, "leather" or cloth interior, etc. Basically a GL or standard package. But as far as I know, no S130 came with power seats. I know for sure Z32 came with them...maybe Z31's I don't know. I think the '79 came only with "highback" seats and later 280zx's had what I call "couch chairs" lol... Aziza's seats probably aren't stock...
-
So it was not an anime series to begin with? That may be even cooler than the anime!!