MONZTER
-
Posts
821 -
Joined
-
Last visited
-
Days Won
22
Content Type
Profiles
Forums
Blogs
Events
Gallery
Downloads
Store
Everything posted by MONZTER
-
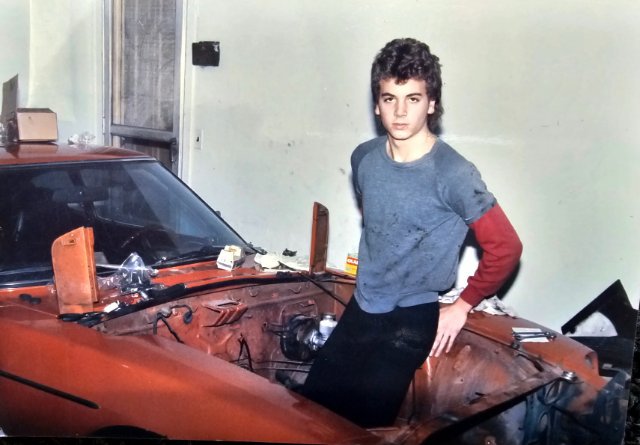
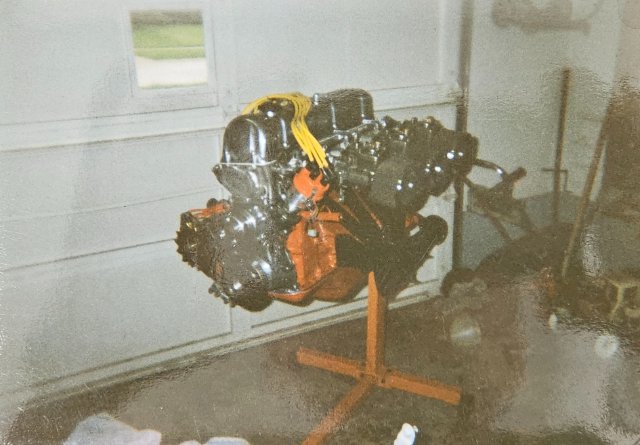
I've owned what will be the turbo car since 1984 (black shell now), which is pretty cool. I bought it in Atlanta, Georgia, so it was in great shape with its original paint and no rust. I still remember the first time I laid eyes on a 240z. I was 14 and working at a bike shop. One of my co-worker's friends had a shiny black one, and I instantly fell in love with it. I saved up around $1,500 over the course of a year. Living in Ohio meant finding a clean, rust-free 240z was a challenge due to all the salt on the roads during winter. Luckily, my dad knew someone who bought cars down south and sold them in the rust belt. I asked him to keep an eye out for an original and clean car for me, and after a few months, he found one. My dad and I flew to Atlanta together, and I even got to drive it back home on my learner's permit. Those were some really great memories. Here are some old pics I found digging throug boxes Me ripping out the engine as soon as I got it. I had a shop class in high school where we re-built a lawn mower engine. This this was my first car engine I ever built. I remember reading the "How to Modify" book over and over. Who did not want that engine on the cover in their dream car? Drove it like this throughout High School.

-
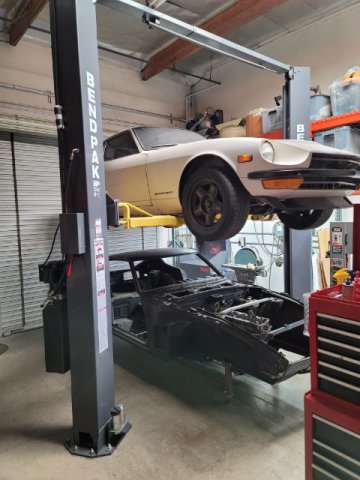
This is both cars as they currently sit. The Turbo car is the black shell. All apart and ready to be put back together. The white one on the lift will be the NA car and its just starting to come apart.
-
I have two cars Im working on, one is a NA car and the other one will be a turbo car. Im having a race against myself which one will be finished up first. It will also be fun to compare the differances between the two.
-
Hello everyone, It's been well over 10 years since I last participated in this community. I'm excited to share that I still have both of my 240s and have recently started working on them again. In the past, I faced some obstacles due to limitations in my home garage and other life commitments like family, job, and finances. Thankfully, I stored the cars instead of selling them, knowing that one day I would return to them. It would have been disappointing to lose them. A few years ago, I left my previous industry after 30 years and ventured into my own business, but it wasn't as enjoyable as I had hoped. Dealing with the day-to-day operations and working alone didn't suit me well. Fortunately, I found a great position in the Aerospace industry with a company that I enjoy working for. This new job allows me more personal time for my hobbies. I was able to keep my shop and equipment from my business venture, transforming it into an amazing man cave, fully equipped for building custom cars and motorcycles. Around six months ago, I started working on my cars again, with the goal of getting them on the road within a few years. Both cars are 1972 240s, one being my old autocross/track day car with its original Safari white paint that I've owned for 20 years. The other one, which I bought back in 1984 when I was 15 years old, has been stripped down to the shell and will be converted to a turbo configuration. Both cars have solid shells, with the turbo car in particularly great condition considering its garage storage and origins from Atlanta. The NA car has some minor rust starting on the lower doglegs, which I plan to replace and repaint from the lower body line down, while preserving the original paint and its nice patina. I thought it would be fun again to document and share my progress on both cars with the community, as well as seek suggestions and ideas from all of you. It's been a while since I've been involved, so I'm sure a lot has changed over the years. I appreciate any help and guidance you can offer. Thank you all for your support. monZter
-
Life long cyclist
-
I do, I bet it is still tossed in closet with lots of other parts. BTW Tony, I thought it was funny
-
I still stop in on the Z forum from time to time, Been busy with Family and other projects, so the Z is getting not much love. I finally got the engine back from the machine shop. All the money I saved to complete it was sitting around so long that i decided to be a good dad and take my family on a surprise vacation to Hawaii. It was a wise choice, as my daughter is getting older and wont want to spend as much time with me once she is a teen, however the Z will still be there waiting to be finished. I got rear ended in my truck a few weeks back, so been driving my other Z every day while the truck is in the shop. I missed it. So to answer your question about machine time, I remember about 8 hours with set-up for machine run time. The roughing goes quick, then the finish step-over passes were not super fine since I was going to clean it up by hand. Regards, Monzter BTW, I know its been a long time since the switchover, but I still just don't like this new format to the forum, I think I am getting too old and resist change.
-
I think 1 fast Z did some work on this idea. Anyways I am not a crankshaft guy to know what is considered "In" balance, but the "out of" balance they found in the article seems to be alot even though it is a cam and not a crank. In this example the camshaft is running at 4,000 rpm (half of the 8,000 rpm crankshaft speed). The left side of the camshaft is generating a force of 34.3 pounds and the right side is 47.6 pounds, and both are Âhammering at 66+ times per second. This may be enough to cause the camshaft to Âbecome excited and set up a vibration pattern that will motivate the roller lifter to bounce on the surface of the lobe. Ultimately, the valve will respond to all of this activity and most likely this will cause the valve to follow a path that is not equal to the designed cam lobe profile. This may also cause the valve spring to become excited, generating an inconsistent travel pattern Âcommonly known as valve spring float. Some of the castings on our z cams are really rough and makes me wonder. I wonder if a crank shaft guy could balance a camshaft? MonZter
-
Camshaft balancing? Anybody have any comments? Just thinking about it and found this article http://www.precisionenginetech.com/tech-explained/2009/06/01/camshaft-%C2%ADbalancing-part-1/ monZter
-
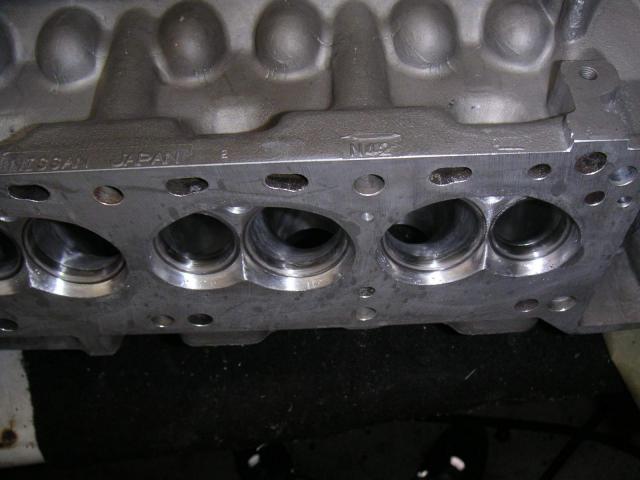
 just because it says N-42 doesnt mean it is stock. A lot can be done with a welder and a die grinder. Only the builders of these beautiful engines will know the real secrets, we can only try until we master it ourselves
-
Definitely one of the best S30s I've seen/heard ever. I gotta ask the million-dollar question. What exhaust are you running? I can't find a description on it anywhere, but it makes the best exhaust note I've ever heard come from an L series engine. Keep up the great work.
-
I've spent this morning going through your gallery pics.. You are soo good that I feel like quitting my project!!
You are like me only 10 times better. Absolutely beautiful work! Can I buy your car when it´s finished? -
I have been running an aluminum radiator on my Z for years with no rubber isolators, and no problems.
-
FYI 6/10/10 Koyo is proud to introduce an all aluminum performance radiator for the 1970-1978 Datsun 240Z, 260Z, and 280Z with manual transmissions. Koyo engineers have designed some unique features into this brand new model. Unlike the traditional downflow style of the OEM Datsun radiator, the Koyo performance radiator is manufactured with a robust 53mm crossflow core design. Another unique feature is the integrated 1/8†NPT female accessory fitting located near the top inlet tube. This fitting (supplied with a threaded plug) will accept a 1/8†NPT temperature sensor supplied with most aftermarket temperature gauges, or may even accept a coolant line for aftermarket turbochargers. Every Koyo All Aluminum Performance radiator is engineered in Japan, precision welded and polished by hand, and are a direct fit in the vehicle’s factory location for an easy installation. Koyo’s global reputation for high quality cooling products begins with the selection of the finest materials. Koyo privately owns each factory, never outsources their manufacturing and overseeing each stage of production using Japanese made equipment throughout the production of each radiator. Koyorad All Aluminum Performance Radiators are hand assembled, precision TIG welded, and triple pressure tested throughout the manufacturing process contributing to reliability and uniformity. The superior quality of Koyorad all aluminum radiators will take your vehicle’s engine performance to the next level. Features: • Koyo “R-Series†Technology • Crossflow Design • OE Specific mounting • Mirror polished finish • Nocolok-R Brazing • Precise Tube and Fin alignment • Billet aluminum filler neck • 1/8†NPT Accessory Fitting and threaded plug • Billet aluminum drain plug Application: 1970-1978 Datsun 240Z, 260Z, and 280Z MT Koyo Part Number #: R022352 Available: Now Info: www.koyoradracing.com Contact: info@koyoradracing.com
-
What you guys are seeing in the header is the merge collector. This is a cone produced from the intersecting of the primaries. Check out these links http://www.spdexhaust.com/ http://www.burnsstainless.com I have gotten to know Jack Burns from Burns stainless pretty well. He has in great depth explained some of his theory of header design and merge collectors. He says 6 into 1 is never a good solution unless it’s very high in the RPM range that you want your torque curve. The large volume of the 6 into 1 slows the gasses down too much at lower speeds and the torque curve is not as broad. On an engine like ours, he recommends 3 into 2 into 1. So 3 matched cylinders into 1 and then the pair into each other. This should give a broader torque curve and more scavenging down lower. Now this is assuming we are building anything other than a Dyno motor right
-
Nice reading and well done. My quick comment is summed up by the quantity of material you have found. Simply, there is no 1 magic bullet that gives them the power. It is the well planned out, focused details in all of the parts. The sum of the whole is made from the parts. Everything is designed to work together, and when it is done correctly, the hp numbers don't lie. I'm sure I have some stuff to add, but its late. Jeff
-
Brake SHOW! Post pics of your brake setup!!!
MONZTER replied to Daggetlover's topic in Brakes, Wheels, Suspension and Chassis
Yep, Hoov is correct, The custom backing plate ties it all together -
Brake SHOW! Post pics of your brake setup!!!
MONZTER replied to Daggetlover's topic in Brakes, Wheels, Suspension and Chassis
You asked for pictures, maybe too many? click on any picture to go to my gallery with more details -
Here is an IGES for you. Its what I designed and used for my header. I have a round port also if you need it. header_flange.zip
-
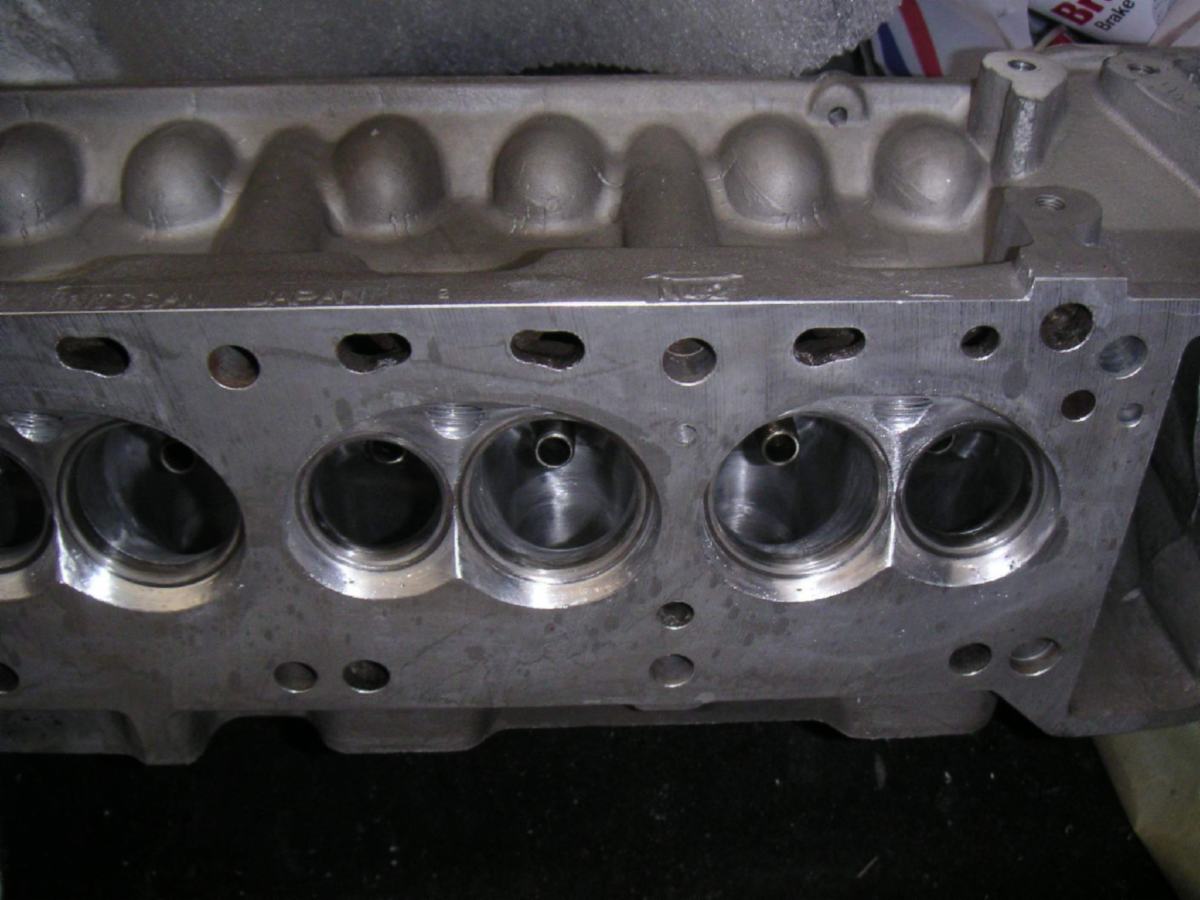
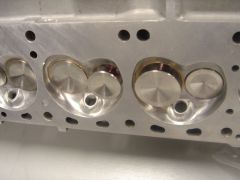
Also, I have posted these pics before. But here is my 240 NA head with 36cc welded chambers and 280 size valves. making the chambers smaller and giving it squish is the same thing Kameari are doing. Someday I will do some real valve and port work on this thing with a 3.0 under it, that should be fun. I have seen some pics that Braap has done with welded chambers as well, nice stuff.
-
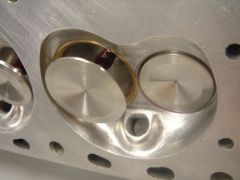
Hey Guys, here is some nice big pics of my Rebello head. Listen to the specs, maybe interesting Valve seats are Oversized Kamearie for the 46 and 38mm valves, You can see them overlapping in the picture. I also have the Kamearie shortened special material valve guides. So I talk to Dave a bunch about this, and here is what he did. We ran the oversized valve seats and matched/ blended the port bowls into them. However, We stayed with the stock size intake on the oversized seat. Dave said going bigger on the intake shouds the valve too much and felt the smaller valve with the big seat would flow better. Did the same thing on the exhaust, but went 1mm oversized there. This head is also set-up with their 10 bizzillion RPM springs and titanium retainers. Any thoughts on the oversized seats? Jeff
-
-
-
I dont remember exactly what it cost, but I have a crank,rods and pistons getting done now. I will find out. When its done he first matches the rods, big ends then small ends. Next pistons. The crank is then done and zeroed out. He then puts on the flywheel and checks it, then the pulley. I think its all pretty standard stuff. any good machine shop can do this.
-
That broken crank was exactly the same as mine that broke. same place, same look. This was a stock motor factory balanced. Like I said I could feel the buzz over 7000. My new balanced set-up no longer has the buzz, and has not yet broke