

ryant67
-
Posts
355 -
Joined
-
Last visited
-
Days Won
4
Content Type
Profiles
Forums
Blogs
Events
Gallery
Downloads
Store
Everything posted by ryant67
-
From the album: 1971 240Z
Do it in a Datsun -
From the album: 1971 240Z
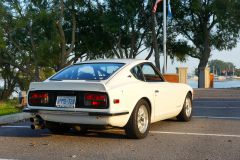
I tried to re-create the old school vertical stacked exhaust look. This is a pretty standard 1in2out Magnaflow muffler with tips welded on. It's a little beefier looking that would have been ideal, and it sits kind of low in the rear. Some days I love how it looks, other days I'm not so sure. We'll see if I keep it in the long run. -
From the album: 1971 240Z
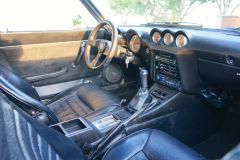
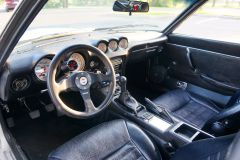
The interior is pretty much done at this point, there isn't anything I can think to change here. -
From the album: 1971 240Z
Interior is pretty clean. I stripped it all out 2 Summers ago and removed the stock tar and paint, etched the metal, and painted with POR-15. I have put in new diamond patterned vinyl, shift and handbrake boots, and Autometer Ultra-Lite gauges. Unusually, my series one Z has the later center console and HVAC panel - unsure why the previous owner switched to this style, perhaps it was a fitment thing since the car has a later 5 speed transmission? Either way, I dig how the HVAC panel lights up green. -
From the album: 1971 240Z
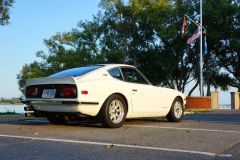
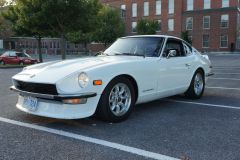
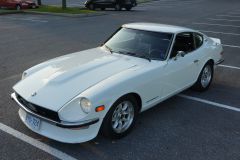
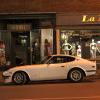
Would love to throw ZG arches on the car, but the stock arches are too clean, and I refuse to hack up a clean series one (and destroy some of the value of the car in the process). -
From the album: 1971 240Z
Not much non-stock on the exterior. Panasport wheels, the car sits about an inch or two lower than stock, and I have an aftermarket airdam on it. -

From the album: 1971 240Z
-
From the album: 1971 240Z
I quite enjoy the Electromotive HPV-1 on the car. It has four little dials that allow me to adjust the timing at 1000rpm, 3000rpm, and... 7000rpm, I think? The fourth dial is a soft rev limiter. -
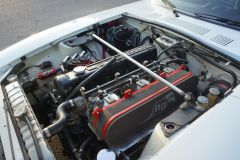
From the album: 1971 240Z
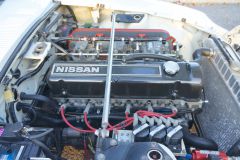
Nice overview shot of the engine. A fair few modifications in sight here: - ITG JC 100/65 air filter - Triple Mikuni 44 PHH's - Mikuni short intake manifold - Oil catch can and breather - Griffin radiator - System 1 fuel filter - Electromotive HPV-1 EDIS running off of a magnetic pickup and crank trigger wheel - Ford 3G 130amp alternator on custom bracket -

From the album: 1971 240Z
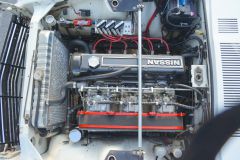
I was going to build an airbox out of aluminum to go over the carbs, but the more experiences folks on the site have been down that road and advised me that the ITG filter will actually give more power on the top end. This is the 3rd ITG filter I have had on this car in the 3 years I have owned it. The first came with the car when I bought it, but it was old, dry, and crumbling. The second went up in flames back around June when my dying ignition switch was giving me hard starts - basically a lot of fuel was getting sprayed onto the filter foam, then one carb backfire set it on fire, good times. No more ignition issues, and the carbs are reasonably well tuned now, so hopefully this one lasts. -
From the album: 1971 240Z
One of the previous owners fabricated up the strange little mounts on the strut bar. No idea what the thought was with them, but they do look kind of funky, in a good way, so they an stay for now. -
Oh, just saw that this is posted in the Toyota L6 forum - ignore me. The sensor will still plug in where the water temperature sensor is though, likely by the thermostat housing, might still need an adapter too. On a modern engine, I think I would be more inclined to run an electronic gauge though.
-
I run a mechanical water temperature gauge, and quite like it because I know it isn't going to fail and will read accurately - and I can also watch the temperature when the engine is off, which can creep up quite a bit sometimes. You will be screwing the plug for the temperature probe into the thermostat housing, which is where the water flows from your cylinder head back into the radiator. The sensor screws in right below the water hose. You will need to have an adapter for the autometer screw plug as it is the wrong size for this hole - auto meter part number 2275 (on summit: http://www.summitracing.com/int/parts/atm-2275)
-
Engine woes- read on if you dare
ryant67 replied to madkaw's topic in Trouble Shooting / General Engine
^inline6: If only the Mikuni manual could have stated the procedure as clearly and completely as you just did, wow! Thanks for taking the time to share - I'm pretty new to playing around with these carbs, and there is a lot of information out there that presumes a level of competency that a beginner just doesn't have. You spelled everything out in layman's terms, which is refreshing. -
Cylinder #2 not firing - Mikuni jetting
ryant67 replied to ryant67's topic in Trouble Shooting / General Engine
Still no luck. Cheers for the suggestion though! I've thrown in the towel, and have dropped the car off at my Z mechanic. He knows these cars well, so maybe he will see something I missed. If not, well... I've ordered new o-rings and a rebuilt kit for the carb, and can strip it right down and start fresh. -
Cylinder #2 not firing - Mikuni jetting
ryant67 replied to ryant67's topic in Trouble Shooting / General Engine
Pulled the carb, and blasted all the passages out with an air compressor I borrowed from a friend - much more powerful than a can of air. No blockage is apparent, air seemed to be moving quite freely throughout the pilot system. One butterfly was found to be slightly open when the other was fully closed. I corrected this, no change to my problem. The cylinder is still not firing. The issue moved with the carb when I swapped them, so it really shouldn't be on the engine side. I'm at a real loss here, and not sure what else I can do. Fuel supply is good. Fuel pressure is steady at 4psi. I have a very good fuel filter between my regulator and the carbs, and it's clean. The floats are properly set. There doesn't appear to be any blockages. I switched from the 57.5 pilot I was using to a fresh, never before used, 60 pilot jet, so it's not the pilot jet that was the issue. The butterfly is properly adjusted. Not sure if this helps with a diagnosis, but when I put my hand over the air horn for the problem cylinder, there is noticeably less suction present than the others, and my hand quickly gets saturated in fuel - a puddle of fuel builds up on the bottom of the carb by the venturi. With all other cylinders, the engine RPMs drop quickly when I cover the air horn. Very lost, and getting tired/frustrated with this. Any suggestions or helpful ideas are extremely welcome! -
Cylinder #2 not firing - Mikuni jetting
ryant67 replied to ryant67's topic in Trouble Shooting / General Engine
Yeah, I agree completely. I read your issue thread, some good info in there - hopefully you figure things out. For the expense of buying another carb, I think what I can learn with a spare one to tinker with is well worth it. Toss the new one on, and hopefully the issue is resolved - then try and rebuild my problem carb at my own convenience, rather than losing precious drive time. -
Cylinder #2 not firing - Mikuni jetting
ryant67 replied to ryant67's topic in Trouble Shooting / General Engine
* tested the wires, not the errors. Autocorrect... Had some issues with the o-rings actually, they seemed a little too large, is that normal? Cheers for the tips! -
Cylinder #2 not firing - Mikuni jetting
ryant67 replied to ryant67's topic in Trouble Shooting / General Engine
Yup, lots of spark, electrocuted myself pretty good too. Tested the errors with the multimeter, all is great. Swapped the carbs, now cylinder 4 isn't firing, but 2 is running fine. I'll take this as good news. Can't be arsed pissing around much more, so I'll call Todd and see if I can buy another carb from him.. . Can rebuild this carb at my leisure then. -
Cylinder #2 not firing - Mikuni jetting
ryant67 replied to ryant67's topic in Trouble Shooting / General Engine
Took the carb off, opened it up and went over everything - compressed air and copper wire - couldn't find any debris or clogs. Put the carb back on, and the problem persists, cylinder #2 isn't firing. Going to swap the 1-2 carb with the 3-4 carb and see if the problem shifts to another cylinder or not. If it does, the carb is the issue. If it doesn't, guess it could be the valves? PS: How much FUN is it getting to the carb bolts on these suckers? Ugh... -
Cylinder #2 not firing - Mikuni jetting
ryant67 replied to ryant67's topic in Trouble Shooting / General Engine
Cheers for the reply! Figured that was going to be what I had to do, good to have specific directions though. Time to pull the carb and learn a little more about how these things work. -
Was working on tuning my Mikuni 44's, changed the pilot jets, and the one for cylinder two didn't screw in smoothly. I backed off and after a few goes back and forth it went all the way in. Now cylinder 2 isn't firing... I've tried changing back to the pilot that was in and work before, no change. I checked to ensure that it is cylinder 2 that is missing, and when I yank the plug wire, the engine tone doesn't change. I am pretty much at the point of taking the carb off the intake manifold and opening it up, but before I do, does anyone have any suggestions? I think I might have loosened some 'gunk' when changing pilot and it has blocked something? Carbs are synced, everything else runs well. The plugs are new. The wires have been tested and work fine. It was running great up until this point, albeit a little rich.
-
Sorry for the long reply, just got around to going through my box of to-be-sorted car stuff today. The Napa part number for the Echlin ignition switch for our cars is KS6673
-
Nice wheels!!! I was looking at those on Zilvia as well, but they were a touch out of my price range and I wasn't sure of their fitment. Can't wait to see how they look on your car!
-
Some insanely nasty paint stripper might work. I used some gel deck stripper ('Super Remover') on the interior of my car and it turned the tar in there into mush that wiped right off. It even worked better than aircraft paint remover actually... You'll want to be very careful though, it eats through regular rubber gloves in about 5 minutes, and burns skin in seconds. Face protection, layers of clothing, painters mask, etc are all necessary.