260zman
-
Posts
33 -
Joined
-
Last visited
Content Type
Profiles
Forums
Blogs
Events
Gallery
Downloads
Store
Everything posted by 260zman
-
First of all, has this engine setup in your z previously run prior to the MAF problem? if not, then did you wire up the MAF? the autoelectrician which did mine, wired my MAF incorrectly (2 wires switched around) and so it started, smoked (really rich) and then over fueled itself. Not sure if this is same as the problem you've got, but check the wiring and check what colour sticker is on your MAF, from memory i think you require a pink sticker.
-
Hey Kiwi303, love your work! i'd be a keen starter if you get this into production. I've always wanted an alloy oilpan in my 260z, instead of my custom one (tank switched around, new baffles, extended wings etc). keep us posted with whats goin on!
-
Jeez guys! they're only spacers for bolts. All i did (last week) for mine was used some 1/2"OD stainless tube which is just about 3/8" ID. i cut off the spacers 10mm long in my drop saw (nothing techo about this i know, but my lathe aint going right now), then linished the burr off the ends, used a bigger drill bit to remove internal burrs, and then pressed them (or use a vice/big hammer and anvil) into the 12mm holes. when linishing the ends, i put a bit of a lead in on one end to help guide the bush into the housing. The 1/2" tube is an absolutely perfect interference fit in the hole (1/2" = 12.7mm) and if they've been pushed in squarely, they wont require much for the 10mm bolt to go in. I think i had to ream 2 or 3 with a 10mm drill bit but that was about it. So there you go, it took me around 20-30 minutes all up to make them up, and i had no idea when i opened the diff up to swap ring gears -that i would have to make spacer bushes. Some people do try to apply rocket science to things that arent going to the moon.
-

Anyone using their stock rb clutch fan with their setup?
260zman replied to Zreddy's topic in Nissan RB Forum
I'm running the factory fan. and also the factory datsun radiator shroud (on a 260z radiator with the outlet pipe swapped over). i had to do very minor mods so that if the motor flexed any on the mounts the fan wouldnt chew the shroud- but nothing dificult.. i guess it depends on what engine mounts you are using, as it would dictate whether it would be high or low within the shroud. i know there have been guys who didnt use a shroud and had overheating issues until they put one on. -
the front Brakes will go on, by either redrilling the R33 rotors to suit the 4 stud or buying new 4 stud skyline rotors (these are available- i got some which are 310mm diameter- ventilated). use the R33 front brakes with an adapter plate to fit them to the datsun strut. the skyline strut will not work without totally redsigning the front end. Rear brakes: the R33 rears have an internal drum handbrake inside the rotor. i tried to use this style rear brake but it makes it really hard to adapt. i know u're trying to use as much of the half cut as possible but in the case of suspension stuff, prob not altogther useable.
-
whoops, sorry- i didnt tell you what car that diff came out of!! It was an 1988 R31 GTS skyline, japanese spec. (so had the rb20det, independant rear end, r200lsd, 4ws, and the front struts you can directly bolt 4 pot skyline brakes onto). it has to be jap spec as Australian ones dont have the same diff, but have a solid rear axle. You should be able to still buy the drive unit from Nissan. hope this helps.
-
There were several different ratios. It depends on model of skyline, and if it came out of an automatic vehicle, as what i've found is they are quite a bit different. i found on these forums once upon a time, a list of all the ratios, and the speedo drive gears (colour of the drive gear is different for each ratio). for the ratio you're looking at, its the same as mine, which came out of an R31 rb20det (old red top motor), it had the longnose r200 LSD, and i think the plastic speedo drive was blue. not sure if i've helped?!!
-
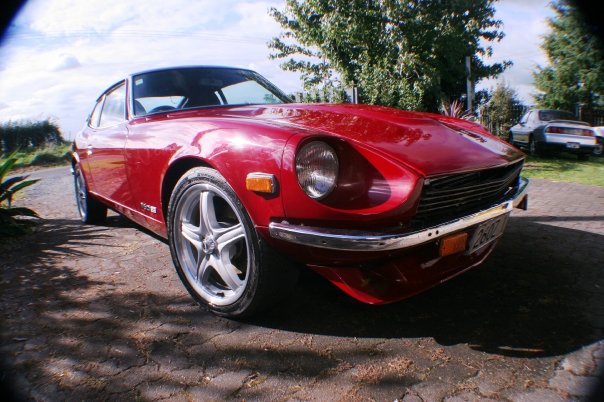
Hi folks, Heres mine- a 260z 2+2 with a s2 rb25det. Only 'finished' it about 3 weeks before leaving to go to Canada for 8 months! so i have something very tempting to go home to now!! Cant wait to get back home and get some more Km's under its belt. Its only running on the factory ecu for now, but will be changed to probably a Link G3 when i get some more money. Disk brake rear, 4 pot skyline fronts, adjustable koni's allround. Exhaust is a twin pipe- 2.25" diameter. I did it like this cos i wanted to get away from the "chuffy" sounding 3" or large diameter pipe, and have a "tight" sounding but flowey enough exhaust. it sounds amazing, not at all like the average skyline boy racer with big bore- which is what i wanted. Was way harder to make though! Let me know what ya think! Justin.

-
Show Off Your Engine Bay! Pics Wanted, L-series
260zman replied to philipl's topic in Nissan L6 Forum
Hi folks. These are some photos i took last weekend in Japan at the Nagano Nostalgic car show. ok ok i know theyre not in zed cars but hey gotta love the exhaust on that GTR! they're all out of GTRs actually, i was a bit dissapointed by lack of 240z's- only 2.
-
he he, this may surprise me as i've never listed my mods or car parts used! 1974 260z S2 Rb25det R33 skyline motor. Diff- Jap r31 skyline r200 Front brakes- Skyline R32 Gtst 4 pots, and rotors. Rear brakes- Mitsubishi vr4 callipers. R30 turbo skyline rotors. Front struts- R31 turbo skyline. Gearbox- R32 rb20det skyline, Master cylinder- 280zx 15/16" driveshaft- 260z. rear sway bar- R31 skyline again! Shock Absorbers- Koni adjusties- Z31 300zx Radiator -260z, hoses- r32 skyline. Hmmm, will probably think of more later but thats a start. Thats only 8.
-
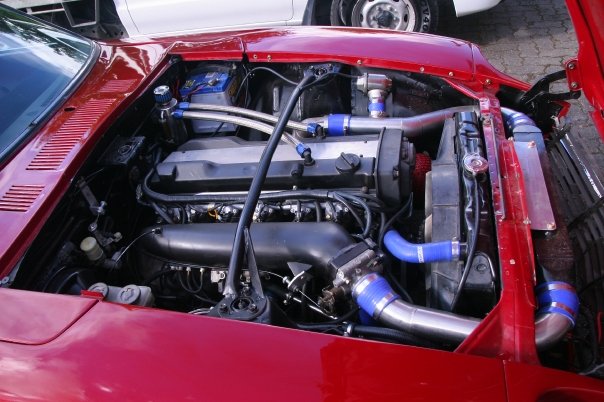
Yeah, i was pretty keen to go to BC, but then a house swap situation came up in Edmonton, and a few good job opportunity for my wife so decided on there. I'm unsure how jobs will go, i'm a fitter by trade, but i'll give anything a go!!! New update on my 260z with rb25det: i got it home tonight from the auto electricians. Bled the clutch. and now i just need to get a fuel leak sorted and a bit of a timing check and she should be good to go!! its running real rich, which could be due to the fact i havent set the fuel pressure on the pressure regulator. at least it wont lean out! Now as for you fellow kiwis offering to look after my beast!! insurance you say kiwi303?!! now thats something i need to organize. i'm 27, have lost my licence once due to too many speeding tickets and i'm a little freeked of what my insurance bill is going to be for a turboed classic!!
-
You wouldnt believe how many guys have said that to me!!! Thanks for the very kind offer though!!
-
Hi everyone, I'm all very excited!! First of all its because my rb25det cranked into life this week, so i should be creating some tire smoke this weekend all going well!!!!! And secondly, in June my wife and i are going to live in Edmonton, which will be our home until early 2010. We are leaving New Zealand in May, going to Japan to get a Japanese Nostalgia Car show and plus what ever other car stuff i can see (any suggestions!!). Then we flying to Vancouver, hopefully buy a camper or van we can live out of, and then we drive down the west coast of the U.S, eventually getting back up into Canada and to Edmonton by the beginning of July. I have no idea what i'm gonna do work wise, but i'll sort something out. However i'm keen to catch up with a few fellow z owners, and maybe i can get a few spare parts etc to take back to NZ! Whats your thoughts my fellow zedphiles?!! Anything going on that we should most definitely not miss? ANyone in Vancouver with a van for sale?!! Cheers guys. Justin
-
There are different clamping styles available. First off theres the good ol drill vice. http://cgi.ebay.com/New-HDC-4-Steel-Iron-Drill-Press-Vise-Machine-7005_W0QQitemZ350158523765QQcmdZViewItemQQptZClamps_Vises?hash=item350158523765&_trksid=p3286.c0.m14&_trkparms=72%3A1205%7C66%3A2%7C65%3A12%7C39%3A1%7C240%3A1318%7C301%3A0%7C293%3A1%7C294%3A50 Then theres the adjustable locking clamp system (works like locking pliers but with only the top arm). http://cgi.ebay.com/9-DRILL-PRESS-LOCK-CLAMP-Vise-Hold-Fast-Precision_W0QQitemZ140298323764QQcmdZViewItemQQptZClamps_Vises?hash=item140298323764&_trksid=p3286.c0.m14&_trkparms=72%3A1205%7C66%3A2%7C65%3A12%7C39%3A1%7C240%3A1318%7C301%3A1%7C293%3A1%7C294%3A50 PLus theres the slot bolt sets you can get. these are fairly cheap and i reccomend you get a set. http://cgi.ebay.com/52-Pc-Clamping-Kit-Clamp-1-2-T-Slot-For-Bridgeport-Mill_W0QQitemZ390026984512QQcmdZViewItemQQptZBI_Tool_Work_Holding?hash=item390026984512&_trksid=p3286.c0.m14&_trkparms=72%3A1205%7C66%3A2%7C65%3A12%7C39%3A1%7C240%3A1318%7C301%3A1%7C293%3A1%7C294%3A50 i find that the lock down clamp works real quick and easy for the basic stuff, and plus its good just for holding the vise in position. hope this helps as we dont want you doing anymore 'helicopters'!!
-
Well done on the lathe score!! You'll have endless enjoyment/frustrations with it!! What tooling did you get with it or using? high speed steel, or carbide inserts? the old school way and cheapest way is using high speed steel which you have to grind to get the correct cutting angles and tip rake. these are probably the most useful for a homebased machinist doing the odd bit of machining, as you can make just about any tool although you'll have to spend a little bit of time learning how to gring the toolsteel correctly. Carbide inserts are awesome but not usually very cheap. the tool holders for them are however! Speed and feed is very important as well as Minimal overhang. by this i mean, dont hang stuff out of the chuck more than necessary, and same goes for the tool. this will help with surface finish and stop things climbing out of the chuck! Just a few things which may help?
-
To answer your question R31. - your r31 would be the jap spec skyline. a rare car these days!!! i've raided my r200 lsd out of one of these, plus my struts and rear brakes etc etc. but anyway, my understanding are that they are mechanical. if you need any red top rb20det parts, give me a yell!! i've got 2 motors-one which is stripped down.
-
Hey Rob, How did the beast go yesterday at Meremere? i was gutted i couldnt get there!!!
-
What i did for my radiator, which was really quite cheap- was use the original one! It had been recored prior to me owning it, so all i did was to get the local radiator repair shop to swap the top inlet pipe to the other end of the header tank. The guy did an awesome job, flushed the core, and repainted it, etc and all for $100 NZ. now thats only about $65 US! it fits, the fan shroud did have to be sculpted in a very minor way (3 minutes) to clear the top hose, and should perform as required for my rb25det.
-
Hi Nzeder! Now i have to say i'm really tempted with those adaptors! one day i'm most definitely going to go throttle body or carbed on my rb. they look very cool, and sound fantastic!!! have seen quite a few while searching japanese nostalgia on the net! Good on you chap!! we'll have to catch up some day. my rb25det Z isnt very far away from firing up!
-
1974 260Z track car. Ground Up.
260zman replied to MoNkEyT88's topic in S30 Series - 240z, 260z, 280z
Ali wire can go okay in the mig, just change the mig liner before swapping rolls over, as the aluminium seems to pick up the ferrous crap in the old liner and not weld very nice. Will take a fair bit of mucking to get it set correctly for aluminium too, ie: heaps of wire feed and heaps of amps!! Good luck! oh and i'd just tack the cage up with the mig, then yeah baby TIG all the way. just my little bit of limited trade knowledge! -
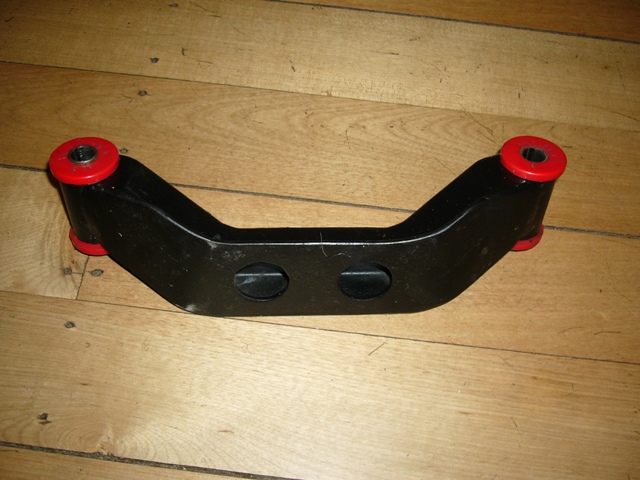
The bushings i got from our local car parts shop, just asked them if i could scrounge through there range of bushes, and had my trusty Mitutoyo vernier callipers with me, kept looking and measuring until i found correct ones. The only pipe i used was welded each end of cross member, so the pipe itself didnt need bending. The channel though- that had to be bent. i just pressed up a channel which was about 18" long (straight) and then cut and welded it to correct angle (a little bit of a mission). and thats about it. i found it all pretty easy due to having a complete workshop available after work and sometimes during work if i'm crafty.
-
Actually, that mount is a completely new fabrication. i didnt want to rape any of my original stuff, so had to make new! the isolator or mount that bolts to that is a GM one, i went to our local parts outfit(repco) and just went through their catologue. To make this cross member it involved drawing it up to get true cutting lengths and then i just folded up a 3mm channel, cut and welded it to right angles, and then closed in the bottom with another 3mm plate. First i made a jig to fit the old original crossmember bolts. so that when the new one was made i could ensure that it would still fit and line up. The pipe on the ends is just 1" black pipe, the rubber bushes fit perfect!!
-
Hi, heres a few pics of my gearbox mount. i didnt want to mutilate my original mounts so fabbed up a new one that meant i didnt have to cut the 'ears' of in the tunnel and reweld them. Just bought some prothane bushes and then made the new crossmember with all the right amount of offset etc. fits the rb isolator.
-
Anyone weld the cank collar with good results?
260zman replied to 05plsrt-4's topic in Nissan RB Forum
ANY machine shop should be able to do this mod in their sleep. its just basic machining. All it takes is for the crank to be setup in the lathe to a fine precision (no greater than .02mm run out), and machine about 6mm off the diameter over the whole area where the new collar will go. using a ceramic insert would be the go here as the crank is quite hard. Then using a suitable high tensile material (4140 or 4340) machine up the collar that will have all the desired flats and seal surfaces etc. the inside diameter wants to be a shrink fit onto the crank (-.03-.05 undersize). Then its just a case of heating up the collar until it will slide into postion on crank and as it cools it will lock solid and you'l have no issues with it coming loose. it would probably pay to machine the oil drive detail in after it has been put onto the crank. In my machine shop here in New Zealand, we could do the whole job (ie making the collar and machining the crank) for $200NZD. I can do some drawings up if anyone requires, to help explain to any machine shop. Hope you can understand my ramblings . -
Awesome setup!! your progress makes my RB build look like its moving at snail pace! I should just trailer mine over and get you guys to finish it!!