wrcbonk
-
Posts
195 -
Joined
-
Last visited
Content Type
Profiles
Forums
Blogs
Events
Gallery
Downloads
Store
Everything posted by wrcbonk
-
Got the rear end back together, bummer about the paint line. Thank god for white, nothing shows too bad.
-
Gord, I am also doing a RB25 transplant into my z. I have a later series 1971 240z (vents on the rear pillars). My stock trans mount perches look similar to yours. I looked at the pictures on McKinney's site. I beleive they used a similar chasis to mine. Their trans mount appears to allow room for the pinion assembly/speedo hook up on the trans. What model chasis do you have? Obviously I should contact McKinney to discuss this with them also. Also, what did you do to remove the stock eltrical speedo pinion assembly from the rb transmission? Thanks Bonk
-
Thats great you guys are using Rustoleum white. I am using it as a durable undercoat/primer for my engine bay, headlight scoops, front quarter, and rear end. I found an outfit in Sacramento called Original Paints. They will put your paint code in a can premixed with clear coat. For my 1971, its 904 Ivory White. I cleaned the engine bay then hit it with the Rustoleum. I am in the process of wet sanding the rustoleum with 1000 grit before I lay down the Original Paint. We will see. I removed the headlight scoops b/c there was some damage to the fiberglass that I had to fix. They are easier to paint hung up. Disregard the line that was from a previous effort that went horribly wrong. You can see the older tarnished white on the door. I am hoping the Origianl Paint will blend a little copared with the Rustoleum on the quarter. White z's and rattle cans! Bonk
-
I also purchased my Series 1 RB25DET from Venus in Sacramento. Any compression check is better than none. About all you get from a 'wet' compression check is an idea of consistency. If one number is substantially higher (correct me if I am wrong) you may have a problem in that cylinder. You need to know what the factory compression is before walking through the door or calling on the phone. I believe that number for the Series 1 is 173 psi. Also, the condition of the other parts is very important. I got sent home with a crushed intercooler, b/c Venus claimed that was all they had, BS, if you ask me. I later realizecd the MAF housing had a crack in it. My wiring harness was a bit hammered also. Things to look for, check everything if you can. Good Hunting Bonk
-
Jakeoster, You pegged my setup, dead stock. If decide to get more agressive with my engine in the future i will need to spend the money on a Bosch 044 and maybe add some more baffling to the tank, maybe even a fuel cell. Hate to lose the spare tire though. Bonk
-
Papa, You are correct about my setup. The plan is to have the filter in the engine just infront of the inline fuel pressure gage. I am not plannng to have a fuel pressure gage in the cab, I just want to be able to check the pressure in the engine bay to check the pump. After the pressure gage the line will run to the stock fuel pressure regulator, which immediately precedes the fuel rail. Need some input on what you mean by a "bypass" line on the return. As it is now the return comes off the back end of the fuel rail and just heads back to the tank. Thanks Bonk
-
Hey guys, I moved this over from Fuel Delivery b/c I wasn't getting any response. Not sure if thats becuase no one saw it or b/c my post sucks, we will see. I have been working on my fuel tank and fuel delivery system for my RB25 swap. I have a 1971 240. I measured the stock RB fuel lines at the rail/regulator and got 5/16ths. I am replacing the stock 1/4-inch return line off the 240 with a new 5/16ths line to match the RB. Plan to use the new 5/16ths line as the pickup and the original 5/16ths line as the new return. I drilled out the stock return line to fit a bulkhead fitting for the new pickup (see pics below). Does anyone have a suggestion of how I should seal that bulkhead fitting? I also have a bulkhead fitting for my pump electrical leads coming out of the tank. As far as the delivery part goes I still need to make up my mind on an external pump or internal pump. RIght now my set-up is in-tank. I want my car's fuel delivery system to mimic the system out of the doner skyline, which used an in-tank setup. At this point I can still change and go external. That is my main question for you Hybridzers. We all have that buddy who is a professional mechanic. Mine likes in-tank pumps because he claims the fuel cools the pump and noise is reduced. The same guy had a 240 for while, but then sold it. He gave me his tank for free so I felt like I could take a chance trying to modify it while still having my tank in case things blew up. In order to keep things from blowing up literally the first thing I did was have the tank hottanked in muriatic acid. After that I painted it to keep the external corrosion down, then I used the Kreme product to coat the inside. I ordered the stock RB25 in-tank pump, a blind plate for access, some bulkhead fittings for the pickup and electrical, and finally a one way ball valve to resist starvation. The blind plate was a pain. I could not get anyone to sell me a nut ring so I had to make one myself. I used sheet metal and threaded inserts. It sucked, but it appears to work. Then came the fun part, cutting into the tank. Its pretty amazing what a guy can do with a cut off tool, a dremel, and a set of step bits. So I have two questions: 1) Am I just asking for trouble going with an in-tank setup or do you guys think this will work well? 2) How well do bulkhead fittings seal? Is there a sealer I should be using? (RTz already suggested Tank Repair material) Oh yeah, I plan to put a filter in the engine bay inline with a fuel pressure gage. I want to thank Monzter and 1-Tuff-Z for their posts on the subject. Bonk
-
5thgen, Ok good to know you used the tank repair material. The guy mentioned it at the parts store, but I wasn't that was what I wanted. Understood that with my homemade system I will have to be cautious with the fuel level. Bonk
-
5thgen, If you have a chance take a look at the post I put in the Fuel Delivery section. I am hoping to get your input on my in-tank fuel pump design. http://forums.hybridz.org/index.php/topic/94261-bonks-efi-fuel-tank/ Thanks Bonk
-
Hey guys, I have been working on my fuel tank and fuel delivery system for my RB25 swap. I have a 1971 240. The stock fuel lines are a 5/16ths-inch pickup line and a 1/4-inch return. The two hard lines coming off my RB are 5/16ths. So I removed the 1/4-inch line from the car and will replace it with new 5/16ths solid line. As far as the tank goes I need to make up my mind on an external pump or internal pump. I want my car's fuel delivery system to mimic the system out of the doner skyline, which uses an in-tank setup. At this point I can still change and go external. That is my main question for you Hybridzers. We all have that buddy who is a professional mechanic. Mine likes in-tank pumps because he claims the fuel cools the pump and noise is reduced. The same guy had a 240 for while, but then sold it. He gave me his tank for free so I felt like I could take a chance trying to modify it while still having my tank in case things blew up. In order to keep things from blowing up literally the first thing I did was have the tank hottanked in muriatic acid. After that I painted it to keep the external corrosion down, then I used the Kreme product to coat the inside. I ordered the stock RB25 in-tank pump, a blind plate for access, some bulkhead fittings for the pickup and electrical, and finally a one way ball valve to resist starvation. The blind plate was a pain. I could not get anyone to sell me a nut ring so I had to make one myself. I used sheet metal and threaded inserts. It sucked, but it appears to work. Then came the fun part, cutting into the tank. Its pretty amazing what a guy can do with a cut off tool, a dremel, and a set of step bits. So I have two questions: 1) Am I just asking for trouble going with an in-tank setup or do you guys think this will work well? 2) How well do bulkhead fittings seal? Is there a sealer I should be using? Oh yeah, I plan to put a filter in the engine bay inline with a fuel pressure gage. I want to thank Monzter and 1-Tuff-Z for their posts on the subject. Bonk
-
Only in Texas, good score!
-
5thgen, I am right in the middle of modifying my tank for efi (rb25det on stand) as well. At this point I can either install the stock rb25 intank pump (I have installed a blind plate on top of the tank) or I can go with an external in-line pump like a Walbro. It sounds like you are planning to use two pumps. Is your plan to have one in-tank (Carter) and one in-line (Walbro)? Is your reasoning for using two pumps surge protection or another performance issue? I am trying to add surge protection by putting the efi pick-up in the taller side of the tank with a one-way valve in that direction mounted on the baffle wall. I will post a few pics tonight. Thanks Bonk
-
Linluv, You are so much farther ahead than me, great work. Your start up video is great inspiration. Hope the electrical works itself out. Bonk ps - I am doing a blog of my R33 S1 build. www.billsrb240z.blogspot.com
-

Looking to swap in a RB25DET into my 240z
wrcbonk replied to musickraver's topic in S30 Series - 240z, 260z, 280z
I am in the midst of doing an RB25 swap myself. Read all the stickies at the top of the Nissan RB Forum. Chris Rummel provided an incredible wiring write up. I am most likely going to use the McKinney Motorsports products for my engine and trans mounts. I purchased by motor from Venus-Auto in Sacramento. -
Junglist, I only had the springs powder coated. The rest were rattle can and are holding up pretty well. When I do the rear end I plan to have more or all the parts powder coated. After talking to the powder coat guys, for only a few dollars more I could have had more parts powder coated black like the springs. Bill
-
Piston, Your question summarized the source of many F bombs in my garage. By adding the poly bushing to the front side of the compression strut, stiffening up the control arm, and adding the bump steer spacer, mating the compression strut with the control arm becomes much harder than the removal of the stock configuration was. First, I bolted together the strut assembly together completely before I tried installing it on the car (i.e. I installed the strut/spring/isolator top portion of the strut assembly and bolted the spacer, steering knuckle, and ball joint on the bottom). Once I had that together as one piece I bolted it up to strut tower. Next I slipped the knuckle over the outter tie rod end and threaded on the castle nut. Now comes the hard part, getting the ball joint on to the control arm, may need a second man at this point. As far as the compression strut goes, first thread the nut on the back side of the compression strut just enough so that all the threads are engaged. Now comes the dangerous part that someone will probably say "You shouldn't do that". Take your shop jack and very SLOWLY and very CAREFULLY jack up the strut assembly so that the control arm and compression strut can be as level to each other as possible. You are jacking off the bottom of the ball joint so mack sure you have the blind screw in the greese port and not the zerk fitting. Watch to make sure that you do not jack the car off the jack stands supporting the body. Even with doing this I has to grab a needle and punch to work the compression strut in line with the holes on the control arm. Try the punch and minimal threading on the compression strut before resorting to the jack. Remember once everything is together, you must add more tension to the big backside nut on the compression strut. One of the compression strut nuts on my car worked its way off after a few months of driving. When I reinstalled the nut I used Red locktite. That big backside nut sees a lot of movement. Bill
-
I know you guys like photos so I wanted to add the pics of my front end rebuild to Hybrid and in the process try out BRAAP's photo hosting routine (Wow, Braap, very easy). I bought my '71 240z about two years ago and early on realized the front end was not performing well when pushed. Under hard braking the front end shook and dove right to left. After doing much research on HybridZ I decided to go for it and rip everything off and replace worn parts and add some performance. My buddy, who is a professional mechanic, offered to put the car on his lift at work and try to diagnose my issues. He put a pry bar on the front control arms and was able to wiggle them back and forth without much effort. He felt new poly bushings would help. He also noticed that all my strut inserts were blown/leaking. I wasn't super happy with the stopping power of the stock set up. I live in California and traffic is either going full blast or at a standstill. I was tired of having to maintain a 1/8th mile braking distance to the car in front of me. I decided to do the toyota 4x4 calipers with vented rotors. I found most of the steering and suspension parts throug MSA and their pricing was pretty competative. I got most things there. As you will see my only complaint is that the bumpsteer spacers they sell for 15" rims did not work for my Weds autobahn 15s. Got the brake kit from Modern. Lets see some pics. Those pho fairlady mirrors had to go Ball joints rubbing, had to go with thinner spacers
-
No Problem Ed, I was going to ask the same question. Mike's site was part of the impetus for my project. Incredible source of information.
-
Agreed, the oil pan will be coming off reasonably soon.
-
RS, I forgot to mention in my first post that the coolant which spilled out during transport was bright and clean, no clumps of corrosion. Pretty psyched to see that from a used motor stored in a warehouse. Definitely plan to pump lots of fluid through the system before we fire it up. Your motor is looking sweet! Bill
-
J, I agree, based on what I have seen from the motor already, I am only planning to replace the wear parts that appear worn from too much time out of the origianl car. I do plan to replace the clutch and throw out bearing. The wiring harness is hammered, I will be running through many hours and lots of soder mending things back together. I give Venus a BOO on that part of the deal. Thanks Bill
-
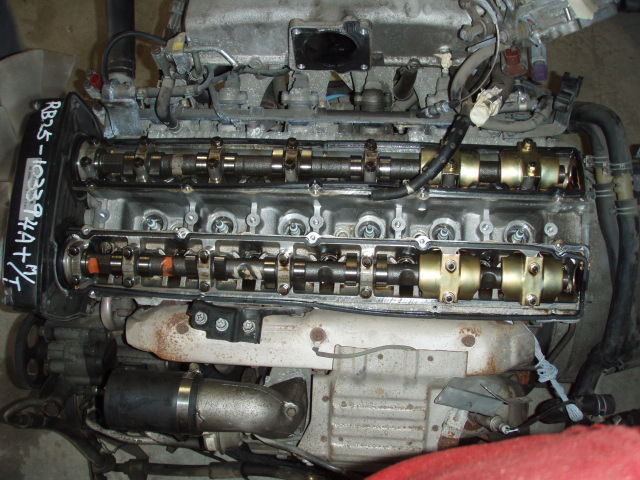
Yes, Apex944, you are right, those are not factory compression numbers. The test was done wet. We were looking for a for an out lier.
-
Hey Guys, bought an R33RB25DET from Venus-Auto in Sacramento last week. I am hoping to swap the motor into my '71 240z. Venus performed a compression check (225, 225, 250, 225, 250, 225 psi). They provide a 30 day warrenty. We pulled the valve covers and to us things look very good, no scoring or dark discoloration, see pics below. I am wondering what a good course of action will be for a factory service of the engine before trying to mount it in the z. When my friend helping me rebuilt the 7M in his Supra he bought a "top-end" rebuild kit, which included items like a head gasket, throttle body gasket, injector seals, etc. I have not yet seen a product like this for the RB. Just wanted to touch base with you guys, let you see the new motor, and get your thoughts. Thanks for your help. Bill