Dan_Austin
-
Posts
223 -
Joined
-
Last visited
-
Days Won
2
Content Type
Profiles
Forums
Blogs
Events
Gallery
Downloads
Store
Everything posted by Dan_Austin
-
The MSD 8920 Tach Adapt does indeed work. The good news is that my tach is virtually identical to what TunerStudio is reporting. The bad is that is shounds like a meth-dosed cricket. So after a week of trying to live with it, it had to go out under the hood.
-
Hesitation when lightly pressing the accelarator after a complete stop
Dan_Austin replied to 2s2mad's topic in MegaSquirt
I have a bit of lean tip in as well which I have been attributing to the 60MM throttle body and linear (on near linear) rod linkage. I wonder if squirters with the same TB, but a progressive cable bellcrank might have less of an issue. -
That part is annoying, but vapor recovery has fallen out of favor, and now we wait for stations to remove the fancy nozzles that they were mandated to install. The postive side, depending on your outlook, is that SMOG test stations appear generally appear not to bother with buying the bayonet vacuum test cap, and usually just make that part of the bi-annual check as 'Not Tested'
-
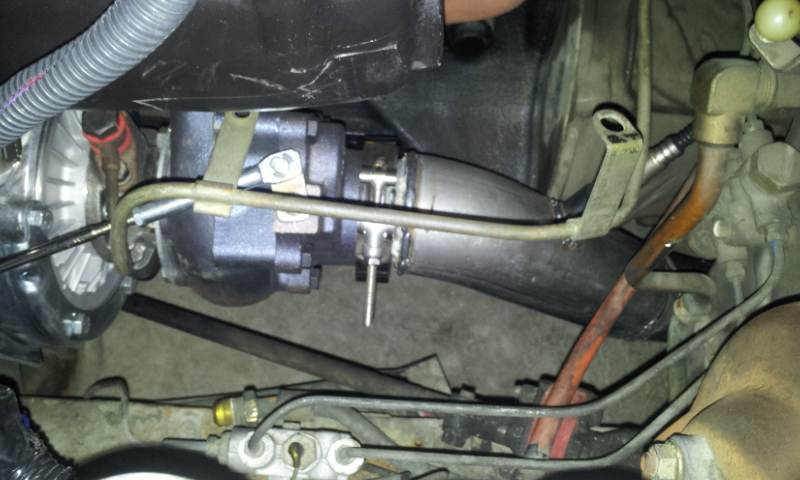
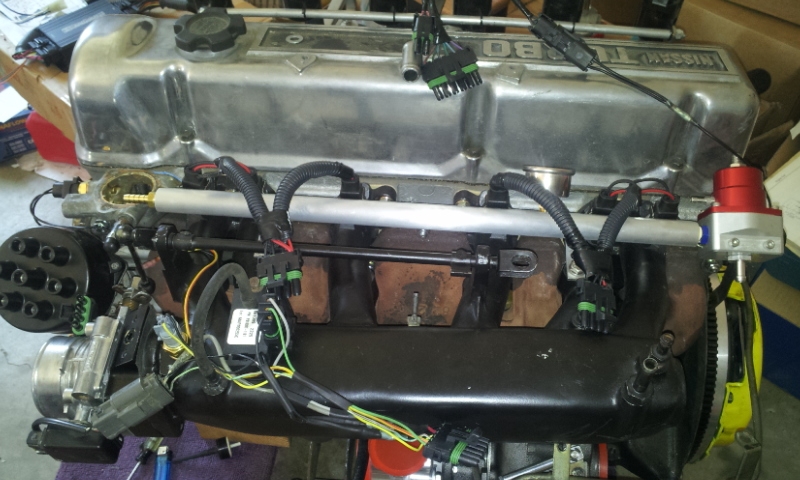
I now have about a full month living with the install. No major changes have been required. I added a GM EGR solenoid for a Fidle valve, and while it works it is a tad too small and only bumps the idle by about 75 RPM cold. I've identified a replacement with the same wiring connector but larger flow capacity, and need to get off my duff to go get one. The tuning has been 90% completed on the daily slog to and from work using VEAL, with tweaks made to handle oddball areas, such as engine braking causing very low map at the middle of the RPM scale. Today I decided to datalog the drive in as opposed to using VEAL to fine tune the map. I found that my cruise map is close to spot on with idle and those engine braking zones needing a bit of love. The attached zip is the MSQ and 24 minute datalog. EGO correction was minimal, basically only during engine braking, which I was please to see. The only other major discovery, which I knew, but is 100% confirmed is my alternator is not up to running the ECU and e-fans, at least not at idle. It also does not seem to be doing particularly well at cruise. This weekend is the 500 mile post break-in oil and filter change, with a lash check and 'nothing working loose' check. Feedback or critiques on the MSQ or log appreciated. My tune is doing almost exactly what I ask of it, but that I am asking it to do what is appropriate. I had a minor setback this week with the car stalling when coming to a stop, and found the cause to be the timing was about 3 degrees to far advanced at idle. 280z-sequencer.zip
-
I recently installed a SPAL dual 11" with shroud that I got off ebay. The height was about 1/32th higher than the 280ZX radiator tank spacing and the width was about 1/4" less than the core width. This allowed for a vey tight interference fit, with just a couple zip tie mounts in middle top and bottom of the shroud for an extra bit of security. I have both fans set to turn on at 195 degrees and off at 170, and at idle with the car not moving that drop takes about 2 minutes. The only negative is the electrical load at idle is too much for my alternator (60amp)
-
I saw that, but I'd rather try to use the tachout pin that I have currently unused, if for no other reason than to avoid splicing into a working ignition harness. Thanks for the suggestion though...
-
Did you find a solution letitsnow? My dash tach is the only incomplete part of my install, and the local electronics scene is sparse. I found a short blurb on another site about using a GM 4-pin HEI module that looks promising and cheap to try.
-
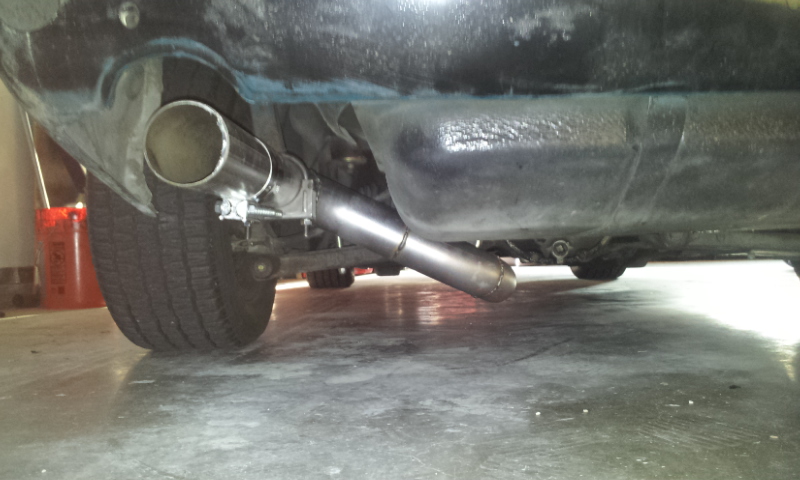
It took longer than expected to get access to a friends welder, but I finally had a chance weld up my 3" mandrel bent exhaust on Saturday. My friend was not happy with his welds on my test scraps, so he gave me a couple of tips and had me try. Turns out I have a knack for it and ended up welding up my entire exhaust systems as my first welding project. Once the exhaust was in, I could install the wideband and start tuning. I missed the third place in TunerrStudio that required wideband setup, but a quick Google search identified the fix and I now have the tune started, I took is out for a couple trips around the block. On the second loop I noticed copious whtie/grey smoke out the exhaust and almost paniced, but then I remembered noticing an excess of protective oil coating the mandrel bends. By the third loop of the 1/10th mile loop the smoke was gone and the VE Live Analyze was doing it's thing. I went over to show the result to my friend who had helped me with the engine swap and welding, He was surprised I had it moving on under power so soon and appearing ready for daily use. The exhaust tucks up nicely, but I do need another hanger just infront of the diff crossmember to have a really clean install. The downpipe did need dimpling to clear the firewall and bellhousing, but only a minor bit. Build recap- F54 block with fresh, but stock dished pistons P79 Head Shaved N42 intake with 240SX TB DIYAutoTune 280ZX CAS wheel ebay intercooler and piping 2.5" 3" mandrel bent exhaust with 3" Magneflow cat 450cc DSM blue top injectors Pallnet rail Aeromotive A1000-6 (pita to find fittings for) ebay 57/63 turbo with v-band integrated wastegate (8lbs) 82 NA 5 speed Fidanza flywheel, Spec XD pressure plate and HD organic plate OBX diff with 3.90 gears (needed to make tired old NA motor feel happy) Oh, and a B&G sequencer allowing for full sequential spark and fuel. It has been one heck of a week, or for that matter the last 13 months while I prepared for the actual swap.

-
Who'd be interested if we made a L28ET trigger wheel?
Dan_Austin replied to Matt Cramer's topic in MegaSquirt
In case someone else decides to try a microsquirt or sequencer, my wiring plan did work. Now to figure out how to drive the tach. I don't want to use the diode trick, and while I think I understand what parts are needed for the high voltage tach driver, I am not sure if that is what I need. -
It's Alive! Turns out the distibutor was OK and now is 180 out, but it makes wiring a bit easier, so it stays were it is. I ended up opening the distributor up to count the slots, and guessed where in the pickup the optical sensor was, which suggested I needed a trigger offset of 150. With the distributor set for maximum mechanical advance I got a stumble, so I took another 10 degrees out of the trigger offset and it fired right up. I need to finish the exhaust and wire in the dash tach, but at least now I feel more confident that I'll have a way to get to work on Monday.
-
Having a plan is close to paying off. The old engine came out and then new one went in on Sunday. I found I had the wrong thermostat cover, so I started on the wiring. The weatherpack connectors made my life easier the couple of times I put a wire in rond place. No need to chop off an end and try again, just release it and put it in the right place. The sequencer came with 3' harnesses, which I thought might be short, but proved to be perfect for the sensors and injectors. I did need to splice six inch splice for the distributer and injectors. This is with the ecu in the factory location, with the fuses visible and accessable from the ecu inspection window, and finally the relays mounted in the stock location as well. I spent Monday installing the radiator and e-fan, intercooler and piping, and trying to find a thermostat cover locally. The local yards said they did not have one, but I went on a yard crawl today and found several after just a few minutes. So now the wiring is complete, the air tract is complete, all fluids are where they belong and staying there. I still need to find the tach lead on the passenger side, but that is the last non-tuning task. I barely got a pop ut of it today. I am on the latest B&G code, so I am still figuring out he DIY CAS wheel settings. I had the distributor 180 out, and a battery that needed a recharge. While waiting on that I reviewed all settings and found a huge error in injection timing angle that likely prevented injection events. With a bit of luck I'll be celebrating extra hard tomorrow.
-
I just finished installing a 27x13x3 intercooler and 2.5" piping yesterday. As Aarang said take the measurments you can get it close. My install used- (1) 2" to 2.5" 90 degree coupler (1) 4" straight pipe (1) 6" straight pipe (2) uncut 90 degree (3) straight silicon couplers (2) 90 degree silicon couplers (1) 45 degree pipe with 4" cut off (1) 2.5" to 2.75" 45 degree coupler - 240SX TB, you might not need this The piping was typical eBay univeral, and I used less than 1/2 the piping in the kit, and by watching the sales on I got the piping for $100, and spent a third of that on the size changing couplers.
-
That is exactly the one I need. I am hoping to find one local (San Jose, CA) as I need to get this together and running this week. If I don't find one by Tuesday, I'll take you up on your offer.
-
I pulled out a worn but running NA 76 motor today and dropped in a rebuilt a 83 turbo motor. I went to swap the thernostat cover and found them to be obviously different, and the one I thought I had with the new motor is MIA. The local salvage yards have not had an Z or ZX models in several months, so I am hoping I can find on in the bay area and finish this swap this week.
-
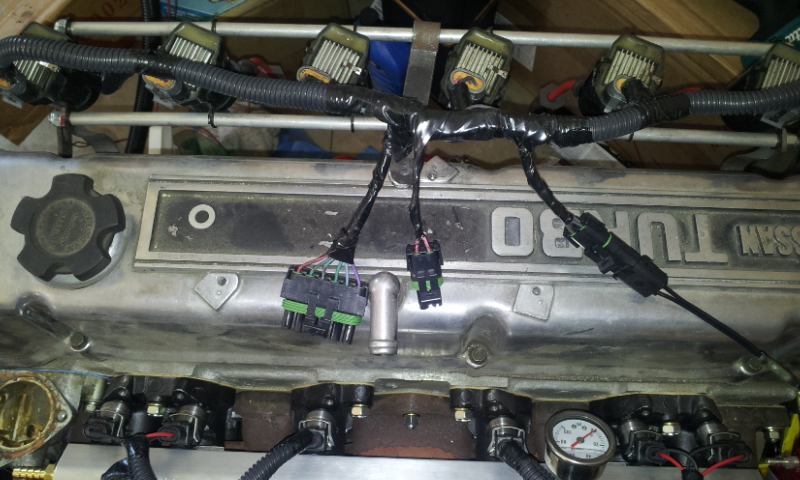
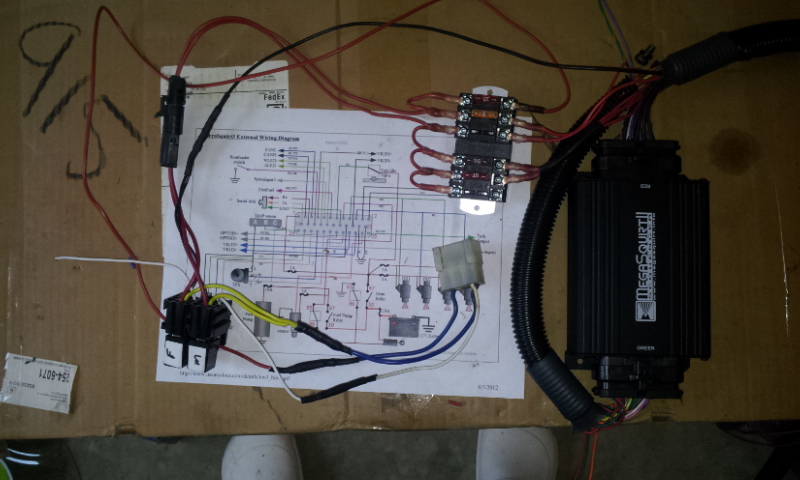
I've been collecting parts for this for over a year. I will be pulling my tired NA 2.8 and dropping in a freshly rebuilt 83 L28ET starting next weekend. I am not going overboard, or at least not by HybridZ standards. The turbo is a T3/T4 hybrid 57 trim/63 A/R, DSM 440CC Lo-Z, six GM D585 coils, a e-bay 27x12x3 intercooler and most of the bits for a 3" exhaust. The last weeks have had me finishing the engine bay wiring harnesses and the under-dash harness. Today I had my first chance to plug the ECU into the dash harness and turn the key on. At first I was at a loss, nothing happened, then I noticed the serial plug was not fully seated. OK, now TS finds the ECU, but I did not get the priming pulse. Second oops. The fuel pump relay did not have 12V on pin 86. A few minutes later I had that fixed an now the ECU turns on and properly engages the fuel pump. The ECU harness is setup with the idea that it will mount in the factory location, with the relays mounted where the stock fuel pump/injector relay mounts and use a single connector to interface with the body harness. A nice extra is that I expect the new fuse block to fit in the old panel window for the factory ECU label. I still need to install the weatherpack connectors on the engine side of the ECU harness, which will be best handled after the new engine is in and the ECU in place. Each connector is labeled, numbered, and documented with an Excel spreadsheet for which wire (color&label) goes to each specific pin on each connector. 26 pins need to be terminated, but that should be fairly simple if I stick to the plan. I have to say that seeing Tuner Studio dispalying live readings for the first time is a huge rush...
-
I've had this link in my watch list for awhile, but I have not gotten around to giving them a try- http://www.nostalgicairparts.com/air-conditioning/datsun-240z-260z-280z-compressor-upgrade-kit-623.php I like the bracket style better than the factory, and it is not much more than the compressor alone.
-
Who'd be interested if we made a L28ET trigger wheel?
Dan_Austin replied to Matt Cramer's topic in MegaSquirt
After many delays I should be dropping in the new motor and installing the sequencer week after next. Looking over the other sets of instructions I have the following mapped out- 280ZX dist harness Red Switched 12V+ White Pin 30 (OPTOIN+) Green Pin 4 (VRIN2+) Black Pin 31 (OPTOIN-) (common return) -
I could not find a decent image of it online, so this is what I managed with my phone-
-
I need a six position four pin EFI to body harness connector for a 1976 280Z. I have a swap about to start`and I really do not want to cut up my my otherwise clean EFI harness, so I am hoping someone has a hacked up harness from a 76 they be willing to part with or further hack up.
-
I bought a house since starting the project, so this years budget did not exist. I have managed to sell bits that I did not need to cover the bits I do. It cetainly helped that I scored a massive deal on the ECU. I think I need an airfilter and maybe a bit of solder. That and to figure out how to mate the aeromotive A1000-6 FPR I bought used to the Pallnet rail and return line. It seems this is an oddball FPR that requires an o-ring fitting that is similar, but not quite a AN fitting. Aeromotive has not been very helpful in this quest. My console is in OK shape, but there are a couple cracks, so I hate pulling it to drop the tranny, but that's what I will do. The trans is out of an 82, and I think was the wide ratio 5 speed, and has not given me any trouble since I installed it. I do need to install new speedometer pinion to match the 3.90 rear-end, but I had planned to do that with it in the car. I'm going to see if any of the local tranny shops might have a plastic end cap for output shaft, since I don't care to see a big Royal Purple puddle, and using my new aluminum drive shaft as a plug seems like a good way to beat it up. Oh, and the unknown Chinese turbo is not going in. It needed more fabrication than I could handle, and I still have no clue as to it's specs. I picked up on from one of the more reputable ebay dealers. It may still be junk, but I at least know a bit more about it. I've been also pouring over the PDF FSM and studying any wiring diagrams I could find, including an original 1976 FSM to figure out where I tie in to the factory harness. I had hoped to use the same power feed as connected to pin 1 of the factory ECU, and I may use that to feed the main relay, but it appears to not be switched.
-
In the year since I started this thread I continued to buy the parts needed for the swap. I think I am about at a point where I do not need anything other than to just start. I've made my stub harnesses for the coils, fuel injectors and have documented with Excel what wires go where. I was planning to pull the original motor and leave the transmission, but the FSM recommends against it. The new motor would be going in without manifolds and benefit from an adjustable tilt sling. Do I bite the bullet and pull the transmission at the same time?
-
complete l28et with harness/megasquirt
Dan_Austin replied to SDgoods's topic in S30 Series - 240z, 260z, 280z
Any other go-fast goodies on the motor? What version of the Megasquirt? I bought out an abandoned L28ET swap, with new turbo (no specs), 5speed, 240SX TB, Fidenza flywheel and ACT clutch for about the same. I sold the tranny and a bunch of other parts I would not use, and bought my EMS, injectors and another new turbo. So I have about the same amount invested, and my motor is still on the floor, no exhaust, not intercooler plumbing and the EMS has not seen power yet. I think I can get enough out of my NA L28 to cover the bits I am missing, but a good, or even almost good tune could take quite a awhile. (time=$$$) So unless the motor is bone stock, or needing a complete rebuild, the price may be on target, or just a bit high. -
I am never in the non-tech areas of the board, and wish I had seen this earlier. It seems one of the votes against came from my Senator. I sent my letter, not that I expect much. I hope that La Malfa and Vargas don't give up and if my Senator continues to oppose it, I can do my part to get him out of office.
-
Hi, I would like to have R200 for my 240z. I live in San Jose too.
When is the good time?
Thanks,
Takashi
408-838-6670
-
I found a complete pinion assembly relatively close for $30 delivered. I had hoped to install it this weekend, hence the search here. The local salvage yards have been lacking any donor candidates, and the local Nissan shop said 1 to 2 weeks for delivery.