supernova_6969
-
Posts
229 -
Joined
-
Last visited
-
Days Won
2
Content Type
Profiles
Forums
Blogs
Events
Gallery
Downloads
Store
Everything posted by supernova_6969
-
Oh and btw its been a while you posted, is the problem still fixed?
-
Hi! Crap, man, you described two things that happenned to me. I have an 1983 turbo-ed and megasquirted engine. The low afr on restart, even after 2-3 hours, is STILL happenning, so i'll check into the regulator.... Eventually (money). As for the electrical issue, my alt died on me (would not charge) so i got it checked (twice) and they eventually changed the internal regulator (its the stock 1983 with internal reg. I dont know if yours is the same... Then 2 days later i realised i was running on battery power when at low rpm( ask me how i know it didnt work at iddle: i was in traffic for 30 mins, and the voltage got so low the afr gauge stopped working and started blinking. Dindnt understand so i figure i' stop-restart the car to reset it.... Tic tic tic tic, on the highway, as traffic starts to move... Arg) I took it to a different shop, and it turns out the tridiodes had died too. Been working fine since... Your battery, when charged (after a drive) should not be below 12.7 volts. While the car is running, you should be around 14 or so.... If you charge the battery and it does not hold 12.6-7 after a day or two, that's a bad sign. The sure sign is if you charge it (ans get acceptable voltage) but that the voltage falls below 7volts WHILE CRANKING THE ENGINE then its time to chabge the battery. My batt eventually died (old age and improper care), and while it held 12.4-5 volts i hooked the voltmeter on the batt, layed it on the windshield and checked the voltage while trying to start her; it got down to like 4-5 volts almost right away. I dont have any issues since i got a new battery..
-
Stock fuel pressure regulator with new walbro 255 pump?
supernova_6969 replied to supernova_6969's topic in Fuel Delivery
Thanks guys. I appreciate the input. loloks like I might go with it the way it is... I'd actually love to have a fuel pressure gauge, as it could help me figure out whether the current stock pump is doing it's job (although I guess I'd have to run pretty fast to watch the gauge in action while under boost)... Like I mentioned though, money is a bit of an issue. anyone knows where a cheap one (ideally one where the needle sits in liquid) can be found? New Zed. I love Ace Ventura, but I'm failing and don't get the reference.. oh! talking through his ass. yeah. The guy is a good mechanic, but very nervous, very by the book. He was probably taught that that's the way to do, it, so he's not budging. Any one else can share experience? -
Hi guys! My car (L28e, turbo-ed up, with megasquirt, see my profile for details) came with the stock fuel pump and fuel pressure regulator (FPR) attached, and with a brand new, uninstalled walbro 255 fuel pump. The previous owner told me the original pump was starting to show fatigue at high boost/high RPM. I haven't seen any signs of fuel starvation under any circumstances, although I am getting crazy, all over Air/Fuel Ratio (not under high boost/RPM). Now, my megasquirt is currently tuned like crap (litterally, really really really badly) which probably cause a significant part of those fluctuations; I also suspect that some injectors might be bad, or something else, so I'm not changing any AFR settings until i test out the injectors (in a few weeks, once I park the car for winter). Long story short, I thought it might be cool to install the new fuel pump.. it looks nicer, it'll probably buzz less than the old one (mmmmmwiiiiiiiiiii.......), and it'll eliminate the possibility that the pump is contributing to my AFR woes. HOWEVER! I've been told by a friend who's a mechanic that the more powerful pump will most likely kill the stock fuel pressure regulator. I'm inclined to try it with the stock FPR, but don't want to drive to work and have the car die on the way there from the new, awesome power of insane fuel pressure (echo, echo, echo....). I don't have a lot of money to put on the car (read no money at all) so I'm curious to see what other people think of the issue, what are your personal experiences, before I try anything out. Thanks a million! Seb
-
Hi! Thanks for posting. Impressive numbers with a mostly stock settup. Quick questions... -With 12 psi, did you do anything to manage fuel, prevent starvation and all? -with the stock turbo at what rpm does it start to spool, and at what rpm does it hit full boost? Thanks!
-
Air Dam Ducting with Intercooler
supernova_6969 replied to CarJway's topic in Windtunnel Test Results and Analysis
can't wait to see what you're going to make! -
Very nice. Besides loiking awesome what do you expect somw of the advantages over stock will be, and why (please speak for us non-professionals). Is it going to be two pieces joined by screw? With or without gasket? Im guessing thats for ease of fabrication ( not solely for the awesome factor)...
-
DIY shift indicator light with distributor/coil?
supernova_6969 replied to ol doc gully's topic in Nissan L6 Forum
I dont doubt what you're saying, pete, but would you be able to explain why? Seb -
DIY shift indicator light with distributor/coil?
supernova_6969 replied to ol doc gully's topic in Nissan L6 Forum
I might be completely wrong here but if you are willing to play with the wires behind the dash you might be able to make your own with a led and a potentiomer (a "volume button", which is a variable resistance). Someone who knows what they are talking about would need to confirm all this, though... But from what i understand, tach needles are activated by electromagnets, which ar driven by voltage that increases with the rpm. If you manage to get to that wire, you could split it, leave one end on the tach, and run the other side to some subbtle yet highly visible spot. At that point, you can put that into the pot. and the pot into the led. Since leds only turn on when a certain voltage goes through them, it would only light when the voltage (which follows the RPM) gets high enough... And you could adjust the voltage with the pot... A few things would need to get figured out first though: - can you actually tap whatever gives the current to the tach. -does splitting it and running something in parrallel affect its output ( which would defeaut the purpose AND make the tack useless) -what kind of led would you need ( i.e. how much current/voltage the source gives out when it's around the time to shift... If the voltage is too low maybe it could be run to some kind of relay, too) Its a lot of ifs but if anyone can confirm if that wouod work, this is a project that could only take as little as an hour or two and cost less than 5$... -
For example, my car would be something like this (if I had a dyno sheet to show). 1. lame (in the litteral sense) 1983 280zx 2. engine: rebuilt L28 with turbo 3. Peak HP: +-200 @ 4500RPM @ 10 lbs boost (never tested, so I'm just guessing) 4. Peak TQ: one million torques @ 15 000 RPM @ 100 PSI (I really have no idea of the real figure) 5. The engine was stock rebuilt by the previous owner with pistons with slightly higher compression (no idea of the figure), a t03-t4 turbo with intercooler and megasquirt II. stock intake and exhaust manifold. 3 inch pipe from turbo to cherry bomb-type exhaust. 6. I have a number of issues; the MSII is poorly tuned and I currently have wildly rich A/F ratios (idles at 12-13, goes down to 9-10 under hard boost), I suspect some of my injectors are not woring properly, I know that some of the plugs are fouled (from the suspected bad injectors). I have some unknown issue that sometimes makes the car lose/gain/loose/gain boost... i think I have misfires under WOT ( I hope it's not pinging) 7. turbo starts spooling and creating slight boost around 2900 RPM. Full boost achieved around 3200-3300 RPM. Engine won't really rev past 5000 RPM, due to poor tunning. it's really lame until I hit boost. like, slower than my 2006 mazda 3 (which is quite zippy. though). and here I would post my underwhelming dyno sheet, as a JPG, for all to ridicule or cry about.
-
Hey guys. I'm a whore for data/info. I was wondering if those of us who have put their cars on dynos could share the results. I'm curious to see what kinds of mods give what kind of power, and what kind torque curves, how soon power comes, etc.... HOWEVER, to make certain this thread is not simple dyno sheet porn/bragging (which is not a problem here, porn and brag all you want. that's PART of the fun), I'd like to put some rule that will actually make the thread useful and easier to read.... 1. L28e blocks only. i'm curious about other engines but the second people post l24, or rb engines, the whole thread will loose focus. OVERSIZED L28 welcomed (strokers and bored engines, for e.g.). 2. Each posted sheet must be accompanied by the following info, in the following format (make certain you kindof get it right, but let's not go overboard about the form here): 1- car: year, model. 2- State of the engine: stock, stock rebuilt, slight mods, heavy mods, total-batshit-crazy-overboard-modded... 3- peak power @ RPM + boost level (PSI) if applicable 4- peak torque @ RPM + boost level (PSI) if applicable 5- short list of relevant mods if applicable, INCLUDING: fuel/ignition management, high compression pistons, turbo size/type, piston oversize and whatever else you did that could make a difference. for parts that are standards and don't really contribute like intercoolers and oil pumps and what not, no need for details. For other mods, like a crazy-fucked-up-pink-shifter-with-part-of-christian-relic-inbeded, well, if it doesn't add hp, don't list it. 6- anything else you feel might HELP OR HINDER your hp figures, like for my car, it's got a megasquirt with a tune that my 5 year old probably could improve, so yeah, that does not help. IF your engine is stock, please write the mileage here! it'd be fun to see how much mileage has eaten how many hp. 7- anything else that's interesting about your engine that can have an impact on the topic. *post dyno sheet* if you actually have a paper sheet, just take a photo with your cell phone or something, and post it. just make certain it's clear. if you don't have a sheet, just the numbers, well that's not as cool, but still interesting. post it! Comment posts ARE welcomed. I mean, i'm doing this so we can look at the dyno results and then talk about them... just make certain you don't post a sheet and a comment in the same post, i guess, to keep things clean. don't be afraid to post a sheet, then comment on whatever else in another, immediate post (like, two in a row). oh yeah! all dynos are different, there are different types, and some have to be corrected for altitude and all that. yeah, yeah, sure... that's 100% right. but I'm not doing this to compare who'd got the biggest dic... ah, HP numbers! this is only to get ballpark ideas of what mods give what kind of power. All right guys. go for it! Seb. PS: if you have a pre- mod sheet and a post- mod DYNO result sheet, you AUTOMATICALLY become king of the thread. there may be more than one king. deal with it.
-
Changing oil pan gasket on L28e(t) with engine in car
supernova_6969 replied to supernova_6969's topic in Nissan L6 Forum
quick question; anyone ever re-used an oil pan gasket? I'm not certain i'd risk it, but if other people have done it successfully.... -
Hey Malibud. have you had any luck figuring out what was the issue?
-
Air Dam Ducting with Intercooler
supernova_6969 replied to CarJway's topic in Windtunnel Test Results and Analysis
It's very well executed. whatever bumps and things don't really matter; who else has a one piece, mostly smooth duct in there? very cool. ( I'm planning on making a duct out of corroplast, which involves having parts of politician's faces on them. yours if definitely cooler). I was looking at it, and one thing that might help make the intercooler even more efficient would be to duct the intercooler itself. What I mean by that is you could make a "square tube" that is about the size of the core that proects forward towards the opening in the facia/bumper. Doing that would allow some air around (I do believe the intercooler is smaller than the hole in the bumper, yes?) to go straight to the radiator, but most importantly, the air coming straight from the outside would be boxed in and forced through the 'cooler. I suspect that with your current setting (and pretty much anyone's regular set up), a significant portion of the air that is moving towards the 'cooler gets pushed around by the relative high air pressure zone created in front of the 'cooler. With the "tube" in front that air would have nowhere else to go and would be rammed into the 'cooler (provided the gap between that duct and the 'cooler is minimal). Something i originally thought was weird was that you didn't do a smooth duct, that it's flat at first and then suddenly goes down. From what I understand, smoother transitions with shallow angles help the air follow the curve and give better flow, but then I saw that the "bowl" is meant to have the intercooler resting in it, so everything makes sense... Finally, one thing you might want to look into is to have some form of an undertray or some kind of spoiler (since your ducting kind of acts as an undetray too by blocking the big gap int he floor) that could help the air flow in a way that would improve cooling. This guys here did some fantastic work on his car (NOT a z car, but the basics are really interesting,and he's got real results). http://www.autospeed.com/cms/article.html?&A=113177 -
Changing oil pan gasket on L28e(t) with engine in car
supernova_6969 replied to supernova_6969's topic in Nissan L6 Forum
so the pan is still leaking. i'm guessing since the oil made it's way between the gasket and the block, there is no way to completely stop the flow.... unless something else is leaking (i'm looking at you rear main seal, although i'm not that accusatory). I have yet to go under there again to seen, but i'll do it soon.... next time i'm doign this, which is likely to be in a year when I rack enough mileage for a new oil change, i'm going 100% RTV.. we'll see how that goes. -
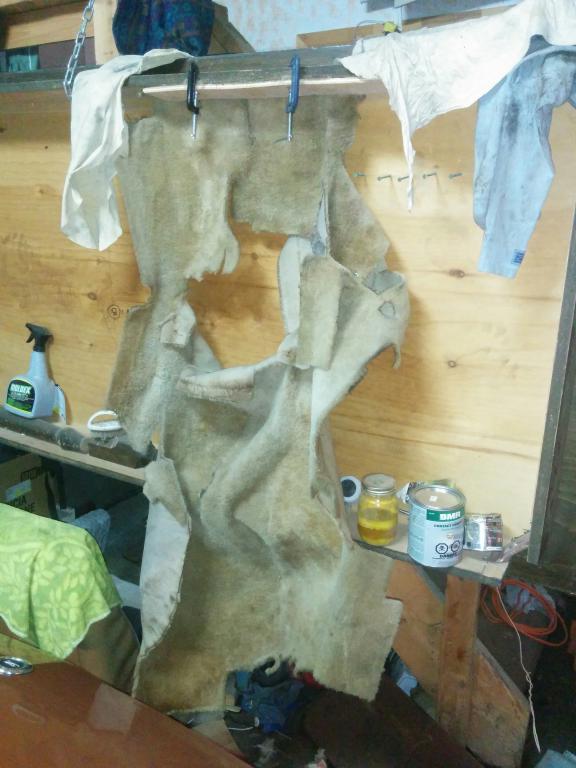
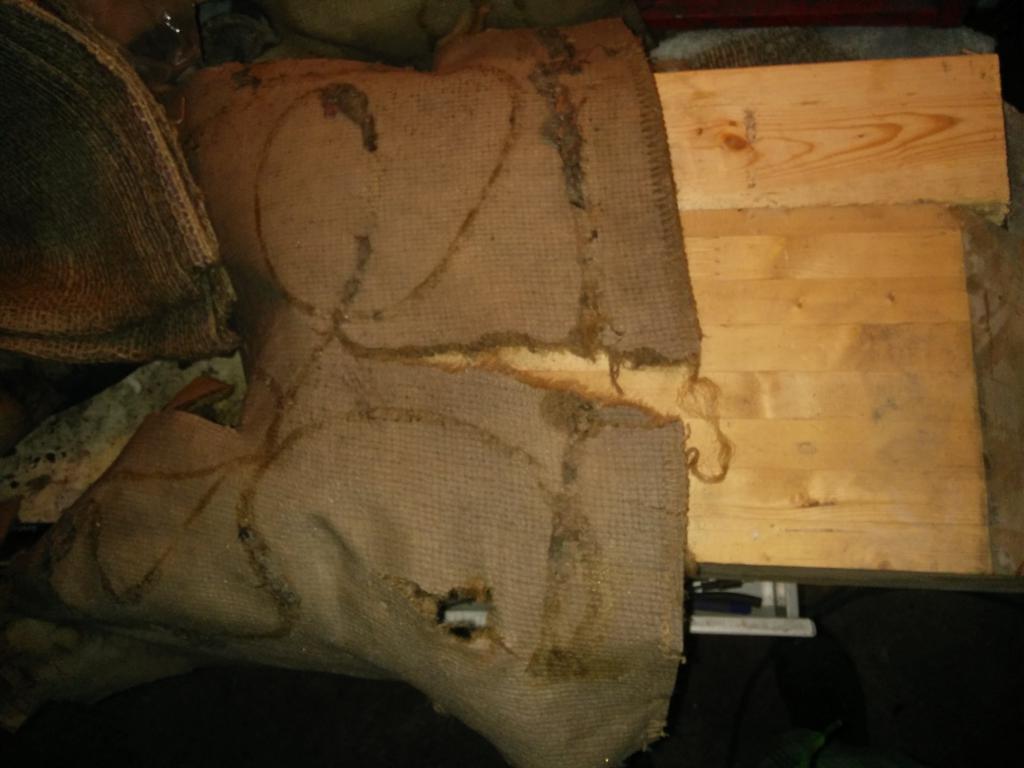
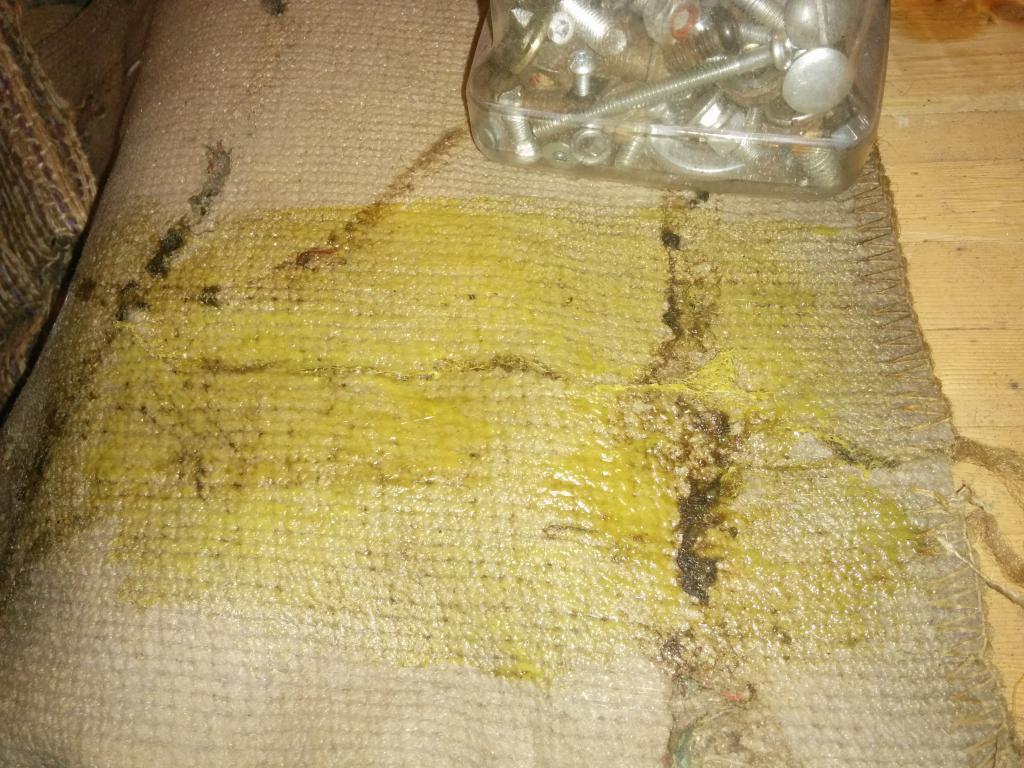
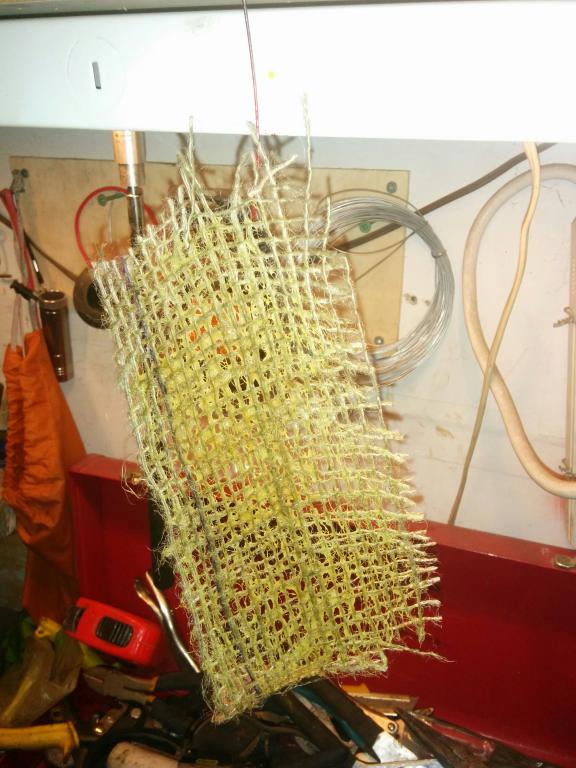
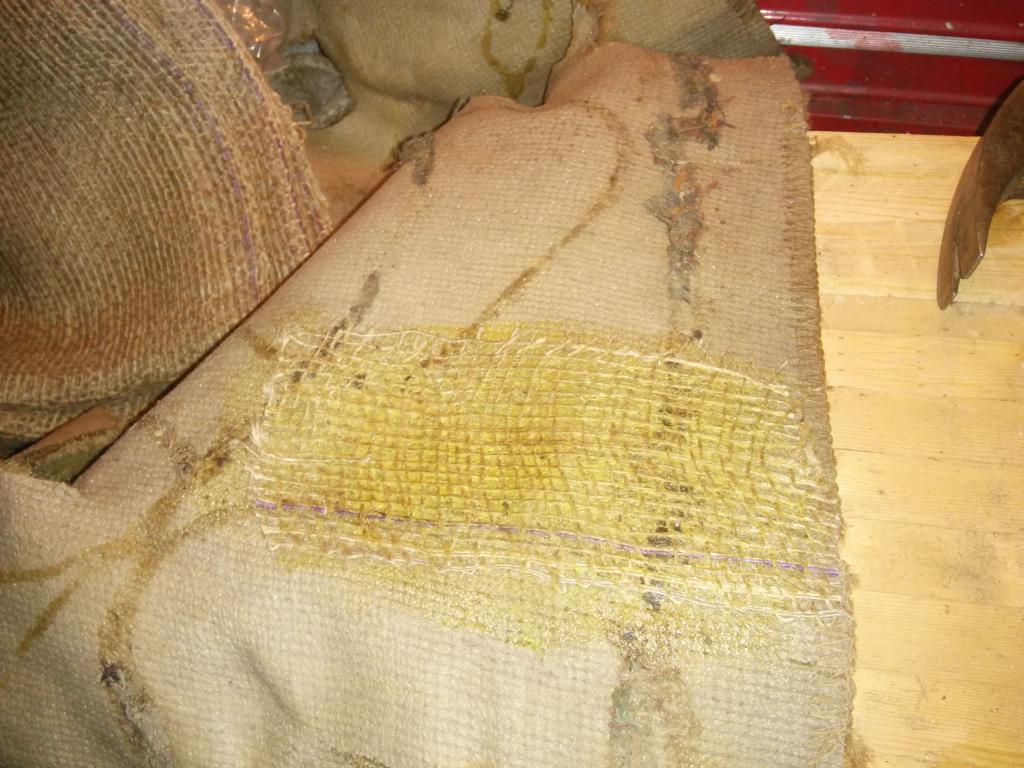
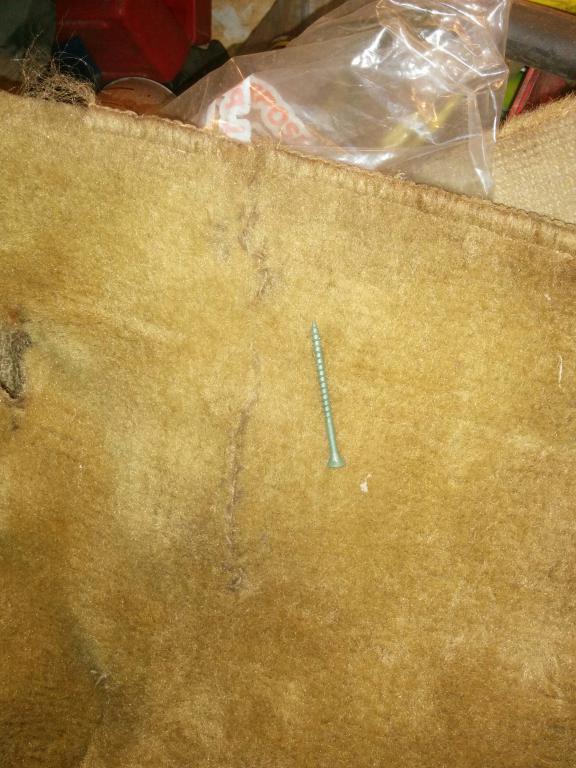
Hi guys! Quick backstory. I bought this supposedly "only needs a tune-up" 1983 280zx, with rebuilt engine, turbo, megasquirt. turns out I need more than a tune up, it runs rough, the programming is all wack, and much more. that'll teach me.... The body is in pretty good shape, just a little rust in the corners of the footwell and under the spare tire. I discovered (and fixed) the rust in the passenger footwell after I ripped the carpet and padding out to try to get rid of the moldy smell coming from (what I now know ) the padding under the carpet; the leaky t-tops made a nice welcoming pool for mold there and voila!, smelly car. In the process of fixing that, I cleaned the carpet with an anti-mold product, that I sprayed on and brushed in vigorously; that did the job, BUT! I realized that my carpets, after 30 years, were now rather brittle, and the fabric of the carpet ended up ripping if I only looked at it wrong, or for too long. This is what it looks like now... I know, it looks more like the skin of a dead animal than anything else.. the rips are bad... and numerous (it's hung like that to dry, from when i cleaned it). When i realized that, i searched for how to fix this kind of issue, and found a youtube video where a guy (who looked like he was a professional) used rubber cement to glue a layer of burlap to the back of a carpet that looked a little like mine, giving it a new "underlayer". I tried searching for it again, can't find it anymore. anyone does, please post it! Anyways, I just got around to doing what he'd done, only I tried a test patch. I wasn't able to find any rubber cement in appropriate quantities, but after some research, I realized that contact cement should do the trick, as it's sturdy and flexible. Here is the rip that I fixed.. with the glue Here is the burlap, covereled in glue too (you can't really see it, but it's there). To get he glue on the burlap without glueing everyting around, I laid the burlap patch on the rip after I'd painted glue on it (the back of the carpet), and brushed glue on the burlap there; because I did it while the carpet's glue was fresh, the burlap didn't stick to it. After about 10 mins, as instructed on the glue container, I lined everything up and dropped the burlap on the carpet. right away, it was solid, but to make certain it was well glued, I used a hammer and basically hammered every inch of the patch(not too hard, but enough to see the burlap getting flattened against the carpet; the guy in the video had used a big mallet that had a surface of about 4 inches square. I used a regular carpenter's hammer. it took a while...). it worked like a charm, and I tried to re-rip rip it: no dice, it's solid. Here is the "nice" side. It has an ugly scar, but I think that's mostly because the ripped edge had gotten discoloured or dirty. I later couldn't resist trying a bigger patch somewhere else and you essentially couldn't see the rips anymore.. Even then the ugly scar was probably there to begin with, with the potential of ripping further and looking even uglier, so my cheap self is satisfied. Ideally, I would like to do one big piece that covers most of the carpet, but since the carpet is molded, I'd have to create a shape and lay the carpet on that. I thought maybe i could use bags of earth or something and pile them up to make a reverse of the footwell, but that seemed like a lot of trouble, so i'll do bit by bits and see how that goes. Hope that helps someone. Comments welcomed, if only to tell my you enjoyed; positive reinforcement is real big to me. Ciao!

-
Changing oil pan gasket on L28e(t) with engine in car
supernova_6969 replied to supernova_6969's topic in Nissan L6 Forum
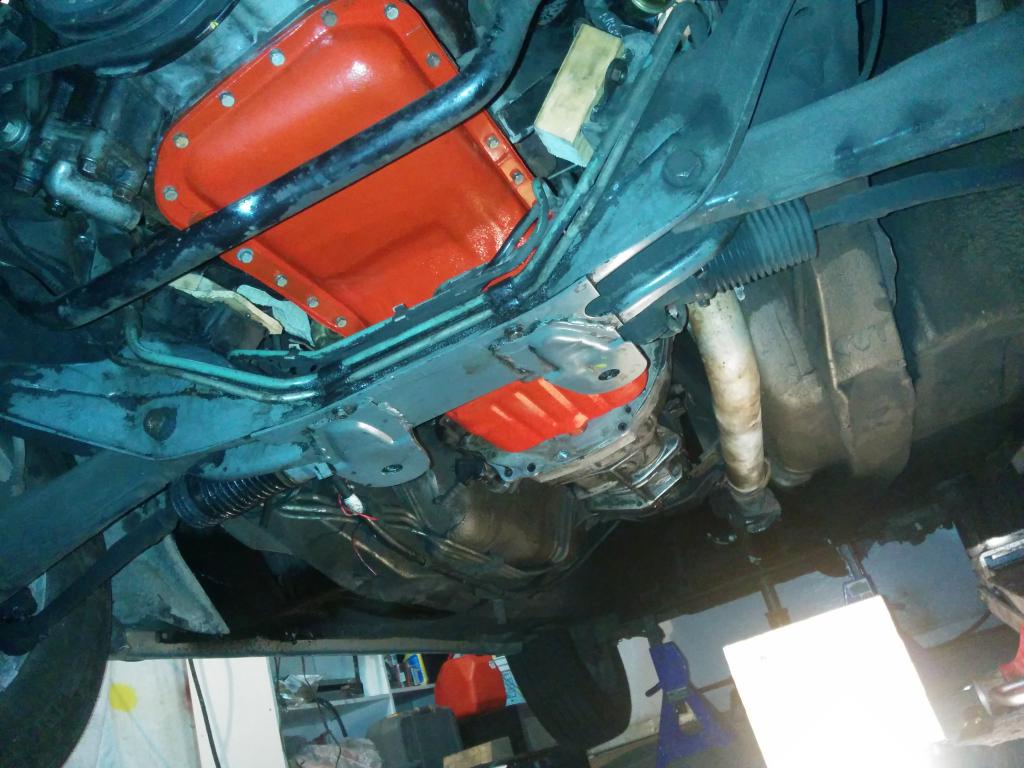
So i drove the car aroundfor a few days and lo and behold, the car seems to loose oil about as much as it did before all this work. I checked it out and the gasket is still straight but it seems a little wet front passenger and the area read passenger is wet all over. I checked the torque specs on the bolts amd they went from around 5ft-pound/60 inch-pound to about 3ft-pd/30in-pd. I cleaned it all up and retorqued everthing to about 6ft-pd/75 in-pd. To get the bolts to stay there i had to torque them all about 3 times and then some for ehere it leaked most. Hopefully that's the last i hear of them. I'll let you know! -
Twin cam head for the L6 from Derek at Datsunworks
supernova_6969 replied to Derek's topic in Nissan L6 Forum
Tony d, what's that "osg car" you're talking about? Can it be found and read about on the internet? Got a link? -
if you want torque on the low end of the RPM band, you're better off with a smaller-ish turbo that will spool up quickly. the downside would be that it won't produce that much power (or torque) in the mid-to-high RPM. I currently have a baddly tuned t3t-4 (t3 on trubine, t04 on compressor), which is supposed to give you power but spin faster, and my turbo start wiving me boost a little before 3000 rpm, which i personnally find high. If i had money, i'd try for a straight t3 to see if I can get that boost faster... metal bearings definately would help to have it spin faster (compared to traditional oil bearing). I suggest you learn about turno compressor maps. they'll tell you what each turbo is capable of... good luck.. let us know what you do in the end and why, and if it works!
-
Changing oil pan gasket on L28e(t) with engine in car
supernova_6969 replied to supernova_6969's topic in Nissan L6 Forum
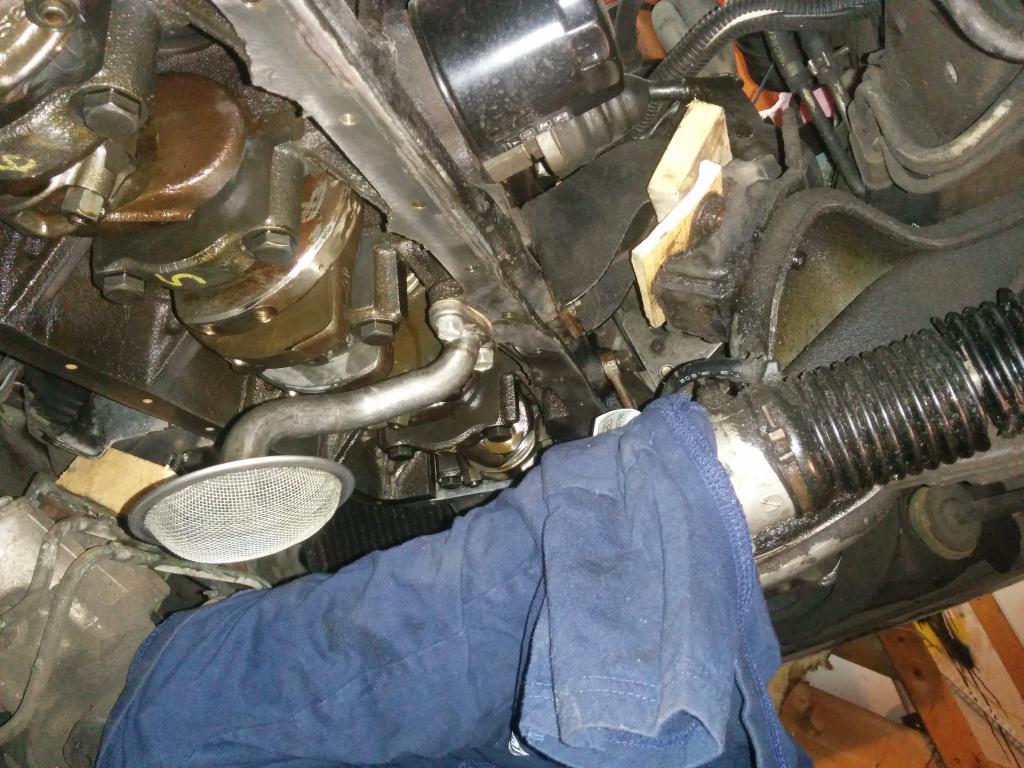
So it's done... reassembly is the reverse of disassembly, as they say in the books (or something like that). I didn't have any significant issues with putting the engine mounts back in their place (which I kindof expected), just had to move the jack a little and they found their way. The only thing i'd suggest is that, when you torque your bolts for the pan, give them a number. physically. there is 31 one bolts and if you do like me, a criss-cross pattern, torquing them all to 25 inch pounds, then 50 inch pounds and then finally to 60 inch pounds, you'll get lost. what I did is I wrote numbers from 1 to 8 next to the bolts, which gave me 3 series of 8 and one of 7. then all I had to do was to torque all 4 bolts #1, then #2, then #3 and so forth, and the criss-cross was perfect. many people won't need to do that, but I usually loose my spot when I do stuff like that, so I would have lost a ton of time re-torquing the bolt next to the one I was supposed to torque and I didn't want to fool around.... Also when I torqued, I got them all to 60 inch pounds or so, and then I ended up going around 3 more times to re-torque them to 60, as the gasket compressed and settled... I haven't had a chance to see if it's perfect, as I realise I didn't have the right sized filter when I attempted to change that and put new oil (I bought three of the fu**ers, and obviously don't have the bill anymore). That's a trip for Napa auto parts tomorow, who, unlike canadian tire, will give me the right model. I suspect however that it'll do just fine. the gasket is nice and straight, and so was the pan. I'l let you guys know if anything comes up. at this point in time, quite a few people have read the tread, at least one or two found it interesting... I do hope this very basic, detailed guide helps some people who, like me, might not be super confident. It's a bit long, but I figure it's best to have more info than less. Good luck, and please do comment when you swing by. -
Changing oil pan gasket on L28e(t) with engine in car
supernova_6969 replied to supernova_6969's topic in Nissan L6 Forum
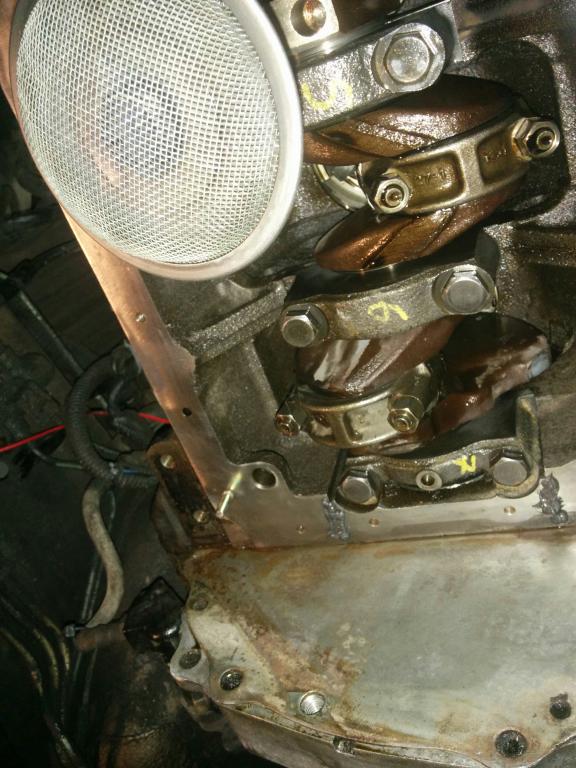
hi! the end is near! yesterday, I painted the lip/contact area on the inside of the pan, as I thought the black mate anti rust paint might not be enough. forgot to take photos. but who cares.. it's simple enough. I also de-greased the bolts by soaking them in a container with WD-40 (I had it around) and giving them a good shake once in a while. I didn't paint them, which I wish I had, as they don't look as nice as the pan. ah well... today, I cleaned the mating surface on the engine, found a little rust on the outside of that (the rust was basically just outside of where the pressure is put on the gasket: where the gasket sealed was perfect and next to it, very clearly delimited, was rust). I sanded that with 220, being careful not to sand the actual mating surface,. I didn't paint it or anything, I really just wanted to make certain the whole surface was flat. Once that done, I covered the crossmember with a rag ( so the pan wouldn't rub and scratch), and did a practice run. I realized that I didn't have enough clearance to safely slide the pan in without having the gasket move around (I put a little RTV on the pan then the actual gasket, so it could't move around too much while I was installing it), so I re-jacked the engine and gained about 1/4 of an inch, which was all I needed. I also realized then that I could install the pan WITH the oil pickup in, so I made a new paper gasket (I had gasket material that was too thin, so I made two and stacked them) and put the pickup in the engine. The official torque for those bolts is 7-12 foot-pounds. I then put a little tiny baby bead of RTV gasket all around the pan's mating surface. Litterally 1mm wide (about 1/32-1/16). I did that because the pan's mating surface is not 100% straight, so I figured the RTV would make up for that (sorry, forgot to snap a photo). On top of that, I put the actual gasket. I'd previously made myself some studs out of an old bolt that was the same size as the oil pan bolts. I figured it might help me put the pan straight and hold it there while I was fishing around for my first 2-3 bolts.. I put a little RTV at the seams where the front cover meets the engine, and put one stud there. and I did the same in the back.. Turns out the front stud was in the way with whatever little clearance I had, so I ended up removing it while sliding the pan in there (sticking my finger in the RTV sealant next to the stud as I was blindly fishing around, of course). The stud in the back helped out, tough, I definitely suggest doing that; the pan was not moving around as I was holding it with one hand and trying to screw in a bolt at the front. So I put 3-4 bolts to hold it there, and them put the stock load spreaders that go around the pan between the bolts and the pan, then got the ones I'd made myself and put those ones on the remaining bolts holes (the ones that "came with the car" only covered about 1/2 the pan; the rest of that pan had the bolts straight on, and the pan was all wavy there from the pressure, so I made myself some extra ones so all the holes are now protected, and the pressure more evenly distributed). So here she is, lightly torqued (about 1-2 ft pound). but looking good. I'll let her rest that way overnight so the rtv cures, and tomorrow, I'm torquing them properly to their required 4.3-72 ft-pounds, and I'm resembling everything.
-
Changing oil pan gasket on L28e(t) with engine in car
supernova_6969 replied to supernova_6969's topic in Nissan L6 Forum
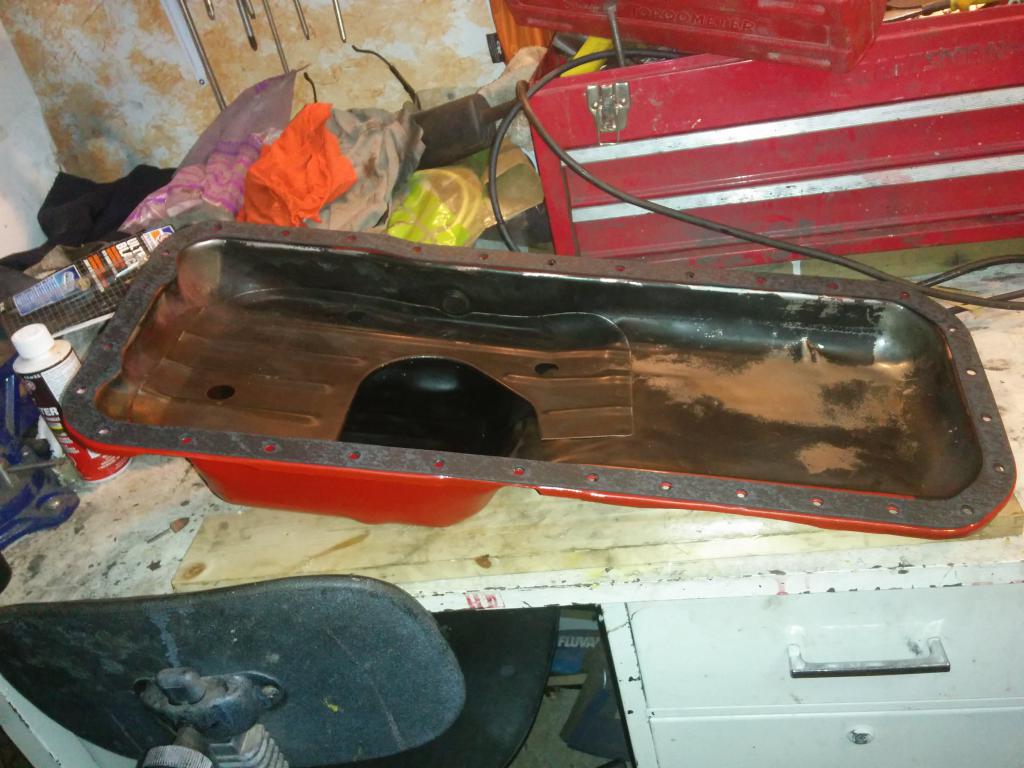
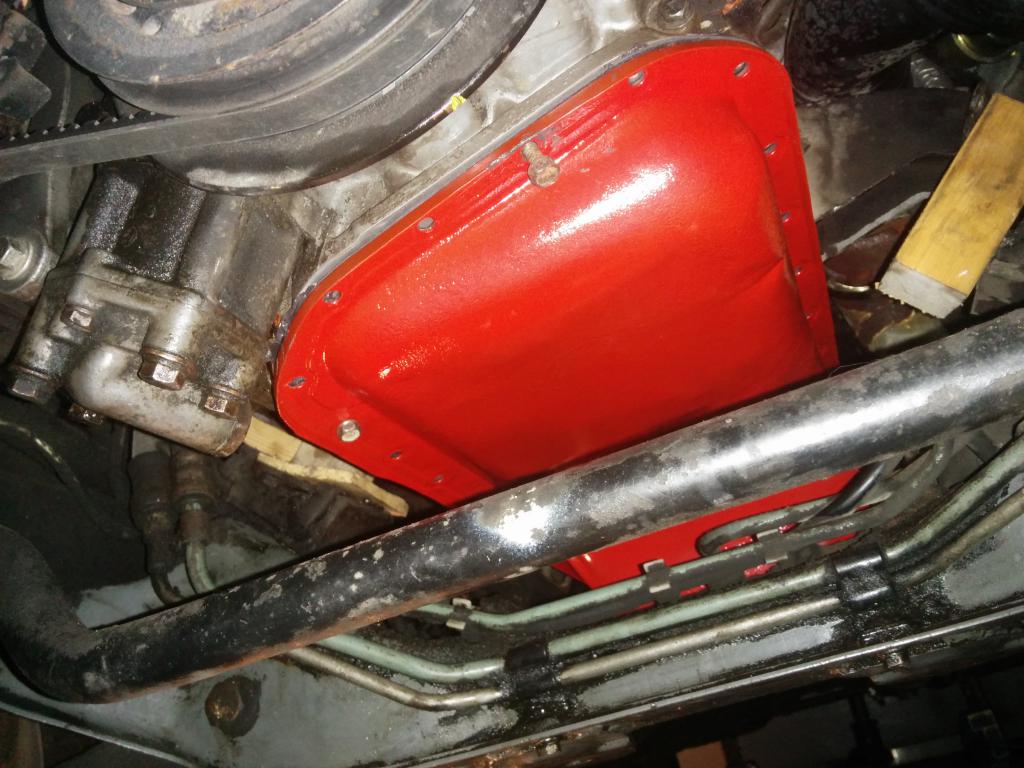
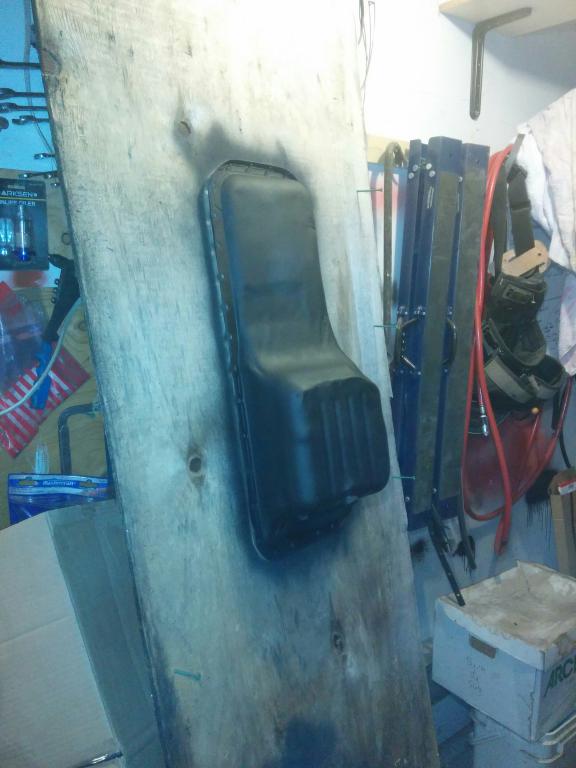
So I was about to put the pan back in the car when I talked to my dad. never a good thing. I mentioned the work i'd done and asked that he thought of my plan to leave the pan's finish (painted some weird grey-brown colour) as is, even if there were a few very small bubbles in the paint. he of course told me I shouldn't let it go, now that it was off the engine. So I did my research and this is what I did: I first stripped the paint usinga grinder with a brush wheel. I got it down to shiny metal (no photo, sorry). Except that there were still some spots where the metal, while perfectly smooth, had a brownish tint to it. To neutralize the rust (that just didn't go back to metal no matter how much I brushed it), I used a phosphoric acid-based product (rust check rust converter, bought at canadian tire)... I followed the not too clear instructions and brushed it all over (with a regular toothbrush), let it dry till it was all blackened and crusted,repeated, and did it a third time for good measure. After that, I took the pan in my shower and rinsed it all up, brushing it with a toothbrush to get rid of the gunk that had dried on it. That was REALLY weird, giving a bath to unpainted metal, but I made certian I dried it right away, using towels and then a hair drier. here is what it looked like after this treatment.. It got all green with black spots, which I understand is normal and means the treatment worked. I hope, anyways. That done, I primed it and painted it with a regular primer and some engine enamel paint. I know red isn't the most typical colour and people say dirt and oil will show, but I wanted something that would pop a little instead of just being there. We'll see how it looks in a few days when I put it in.
-
how to install a fuel pressure regulator and rail
supernova_6969 replied to 280zmonstar's topic in Nissan L6 Forum
do you own all three rails or is that picture from the maker, and you ordered one like it? I've just done a bunch of research.... One basic thing to do is to put a fuel filter between the tank and the pump, while you're playing with the fuel lines and all. see this for a good write up. http://atlanticz.ca/zclub/techtips/fuel/g3filter/index.htm. his site is also grreat for all sorts of basic tips. hard to navigate but once you figure it out, all the articles are worth reading. as for the install, some guys do a deadhead configuration (tank --> pump ---> filter --> regulator --> rail, with the return line straight form the regulator to tank instead of from the end of the rail) for good looks and simplicity, but that seems to sometimes cause issues with ther pressure going up and down. people have talked about putting a big damper at the end of the rail. there is also concerns with the fuel getting too warm in the rail, although the bigger rail you're putting in would ofset that. others put the regulator before the rail: tank --> pump ---> filter --> Regulator --> rail --> return line... but it seems most manufacturers suggest putting the rail after. you should check with the company that makes yours. otherwise, seattlejester basically said it all. the way he describes seems like the most recommended one. as for where you want to put the regulator, you could find a way to bolt it up right next to the rail on top of the engine (similar to the stock location) and run a return line from there to the tank (either parallel to the intake line, or in the back of the engine against the firewall, which sometiems looks cleaner), or you can mount it next to the fuel filter stock location, although that would imply running a vaccum line accross the engine all the way there, which is not a big problem. you might argue that having the regulator away from the engine clean things up even with an extra vaccum line. and you can always tuck that line somewhere, while you can't tuck the regulator anywhere.. although yours looks nice, make certain it can be seen one thing I suggest is to google 280z, 280zx, l28 engine and whatever else you can think of and look at pictures of people's engine bays. you'll see a few setups there that should inspire you... good luck, and post pictures and tell us stories about what you en up doing. -
nice work on the connector. I like that you put heat shrink on it. the one that came with my car didn't have heat shrink and things moved enough that the connection to the fuel pump got undone when I was adding a wire for a O2 sensor. not cool. one thing that i'd do if I were to make one would be to label all the individual wires right outside the connector (i'd do it inside, but no room); while you might remember what does what or look at a pinout, It's safer to have it all written up right there, so you don't have to go print a pinout, or try to remember everything. optional, but the moment you'll have to troubleshoot, you could be glad....
-
Changing oil pan gasket on L28e(t) with engine in car
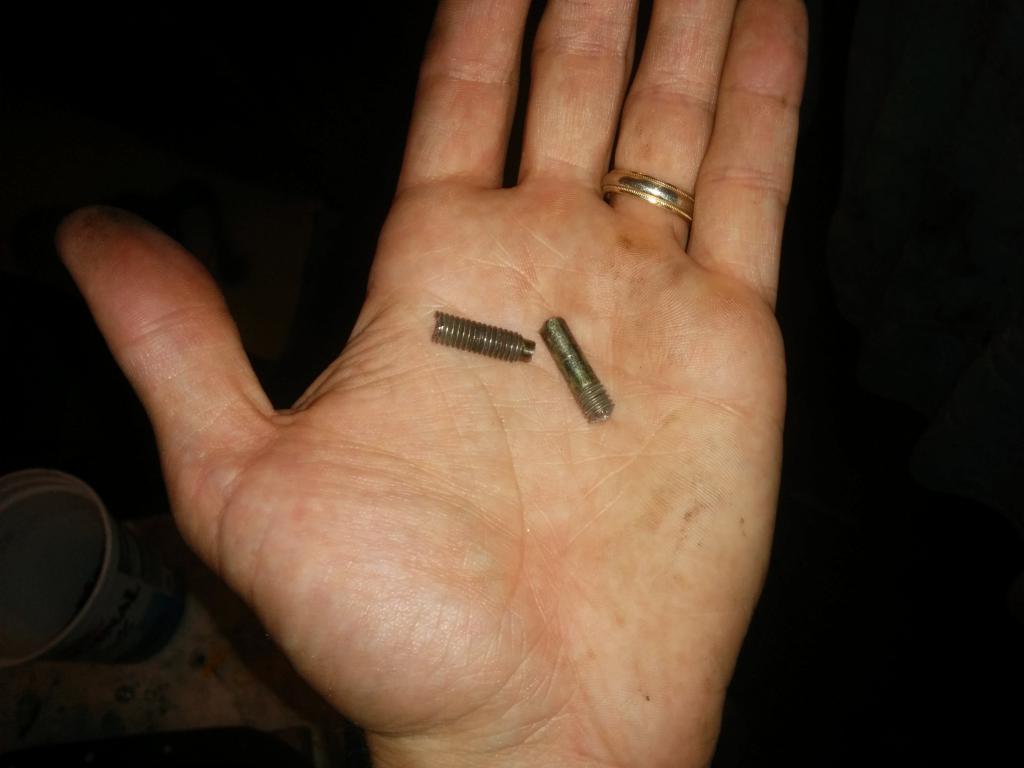
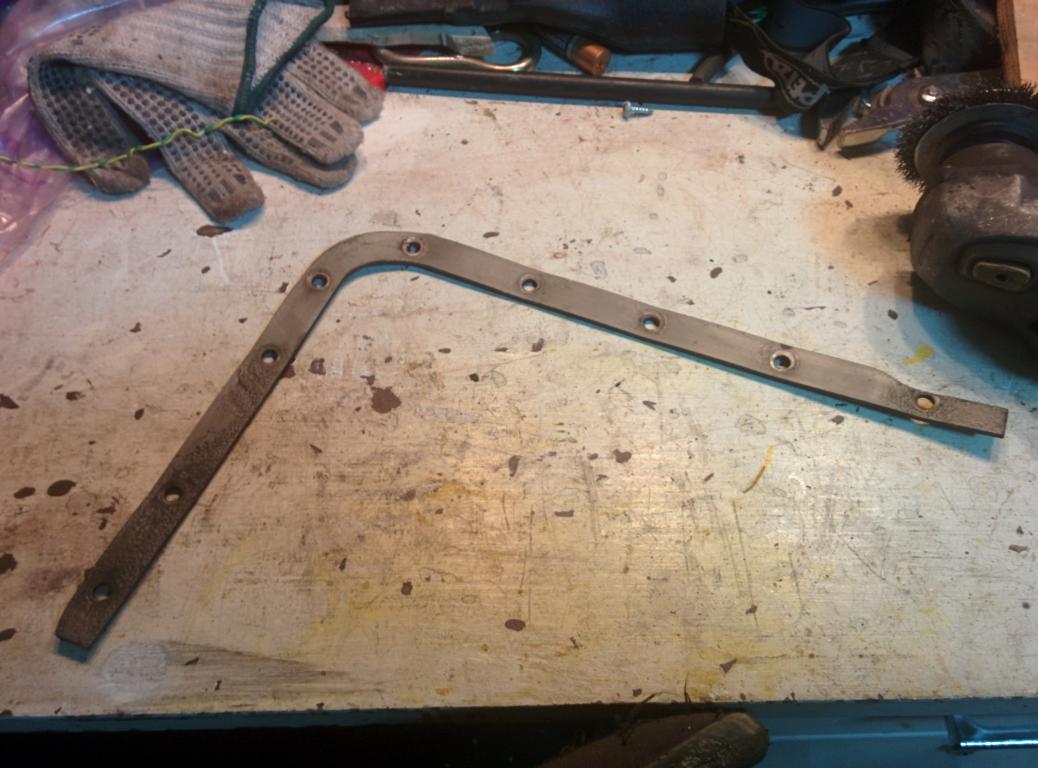
supernova_6969 replied to supernova_6969's topic in Nissan L6 Forum
So i was thinking of a way to make certain the pan does not get all bumpy again.... I realised that on my pan, about half of the lip (back half on driver's side and rear of the pan) had these oil pan load spreaders, flat metal bars about half an inch wide, kindof like a flat washer that covers a few holes all at once, contouring the pan and going between the bolts and the pan itself. I didn't think anything of it at first but now i'm wondering if it's stock and if so, why is there only half of the pan covered... this is one of the two pieces i'm talking about. you can see it's not too straight, another proof of overtorquing... Do you guys have that? If so does it go all around or does it cover only part of the pan like me? I was thinking of fabricating some for the rest of the pan, to even out the pressure of the bolts.... Thoughts?