Dat73z
-
Posts
852 -
Joined
-
Last visited
-
Days Won
8
Content Type
Profiles
Forums
Blogs
Events
Gallery
Downloads
Store
Everything posted by Dat73z
-
Some quick photos of the Nissan comp OE type roll bar test fit to determine the final position of the trunk floor plates. The roll bar is an absolute work of art made by Romas at DCW Classic. I've definitely learned a lot about the racing history behind the s30 and am grateful to have made many new friends all over the world this past couple of months, exchanging notes with experts in the community such as Romas, Alan T, Kats, Chris, Florian, and many many others. This build definitely would not have been possible without the support of the community. I started flattening the trunk floor for welding yesterday but I think I'm going to take a break for a day to fully prepare the welding areas and work through the interior overall which is covered in old sticky adhesive/tar remnants.

-
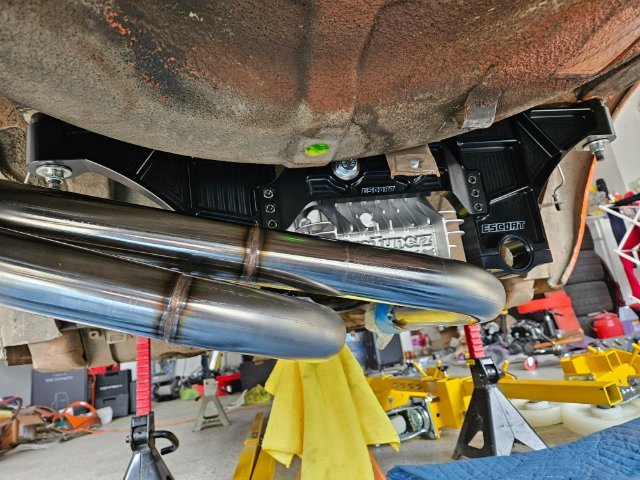
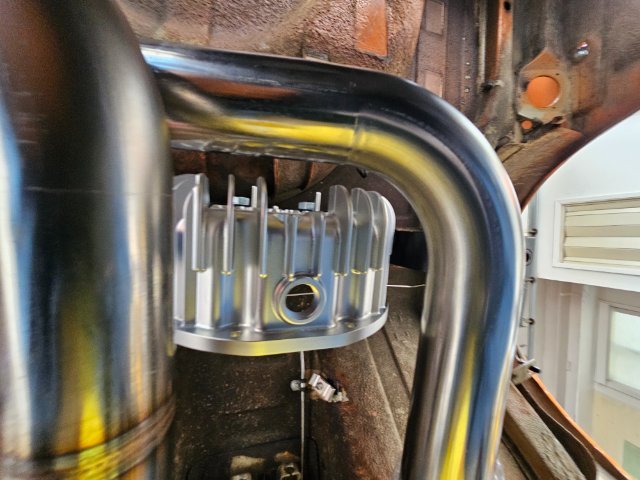
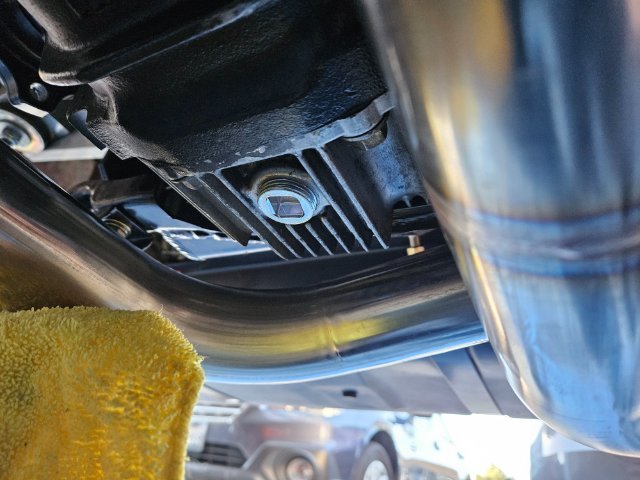
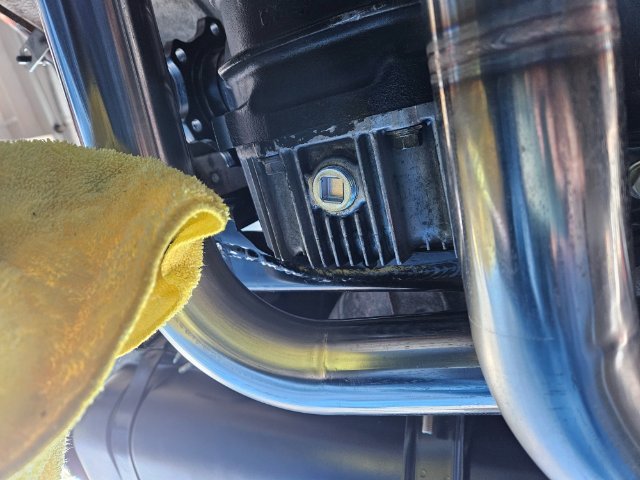
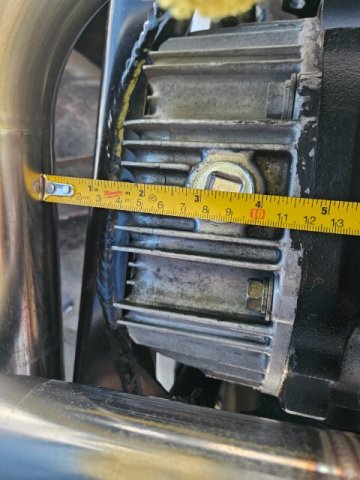
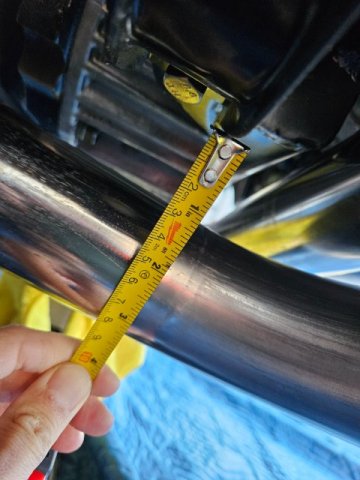
Continuing on chassis reinforcements, the Nissan comp OE type rollbar will be delivered later today. The OE type rollbar bolts to the existing m10 captive nuts above the rear tubs and also to the trunk floor straddling the reinforced u-channel between the rear shock towers and rear suspension/driveline mounting points. For the floors I've started fabricating some 6"x6" 1/8" steel doubler plates which I will weld some captive nuts as they do in the JDM then stitch them in with the tig. In preparation for this, I bolted in the Escort 1 piece rear end which will stay in place for fabrication. Given the reinforced structure of the rear suspension points, I don't think things will move around but just for peace of mind that everything bolts up properly before and after welding. I've learned my lessons over the years from welding warpage and fixing my mistakes with blocks of wood and BFHs 😂 I also decided to mock up the PTZ cover one last time to verify dimensions before machining and I'm not sure how I got this so wrong but everything fits. I was under the impression that the Escort geometry was the same as OEM so maybe the T3 geometry is different. Not a big deal either way, as the front diff mount needs a bit of refabrication for the exhaust and shortening the AL driveshaft is straightforward. I also have some spare Q45 diffs I could blow apart and check for fit, but I'm running out of time and need to do some other welding and misc. chassis work before it goes on a bodycart for transport next week.
-
@Zetsaz a lot of my friends have been doing the same 😅...not a bad move imo if you're planning to use the parts. My OSG LSD actually came in a month or so ago before this whole mess but as we've seen things can change by the hour lol. One thing to look out for is some importers have already been upcharging 25%+ for "tariffs" even though they aren't fully in place yet. I was asking around this past few weeks and got similar stories from a lot of 3rd party importers so maybe they were anticipating and charging the 25%+ upfront to be safe, but who knows if they would've pocketed the fees or refunded those extra costs if the tax bill didn'tcome in. I ended up ordering parts direct from JP companies like Escort and they did not charge me the thousands of extra in "tariff" fees, they just let me know if it's stopped in customs I would need to pay the taxes to get it released which has always been my experience prior.
-
Last month blew by but good progress has been made on the chassis. This next few weeks I'll need to finish stripping a few things off the chassis and get it loaded onto a body cart for transport in May. Due to the uncertain tariff situation I procured a few parts I was initially planning to order after the car goes out. I decided to eat the costs now as prices could potentially increase 25%-200%+ on the US consumer tax side and who knows how sticky that will be. For the turbo build refresh I wanted to beef up the chassis and rear end. A few weeks ago I dropped off the Q45 diff for a full rebuild with R34 GT-R 3.54 gears and a OSG Super Lock LSD. My rear end was also already structurally reinforced and plated in, but I decided to take that a step further with a Escort JP single piece rear end. I also received a PTZ rear finned cover, which I will need to perform some machine work to fit. For additional chassis reinforcement, the OE type competition rollbar should arrive soon. It's more of a historic/obscure part but I'll post some mockup pictures for anyone who's interested.
-
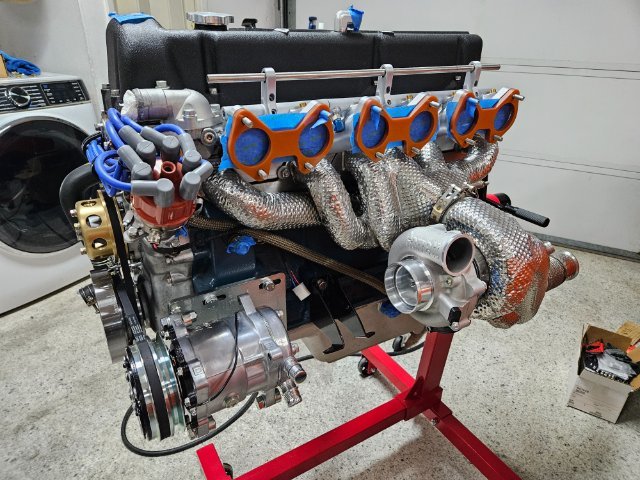
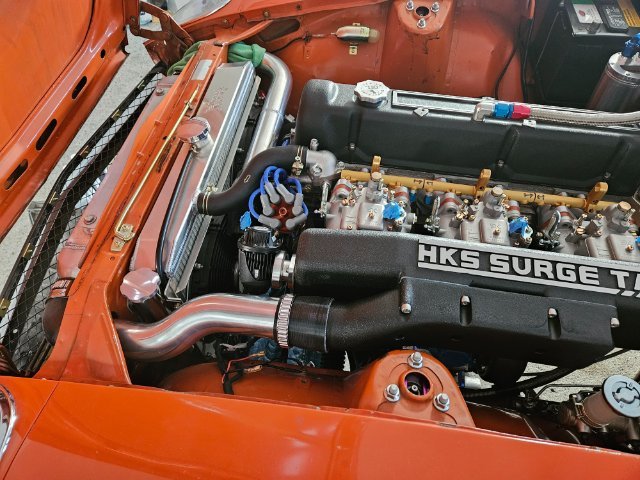
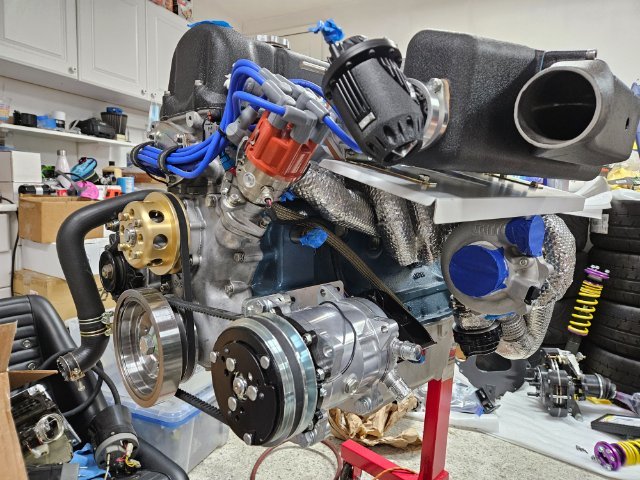
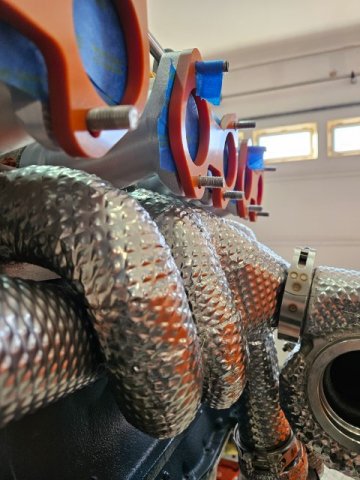
@DuffyMahoney the raised aspect of the manifold is for packaging. I think l posted these pics before, but here's what you're working with on high mount turbo setups and surge tank/induction boxes (ignore the cold side charge pipe wonky angles I will fabricate a new one later). Early on I referenced the dimensions between a few other manifolds I had (SK/FET/Mik). The form is really dictated by making everything fit and function properly, and as you can see space is at a premium.
-
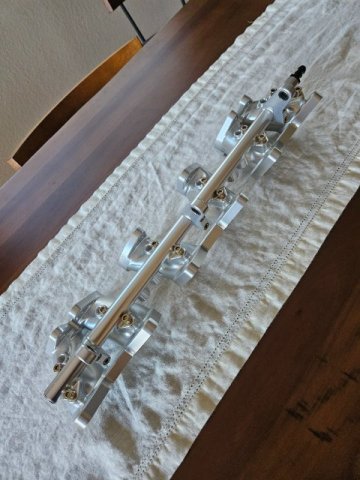
@DuffyMahoney yes balance bar with takeoff ports in my case for BOV, timing control, brake booster, etc. The takeoff ports are separate from the 1/8 npt ports you can see on the runners which may be used later for direct port nitrous or other injection. Also modular rod holder. I'll do a proper photodump and full post later but it is a clean sheet design by Larry Asp at Revery Performance so you likely see some similarities to other manifolds he has designed including one I've seen on a SEMA Z. The concept here was the ultimate mid-runner high clearance manifold. The geometry is such that it clears even high mount turbo manifolds such as the ProtunerZ vband custom I am running along with providing adequate clearance to run a surge tank or air box. We went through several design iterations over 2 or 3 years (I took a ~1yr break from my Z to finish building and selling a couple of other cars before starting back on this build late last year 😂) and found the ideal packaging in the s30 chassis. Imo there are a lot of novel design features present here which are missing from any other offering on the market today such as the o-ringed balance bar, ability to isolate individual runners and sync check without pulling the airbox/surge tank, etc. I'll cover the aspects later when I get past paintshop crunch time. I can't say enough good things about Larry but he's an incredibly talented designer and incredible to work with. I'll be showcasing more of his work soon 😁. If anyone is interested in getting one of these manifolds or anything custom made reach out to him.
-
Still going through prep work on the chassis but a quick turbo update. Got the custom cnc intake manifold in and couldn't resist unboxing. I'll dedicate a post to this later when I get it fully set up but I snapped a pic on the dining room table before it goes into storage for a while 😁 Next up will be the cnc fuel system components and there are a couple of concepts I have in mind from OEM performance blowthrough cars such as the Lotus Esprit Turbo I'd like to implement and have parts machined for as well.
-
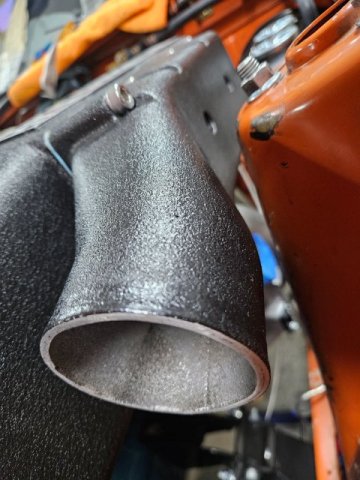
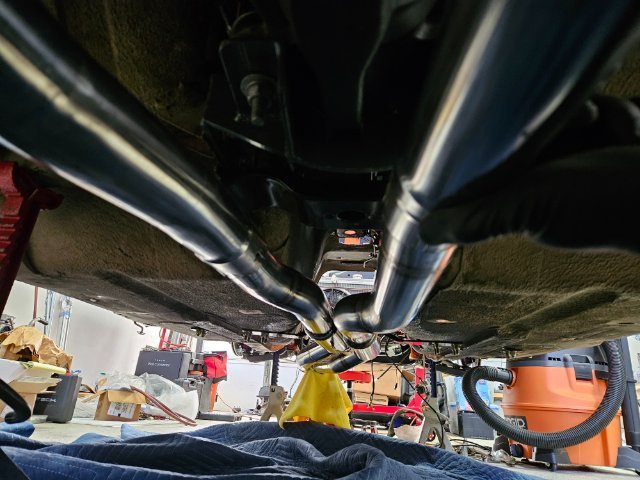
This afternoon I checked the mid-section of the exhaust. Looking at reference pictures when I had the cd00a in the car I will likely need to section the front of the exhaust right before the twin resonators and build the merge to carefully run around the trans mount and case. This will also allow the exhaust to suck up into the tunnel as the AE trans mount hangs much lower than the OE mounting arrangement. What will be interesting is if I can fit a flange or dual vbands on the resonator end. As with most everything else on this build it'll be crazy tight but I think doable. Something to look forward to when the shell gets back in.
-
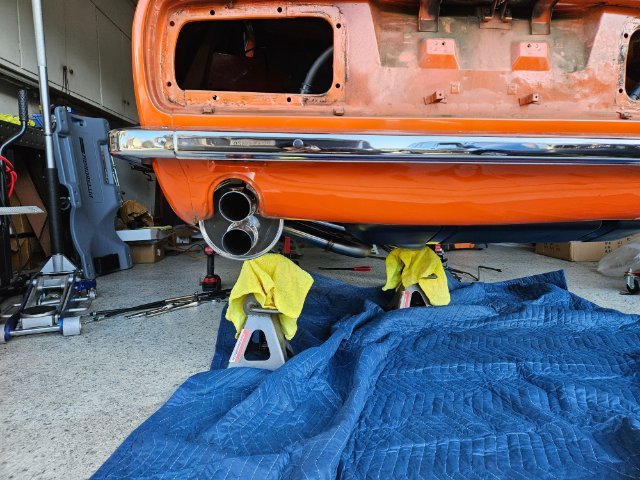
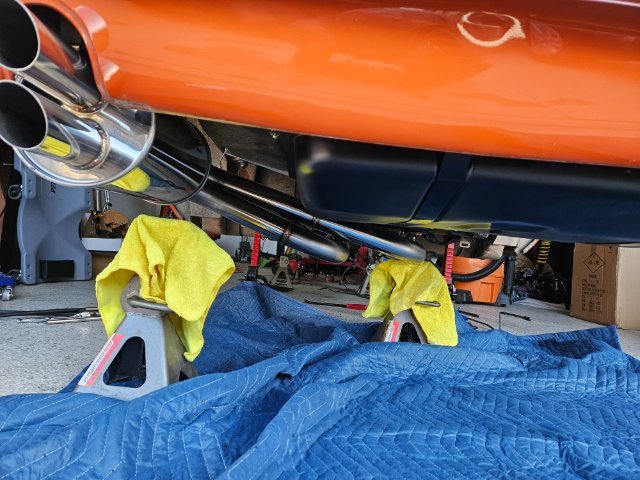
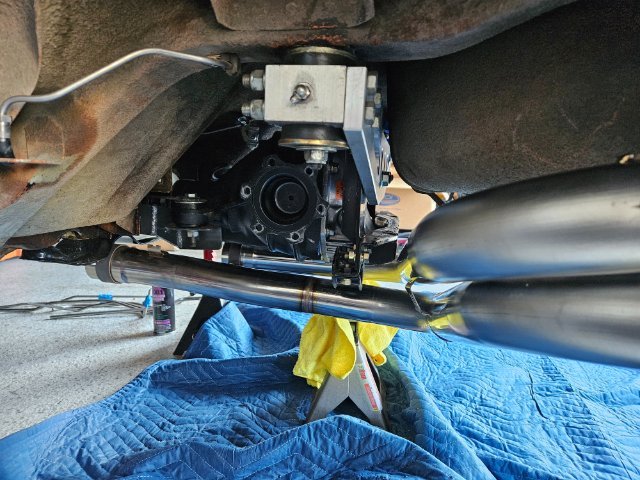
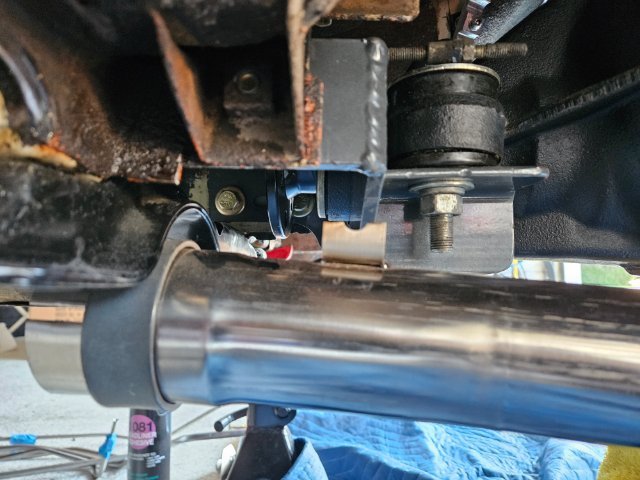
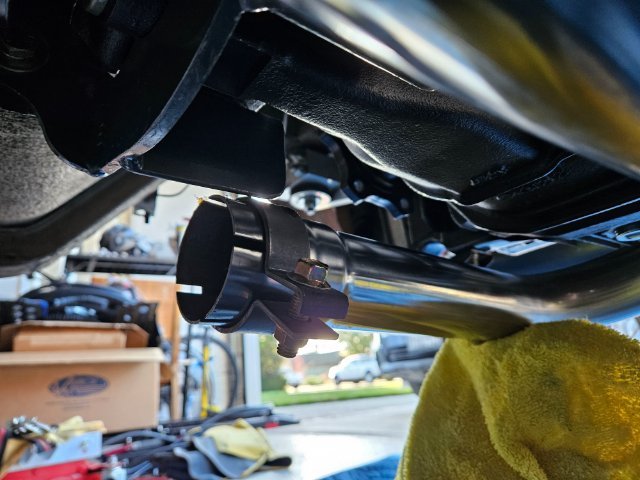
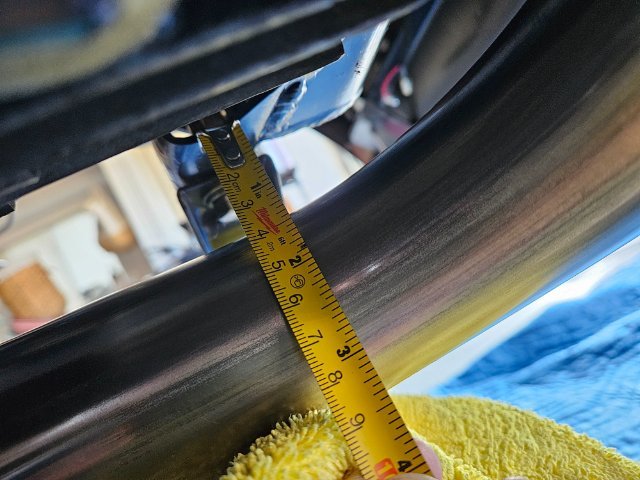
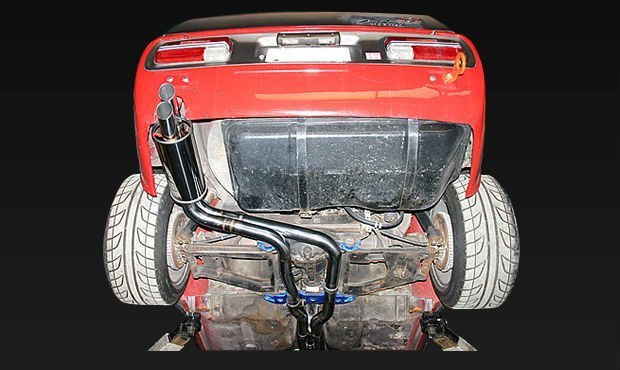
Another crazy week but I've been making some progress on the Z in the evenings. Last week I threw the spare rear end setup back on to mockup the NOS Reinhard twin 60mm exhaust and see if the Escort Japan rear end setup will work. My rear end setup is far from stock as everything is structurally reinforced, boxed in/plated and welded out but the geometry to the LCAs/caps is the same. What I found is: 1. There is about 4.75" (4.5" to be safe) from the r200 case rear cover flange to the rear pipe. 2. There is something like 0.5"-1" to the rear caps if I account for adjusting the system fit. 3. I will also need to trim the r200SN front mount a bit to pull the exhaust into the early s30 twin pipe rear crossmember cutouts. 4. I also had to trim the front exhaust mount to clear the r200SN but like my last custom exhaust I'll tig in a new bracket which will turn the mount 90 degrees for clearance. I also left some of the original mount there to triangulate the new mount when I tig it in. Fitting up the system it's pretty evident it is exceptionally high quality, a work of art. It was near impossible for me to actually find any pictures online and I think most people who have posted just purchased the muffler or back boxes with custom piping so I'll photodump a bunch of reference pictures. Maybe in another 10 or 20yrs someone will also be doing the same off these grainy pictures 😂 I'll check the center section as well and upload pics of that later but am most concerned about getting parts on order for the diff rebuild.
-
Thanks @madkaw, I'm checking that out now so I'll see how things look. Quick update on the turbo build I unboxed a heatshield from Datsun Spirit and test fit it up last night with the restored SK50s and Surge Tank. I think it'll work well with some slight modification and perhaps add a secondary layer with an air gap. I'll also need to drop the engine in one last time to double check the turbo cartridge clocking and hot side clearances before welding out the elbow. I have about 2 months left to go before the bodyshop so I'm minimizing the time spent diving into specific aspects of the turbo build unless I need to. Mostly I'm test fitting things to ensure I'm not missing any packaging considerations on the chassis. Any other fabrication work can wait until the shell is at the bodyshop.
-
That's good to know on the Q45/Z32TT wheel bearings. No I am running 280z stubs with the Q45 CVs and custom Moser cut shafts. I looked at the t3 Q45/Z32TT option a couple years ago when swapping out my t3 Konis/GCs and wilwoods and parts availability was definitely a concern. I ended up locking in on the KW and Stoptech setup for the long-term, so my weakest link is still the stubs 😅
-
@calZ sounds good I'll send you a DM when the time gets closer. I agree it's typically about finding the compromises you're willing to live with 😅 I've been continuing the prep process for the bodyshop and realize I need to check some clearances/brackets on the rear end. A few years ago I imported a NOS Reinhard full 60mm twin exhaust for this build. I figure the twin 60mm should be as good for single or twin turbos. My Q45 r200 is getting rebuilt with a OSG LSD and for the rear end I was thinking of upgrading to all Escort Japan pieces including their extended rear diff cover. The problem which may present is how the r200 (and so far as I can tell the vintage Nissan Comp systems) wrap around the rear of the diff. I only have one grainy picture of a full Reinhard exhaust installed so later this week I'll test fit it up with a spare diff to see.
-
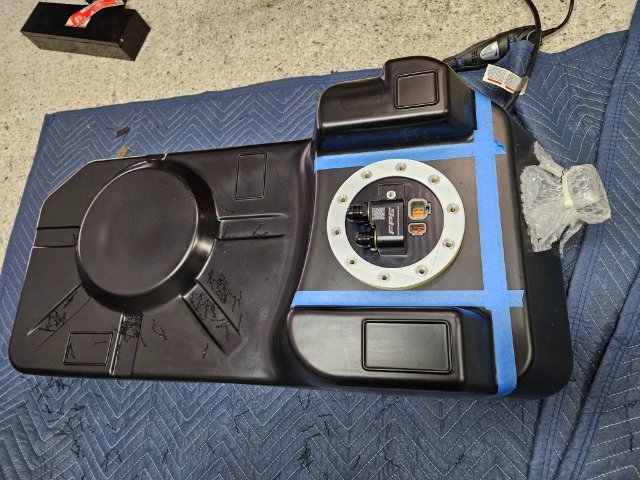
@Zetsaz there is no baffling inside the VTS tank other than the formed center area. However, the formed center area fully blocks off the fuel towards the rear of the tank which perhaps has some benefit under acceleration/cornering but overall I'd say it's comparable to the OE tank. The main benefit (other than being poly) is the formed recessed component mounting area. I think earlier in the thread I showed some pictures of the modifications on my OE steel tank which required quite a bit of cutting/welding/waterjet custom tank ring for the fuel cell plate. I also sealed off the stamped center baffle and added one way valves. Either way nowadays there are a lot of options for fuel slosh control such as Holley Hydramat, Aeromotive Stealth System, in-tank passive/active surge tanks, fuel pump trays, etc. Each has their pros and cons but that's a separate topic 😅
-
@calZ if you are referring to the adapter ring there are no links as it is a custom one-off piece in design. What you see in the pics are the developmental 3d prints before machining and finishing. There are a couple of minor things to sort out I didn't show such as an integrated fuel sender with roughly the same ohms sweep as the s30 gauge. If you're interested in getting an assembly let me know and I'll get some pricing for you when the time gets closer to production. Lots of irons in the fire right now, but I'll dedicate a post to the updated fuel system later like the custom cnc intake manifold.
-
Haven't posted in a while as I've been busy blowing the car apart to a bare metal shell along with welding and rebuilding a bunch of stuff in preparation for the spring bodyshop dropoff date. For the turbo build I started prepping the tank for the in-tank FPG surge tank with integral Pierburg lift pump. I'll be running a single walbro 450 to start, with the option to run twins (3 pumps total including the lift pump) within the surge tank feeding through -8 and returning -10 directly back into the surge tank. Every fuel system I've ever ran in a s30 has been a compromise, so hopefully this will be the last fuel system I ever put together (for this car at least).
-
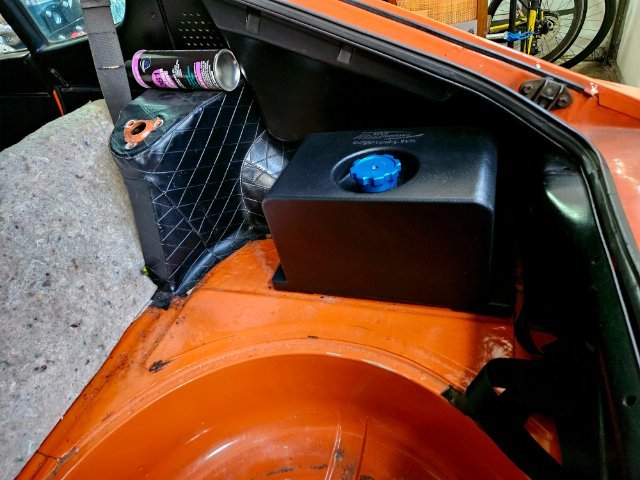
A busy start to the weekend due to the holidays but the plan is to get the mounting locations for the water/meth tank set and finish stripping out the interior. For the water/meth tank, I think the cubby area on the pass rear works well and it'll basically blend into the black interior when it's all back together.
-
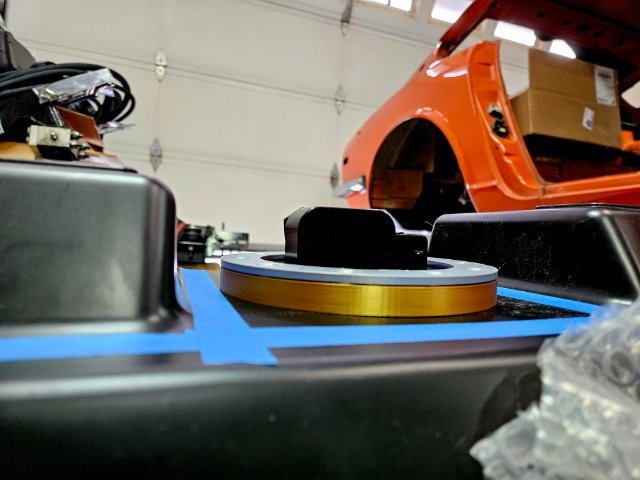
@calZ I'm working to import the Mizukami Auto one and yes the exchange rate has been phenomenal 😁. Nils at JDMJunkies is running one on his Swiss s30 build and when I messaged him he had nothing but great things to say about the build quality, fitment, and how complete the kit was down to the weld-in floor plates. I also went down the rabbit hole of investigating other available option(s)/what is historically accurate/made some friends along the way lol and settled on the Mizukami bar as the most viable option for my needs. @A to Z The manifold is a novel clean sheet design from a very talented designer and friend. I'll dedicate a post to discuss the design philosophy and aspects when it's time to refocus on the driveline.
-
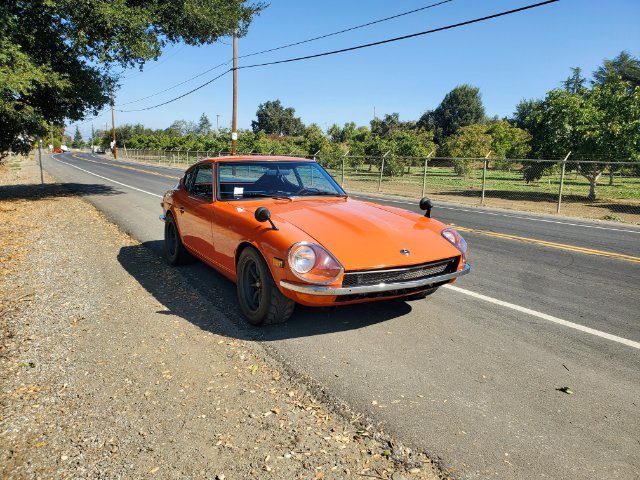
Thanks for the discussion guys, and no offense taken @A to Z. In terms of the scope, chassis modification such as full length frame rails will be carried out for strengthening among other aspects I'll cover later. I see 50k being repeated a lot not sure where that's coming from but this will be done to a high standard regardless. I don't think I've really posted much about the car itself or what it means to me but it'll remain frozen in appearance as a clean narrowbody car, without bodykits, big wheels, etc. It's more nostalgic for me that way and I've already shown early in the build thread, tucking 245rcomps under the factory arches. Not much to update here as I'm recovering from the rona but a lot of irons in the fire. Cnc intake manifold is in production, got some updates and very excited for that. Waiting for my water meth tank to get in and determined the location. Waiting for news on getting a Nissan Comp OEM style rollbar imported so I can weld the floor plates in for that. Also met with the bodyshop guys today to look over the car and the target date to get it in is May. Basically do all the remaining cutting, welding, and drilling before the shell goes on rotisserie.
-
Still feeling terrible but I'm trying to get all the parts back onto the engine to make space for shell tear down. Today I put the hot side parts onto the engine, and like most custom setups clearances are exceptionally tight so assembly order and angles all matter. I think if I'm feeling better next week some buddies will come over to help strip the rest of the shell. I should probably also find some roller suspension for traveling to and around the bodyshop.
-
Got super busy and had to take a break, but this week I got covid so I get to catch up on some unboxing and setup. Unboxed my shielded vband special PTZ and hot side components. Also my custom cnc intake manifold is in production so I should have that in soon. I'm changing directions a bit on the build. After years of keeping it a clean patina driver, I've decided to rotisserie restore the car at a local shop that does a lot of high end work for GTRs and other really sick JDMs. The target date to get it in is this spring so I'm going to finish all the bespoke fabrication work so everything goes together like Legos when I get the shell back in.
-
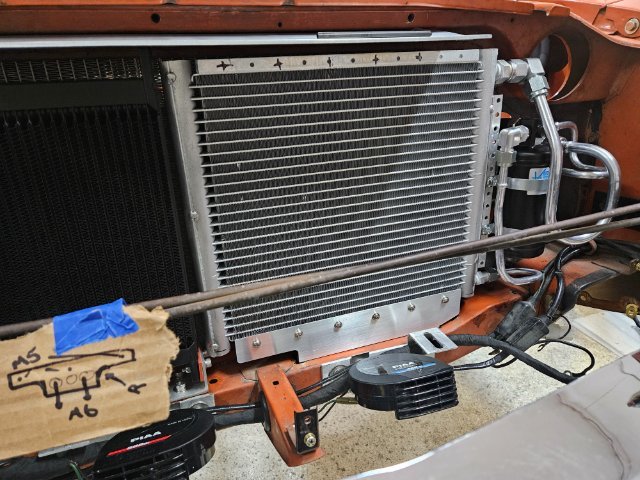
My plan is to eventually put a couple gallon anti detonant tank in the spare tire well area for volute or direct port injection. For my setup it hasn't been needed at 10psi on 91 CA pump gas and 8.5:1 CR but I want to double that with the new G series turbo. I measured everything out and few years ago for likely candidates around the engine bay area in front of the rad support would be taken up by the oil cooler and AC...which is the case now. The other area I evaluated was the washer bottle/clutch master area which could work but I really wanted at least 2-3 gallons of volume for convenience. Yesterday turned into a nice all day date with my wife so I didn't get much done. After soliciting some opinions from FB groups I decided to leave the lower condenser mount as-is to force air through the coolers. Doing nothing at all is less work and eventually I may redo the air ducting when I do a v3 cooler packaging update in another 5 or 10 years 😆 I considered serviceability when fabricating all of this, with good access to the rad hardware. The easiest location for a top soft mount without making new holes in the chassis seems to be bracketing off the top and/or bottom rad bolt(s), especially if I want the top intercooler air plate to remain independent but this would affect serviceability. Not sure what the best path forward is but I'll think about it over the week.
-
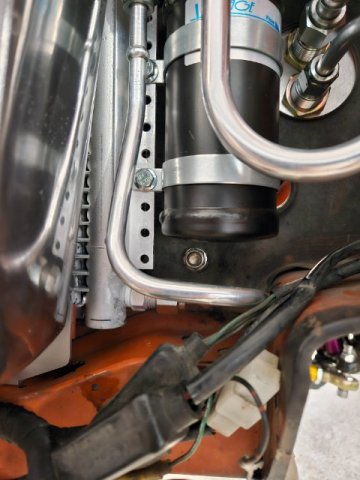
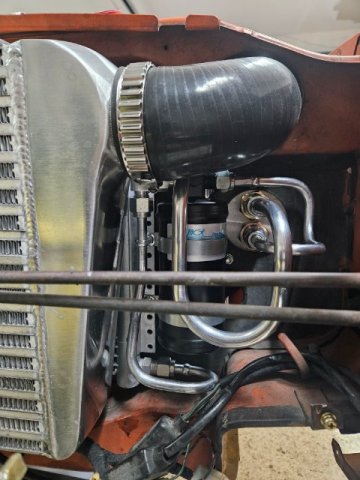
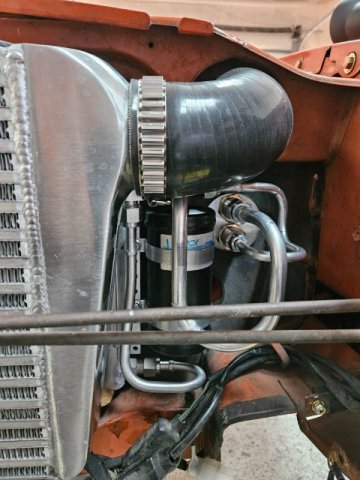
Thanks it feels good to be working on it semi-consistently again. I still haven't had my half day this weekend, but I had an hour tonight so I started final shaping the lower condenser mount. I drew what I had conceptualized on a piece of cardboard a few weeks ago but decided to freestyle it as I was filing things down. I could do a lot more but I think I'm going to punch some speed/air bypass holes on the bottom of the mount and call it. The mounting is Setrab sandwich style soft mounts with high temp silicone sheet. I'm going to try to wrap this tomorrow and weld in the top soft mounts to the intercooler air plate.
-
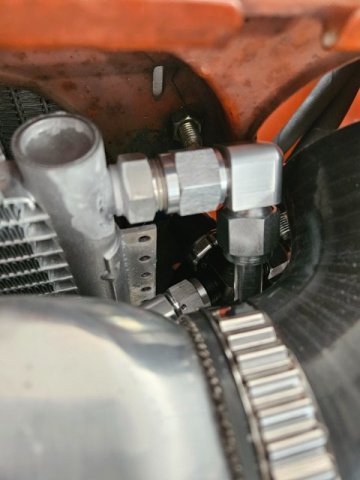
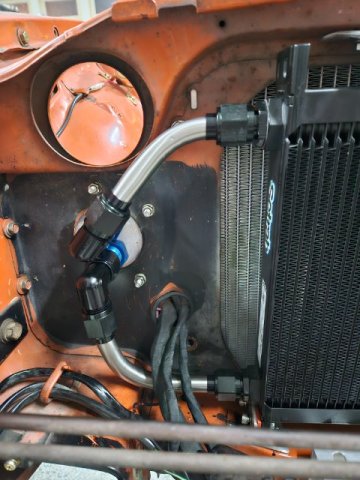
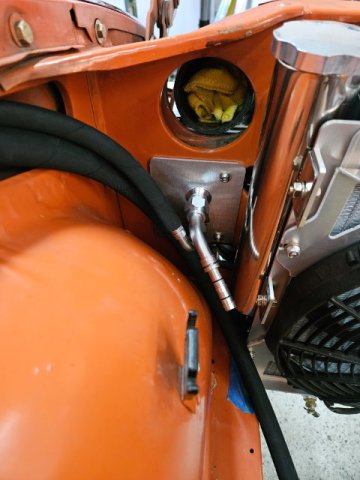
Things got super busy again but this evening I went ahead and hardlined the oil cooler. I'm a bit out of practice on stainless so I accidentally put a couple of tooling marks in the tubes. The line sections are short so I'll work them out with a hardened rod when I wash everything out and rebrush the finish for final assembly. It's one of those things where I need to remind myself to slow down and think things through otherwise I end up making more work for myself or waste material. I also hit the AC Hardlines with some steel wool and wd40 to get a uniform finish but it's is a bit bright for me. I may go back and redo those in brushed as well. I realize I keep getting busy so this weekend I'm going to try and dedicate a solid half day to wrapping up the turbo cooler packaging updates.
-
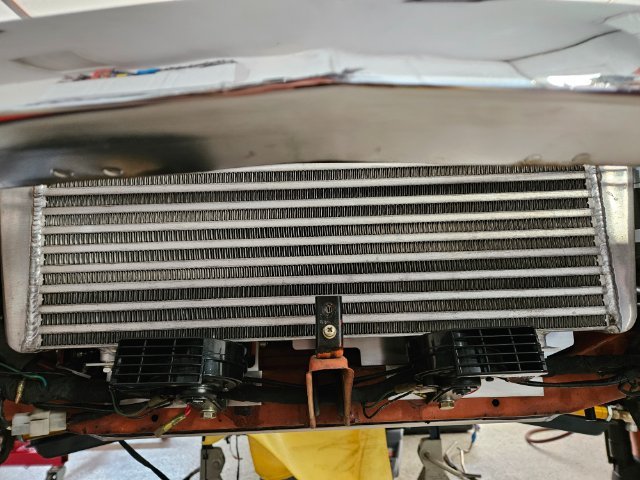
@calZ I actually got the fresh air duct idea from the v8 subforum here a few years back when brainstorming the AC setup. I don't recall the thread but it was a super clean silver Z and they ran the lines across the rad support to the pass side. HybridZ is an absolute goldmine of info so maybe someone will stumble across our discussion too and get some inspiration. There's a lot more going on with the AC install on this build I've been working in the background including inside the cabin (I'll update that ongoing thread in the Interiors sub sometime) but I've been trying to keep this thread mostly dedicated to the turbo aspects. For the cooler packaging I intentionally wanted to keep all the AC componentry all on the DS and the oil cooler all on the PS with the intercooler in front of and crossing between the two instead of single sided. So that's why I went through all the fabrication work so far...it would have been a heck of a lot easier to mount the oil cooler in front of the intercooler, run the AC lines much longer onto the other side of the car, etc. but that wasn't the vision
-
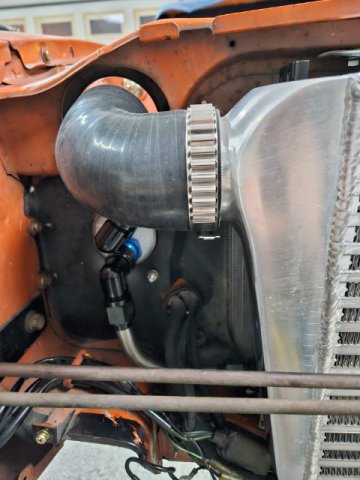
My workspace is a mess so this evening I started cleaning up before proceeding so I threw the intercooler back on to check clearances for the AC and oil cooler sections. I think everything looks good to continue fabrication. My welding station is currently set up for AL which it never is so I've been contemplating also hard piping the intercooler with aerospace wiggins clamps. Not sure if it's worth it for this ebay special as the clamps and separate weld ferrules are eye bleeding expensive but I'll simmer on it over weekend projects.