Dat73z
-
Posts
852 -
Joined
-
Last visited
-
Days Won
8
Content Type
Profiles
Forums
Blogs
Events
Gallery
Downloads
Store
Everything posted by Dat73z
-
A quick update, life has been crazy, parts are still trickling in and hopefully I'll have everything within this next month. Apparently OE Nissan s30 MCs are ridiculously expensive now and 50mm carbs are going onto the build. Hopefully I'll have more time to post updates soon as a lot has changed

-
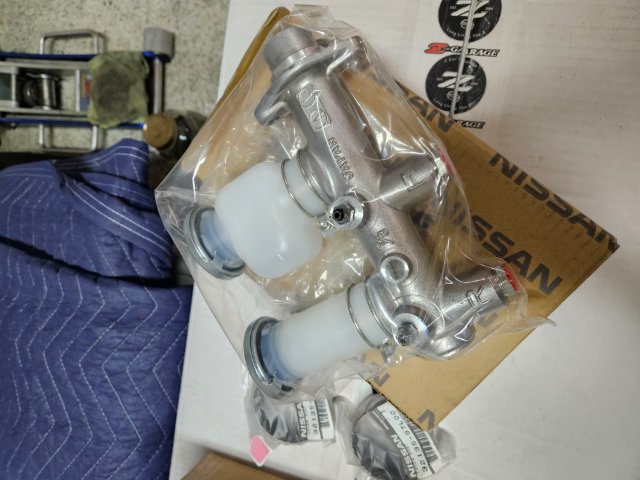
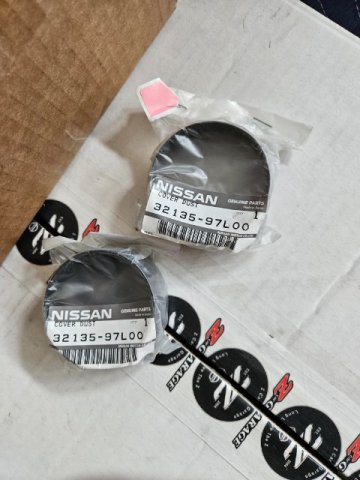
Got some more wiring done while I'm waiting on other parts which have been trickling in. Not sure why but the shorter KA/SR trans yoke dust covers were NLA for years then they came back in stock recently so I ordered a few and they just came in from Japan. My current JDM SR trans is missing this so I'll tap it on later this spring.
-
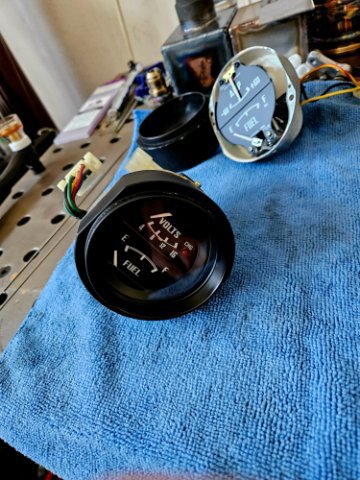
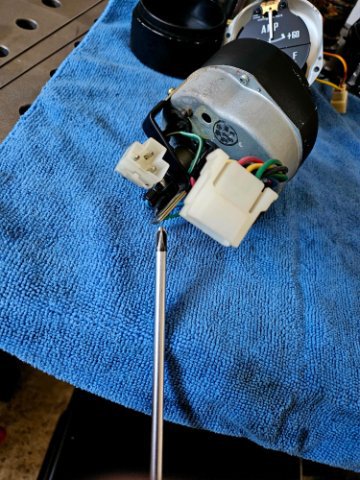
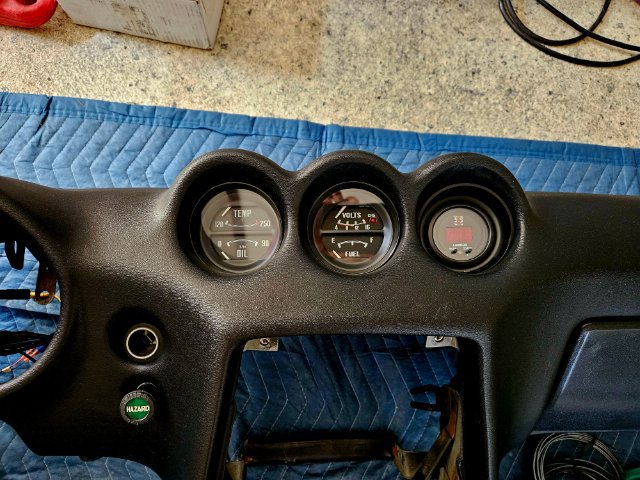
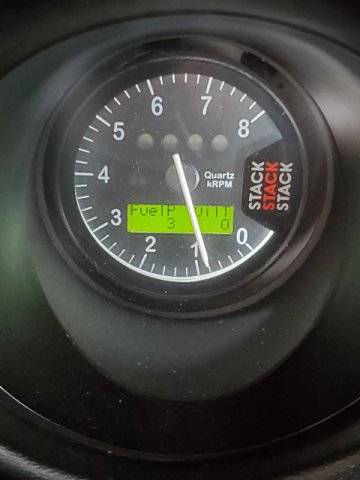
I had a few mins after lunch so I went ahead and swapped the gauge housings and rear mount brackets to test fit. So now the early 280z voltmeter bolts into where the ammeter used to go. Now that I've verified the fit I'll tear it apart for restoration and rewire it all to mate with the OE 240z harness.
-
Realized I haven't updated for a while but the build has been going on in the background. This past few weeks I was waiting on electrical parts so I fully stripped down the suspension as I have a new set of coilovers and brakes going on. Today my voltmeter finally showed up so I'll start gauge swapping later this weekend.
-
http://www.vintageconnections.com/
-
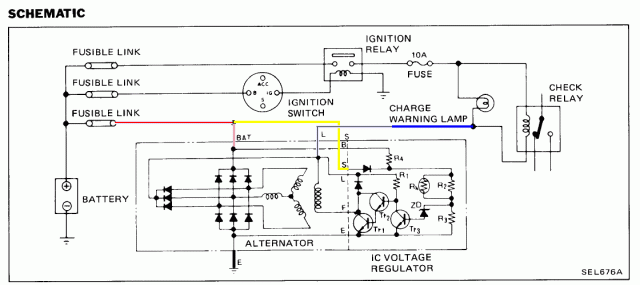
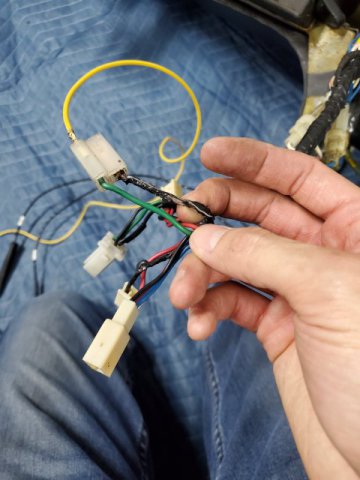
After some research, I saw a lot of Z forum questions on how to get charge indicator lamps to work without many clear answers although it is a simple circuit and universal for many vehicles. I recall wiring in a few on motorcycles many years ago. I found a schematic I believe from a 280zx off atlanticz which shows the circuit. It seems the charge lamp will be between the L terminal (switched ground) on the alternator and 12v switched ignition. So if my understanding is correct, when the engine is off or a charging fault occurs, L will approach 0 providing the ground for the charging light to go on. Next I will need to research if it's better to have ring and/or spade terminals or if the set screw type terminals are acceptable for all of the stranded 12v ign wires I want to consolidate on the car. The set screw type power distribution solutions are generally more compact, but seeing as my car vibrates its fasteners loose regularly I'd be concerned wires can vibrate loose or fatigue and shear over time.
-
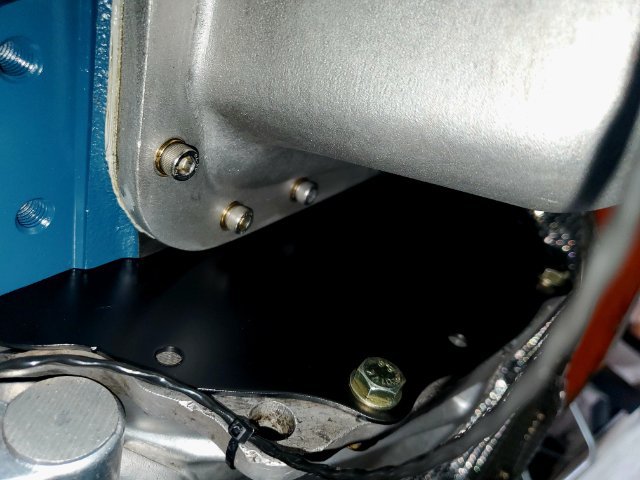
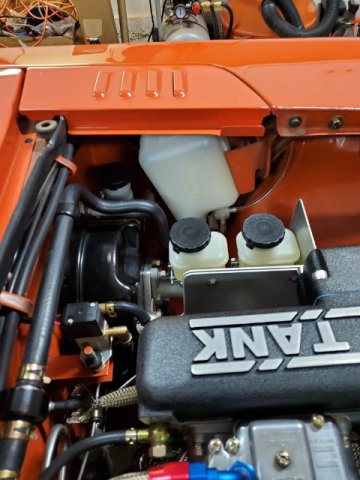
This AM I assessed what needs to happen. I ordered 10AWG gxl wire for the fuel pump dedicated power and ground circuits, and 12-14AWG txl wire for the harness repair/uprating. For the walbro 255 I think the final 2 foot pigtail to the pump is like 14 or 16 AWG, so it's questionable what a 10 AWG dedicated feed/ground gets me, but at least there will be limited voltage drop and headroom to upgrade the pump later. Since I have this all torn apart and my 12v ign and a ground wire melted I have decided to pull all accessories off the harness and into a dedicated distribution panel to avoid this in the future. I currently have: (1) fuel pump trigger, (2) boost controller, (3) o2 sensor, (4) tachometer, (5)msd 6ald. There are several fused/relayed compact powersports solutions I'm eyeing for this. I'm also planning to swap in an early 280z voltmeter and built the charge light off of the alternator L circuit as my amp meter doesn't do much with the internally regulated alternator. This will also be an ideal time to fabricate the AC system but I also want to drive my car this spring so perhaps it'll have to wait until winter again. Hopefully I can get everything ordered today then as is usual it'll be a couple week wait for the parts.
-
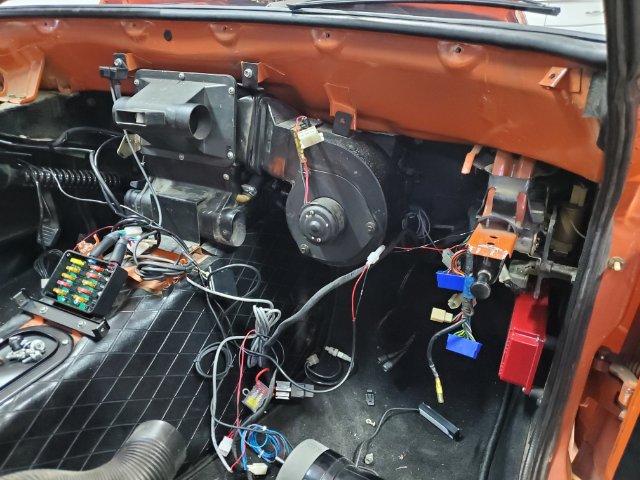
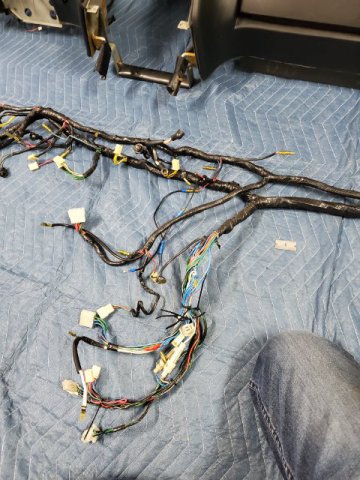
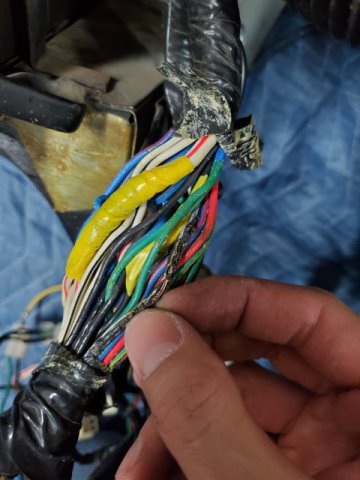
Next week my schedule looks terrible again so I decided to press forward and get to a good stopping point. I finished unlooming the dash harness and found the extent of the ground and 12v ign wire melting stopped where they respectively tied into larger branches. I noticed also some damage in the harness where the previous owner had spliced into some areas back when the car was drawthrough turbo in the 80s for the boost gauge, water/meth injection, etc. Generally, this harness is actually one of the nicests 50 year old s30 harnesses I've worked on, not far gone enough to warrant replacing everything. So I think the strategy here will be to uprate and replace all of the ground and 12v ignition wires, along with the entire fuel pump circuit (green wire + ground is about it) on the body harness. I'll order some rolls of factory colored wires today and clean up the harness while I wait for materials to arrive.
-
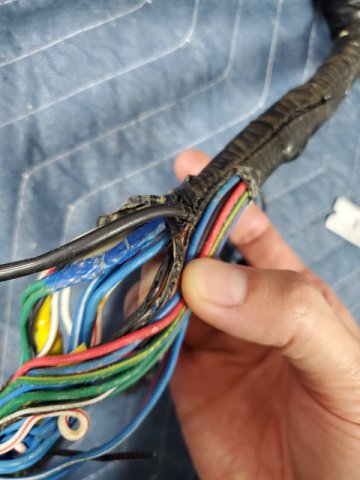
This morning I started back in on unlooming the harness. So far I see 2 toasted wires. A black wire (ground?) And a black with white stripe (12v ign?). No smoking gun yet maybe they contacted at an exposed branch somewhere upstream.
-
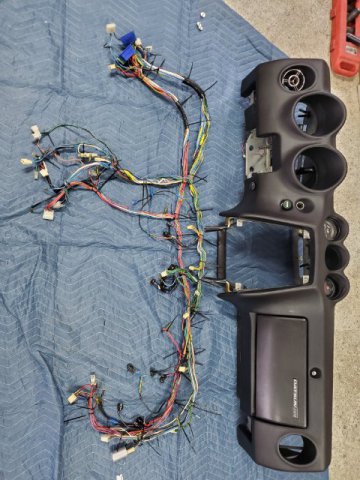
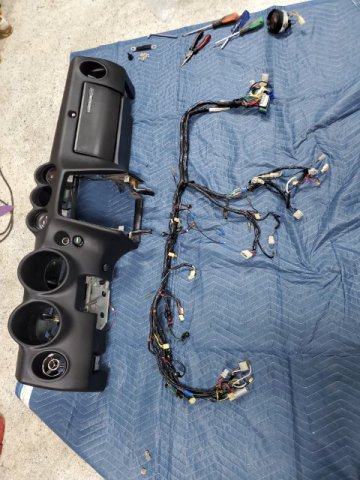
And the main dash harness is out. If anyone knows how to swap to a 280z volt gauge from the 240z amp meter let me know. Tomorrow I'll start unlooming everything and hopefully not get too confused.
-
Today I got the dash pulled. I started tracing the damaged wire back from the fuel pump circuit. It looks like the black/white stripe which if I recall correctly is 12v switched ignition. I was using this wire to feed the 12v ignition leg of the oil pressure sensor to trigger the 12v relay to the fuel pump once that circuit closed under pressure. Now that I'm thinking about it, I had one oil pressure sensor start failing almost new but it was due to an oil leak due to a manufacturing issue earlier in the build thread and not an electrical issue. Hopefully I can get the harness out and decide what to do from there.
-
It's been a hectic few weeks but I've been inspired to get back on the build this weekend. Yesterday I had the opportunity to go for a ride along with a skilled driver then test drive a 3.2 NA stroker car with triples and the brakes I'm waiting on. I must say I miss being able to rap the throttles NA but the 3.2 turbo just sucks you into the seat in boost. The plan this spring has changed a bit as I've been inspired to revamp the s30s suspension a bit more but this weekend I'm going to focus on getting the main harness out.
-
@madkaw same observations here on my 3.2 Rebello. I'm only a couple thousand miles in boosted but I've been borescoping all the cylinders since it came off the dyno.
-
I feel like I've had this vehicle long enough that I've stripped the car down to a shell and rebuilt it with all new components 3 or 4 times at this point 😂. Kinda like my buddy, his s30 is like an airframe that keeps getting stripped down and rebuilt. When you do the RMS make sure you use a RMS tool. I used to always knock them in by hand but the proper tool makes it so much easier and foolproof. Also inspect the side seals.
-
Yeah really looking forward to it, everyone I know locally who runs the setup only says good things. This AM I had to get under the car to unplug a few things so I performed a quick undercarriage inspection. All looks good and bone dry and it seems the RMS was the leak culprit. Hopefully it stays that way until the next major service
-
Just a quick update, it's been a busy week but I think I've figured out a few more pieces of the build. After some more measurement I decided that my existing T3 brakes are just too large for the wheels I want to run. I like the setup but the brakes are absolutely massive. So I stopped by ZCarGarage which is down the street from me and purchased their StopTech street setup with the ebrake. Unfortunately it sounded like it may be a couple months until the kits are back in stock. My wheel builder has worked with Rob and ZCG before so perhaps I can measure a wheel on one of their shop cars, I'll need to call and see. For the electrical harness I still havent decided what to do about that but I started tearing down the interior so maybe once I unloom the main harness and get a good look at it I can figure out if I want to replace everything or repair it. This would probably be a good time to put in the new headliner I've been putting off since last summer. In the background I've also been doing some random welding and fab work for some friends like the L series -10 block vent.
-
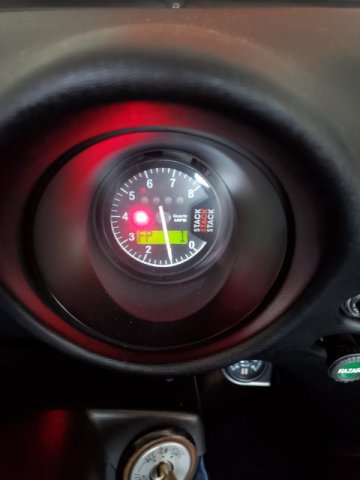
This AM I finally had a few mins to work on things a bit. I started off by firring up the car and letting it idle up to temp for a couple of fan cycles to get an idea of where things are at before I start tearing things apart again. There is definitely a slight carb imbalance which I'll attempt to work out a bit more this go around. My fuel pressure sensor read 3psi for a while then my FP warning light went off again to 0-1psi like I saw yesterday on my short drive while the mechanical gauge read 3.5psi. So I'm assuming this may be electrical related. Hopefully I get start tearing into the dash later today. 20230312_084853.mp4
-
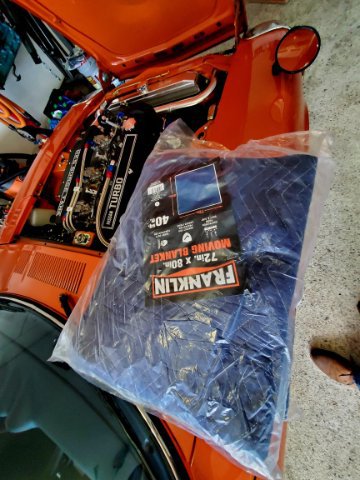
Tonight it finally stopped raining so I grabbed some moving blankets to prepare pulling the interior again. Out of curiosity I plugged the battery in and keyed the car over. It fired right up on the first crank so I took it for a quick spin around the block. My electronic fuel pressure gauge is out and reading 0-1psi while my mechanical in the engine bay showed 3.5psi so I stayed out of boost to play it safe. I need to gut all of the electrical and go through everything so that will be my spring project.
-
@DuffyMahoney Yeah, we're super excited- he was born just a couple weeks ago so we're waiting to pick him up at 6 weeks or so. Just a quick update on the turbo build, I realized life was getting too crazy so I decided to take a couple week break. My life is way less crazy without project vehicles, that is for sure. My wheel builder texted me for an update on the measurements and I totally unplugged/forgot. Later today I'm planning to pick up a moving blanket from Harbor Freight and start the dash teardown along with figuring out the barrel measurements around my chassis/suspension.
-
Thanks @240zturbo, and this is why I love HybridZ and continue posting here even in a time when everything has basically moved to FB, IG, etc.. Lots of concrete info on here from people who have actually done this whereas it's hard to separate the opinions from real data on social media.
-
A quick update on the build. I've been pulling 80hr weeks at work and just haven't had the time to touch the car, and also my wife wants to adopt a dog this weekend lol. But the plan is to start pulling the dash. I think I need to get a moving blanket first or something to lay down on the floor to not ruin the dash as the last time I had to off was a few years and a few houses ago to install a new dash skin.
-
@240Z Turbo how much boost were you running on that setup? Thanks for the tables that's a helpful reference point and yeah I'd like to have some form of knock detection. To be clear the 30/32 value is all in without boost retard and I pull ~1 deg/lb of boost so it's closer to 20deg all in at 7k @10psi. I'm also running 91 pump and looking at meth injection since fuel availability and costs are issues for me.
-
Hey @240Z Turbo it is apparent you have a lot of experience with this so thanks for posting the info. I was actually afraid to add timing towards redline as I wanted to get the car on the dyno first to baseline and go from there so I limited my timing at 7k to 30/32 degrees. Lots to process and I'll dig into it over the next few weeks. The car is likely going to be down again for the next month or two as I come up with and execute a strategy to modernize all of the wiring. I'm still at the point where I'm pushing things and they fail so we rebuild/tune it back better until the next weakest link fails.
-
Tonight I wrapped up the evening by assessing where to mount a fluid reservoir for meth injection. I'm thinking maybe the washer bottle area would work but I'm not sure how much volume I'd need. In front of the rad support is crowded and I'm not sure if I want to go in the fender well or trunk. Ideally I'd do one fillup per tank of fuel so more research is required. I'm thinking I can weld up an aluminum or stainless tank in that area that could hold at least a gallon.
-
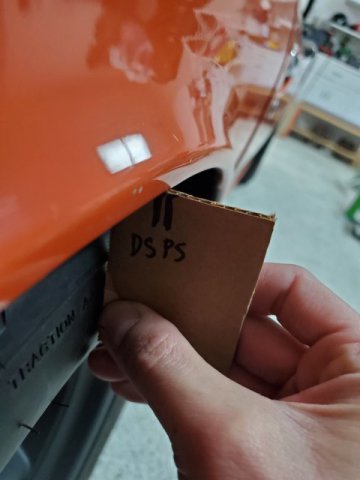
Since this is in the turbo forum, I've been trying to keep this thread turbo specific instead of a full build thread and most of the sidebar projects I post are generally things triggered by or affected by increasing the pwr/trq output of the s30 platform with the turbo. One thing I have been working on/struggling with is increasing traction as the car would spin at full boost 60mph on 225 rcomps. So I want to go 245s or wider street tires. Tonight I started back in the quest for for traction. One struggle with my chassis in particular is how the car was assembled. I am also still running a close to factory setup and I know there are 8.8 setups out there now and more that give a lot more clearance but I'm working with the corner I built myself into over this past decade. So far as I can tell, with the way the chassis was welded on the assembly line certain things like the rockers and suspension mounting points are off left to right. I've seen this on over a few dozen s30s over the past few decades, no two cars are exactly the same. Perhaps my car was built on a Friday 😂 So what that means is I'm measuring everything from the DS which has 1/8-1/4" less clearance than the PS front/rear. A small detail but something that needs to be considered when pushing things on your setup to the limit. The clearances were actually tighter but as I posted earlier in the build I set the stage for this next phase by dialing in more negative camber and moving the spring perch height up.