

Jboogsthethug
-
Posts
1719 -
Joined
-
Last visited
Content Type
Profiles
Forums
Blogs
Events
Gallery
Downloads
Store
Everything posted by Jboogsthethug
-

Jboogsthethug's 1971 240z build
Jboogsthethug replied to Jboogsthethug's topic in S30 Series - 240z, 260z, 280z
@Boben Thanks, it does look spiffy! If I remember correctly it is a little warped but I don't foresee a problem with it after bolting it down as it's pretty slight. I could be wrong but I haven't done a pressure test yet! I would agree that if you're able to use more of the original pan material then you'll probably have less chance of warpage! I can keep you updated after the pressure test for my results though! -
Keep up the hard work! You're smart about it all! I did a majority of the welding then painted, not realizing how much I'd change my mind about what I wanted before being done. Now I have to repaint over all the welding haha.
-
Jboogsthethug's 1971 240z build
Jboogsthethug replied to Jboogsthethug's topic in S30 Series - 240z, 260z, 280z
@1969honda Thanks man! I actually do plan on adding that myself! I'll probably use some door hinges and close the holes up on the one end ha. Easy peasy! I just need to extend the oil pickup tube now ha. -
Jboogsthethug's 1971 240z build
Jboogsthethug replied to Jboogsthethug's topic in S30 Series - 240z, 260z, 280z
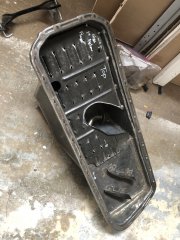
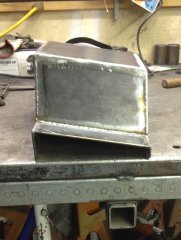
So I needed a custom oil pan for the RB25. The problem with the stock RB oil pan is the Z cross member is right in the way due to it being a front sump pan. You instead need a rear sump pan. I had a few options. Mckinney motorsports pan, CX racing pan, or have someone build one. I Also debated on doing it myself but I've been looking for an excuse to hire my cousin to fab me up something because he is so dang good. I gave him a call and he agreed to look it over! After taking the pan over, explaining my vision, etc. He was excited for the challenge! He initally was going to recreate the flange but then decided to just cut off the old one. I told him I wanted it to be a little deeper than normal so it would hold even more oil. I figured might as well! Here are the sides he cut out. Notice the edge on the left is not as wide. That is due to the natural angle of the engine, the oil pan has to compensate in order to have a flat bottom. Here it is tacked up a bit! The welds for the main pan all done up! He forgot to measure the width beforehand to make sure it would still mount up. I had the engine so we measure from the center of each bolt row and made sure it lined up! Then he started putting the pan together! The outer welds all smoothed out! Old vs New! Keep in mind it is reversed as the new pan is rear sump vs the stock front sump. You can see there is a little bit of additional capacity. Here are a few photos showing how we took the original windage tray and flipped it both ways in order to keep the location of the oil feed in roughly the same location. It regquired a little bit of cutting to open the hole up a bit. Then he bent each of the flanges to be inside out to catch the oil efficiently off the camshaft. All finished! It was a pretty dang good first attempt! Bolts up perfectly, and it is as solid as a tank! Seriously, I could use this thing as a skid plate ha. It is not helping the weight loss aspect but is perfect for now! -
From the album: Jboogsthethug's 1971 240z build
© justice Goble
-
From the album: Jboogsthethug's 1971 240z build
© Justice Goble
-
Jboogsthethug's 1971 240z build
Jboogsthethug replied to Jboogsthethug's topic in S30 Series - 240z, 260z, 280z
@Exposed Thanks man! That is a good point I forgot to mention. I am going to delete the vent tank, block off the lines going to that on the main tank except the biggest vent line. That one I will run directly to the hole in the filler neck. I'm hoping that using that and a vented cap will allow it to escape without fuming me out! If that doesn't work, I'll throw one of these underneath! -
Jboogsthethug's 1971 240z build
Jboogsthethug replied to Jboogsthethug's topic in S30 Series - 240z, 260z, 280z
Back at it for another update!! So, after deciding to do the dual MC, I knew I'd need to swap up my brake lines a bit to work out. I also knew I needed to upgrade my fuel system as my current lines would for sure not deliver the fuel to the RB as needed. I started researching a few different options and found this thread: On the first page he goes into detail on what he decided to do to setup his fuel system. It seemed legit to me so I pretty much copied it! He also details out the connections really well so I won't go into that. I looked around and found a new Bosch 044 and Carter for cheap! Ebay baby! I also picked up this surge tank. The idea is the first pump (The carter) continuously pulls from the main tank, through a filter and into the surge. From there, you have 3 more ports. One goes from the bottom of this tank to the Bosch, which pumps to the engine. Then, there is a return from the engine. Then, a last outlet that send the overflow back into the main tank to start the cycle all over again. This setup will allow me to constantly feed my engine and never run out, whereas just running from the main tank may result in dry spells during hard turning. This is hopefully going to prevent that from ever happening. Fix it before it's a problem! I also picked up an intercooler, a flaring tool, IC piping, braided fuel line, clamps, and a whole lot of -6 AN fittings! I started running the new hardline (3/8") through. Pretty straightforward! I could've followed the body better here but I wasn't too worried about it taking over that corner so I just ran with it. Here you can see I put the wrong ends on like a dummy ha. So I had to cut these off to put the AN fittings on. I used the stock tabs as mounting points and just put the two clamps back to back to hold them in place. Very effective in my opinion! Then I didn't have to drill two new mounting points. Now here's the unfortunate side effect of cheap tools. After 4 or so flares, the threads on the tool stopped holding the tubing in place. So after I cut off the wrong fittings underneath the car I have yet to be able to flare the ends again. I sent that tool back as defective for not working more than 4 times, and now I will probably invest in a better tool. So, that is the last step on the lines themselves that still needs to happen. This is the mostly finished outcome of the fuel system, you can see I used a hole drill to cut some perfect holes and used rubber grommets to line them and prevent the lines from getting cut. Temporary until I get a new fuel tank installed and cut out the spare wheel well! On a side note, my buddy picked up this sweet fox body! It needs some work but it's the first FB i've liked ha. I'm digging the body kit! In my next post, I'll go over the custom oil pan for the RB25! It is sick! -
Haha the sad truth! I just want to get this dang build done. 5 years in July that I've been working on it! Freaking ready to drive!
-
Yeah that sounds like a solid plan! Those bushings will help a lot I'm sure! I still haven't done those myself! On the to do list for sure.
-
dang this thing is so sick! It's been a while since I've read through it, looking forward to see it come together! I would like to do the tube chassis front end one day, but it will not be for a while ha.
-
New Year, New Member, New Motivation
Jboogsthethug replied to Draelu's topic in S30 Series - 240z, 260z, 280z
Welcome to HybridZ! She looks to be in good shape from what I can tell! I don;t know how much body work you plan on having done, but if it's a lot I'd suggest doing all your mechanical work done beforehand. Then, when you get that body in pristine shape there is a lot less chance of ruining all your hard work (or the money you paid for it)! I have learned that the hard way ha. -
I myself had my Z dustless blasted. It worked well for the most part, but the hood and hatch were both wavy afterwards from him blasting straight on which was a huge bummer. Then, I had the enormous job of cleaning the sand off. The problem with dustless is they mix water with the sand to stop "dust". It works great for that but becomes a muddy mess and dries that way, meaning you then need to brush/wipe it off afterwards. It was terrible getting out of the interior crevices, I still have sand fall out of the cracks ha.
-
Yeah I can tell ha. What do you have planned for it?
-
haha smoking deal! I paid $2700 for mine. Cheapest I could find, it was rotting in a field. Rust everywhere, literal rats nests in the AC, interior was trashed, etc. Your Z is in dang good condition!
-
Jboogsthethug's 1971 240z build
Jboogsthethug replied to Jboogsthethug's topic in S30 Series - 240z, 260z, 280z
Ah smart! I will have to do something similar, I like that idea a lot! -
Jboogsthethug's 1971 240z build
Jboogsthethug replied to Jboogsthethug's topic in S30 Series - 240z, 260z, 280z
So after transplanting the new heart into the Z, I realized I didn't plan on using the stock hood/latch and would want to have something lighter eventually, as well as it kept bumping the RB during the install. I cut that crap right out of there! As more times goes on, I regret painting my car earlier as I keep scratching it and giving myself more spots that are unpainted ha. Lesson learned, too late now! I'll fix it eventually after I get to a place of contentment. Also, I never mentioned this but I picked up these eagle alloy wheels for like $400 or something? I'll need new tires eventually but it made my Z look sick! Look are important I also bought these off a member on HybridZ who was selling all their parts stash. I figured they'd come in handy when I was ready to upgrade suspension! I also got around to cleaning up my garage a bit. Picked up a mini stack tool chest for like $60, great deal! That is the last part of my house remodel and I have big plans, but for now this will do! One thing I realized is my brake MC decided to stop working while it sat. I took it apart to try and clean it out but I couldn't get it working again. So then I bought a kit to rebuild it, but it turned out I had the wrong MC for the job. Only some of the MCs are rebuildable, I had the wrong one ha. So, sent the kit back and looked at my other options! To buy a new stock MC it was just as expensive as buying 3 used aftermarket cylinders from Tilton/Wilwood. I always wanted to eventually do a dual brake MC setup, so I figured what better time than now?? I picked all three up for like $140 on ebay. They came in this evidence bag, which I thought was pretty funny ha. I decided on a 1" for the front and 3/4" on the rear. I may regret the size but if I do I'll pick up a 1/2" and swap them around. There was also a 1" clutch MC that I figured I'd swap in sometime later, all remote reservoirs! My plan is to mount those inside the cowl to save space! Anyway, I got to work! I read up a bunch and this thread helped a ton with info, especially when it comes to figuring out the pedal ratio: The only problem is the freaking pictures from photobucket no longer appear. Screw you PB, ruining all my favorite threads! So here are my pictures of the process, pretty similr to what they talked about! I'll also try to be detailed to help give some info to anyone looking this up in the future. I bought the Tilton 600 series balance bar assembly https://tiltonracing.com/product/600-series-balance-bar-assembly/ First things first, I needed to measure and come up with the correct stroke and figure out how much room I had to play with to drill the bore hole. By my professional chalk on cement measurements show, my brake pedal was 5.25" from the pivot point. I have 5.75" of pedal travel at the outer diameter before hitting the firewall. My original MC Plunger point gave me 3.25" of stroke. In order to get the correct leverage I needed to move the plunger attach point up about .5". That would make it easier to compress without the brake booster. (The measurements were pretty much on point to the thread above.) My initial drill point, I think I moved it very slightly. Once I got it dialed in, I used that point with my hole bore and got to drilling! I had a slight gap due to the slightly bigger bore diameter (I couldn't find the exact size). No worries, close enough! I then got to welding! I measured the center point and basically just did my best to hold it exactly parallel. After tacking, I double checked center and made sure it was exactly perpendicular to the pedal, then welded it in! I have little bursts of good welds ha, I wish I was better at welding. Slowly getting better but plenty of room to grow! Well son of a gun, I realized I warped the bore ever so slightly! I Could no longer get the bearing to fit through. Calling around to machine shops provided me with some expensive options that I could not afford. Hundreds of dollars for this little hole ha. So I thought about it, took my drill, fit the biggest bit I could into the hole and put sticky, 2000 grit sandpaper on it and just drilled it. As it would loosen up, I'd add another strip of sandpaper. I did this for about 10-15 minutes and voila! Perfect once again! I was pleasantly surprised at this one ha. Slid easily through now, no catching at all! At the same time, I worked on the framing a bit. First, I just used the hole and marked around it to make a template. Cut it out with an angle grinder and then welded it in! I also added some bracing to the side to help with flexing, these welds I was pretty happy about! All smoothed out! I then made marks on each end of the pedal box so then I could use that to create a center point for the holes I then needed to drill for the MC mounts. I transcribed from that point. Then I created a center point of tape and made marks with the brake pedal completely open and completely compressed to find the centerline for where the plunger needed to be. Then, after making those lines, I measured the 1.25" both ways for the center points and test fit it with the balance bar. Lines up well! Pilot holes drilled. Then the bigger holes and other holes were drilled out. Then I put the bolts through, welded on the back end so they won't turn and spray painted with some primer and black gloss! Installing into the brake assembly. I also made a plate on the other side to basically sandwich the firewall and give more strength. I painted that as well. Here they are installed!! I also bent the brake lines later on whcih you can see here, I'll create a post to document that later! Until next time! -
Jboogsthethug's 1971 240z build
Jboogsthethug replied to Jboogsthethug's topic in S30 Series - 240z, 260z, 280z
In my last update I talked about getting a new fuel pump, I forgot I also swapped out the starter. But not before trying to fix it! haha I took it apart and realized it was pretty well rusted out on the inside, but after cleaning it up it didn't look too bad. Unfortunately, I realized the little prong things that connect to the motor that basically convert the power from the battery to spin it were so old and worn the wires had been rubbed through. It was only an hour or so of wasted work so I wasn't too sad. I figured for some people wanting to restore it this pics may be helpful! After realizing it was trashed, I didn't want to go through the work of wiring new contacts in so I said screw it and picked up one new from the auto parts store! Another thing I did before starting it is wire this in. As promised, I wanted to revisit what I found out (as much as I can remember anyway). The idea was that I'd flip the main red switch and the first blue switch and that would give me the power to the button and also act as like a theft deterrent step. Simple, but later I wanted to expound on a series of switches that had to be switched in a certain sequence for it to work. Just an idea! I initially followed the instructions that came with the kit and when I'd try to start it I would get power to the first switch and the push start, and they would light up. This was all like the opposite of what I wanted. So, back to the drawing board! Eventually I got that all figured out (I forgot, it is all covered in this thread so no need to re write it! Yeah boi!! Anyway, went through all that just to find out the tranny was jacked and after the struggles I already covered in the last update (and this thread: Here are some pics they sent me of it! So, out with the old.... Sold to a fellow Utah Z owner. And in with the new! That ranger was in it's most precious form that day! Big thanks to my awesome wife for letting me buy the new engine! Here she is going into the engine bay! I don't think this is what my insurance agent would call "blanket coverage" but ti worked well to protect the paint. Ha, dumb dad joke. I decided to build my own brackets so I wanted it as far back as I could get, but leaving a little wiggle room in case of shifting during driving or flex or whatever. This looked good to me! Here are a few threads I started when I was leveling it out and figuring that all out: RB25 engine resting angle. : Working through how people have built their mounts: It's to the side here, but I was able to center it pretty well when I built the mounts. I also picked up a new exhaust for the L24 before I sold it, much bigger and better than the stock exhaust. I kept that and will connect it to my RB! Here are some pictures of building the mounts! I cut the 240sx mounts up and reused the same pieces. I plan on reinforcing this some more later for sure though. Resting in place. Got the shifter centered up nicely! Ghetto solutions over here (Using a block of wood to strap the transmission into place) but it worked! This hose was right in the way, so I loosened it up and just rotated it down. I'll put a different hose in later and route around it. Sufficient clearance right here! Then, using a string I took measurements for the brackets. I just held it corner to corner at the length, then measured afterwards. Corner to corner, measure, repeat. What I ended up with: My beautiful welds haha. I'm going to clean those bad boys up too. And she's in! More to come later! -
Jboogsthethug's 1971 240z build
Jboogsthethug replied to Jboogsthethug's topic in S30 Series - 240z, 260z, 280z
Dang welding the nuts in is a great idea! I've thought of welding some bolts in (the opposite of your idea) but your idea would probaly even work better! Was that a pain to get it lined up? I still haven't quite figured out the logistics. I will probably do 1x1 to keep it low! I actually was checking that out! The only problem is I would for sure be hitting my head with my helmet on during events! Even with my seat sitting on the mounts just flat on the floorpan I am close to the ceiling. I wouldn't even consider myself super tall ha. -
Jboogsthethug's 1971 240z build
Jboogsthethug replied to Jboogsthethug's topic in S30 Series - 240z, 260z, 280z
Yeah I'll cross my fingers for that! Technically it is again back off the road, but I'm hopeful to have it back on again soon! I don't think I really need to spend any more money on it other than a few things here and there to have it driving at least! We shall see ha. I actually just asked her what that was about and she explained it was because it's a "roll" cage haha, bread roll. That one went over my head ha. It is behind still, I'll continue to update but there's some cool things in the works! Amen to that, it really was terrible. Did you mount the bolts straight through and have them sticking out the bottom? -
I agree with LLave, no need to break the bank if you are DDing it.
-
280Z Restomod Progress
Jboogsthethug replied to dmoralesbello's topic in S30 Series - 240z, 260z, 280z
That looks awesome, well made considering it was not the intended application! A lot of awesome little details throughout your thread, you definitely take time for each little thing. -
Looking forward to seeing this one play out, props to you for taking it on!
-
Jboogsthethug's 1971 240z build
Jboogsthethug replied to Jboogsthethug's topic in S30 Series - 240z, 260z, 280z
As a followup to the last post, here are a few pics of the finished install of the ignitor and the fireball, as well as the wiring to the alternator. You can see how the ignitor just swaps out the traditional points setup. Way more reliable in my opinion. Here is a nice reference picture to show what wires went where. If I remember correctly, black was ground to the dizzy, red was the positive to the dizzy, purple was ground to the harness and pink was the positive to the harness. This setup worked well! Ok, so part of the alternator upgrade I need to rewire a few things for the alternator to actually charge the battery. The original alternator has less prongs or something, no screw on the back maybe? This one you needed to connect the positive from the plug to the screw before taking it back to the battery. It looks like I connected the ground to that plug as well? I can't remembere it all but I researched and tested this a bunch to finally get the right combination where it would charge and I'm pretty sure this was it. This was the most complicated part of the alt swap, so if you get a chance you should do it too! Just a close up to show which wires go where. The back of the alternator is the top of this image. At this time, it was Christmas time in 2017! I pulled this out and I could not for the life of me figure out what it meant. The bread was throwing me off. I can't even remember what the bread had to do with it looking back ha. Anyway, it was $400 to buy the metal for a roll cage! I already worked things out where I built a website for a fabricator in exchange for the roll cage. I was stoked! I didn't get around to it for a few years, more on that soon ha. At this point, I needed to figure out the dang seat mounts. with the stock mounts in place and my cushion in the seat (Corbeau FX1 Pro), my head was touching the roof. That just wouldn't fly! So I knew that I at least needed to get rid of those. Not too worried about structural integrity ( a common worry that hasn;t been proven either way as far as I've been able to find) as I will be doing a whole lot more to strengthen the chassis up. V1 of my new mounts included som 1"x 2" bars from a local metal yard welded in place of the original mounts. Here I am jsut making sure they are level before tacking them down. Unfortunately, after testing these out I realized I'm still too tall, especially when a roll bar is in the mix! So, I eventually cut them out again. I will probably do some sort of mount that is welded directly to the floor and then the bolts go out through the bottom! That will work well and be the most simple approach I believe. That will be coming soon! Now, this is where things get interesting! I finally got my wiring done up and wanted to see if it would now start! I actually had wired up the push button by this point, I'll go over that in my next post. Once I sorted that out, getting it started went pretty smoothly! I had previously tuned my carbs up before taking the engine out, so I wasn't too worried about that and was more concerned with just getting fuel. I cranked it a few times and it wasn't priming. After a quick trip to the parts store, and a few bolts I had installed a new fuel pump (not sure where the pictures are) and it was priming great! Tested the started, things were going smoothly there. hooked up the throttle, exhaust, misc parts, then I decided to give it some juice and see how it went! She started up beautifully! First time in 3 years that it had ran, and it sounded awesome! I was stoked obviously. IMG_9909.TRIM.MOV I then grabbed a spare seat and threw it in the passenger side for my wife and I got in mine (Neither were bolted down) and we went for a test run around the block! the engine was great, and the E brake also worked well as I still hadn't hooked up the brake lines ha. However, I quickly realized I had a problem with my transmission that I never once noticed when I first bought it. I couldn't shift into 1st or 3rd, and I knew that wasn't a good sign. A few days later I had time to take it all back out and take apart the tranny. a few of the gears were broken badly, huge chunks missing. A super bummer as I was told when purchasing that it had been gone through before and the tranny in particular was in great shape. This left me deciding what to do. I did always imagine swapping the engine eventually but didn't have crazy money to spend. I opted to try and find a 280zx 5 speed and swap that in, as that would give me even better control over my gearing than my current 4 speed and would be much cheaper. Problem was, it was apparently dry season and after waiting a few months I still hadn't found anything. I gave up on that plan when I was talking to some friend who just had bought a 280sx and didn't want the powerplant that had been swapped into it. They were letting it go for a pretty good price to me, so I jumped on it! I'll get to what my new engine is pretty soon. Regardless, just another day in the life of a budget garage build ha. My grandma used to race powder puff back in the day, so I of course had to show her and my little brother the progress! This is actually when I was putting the new powerplant in and was showing them how good it looked! She's come so far and yet has so far to go! Extra goodie: I also threw a bushing into the shifter handle at some point to tighten up the shift feel. It was like 3 bucks from the parts store and popped in pretty easily, instant improvement over the plastic bushing. This is covered pretty well in this thread: Until next time! -
From the album: Jboogsthethug's 1971 240z build