

zeeboost
-
Posts
652 -
Joined
-
Last visited
-
Days Won
7
Content Type
Profiles
Forums
Blogs
Events
Gallery
Downloads
Store
Posts posted by zeeboost
-
-
Sounds like a good idea, but the headlight bucket is already molded to the fender, and the front bumper is molded to the headlight bucket, so it's not too feasible right now. At this point, I don't think I'll be going the sealed route - I'll just have the covers removable so I can clean the gunk out of the buckets. Hence, why I'm trying to figure out what I should do with the headlight cover weatherstripping.
-
I saw a heavily modified S30 at an MSA show several years ago that the owner had done something like this to. It looked "O.K.". Actually it looked like a lot of work/money for just an o.k. result. It did get me thinking though.
I hate those brackets. Exposed screw heads and double back tape, arg!
So I was thinking: You could paint the clear covers about an inch or so in from the edges the same color as the car. When mounted it would look like you had smaller than normal covers. Then glue acrylic blocks to the backside, behind the painted areas, as mounts. In the blocks drill holes and glue in dowels that would fit into matching holes drilled into the headlight buckets. If you were carefull, and clever about where the mounts are located, you could get a nice tight fit without any exposed hardware. The covers could be installed and removed by squeezing them enough for the dowels on one side to clear the holes. Use some small felt pads on the mounts so any movement won't mar the paint.
Dan, that's an idea and a half right there! That may be my best way to approach this. The only other potential problem I'd have is the weatherstripping around the covers. I'm sure using them would help reduce dirt/moisture/other crap from getting inside, but on the other hand, the rubber will look out of place on one section of the cover. The cover has two streamlines (for lack of better word), one on the upper portion and one on the lower portion. I was planning on painting the cover the same as the body from the lower streamline to the bottom of the cover. Pictures would probably help more than an explanation:
A crude rendering:

This probably is the closest resemblance of what I'm going after:
And originally I had intended on using black pan-head mounting screws, and having a black ring outline the cover (think aston martin vanquish). Another crude sketch of that:
So if I use the weatherstripping around the cover, it will look awkward where it sticks out in the painted area of the cover. I could paint the rubber the same color as the body and cover, but it would still look odd sticking out like that. I'm not sure of a better way to seal the cover and still have it removable, so I may just end up cutting the rubber out of the painted areas, and just have it seal of the rest of the bucket. I don't know how efficient it will work, but it's the best I can think of at the moment. Again, the dowel pins are an awesome idea! When you mentioned the felt pads, which paint are you saying would be damaged?
-
Well, it's starting to look like the cost is greatly out-weighing the benefit of having a flush cover, so it looks like I'll just be installing it using the brackets. Bummer...I'm not sure if I'm going to use the weatherstripping around the cover just yet.
-
Just a little thing I noticed about locking lugnuts, is in my years of working at a ford dealership, I've been able to remove any and every locking lugnut with the key missing. Several times, especially through a used car trade-in, there will be aftermarket or locking lugnuts, but the key is nowhere to be found, so they'd have me remove the locking / tuner lugs and re-install the factory lugs. Also, there are several locking lugnuts that re-use the same key pattern, as over time I've accumulated a small key set in my tool box, and occasionally I'll have one that will work. Companies make sockets that are made to fit over lugnuts, and dig into them as soon as you start turning counter-clockwise, thus turning the lugnut with it. There have been a couple that I needed an air hammer to get it started, but nothing that couldn't be done with a normal hammer and chisel.
TRUE, they do act as a theft deterrent to the lazy criminals, and they will generate a little more noise and time consumption to remove them, but they are not full-proof.
-
Hah, I've probably thrown away about three of these...never figured anyone would need one.
-
-
lol - I wish I could find the video, with the steel ball rolling into the rust hole on the hood
Seriously though, I think I could go on a murder spree after walking out and seeing my GTR like that. Wow...
-
Long story short, I have a set of coilovers installed on the rear of my 280z, but I just need 2 for the front. I can't find anywhere that doesn't sell these in anything other than a complete set of 4. I e-mailed Modern Motorsports, but never received a reply. Ground control and the other companies I found only sell these in sets of 4, so if ANYONE out there has 2 of these that they'd like to get rid of, or if you even know where I can buy these individually, please let me know. Thanks!
-
No problems with my stage III ACT in my 240z turbo, and the centerforce dual friction works great in my '76 280z. Not sure what exactly you're looking for - both are good street/strip clutches.
-
Same thing happened here, driving 3000+ miles from central texas to all throughout california, and then back. It was both of my feet, actually. I drove both barefoot and with shoes on, and tried to rest them in different positions every few hours. After about a week, the pain went away. I figured it was something similar to bedsores.
-
whhhhyyy
Apparently it was built for the FnF4 movie for off-road use, more specifically during the first major race, where Brian drives it off a cliff.
-
For whatever reason, in my mind I pictured him removing it in an s130. In my s30, I could pull it without dropping the (factory) exhaust. My mistake
-
How are you not able to get the driveshaft out? If you haven't already, drop the exhaust. It's a lot easier to access and remove everything, and I'm not sure if you can remove the transmission without dropping it. The driveshaft just has 4 bolts/nuts holding it on to the companion flange of the rear diff. Once you remove those bolts, tap the driveshaft with, preferrably a mallet, but a hammer should work fine, to break it free from the companion flange. Then the driveshaft should simply slide off the output shaft of the tranny. Like stravi757 said, don't forget to drain the fluid out first.
-
It looks like he got your e-mail
Feels like[/b'] Zero to 100mph in less than five seconds!!!!!!!! -
You could minimize the dirt, bugs, etc. by using a PVC coated reticulated open cell foam baffle glued with silicone to the underside of the vent/weep hole.
There's a mouthfull - I'm guessing it operates like a check-valve? At this point, I'm still thinking my best option might be to seal it off. Kiwi - that sounds like a great way to keep the moisture out, but I think I'll see if I can completely seal it off first, and see how that goes. It's such a crazy, over-engineered way of doing the job, I like it...just not as practical
I was talking to the body guys about this earlier, and they're not sounding too confident on this any more. The guy doing most of the work to my car told me the best way to do it would just be by using the brackets, since it would be 100x easier to change out if something did happen to the cover, not to mention cheaper. He said that the flexible filler the owner of the shop told me about, probably wouldn't be a good idea because when it heats up (good ol' Texas heat) the plastic headlight cover would end up expanding slightly, or something like that, basically resulting in being able to see the outline of the cover. We're looking at other options, but I'm kinda bummed out. This headlight project was the main reason I took the car to this bodyshop, because the owner told me they could do it...and now I'm getting conflicting points of views. The body guy said he could do it, but couldn't guarantee anything on it
We'll see...
Cygnusx1 - do you have any other info on your seamless covers?
-
This should probably be posted in the non-tech forum...
...and how much do you want for the Lexus?
ps - I'd still been wanting to go check out the Datsun, but I never got enough free time. Whatever little time I had availble was either spent with the woman, or preparing to move to Arlington.
-
-
After reading what he said in the picture, yeah, I would say so.
-
Man I couldn't find the one about the 50% off shirt...
This it?
-
Cygnus - Thanks, it looks like I get to figure out the best way to seal this beast.
Avernier - I'm painting part of the headlight cover to make it look like part of the car, hence why I'm wanting to mold the covers and flush any gaps.
Even though I love this car (minus the stripes someone drew on it...?), I do not want to be able to see the shape/outline of the covers through the paint:
...but to make it look like one with the body, such as Darius did:
-
Well thanks for the votes, guys, I went ahead and sent pic #1 to them to use as a reference.
-
What if I mold the headlight cover on and seal off the headlights using a rubber gasket of some sort? If I bond the covers to the bucket, and use a body filler to smooth the transition from the bucket to the cover, this should create an air-tight seal, correct? Thus, leaving the moisture's only area of entry to be the gap between the headlights and the bucket? So basically, if I completely seal this off, I won't have to worry about trapping moisture inside and running a vent tube, correct?
edit:
Also, I don't mind if I need to run a concealed drain tube for moisture, but only if it will keep the headlight covers from fogging up. If I'm still going to have those issues, I might as well go through the trouble of sealing it all off (again, if that will keep the moisture from collecting on the inside).
-
Then all you have to do is remove the headlight to get in there and clean once in a while.
Just a thought.
Scott.
I've been keeping this project pretty hush-hush for now, but I may not be able to remove the headlights once I'm finished. If I can, it won't be an easy task at all. It's not going to have the original 7" headlights, basically. How do other cars get away with this? Are they completely sealed, not having a drain tube or anything?
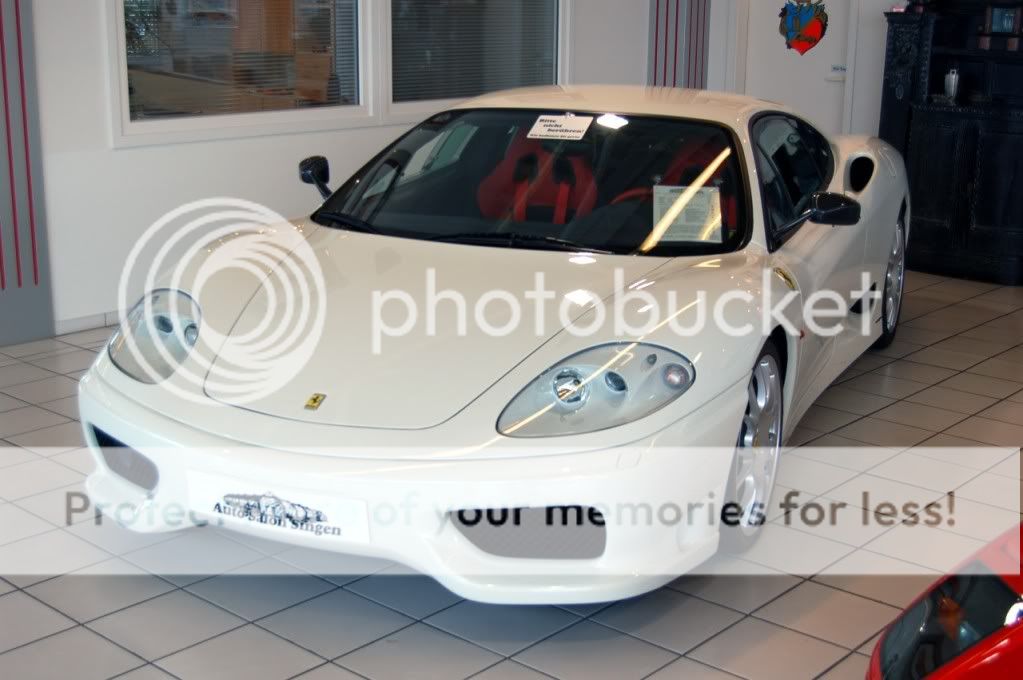
Some examples of the headlight cover finish I'm going after:
Ferrari 360
Ferrari f50
Aston Martin:
-
Yeah, no kidding. I just wasted over four hours on that site and I have an exam tomorrow...awe crap, today. Thanks aux!


Molding headlight covers - problems with moisture?
in Body Kits & Paint
Posted
Ah, okay. Thanks for the clarification.