-
Posts
13742 -
Joined
-
Last visited
-
Days Won
67
Content Type
Profiles
Forums
Blogs
Events
Gallery
Downloads
Store
Everything posted by JMortensen
-
Took a look and my regulator is non-return and is 1.5-4 psi, perfect for the Mikunis on the old motor. So I'm looking at bypass regulators and they're more expensive than my pump! I think I'll just run the pump to the regulator to the carbs and dead head it and replace the pump more often. The last Carter pump I had was used for who knows how long, set in a box for about 5 years and then I threw it on my car and drove it daily for a couple years before it finally died.
-
I was going to dead head it, not sure if I should dead head it or have a bypass regulator.
-
I'd even take a "put all that crap on ebay" and buy this crap instead!
-
Grassroots Motorsports Aero Article
JMortensen replied to Zzeal's topic in Windtunnel Test Results and Analysis
OK, and I will give you that there may be some benefit there. My guess though is that several small and fairly inconsequential things on a Z will not add up to a decent gain in comparison to another car with better aero. The Z is so poor aerodynamically and the hood so sharp in front I'm just not seeing that making much of any difference. It's too bad that it wasn't tested in the wind tunnel to prove one way or the other. What we can say from the previous testing is that the airflow at the front edge of the hood isn't smooth; just looked at the wind tunnel pics and verified this idea (test 9, 14, 16, 17). The yarn is not flat on the hood at the leading edge, which is no surprise really. So put the hood pins close to the front of the hood and the rear ones right at the back, and the fronts will be in disturbed airflow and the rears will be in the high pressure area at the base of the windshield. That in and of itself could reduce whatever tiny amount of drag there is from hood pins pretty effectively. But even with more traditional placement at the rad core support I just can't see it being a worthwhile thing (to me from my bang for the buck perspective) to concern myself with. I really think that the goal for us road racers should not be so focused on reducing drag, it should be to produce downforce. Focusing on drag in a Z just seems like tilting at windmills, and we have no shortage of power for these lightweight cars to overcome a .005 CD increase in drag. For what it's worth I signed up for a free issue of GRM, so maybe after actually seeing the article I'll have a better idea of what the author said, assuming I get the right one. -
Nobody has anything for me here?
-
Grassroots Motorsports Aero Article
JMortensen replied to Zzeal's topic in Windtunnel Test Results and Analysis
I used to race with the Maximum Motorsports guys who all ran Fox body mustangs, I can't remember any of them having hood pins. I guess I wasn't too focused on their hood fasteners, but I did see quite a few of them month after month and year after year, so I would hope that I would pick up on that kind of thing. I wonder if the US version of the car didn't get pins. -
Grassroots Motorsports Aero Article
JMortensen replied to Zzeal's topic in Windtunnel Test Results and Analysis
Looks like you can get Chinese knockoffs for $49 per pair. That's still a lot of money for hood pins. I'm not sure we got that Falcon GT with hood pins in the US. It's not ringing a bell. -
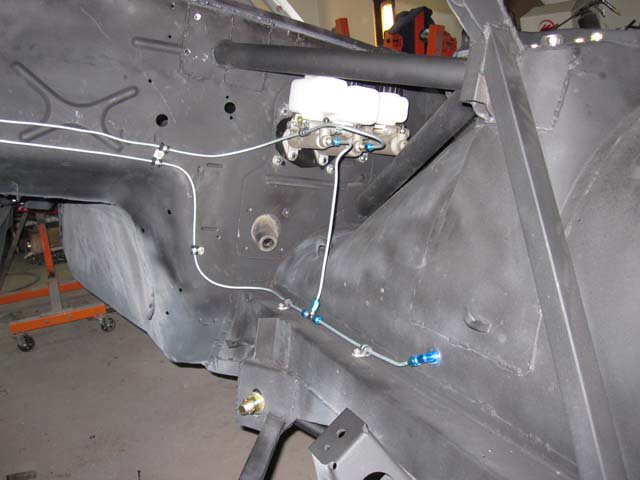
I am done plumbing brakes and I'm looking at getting the fuel system ready. Engine is a 5.3, will run a BG Race Demon 650. I was going to run 3/8" lines and I bought a pump back when I was going to run the L28. It's a Carter P4070 and it puts out 70 gph at 6 psi and has 1/4" NPT inlet and outlet holes. Here are my questions: 1. Is 3/8" fuel line big enough to support say 400 bhp? I've heard conflicting info on this one. 2. Is 6 psi that my pump puts out enough? I can't seem to find a spec on the carb. Not sure where to find that info, I did find this: http://racingarticles.com/article_racing-68.html which says "fuel pressures are typically 7-9 psi" and this: http://www.barrygrant.com/demon/default.aspx?page=29&specs=29f which doesn't specify a fuel pressure at all, surprisingly. 3. If I have a pump that puts out 6 psi, can I get away with no regulator? 4. Do the BG carbs take the same carb feed line as the 4150? 5. If I do have to put a higher pressure pump on there and run a return, can I just drill a hole in the plate on the top of the cell and install a bulkhead fitting? My cell has a fill and a vent fitting, but nothing else.
-
plumbing race brake system
JMortensen replied to JMortensen's topic in Brakes, Wheels, Suspension and Chassis
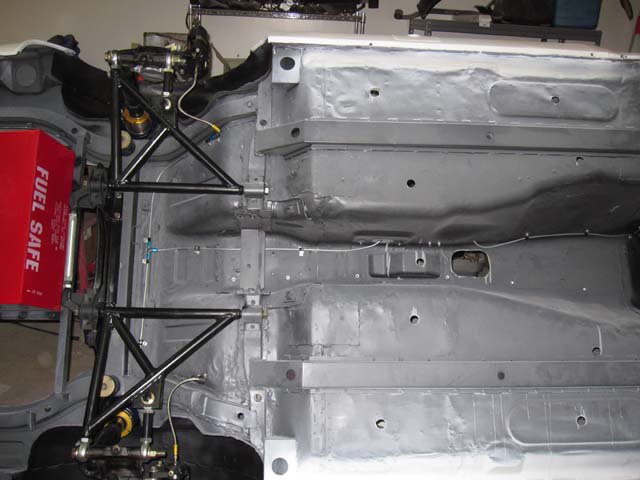
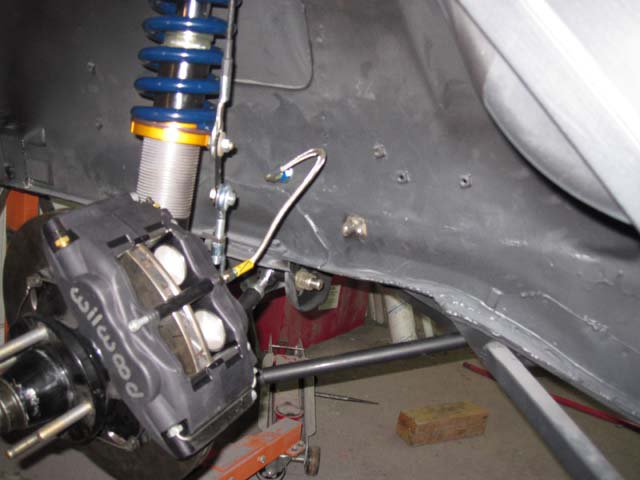
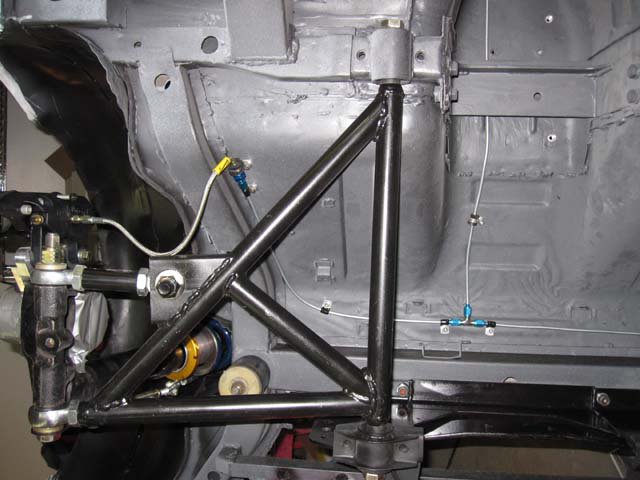
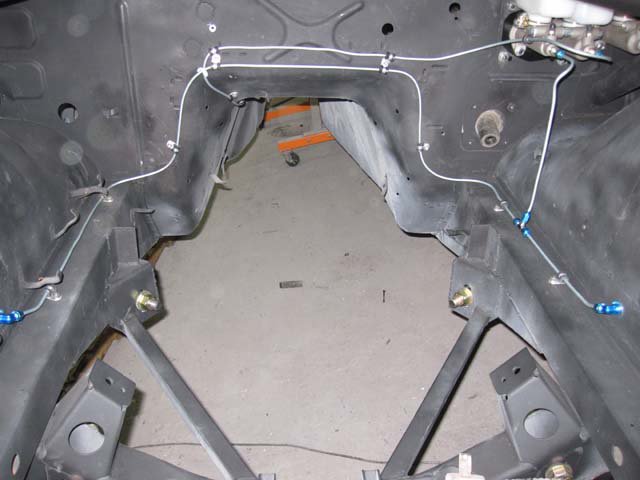
Brake plumbing is done. I made several boneheaded mistakes: I first drilled all the holes for the plumbing and installed nutserts down the driver's side of the tunnel. Then I decided to run the brake prop valve inside the car. This caused a bit of an issue. I'm going to see if the nutserts are in the way and drill them out and just leave open holes or put them back in from the topside if that is the case. I'll probably use the second set of nutserts for the gas line plumbing. Also had the brake lines running higher than the master, and then was thinking: "wait a minute, isn't that going to make it a ***** to bleed?" so I had to re-bend the line for the rear brakes, and wasted another couple nutserts. The last problem was the length of the braided lines. I should have probably gotten 10" lines for the front and 8" lines for the rear, but instead I had ordered up 12" lines all the way around. In the front they were interfering with the wheels, in the rear it was hard to find a spot where they wouldn't be running close to the CV shafts or wheels. I found spots that work front and rear, but I think if I need new lines in the future I'll buy the right size, even though that would require a redo of the hard lines in the back. On the plus side I think the front brake line routing with the bulkhead fitting is pretty sweet, and none of my flares cracked even with my Summit Racing AN flare tool, which I suppose is not the best one out there. It will be interesting to eventually get the thing on the ground and put some fluid in it and see if it leaks at all. -
Grassroots Motorsports Aero Article
JMortensen replied to Zzeal's topic in Windtunnel Test Results and Analysis
I haven't seen the article, but hood pins don't seem the most cost effective place to look for aero gains. Maybe I just haven't been able to find the cheap ones but a set of traditional hood pins is less than $10/pair, and a pair of aerocatch pins is closer to $150. NRG makes some that are just over $110 per pair. On my car I'll need 8. I can spend $450-$600 on hood pins to follow the advice of the author, or I could buy regular hood pins for $50 including shipping and have another $400 to $550 left for an air dam, a wing, hood vents, materials to make a radiator duct, or any number of things that might have a much greater effect on the car as a whole. I really think the drag created by the hood pins is fairly inconsequential. It might be "low hanging fruit" because it obviously creates unnecessary drag, but what I'd like to see is drag numbers for and without hood pins to back up the assertion that it is a good place to spend the money. It's tough to find GRM on the news stands around here and I dropped my subscription years ago when it started getting more and more fluffy. I hope this article hits the internet at some point so I can read the whole thing, but I'm not impressed with the "get rid of your hood pins" part. -
S130 Suspension Tech
JMortensen replied to Smokescreen's topic in Brakes, Wheels, Suspension, and Chassis
I did a lot of thinking about this when I modded my TC buckets. I ended up slotting the crossmember (which I had already done previously for bumpsteer adjustment) and slotting the TC bucket so that I could raise or lower the pivot to affect pro/anti dive. I think a very lowered 280ZX is going to have pro-dive. The TC rod will angle up from the control arm to the frame. When you step on the brakes that rod wants to level itself out and can only do so by compressing the front suspension. I think being neutral or very slightly anti-dive is better because the suspension can move more freely and doesn't use suspension geometry to make nose dive worse. Really though, the ZX has an advantage here over the Z because of the rear semi-trailing arm. If you can get the rear arms to angle down slightly from front to rear they will also have pro-dive, and the effect is that the chassis lowers itself when braking instead of stink-bugging the rear end. Of course the offset to that is that pro or anti anything on the suspension tends to lock the suspension up. The effect of braking forces makes the control arms as long as possible (levels the control arms) and then resists moving over bumps because that's pulling them from their "longest" position. Shortening the TC rod has the effect of turning the front control arm and TC rod into a semi-leading arm and makes it more reactive to braking forces than it is if the pivots are parallel to the chassis centerline. The first couple pages of this thread discuss this effect: http://forums.hybridz.org/index.php?/topic/41611-tc-rod-pivot-relocation-bad-dog-subframe-connectors-slotted-crossmember/ A friend of mine made TC mounts for his 510. He made a triangular bracket with 1/8" steel plate and boxed it in on 3 sides and he had one pivot at the stock height and another 1" higher, and he ran a rod end in front, a turnbuckle and then a fabricated rear J arm to attach to the control arm. That's essentially what you'd need to do. It really seems a lot easier to do this project on a 510 than a 240 because the 240 has the TC structure built into the chassis in a much more difficult to work around way. I think a 280ZX should also be fairly simple to work with. -
S130 Suspension Tech
JMortensen replied to Smokescreen's topic in Brakes, Wheels, Suspension, and Chassis
No, you are wrong again. If you section the struts and then lower the perch to the point at which the gland nut hits the strut top when the weight of the vehicle is on the suspension, you still have NO suspension. Common sense would tell you that the spring is going to sag, math would enable you to estimate the sag, but you continue to deny reality and say that your springs only sag 1/4 to 1/2 inch with the full weight of the front end on them. Un-possible. Probably the biggest other issue related to lowering the car that far is suspension bind. Suspension parts can literally smack into the frame leading to catastrophic failure, or they can be twisted past the point where they can move freely, resulting in bent suspension parts or possible catastrophic failure. I found a BUNCH of suspension bind on my S30 when I checked. The rear sway bar was hitting the frame. With the sectioned struts in the rear the lower control arm could hit the frame. The front sway bar was at such an angle that the end links were bound and the end link bolts were bending. The rear sway bar end links were hitting the frame. The TC rods bound in their mounts that I had someone build for me previously, etc. Your car is being run lower than mine was. They're not the same platform, but to think that you can just lower it as far as you want and that there won't be any repercussions and not to bother even checking is not smart and potentially unsafe. Beyond that you have the bumpsteer issue. I don't know what the curve is like on the S130, but I've reported my own car's emergency lane change manuever over one particular bump at the track numerous times, and I would imagine that the S130 has a similar bumpsteer curve and that it gets similarly worse the farther you get from Nissan's intended ride height. Mine was that bad BEFORE sectioning the struts. Your semi-trailing arm rear has similarly bad rear toe changes. You can see from Frank's post #127 that the farther the suspension moves from flat the worse the toe change becomes. Where is your control arm in relation to that graph? I don't think the exhaust tubing is really an issue. It's shoddy workmanship, but I don't believe that it is inherently unsafe. I don't see the tubing folding under the load from the spring, especially when the spring can't compress far if at all before the suspension bottoms. I like the idea of cutting the BS out of this thread. This one WAS going pretty well. Maybe make a new "What PurePontiacKid is Doing Wrong" thread and move all the crap into that one. -
New Pilot Bearing, Clutch, Pressure Plate, and Throw Out Bearing
JMortensen replied to jacob80's topic in Drivetrain
There is a little nub that sticks down off the bottom of the trans. Put the cup of any regular hydraulic floor jack under that nub and the transmission will balance on it. Lower the jack, and then slide the trans off of it and push it off to one side to replace your clutch. Reverse to reinstall, no special tranny jack needed. -
S130 Suspension Tech
JMortensen replied to Smokescreen's topic in Brakes, Wheels, Suspension, and Chassis
Bullshit. Try typing some other stuff that isn't true and you find that your computer can't magically make that happen either. 1/2" droop on a stock ZX would require approximately 1400 lb springs. Those are not 700 in/lb springs, let alone 1400 in/lb springs. 1/4" droop = 2800 lb springs. No way in hell. They're probably 350 in/lb guessing based on a picture via the internet, translation, you're driving around with the suspension bottomed. Here's an idea for you to recoup some of your losses on the suspension you paid for but are not using. Get a steel top hat, weld a 5/8" bolt in it so that you have a stud sticking out the top, then weld the top hat directly to the strut housing. Now you can sell your Koni shocks which don't actually do anything 99% of the time, and your coilover kit. Now you don't have to worry about bumpsteer because you have a fixed suspension. PLUS, it will handle like a go kart. Literally. In the rear you could get a tube, weld the 5/8" bolt to the top and a clevis to the bottom to make it similarly unsuspended. Then all you have to worry about is breaking the chassis with the NVH you put into it through the what-would-have-been-suspension. So when you didn't need suspension, you didn't feel the effects of having no suspension? I never would have guessed. A glowing endorsement for what not to do from who not to take advice from. -
New Pilot Bearing, Clutch, Pressure Plate, and Throw Out Bearing
JMortensen replied to jacob80's topic in Drivetrain
2x4 behind the valve cover works just fine to hold the motor up. -
Road-Racing carburetor modifications for 350 V8
JMortensen replied to bjhines's topic in Gen I & II Chevy V8 Tech Board
I've settled on this one for my 5.3 (325): http://cgi.ebay.com/ebaymotors/Barry-Grant-650-Race-Demon-2282010RR-Road-Race_W0QQcmdZViewItemQQhashZitem5ad7509b62QQitemZ390159440738QQptZMotorsQ5fCarQ5fTruckQ5fPartsQ5fAccessories They make a 750 which might work too for the 350. -
S130 Suspension Tech
JMortensen replied to Smokescreen's topic in Brakes, Wheels, Suspension, and Chassis
You drove daily on that? Not smart. How stiff are the springs? I have some 600 lb springs and the wire is A LOT thicker than what you have there. 600 in/lb springs would probably give you 1 1/8" of droop, which puts you right on the verge of bottoming. I bet you were running with next to no travel. If you had installed bumpstops, I have no doubt that you would have been on them the whole time, in fact they probably would have lifted the car. Bumpsteer spacers don't fix bumpsteer, they adjust roll center. If you were running that low you need to actually fix the bumpsteer. See the FAQ post on bumpsteer for more detail. The roll center issue is much less of a concern as it relates to safety. Might be a handling issue, but pretty minor in comparison. Really, there are a bunch of other problems with running that low, not the least of which is bottoming the top hat into the strut. As you've discovered it makes a lot of unpleasant noise as the metal pieces smack into each other. What you probably fail to realize is that the suspension and the chassis aren't meant to take that kind of abuse. If you really want the car that low you need to do some pretty major modifications to make it usable. If you aren't willing to do the modifications, you're really doing something pretty ill-advised by running the car that low. I don't see how you could look at that and manage to convince yourself that you still have adequate suspension travel. Your denial-fu is strong. I had a friend who used to deal with lowered Hondas and Acuras in the early 90's. He used to comment that they would buy lowering springs, cut the usable part of the spring off and throw it in the trash, and install the unusably short part of the spring and then drive around. Pretty soon they would come to his shop for a noise in the suspension, and he would find that the one or two coils that they had installed as the spring had fallen out when they had gone over a bump in the road. Perversely you have a usable spring length but you've chosen to install threaded coilovers and lower the perch to the point of unusability. I guess you went the expensive route to having no suspension. -
I'm with David. If you take a second to look at the suspension and think about what it does, you should be able to figure out that the loads from the TC rod transfer to the chassis RIGHT THERE. If the frame is swiss cheese there, then that needs to be fixed right away before you spend money on cool go fast parts.
-
plumbing race brake system
JMortensen replied to JMortensen's topic in Brakes, Wheels, Suspension and Chassis
Great. I should be in the ballpark by the sound of it. -
plumbing race brake system
JMortensen replied to JMortensen's topic in Brakes, Wheels, Suspension and Chassis
That's good news! I had the early booster and 15/16" master and didn't have trouble, so I may get close to equal with the new setup, and if not a change down to 5/8" should get me there or better, by the sound of it. Lots of Wilwood and Tilton assemblies are available in 6.25:1, and there are others that are 5:1 and 7:1. 6.25:1 seems to be the most common. What size pistons and calipers are you running? I have a weird situation where I bought Dynalite calipers for the front and then realized I wanted Superlites because they are bigger, so I have front and rear calipers with 1.75" pistons. I suppose I might have to go bigger with the rear master if I can't get the bias dialed in with the prop valve and balance bar. Hoping I don't have to do that. Back to the plumbing, I was having a hard time figuring out the front brake line routing under the frame rail because of the mods I did there when I changed the TC rod mounts. I came up with a solution though. I am going to run a 90 degree bulkhead connector so the brake lines will run down the frame rails and to the bulkhead. I'll drill a hole through the fenderwell in the best spot and then connect the brake line on the other side. I think this will work pretty well for the front. Still considering what to do on the back... -
You should be able to wrap a rag around the flange and hold it with one left hand while hitting the impact with the other and remove the nut that way. Same for reassembly. The flange may or may not come right off. It's a splined flange, the flange slides onto the pinion splines. The pinion by the way is the long shaft and gear inside the diff which turns the ring gear, the ring gear is bolted to the limited slip. Those pinion splines may be rusty and then you'd need a puller ($10 tool at any auto parts store). I haven't needed a puller for any of the flanges I've pulled off in the past, but if you're in the rust belt in PA or something you may not be so lucky.
-
Crush sleeve differentials have the pinion bearing preload set with the torque on the pinion nut. If you change the torque there you can really affect the pinion bearing/race relationship and you can end up with slop which allows the pinion to move around or you can end up with WAY too much preload which will bind the pinion shaft up. That's why I ASSumed you were making reference to crush sleeves. Really in the R200 no reasonable amount of torque should lock the thing up. It's as simple as that. If that happened on yours, something went wrong. If I had to guess I would say the pinion seal got F'd up when you put the yoke on, or the seal wasn't bottomed in the housing so the little lip that sticks out was dragging on the backside of the flange as it turned. Changing the torque on the nut really doesn't have the same effect as it does on a crush sleeve setup, so barring something minor like the pinion seal dragging or something major like the bearings being totally shot, the pinion nut torque should not have any effect on the pinion shaft spinning freely. I've put a couple on my Z over the years, my MO is to red loctite the nut and then hit it with an IR231 impact with the impact on 5 (highest setting). I'll drain the air compressor until it fills up again and then hit it with a nice full tank. Mine didn't seize.
-
You can reuse the nut you take off. You only need the flange which is #37.
-
Axles that work with the modern motor sports kit
JMortensen replied to 240zRacer's topic in Drivetrain
If you do the 930 CV conversion, you still have the same size splined shaft coming out of the diff. It just terminates in a 4 bolt flange which bolts to the Porsche CV joint. If the tripod CV busted, I think the 930 CV might be worth considering. If the shaft busted, I don't see a big difference between one and the other. That said, ezzzzzzzz mentioned shortening the driver's side shaft 3/4", and THAT is something that might be worth checking out a little further for the OP. I would look for suspension bottoming or the CV bottoming on the launch, angles of the CV shafts, etc. Angularity issues and binding are your enemies. -
This is not true. The R200 doesn't have a crush sleeve, it uses solid pinion spacers. Tightening the pinion nut has not effect on the bearing preload or the pinion depth or backlash. If you tighten the nut and the diff seizes, there are other problems. Don't make it harder or more confusing than it needs to be. Switching the flange should be as easy as taking the pinion nut off, removing the flange, installing the new flange, red loctiting the pinion nut, and torquing it to spec. Can't recall the spec but it's ~150 ft/lbs. Basically RFT and it should be good to go.

