JMortensen
-
Posts
13742 -
Joined
-
Last visited
-
Days Won
67
Content Type
Profiles
Forums
Blogs
Events
Gallery
Downloads
Store
Everything posted by JMortensen
-
Hmm... I have a stainless 1/4 NPT union into a brass adapter on the filter. I suppose I could go get a stainless adapter for the NPT fitting. I guess the trouble might be getting the brass one out of the filter now. The pump, I'm sure you'll remember, is rubber mounted on 3 vertical studs. I shimmed out the pump bracket so there is less strain on the rubber mounts, but there still was a little deflection in the rubber when I tightened it down. If necessary I think making a mount to solid mount the pump wouldn't be too difficult. Just drill the holes the same size as the studs on top and bolt it solid that way. I suppose another solution would be to go to a smaller filter that might be more flexible in where it gets mounted. I chose this one simply because a friend of mine had used it in the past. Thoughts?
-
Got a suggestion on another forum to hook the NPT fitting on the pump to the NPT fitting on the filter. I went and looked and sure enough I had the fitting and adapter necessary to do this. Hooking them both together directly gives me room to get the other filter on the side as well. Need a union and a 90 and I do the hard line stuff. Thinking I should hook the hard line directly to the filter and get rid of the soft line from the filter to the floor, will look at how difficult that bending will be. Should be pretty easy.
-

Eibach Progressive Springs mounted
JMortensen replied to degofedal's topic in S30 Series - 240z, 260z, 280z
Front springs should be shorter. Tighter wound coils are on top (nitpicky but reduces unsprung weight a little bit). -
If you decide to put longer ARP or similar studs on the rear and don't want to pull the axles, you can drill a hole in the backing plate to fish the studs through.
-
Just reading my previous quote there and I worded it pretty badly. The street flare is 3" wider than stock ZG is 1.5-2 inches wider than stock. That's going by memory on the ZG, so might double check me.
-
The rear flare is a 3" increase from stock. If you can find the same spec, then you have your answer. I want to say ZGs are an inch and a half or two inches wider. I'm pretty sure MAS did make them for MSA, but they don't make them anymore and no longer have the molds.
-
Help on the six clutch R200 mod please. Now which fluid?
JMortensen replied to SATAN's topic in Drivetrain
Pretty much any gear oil is going to be OK. I like SWEPCO 201 and it requires little or no LSD additive, depending on how tight you have it shimmed. Any quality gear oil should be fine and if you want to spend a little more on Amsoil, Redline, SWEPCO, etc. it's probably not going to hurt anything. -
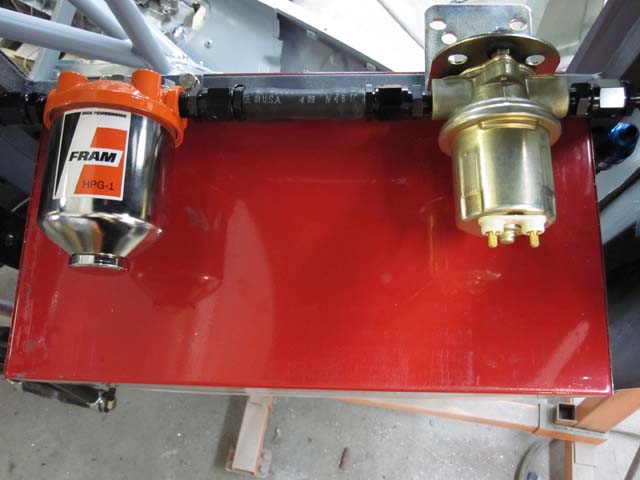
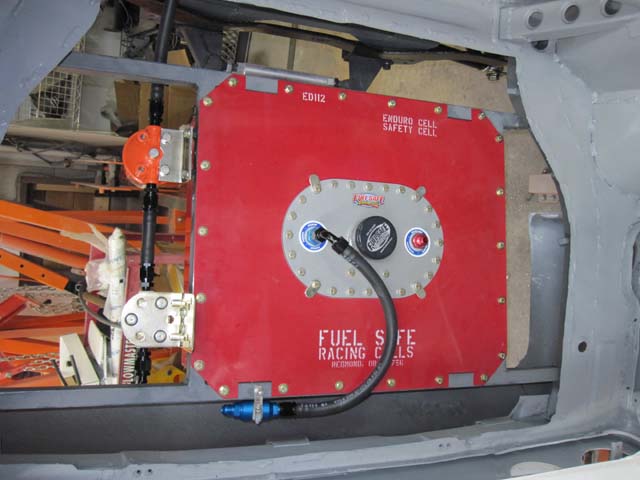
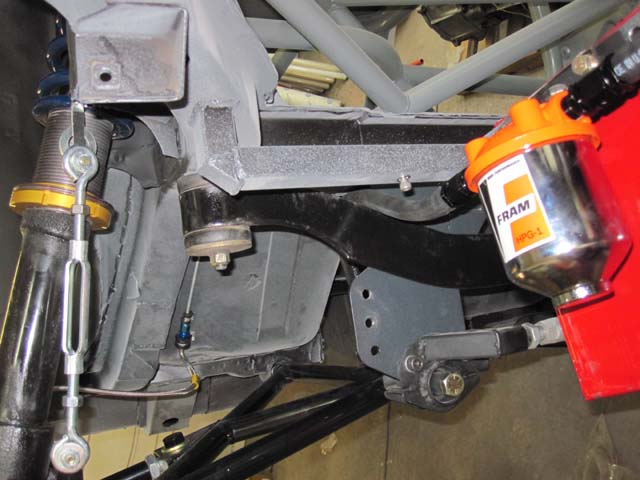
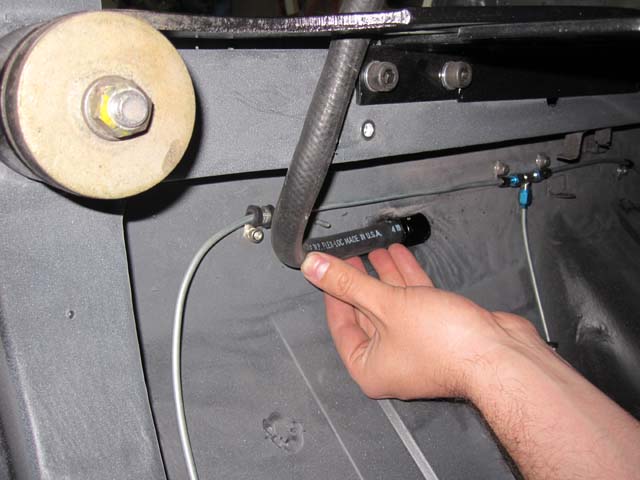
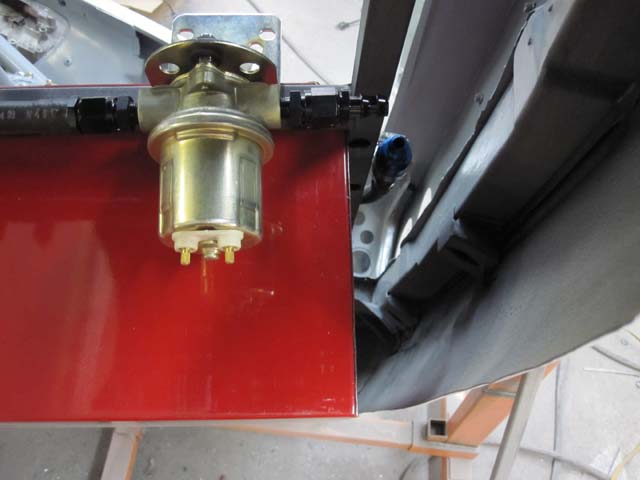
I'm already mostly done with the push-lok and I have heard enough horror stories about ss braided that I'm not going to turn back now. I know this will be OK for tech at autox and track days, which is what I'll be doing for the foreseeable future. I think it's good for road racing too, not sure haven't bothered to look. I am having a bit of trouble with the filters and pump, just figuring out where to put everything in the car. If you line up the filters and the pump and fittings, they're longer than one side of the fuel cell. I can't put them in the front because I can't get at that side of the cell frame to drill holes, so I put the pump and filter on the driver's side of the cell. This means that my 90 heads BACKWARDS to get to a first filter, then around the corner to the pump and filter. Not really happy with the way this is turning out. I really wanted to keep the fuel lines away from the rear just in case I do decide to road race the thing, but I guess if I do that I can just redo the plumbing at that point. Here's what I have so far. I'm not sold on this, so if anyone has a better idea, now is the time... Pump and filter with about 1" hose in between the fittings: Top view, filter before the pump is held on with hose clamp screwed to frame. Better way to do this? Soft line will be clamped to frame rail and will head right through this little hole between mustache bar and frame: It will end up on the floor here and there will be a union to attach the hard line. One problem I'm having is this rear corner of the cell. The hose doesn't like this corner and a 90 is just a bit too short, so I think I'll have to get a 45 for this part. So that's about it. Haven't done the hard line stuff yet, but that's going to be really easy. It's where to put all these little parts that is giving me a hard time. Suggestions on how to do it better appreciated as usual.

-
safety wire for brake rotor bolts
JMortensen replied to bjhines's topic in Brakes, Wheels, Suspension and Chassis
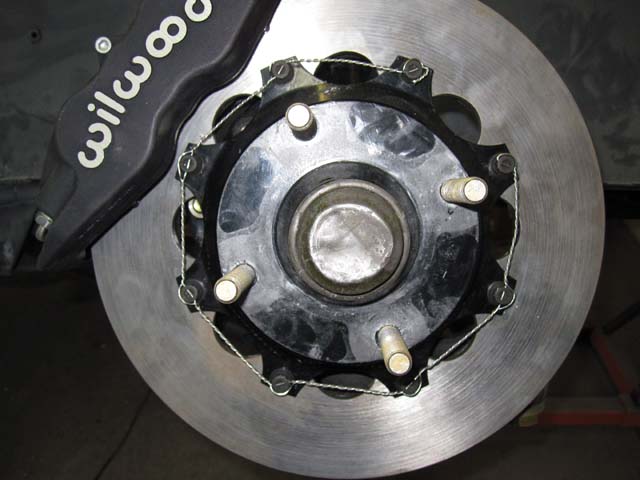
The loops are really pretty tight, it's that damn thick wire that makes it look loose. I have to go to Harbor Freight anyway, maybe I'll pick up some thinner wire and redo it. Glad to know that I had the idea right, because I looked at numerous sources trying to figure it out and asked several people as I was going along to make sure it was correct. Thanks for the feedback. -
Problem number 7958. When I put the 90 degree fitting on the cell, it sticks up about 2 inches above the rear deck. I guess now I need to figure out how to seal that area off. I could put a cover over the deck and then pop up where the fitting is I guess. Or I could put a raised frame in above the deck so that the cover could be flat. Either way looks like more work than I wanted to do...
-
safety wire for brake rotor bolts
JMortensen replied to bjhines's topic in Brakes, Wheels, Suspension and Chassis
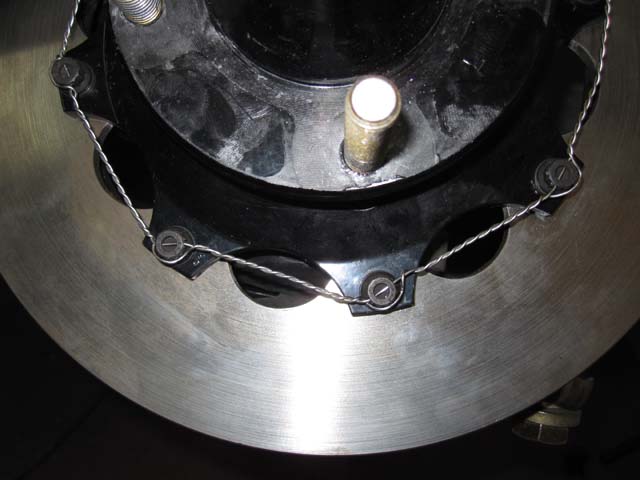
I looked at a bunch of pictures online to figure this out and apparently I still got it wrong apparently. Unfortunately, I'm not following what you mean here. I thought the idea was to run the wire so that if it were to get pulled the natural reaction on the bolt would be to tighten. The way mine is set up it doesn't matter whether you pull on the wire to the left or right of a given fastener, the reaction of the fastener will be to tighten. Are you telling me that the single wire that gets wrapped around the bolt head is on the wrong side? Sorry, I'm just not following... -
safety wire for brake rotor bolts
JMortensen replied to bjhines's topic in Brakes, Wheels, Suspension and Chassis
How does it work when you wrap the twisted wire all the way around the fastener? Wrap it once, then put one wire through the bolt, the other around (like I did) and then move to the next one? -
I've been watching your plumbing thread. Very nice. Any opinions on fuel pump height? I really think it will be OK at the cell flange level, it is lower than the outlet of the cell on top.
-
Help on the six clutch R200 mod please. Now which fluid?
JMortensen replied to SATAN's topic in Drivetrain
If it sounds like the ass end of the car is going to fall out and be laying in the street behind as you roll to a stop, then yeah, that's normal aggressive clutch chatter. -
safety wire for brake rotor bolts
JMortensen replied to bjhines's topic in Brakes, Wheels, Suspension and Chassis
I just did this for the first time too a few weeks back. I used Harbor Freight pliers and wire. It was the thick wire, next time I'll get the thin stuff. Just a bit hard to bend. I also got the smaller pliers, should have gotten the bigger ones. The thicker wire was hard enough to bend that I went with the straighter of the two holes drilled in the ARP bolts because it was just a pain to get the wire into the bolt from the side, but they all are set so that if the wire straightens out it pulls the bolt tighter like John's.
-
Rear wheel placement in fender well
JMortensen replied to rx8ss's topic in Brakes, Wheels, Suspension and Chassis
You can't put the strut at an angle at the bottom. No matter where you shim the strut to, it's still perpendicular to the control arm, unless you got real creative and changed the angle of the inner mounts. The stock rubber top may have enough give in it to make this kind of thing work, but it still is not the greatest idea. I think with a camber plate it is really a lot worse since there is no give in the monoball. In that case you're relying on bushings or control arms to twist to allow the suspension to move at all. What gives first, and how is this going to affect the lifespan of all of these components, and what does it do to stiction are the three questions I'd be asking myself. -
Rear wheel placement in fender well
JMortensen replied to rx8ss's topic in Brakes, Wheels, Suspension and Chassis
Moving the wheel back is a VERY bad idea if you have poly bushings or rod end control arms, or camber plates up on top. The control arm needs to be positioned so that the strut is vertical when the top of the strut goes into the strut top or camber plate. If it is off to one side and you force it in (as would be the case if you moved the strut back), then as the suspension compresses the top of the strut will get further and further out of alignment with the control arm as the suspension compresses, giving you more and more side load on the strut, more stiction, more flex in the strut and/or the control arm, whichever is weaker. I really think it is a very bad idea to move the wheel back without making sure that the suspension is still squared up with the strut top. You could do something more radical and weld an offset camber plate on up top so that everything is still squared up, but if you just buy that arm and move the wheel back it's going to be worn out struts, bushings and crappy sticky functioning of the suspension IMO. -
Gurney Flap Across the Bonnet/Hood
JMortensen replied to 260DET's topic in Windtunnel Test Results and Analysis
I think there is a reason you don't see this. Turbulence is still not high pressure, it's low pressure. It's just not efficient low pressure. It's drag. So you'd probably create a bunch of drag and very little downforce. The reason it's worthwhile on the hood vents is because the pressure change on top of the vent reduces the pressure under the entire surface of the hood, and a slight pressure change under the hood multiplied out by the surface area of the hood can have a very large effect on overall downforce. I'd put a bigger splitter on or bigger vents in the hood, etc before trying to put a spoiler on the hood (which it seems is basically what you're talking about doing). -
Got all my fittings yesterday, thinking about how to mount the pump. On the stock tank I mounted the pump to the two holes in the front that are right on the seam where it is pinch welded. On the cell I don't have that luxury. I have a frame around the top of the tank, but nothing below as this cell is designed to hang from the top flange. One thought I had was to mount the prefilter and pump right off that frame, but I understand that the pump supposedly works better the lower it is. Not sure that this matters when the fitting that comes off the tank is already higher than the proposed pump mounting spot. Also I currently have the cell mounted with bolts and nuts, was considering doing some/all nutserts on the frame, but not sure if that's a bad idea just in case the car flips. I know the nutserts aren't as strong, and these in particular are aluminum nutserts, but I figured I'd ask. I think it would be easier to change the pump if I didn't have to find the nut on the bottom to get the bolt out is my thought.
-
Brake hard line size?
JMortensen replied to jkgts1's topic in Brakes, Wheels, Suspension and Chassis
3/16" is fine. You're really not moving a lot of fluid, just the pressure has to be transmitted through the line unless you're bleeding the system. -
Strictly speaking, dowels can handle more shear loading than bolts because they aren't threaded. Threads are stress risers making dowels much stronger size for size. That said, I think in this case the purpose of the dowels is alignment as you said. If Dave's suggestion to move them is doable, that's what I would do.
-
Tony is right, both in terms of swapping the towers and that post count means nothing. I swapped cam towers from a P79 if memory serves when I added a cam to my E31 head because I had an internally oiled cam and a spray bar head, and I wanted to run the right towers for the oiling system. Now I realize that with the pump I had I should have just left it and used both oiling systems, but I ran that head with that cam for many years as a daily driver and had no problems. Like I said, make sure it spins freely. That means that you're in alignment and good to go.
-
350 bhp is doable with a NA L6. I'd like to see dyno sheets for the L6 running a Holley 4v that is pushing 350 hp. It's car show hp. The one and only time I went to the MSA show about 12 years ago I was astounded to see all the trashy looking Z's with 40mm Webers or Mikunis claiming 300 hp or more. Same thing here.
-
If I recall correctly you can't flip them around, but you can mark them 1, 2, 3, 4, 5 so they go back in the same spot. They don't require line boring or anything like that. You can take them off, shim them up and there are no ill effects from doing so unless you really don't pay attention to what you're doing. Put the cam in, make sure it spins freely before hooking up the timing chain, and you're good to go.
-
Clarkson has a way with words. So does Hammond. "Tuokool!!!" http://www.youtube.com/watch?v=J_duTTLS1ic&feature=related