AydinZ71
-
Posts
1073 -
Joined
-
Last visited
-
Days Won
27
Content Type
Profiles
Forums
Blogs
Events
Gallery
Downloads
Store
Everything posted by AydinZ71
-
240z SCCA vintage race car, restoration
AydinZ71 replied to AydinZ71's topic in S30 Series - 240z, 260z, 280z
Thanks Ben! yeah I’m really intrigued by Haltech’s dynamic learning feature. Apparently it monitors throttle, idle, etc and AF to long-term trim the fuel settings. Obviously won’t tune for WOT torque, but nothing will replace a dyno. I also like how much I/O you get for a $1300 ECU. I feel the need to include a knock feedback for ignition retarding. The head work on the N42 landed me around 10.5:1 on the 3.1L, so I think I will be knock limited vs. torque limited on ignition timing. Willow Springs is in the desert and 2500’ and decent so knock will definitely be a risk that will be hard to mirror on the dyno. if there is too much advance left on the table, I might take it to my local shop and have the head shaved to 12:1 for 100 octane. Got a spot near me for $11/gal on a pump which is rather convenient. I have the Kameari chain tensioner so I won’t need to shim my towers more or thicken my lash. I don’t have a tuner yet, but being in the LA area I kind of have my pick to choose from. I should call Erik’s racing and see what his preference is. He is obviously a legend, and has a flat $500 fee to tune from a base map. I’m looking forward to eventually using CAN and a digital HUD, but I’m appreciative of the opportunity to take a break from big spending 😂 Need to get some seat time before I can appreciate all there is to gain from data. I’m literally a novice driver 🤦🏽♂️ -
240z SCCA vintage race car, restoration
AydinZ71 replied to AydinZ71's topic in S30 Series - 240z, 260z, 280z
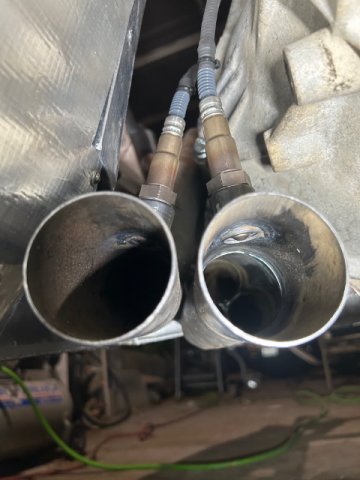
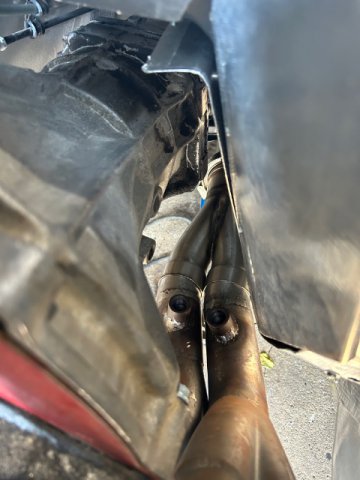
@tube80z thanks Cary! I will look into MAXXECU! My nearest experience with EFI was the SDS system I have in the turbo street S30 I built 20 years ago. Now that I am much more confident on the wiring side (partly from engineering background, partly from the wiring fundamentals course on HP academy) i feel comfortable tackling just about any kind of sensor/actuator wiring not requiring a scope. In that way, I'm looking forward to a more open-ended ECU with more I/O so i can get more creative short of utilizing CAN. The 3.1L is definitely the least compromised engine I have built, so I want to build-in safety interlocks to kill the engine when necessary. 100% clear on the “PIG” 😂 I commissioned the first natural gas pipeline in Jamaica (probably unqualified at that time), and learned more about pigs than I care to remember haha. What you propose is novel and makes absolute sense. Wonder why I didn’t think of it! The nice things about Tri-gas is since it’s mostly helium, you don’t need all the volume changes of a heavier inert gas just to get started. It kind of floods the top of the 3” tube, so you can start welding pretty shortly after you start the purge and still not seeing any signs of sugaring. Granted, you have to rotate the tube and keep welding from above, but I would be doing that anyways. I gotta say, MIG welding stainless surpassed my expectations. I would argue it welds even better with tri-gas and 308L, than my regular mild steel wire and substrate w/ C25 gas. I blame that on the unavoidable flash corrosion and contamination Mild steel is susceptible to. one day I will migrate to TIG. I just don’t have the justification at the moment, since the exhaust is likely the last of my welding on this car. -
240z SCCA vintage race car, restoration
AydinZ71 replied to AydinZ71's topic in S30 Series - 240z, 260z, 280z
Thanks CalZ, Jon, Up on the list now is the Haltech 750 elite. Il do a little more comparing between the different versions, but I think I’m going to Haltech! Thanks!
-
240z SCCA vintage race car, restoration
AydinZ71 replied to AydinZ71's topic in S30 Series - 240z, 260z, 280z
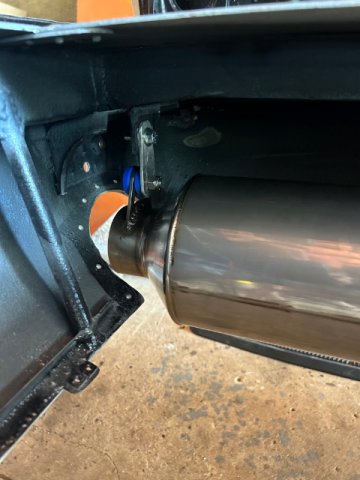
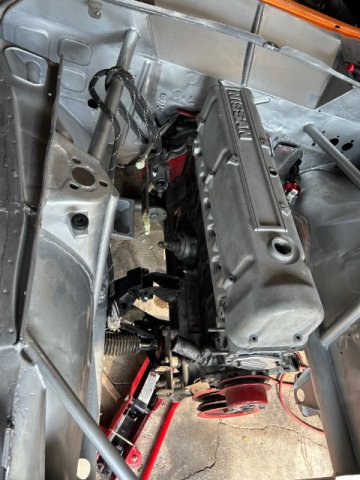
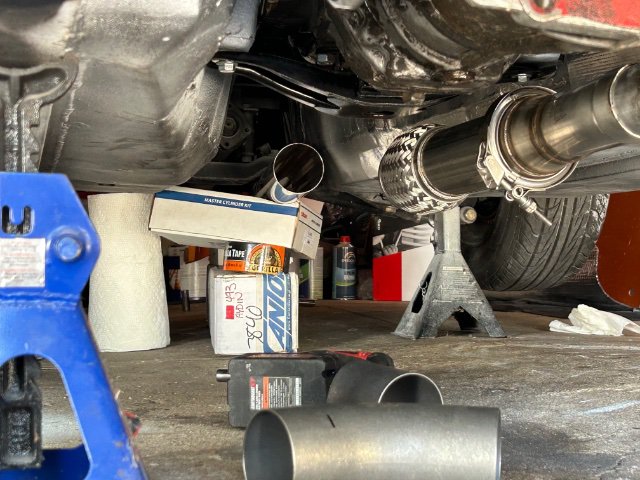
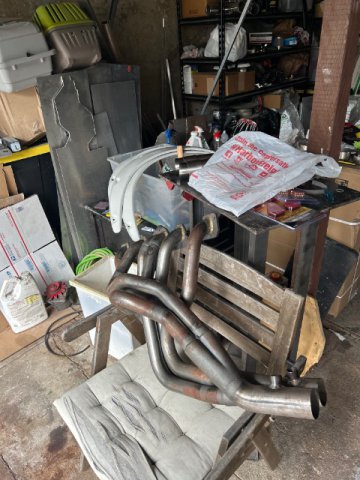
Been a little bit…. The Swain lightening header coating is an 8-10 week lead time at this moment 🤦🏽♂️. So everything was prioritized to mock-up the exhaust and get the header shipped out. 2-1 collector is from Burns stainless. 3” 18-gauge 304SS from I’m the collector back. I bought some tri-gas for the mig and made a jig for back-purging. If anyone else’s is attempting this, keep this in mind: you will go through helium tri-gas FAST. Be stingy with the back-purge. the L24 is in now, but my N42 head just shipped from the venerable Mr. Yoes. So the 3.1L will also be ready in about a week, too. If I get the wiring and plumbing done within 8-weeks (not a big challenge), I’m going to be too tempted to drop in the 3.1 long block 😂 Only issue is I did not plan around the EFI for the Jenvey ITB’s just yet… Anyone have recommendations on an ECU that’s a good balance between cost and performance? Was looking at MoTec, but difficult to justify since I don’t need 1/2 of the features it comes with. Knock control would be the only dynamic “add-on” I would consider. The goal: this car will be running within a week of receiving the header back from Swain. Setting my calendar to it… car will be “done” (more or less) by mid October. 3 years, and 3 months after my initial purchase of a rusted-out POS.
-
240z SCCA vintage race car, restoration
AydinZ71 replied to AydinZ71's topic in S30 Series - 240z, 260z, 280z
Thanks friends! I will post more this weekend when I eliminate all the runs and the clear has fully cured so I can start putting latches back on. This particular clear seems to stay soft longer than others, but it had a good long "wet" time to it. -
240z SCCA vintage race car, restoration
AydinZ71 replied to AydinZ71's topic in S30 Series - 240z, 260z, 280z
@clarkspeed thank you! updates. Starting to look like a real car.
-
240z SCCA vintage race car, restoration
AydinZ71 replied to AydinZ71's topic in S30 Series - 240z, 260z, 280z
Special thanks to @clarkspeed with his help offline with wiring. You’re go-by’s were very helpful, thank you! Have a question for you and the broader group. Does anyone have experience splicing sensor signal wiring for electronic sensors? I am planning my wiring since body/paint in nearly complete. I would like the chassis to be as plug-and-play as possible for the two engines I have: 1) L24 EP spec motor, SU carbs, crank fire ignition 2) (under development) 3.1L L28 running Motec EFI Although I plan on completing the EFI wiring harness at a later date, I believe there are some steps I can incorporate into the existing wiring I am developing for the L24. For example, I have electronic autometer gauges that I should be able to use the signal from as some of the necessary I/O for the MOTEC ECU. Does anyone know the appropriate way of splicing analog signal wire? Let’s say, a voltage sweep from an engine water temp gauge. Reviewing the wiring details of the gauges, it seem most have a signal output for a data logger, but was curious if I could just splice the analog signal directly. -
Need replacement sheet metal (particular patch)
AydinZ71 replied to Ahvicha's topic in S30 Series - 240z, 260z, 280z
@Ahvicha are you experienced with metal work and rust repair? That’s a small, reasonable candidate for a simple fabrication. Best part is, no one will ever see it if you screw it up. Buy some 18-gauge mild steel sheet metal, some poster board and start tracing/cutting a template. Then just cut the metal to the template outline. Use welders magnets from HF and a hammer to fit the new piece in and weld. you will have to remove all that rust back to shiny bare metal though. Use a wire wheel, and either a small dremel, die grinder, etc to remove the area for your replacement piece. If you are inexperienced with metal work, I think you will struggle regardless of whether someone makes a replacement/donor piece. I would spend some time practicing your thin sheet metal welding. -
240z SCCA vintage race car, restoration
AydinZ71 replied to AydinZ71's topic in S30 Series - 240z, 260z, 280z
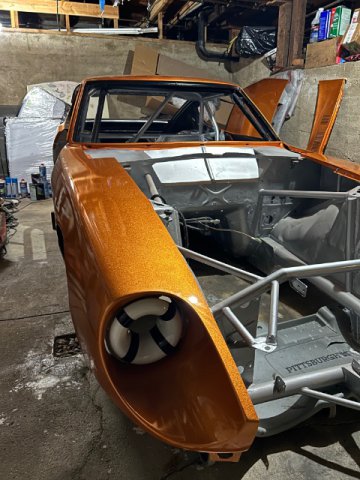
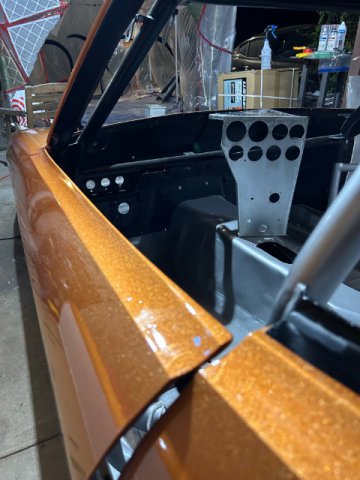
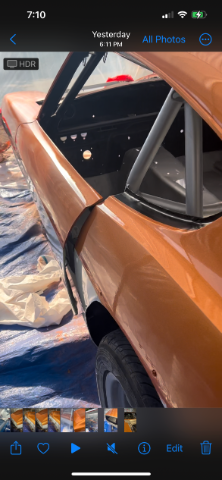
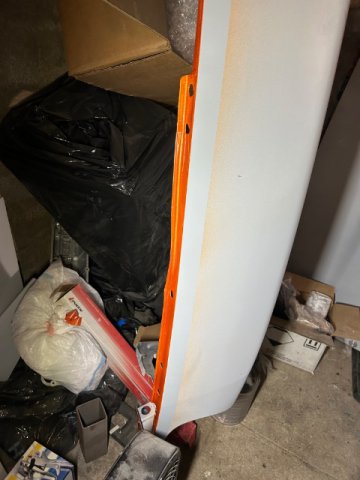
Got the door jams, hatch jams, cowl sill etc. painted to the car’s final colors. Now I can start block sanding the whole car now that body work and primer is done, and we can get some damn paint on this sucker. Weather still isn’t cooperating in Southern California. Too humid/wet as every day is overcast and we have rain scheduled for tomorrow. Very unusual. IMG_0816.MOV
-
IMSA GTU vintage racer build
AydinZ71 replied to clarkspeed's topic in S30 Series - 240z, 260z, 280z
@clarkspeed yeah I was told From a few sources to try welding cable. I believe it is 1awg? I just remember running the calcs and estimating the FLA draw of the starter motor (not the solenoid, I think that’s only 20-30A) and it checked-out. We’ll see! On the bright side, it’s not like you engage the starter for very long so it’s unlikely to overheat if it’s only 1-2 sizes small. -
240z SCCA vintage race car, restoration
AydinZ71 replied to AydinZ71's topic in S30 Series - 240z, 260z, 280z
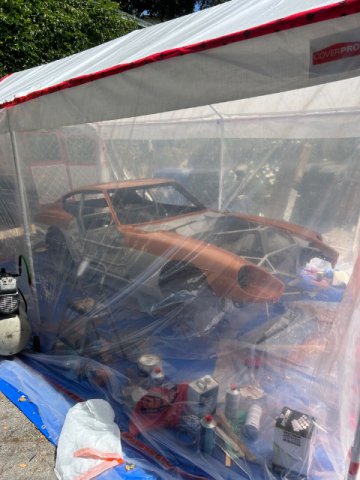
@clarkspeed indeed! Plan is to have plastic on all four sides. Using a thicker gage for the floor, possibly even a cheap HF plastic tarp. Plastic is pretty cheap and I intend to toss it when I am done. Reconsidering building the tent in my driveway again. Mostly because it would be easier and (as you mentioned) easy access to ambient light. I was worried the 10' standard easy-up width wouldn't be enough, but then remembered I could just flare-out the plastic on each side. HF sells a cheap one that's 10'X20'. I thought about the explosion risk as well, but I ran the calcs. Even at a conservative 4% lower explosive limit, the 2500cfm fan I bought makes it rather implausible that an explosive mixture would be likely. Especially with an HVLP gun. I am going to add one small box fan w/filter as a "pusher", but the main fan will be used as a fume extractor. I have 50X25" of make-up-air filtration which should be enough to keep-up. We will see! If I'm on the news, we know something went wrong. -
IMSA GTU vintage racer build
AydinZ71 replied to clarkspeed's topic in S30 Series - 240z, 260z, 280z
Very cool! Thanks for sharing. Yeah i figured race car and all...might as well save a pound or more just sizing the wires appropriately. I will start looking for those while searching amazon. Appreciate it! -
240z SCCA vintage race car, restoration
AydinZ71 replied to AydinZ71's topic in S30 Series - 240z, 260z, 280z
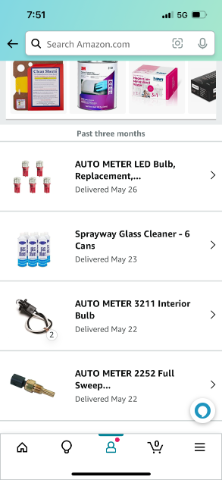
Funny! Look at my recent Amazon purchases 😂 like minds I suppose. Brian from Paint Society recommended it for the water-based wipe-down before solvent wipe down (urethane primer prep, NO solvent on polycarb). I have a feeling there is some solvent out there that won’t cloud the plastic but not worth the risk unless the water based doesn’t cut it. Any water based cleaner is usually some form of evaporating surfactant. A type of alchohol usually, since it’s soluble in water. Man… I spent way too much researching this damn paint job.
-
240z SCCA vintage race car, restoration
AydinZ71 replied to AydinZ71's topic in S30 Series - 240z, 260z, 280z
@manninen never heard of them. The TE37’s in my spec are 10.9lbs. I will stick with the Volks, but thanks. -
240z SCCA vintage race car, restoration
AydinZ71 replied to AydinZ71's topic in S30 Series - 240z, 260z, 280z
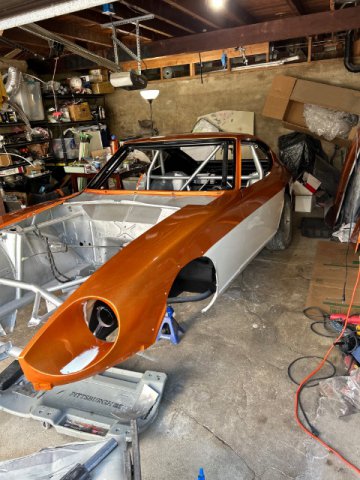
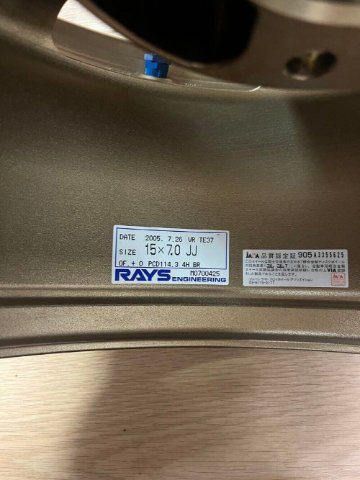
@clarkspeedhaha, yes definitely Polycarb. The Bosch blade says plexiglass, but it appears to work great on any kind of hard plastic. Does not gunk up or catch, and cuts pretty smooth. Yeah I did the trace too, but it appears I cut too much on my first pass. You warned me about leaving extra on, but its really difficult (as you know of course) to get the "bow" going around the sill when test fitting. The SCCA thickness spec. which matches a 1/4" equivalent thickness is naturally hard to bend. The 1/8" thick hatch class was much, much easier and I got a near perfect fit. Updates: I found a NLA set of TE37's at a reasonable price! $2250 including shipping from Japan. It has taken me three years searching ebay to find a pair. It is the lightest commercially available wheel for the 15"X7" spec. in the OEM bolt circle. Picked up another used 5hp 120v compressor for $60. Gearing up to paint the car, and needed more CFM to keep the gun moving. Also gathering the fans/filters/plastic to make the booth. All I have left is to block sand the high-build primer and its time to finally paint the SOB.
-
IMSA GTU vintage racer build
AydinZ71 replied to clarkspeed's topic in S30 Series - 240z, 260z, 280z
Appreciate it Clark! Hey, do you mind taking a photo of that crimper/stripper you like? Since the brand is worn-off, I can at least look for one in the same "style" Since this is the first time I'm doing wiring beyond the amateur twist and tape, the materials themselves and where to get them is a little lost on me. I already started my wire sizing chart, and will likely make a crude sketch of the point-to-point. Where did you get your 3-wire shielded? Any specific spec's I should look for? How about the shrink tube label maker, and the shrink tubes themselves? Sorry, so many questions. -
240z SCCA vintage race car, restoration
AydinZ71 replied to AydinZ71's topic in S30 Series - 240z, 260z, 280z
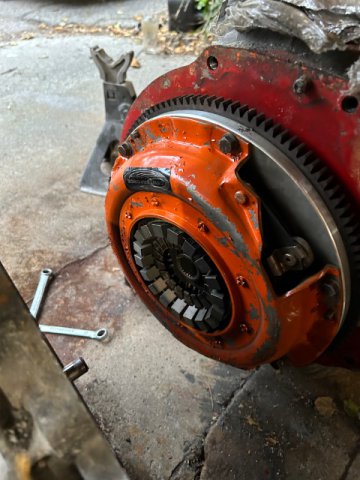
ouch!! Yeah I had always been told to stay away from centerforce. Hmm… wonder if this thing would be of value to anyone. Yeah I have never run a multi-disk, so the various layers through me off. One of the last remaining “surprises” from the PO. I do still have the quartermaster button flywheel/clutch ready and waiting for me. I probably won’t put it in until I have worked out all the bugs and had a few test/tune days at the track. Almost everything is brand new and needs adjusting on the car, so one less variable of inconvenience. In the meantime, I have a 9lb Kameari flywheel and OEM Exedy disk/PP I can throw on. That should be a reasonable solution until the car is a smidge more competitive. Thanks Jon! -
240z SCCA vintage race car, restoration
AydinZ71 replied to AydinZ71's topic in S30 Series - 240z, 260z, 280z
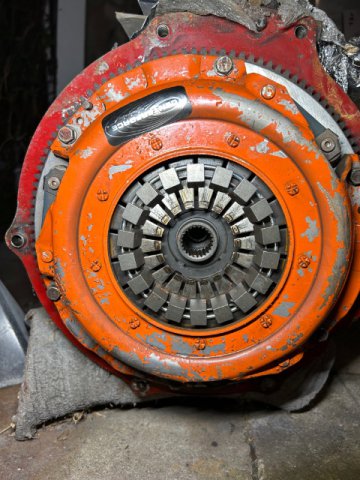
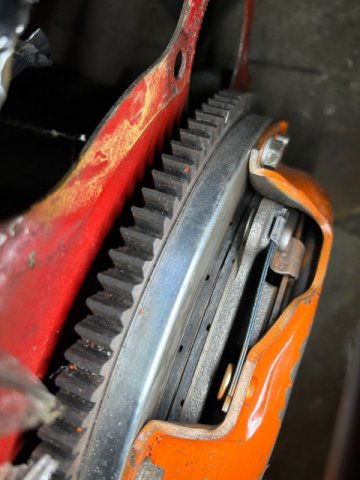
OK. Need to clean and organize the garage so I can build a spray booth with plastic sheeting. Pulled the 4spd from the L24 that was in her when I purchased her. Got some fun bits under the bell housing. Anyone recognize this clutch? Appears to be a muiltiple-disk centerforce. No idea why you would need this with an L24 but can’t complain. The flywheel also appears to be non-stock. Tried scratching it with a piece of 6061, no dice. I’m guessing it’s steel, but it’s spotless. Seems rather thick for a lightweight unit 🤷🏽♂️
-
240z SCCA vintage race car, restoration
AydinZ71 replied to AydinZ71's topic in S30 Series - 240z, 260z, 280z
Thanks man! I wish! Both the windshield and the hatch glass, I traced and cut until it worked-out. The windshield is a bit butchered. I had to fabricate hold-down flanges for either end so the screws didn’t cause too much visual distortion on the “glass”. Top and bottom screws didn’t have enough pressure to cause divets, but the passenger/drivers sides did. I did learn a few things: use a quality plexiglass - specific Bosch blade. The actual jigsaw didn’t appear to matter, but the blade was crucial. Measure a billion times and cut a tiny amount at a time. I over-cut the front, but by the time I got to the hatch I got the hang of it. You can use a block and 80-grit to make minor adjustments on the ends. I used this expensive purple painters tape from 3M (I’ll look it up if you need it) which made it easy to mask the curves for the black anti-glare mask. Used a caliper to mark w/ a sharpie a set distance from the edge, then connected the dots with the masking tape. I used single stage 2-component urethane for the mask. I was nervous that any other paint could fail under UV. Base/clear probably works but I was nervous that the base would be exposed through the glass and would miss-out in the UV protection afforded by the clear 🤷🏽♂️ Probably overly conservative. many thanks to Clark and the HZ family for the pointers they gave a year ago. -
IMSA GTU vintage racer build
AydinZ71 replied to clarkspeed's topic in S30 Series - 240z, 260z, 280z
@Ben280 yeah I had not heard of it until I did a bunch of online research. If it’s good enough for a military aircraft, it’s gotta be good for a race car! @clarkspeed This time around, I had time to read your full list. Do you mind sharing the make/model of some of your tools? Stripper, crimper, etc? There are soooo many options it’s a bit overwhelming. -
IMSA GTU vintage racer build
AydinZ71 replied to clarkspeed's topic in S30 Series - 240z, 260z, 280z
Wow look at that! Nice wiring job! what kind of wire did you buy? I bought some tezfel Mil-spec wire to try out. The insulation appears to be lighter and it withstands higher temps for the engine bay. Looking great Clark. What fuel do you plan to run? Leaded? -
240z SCCA vintage race car, restoration
AydinZ71 replied to AydinZ71's topic in S30 Series - 240z, 260z, 280z
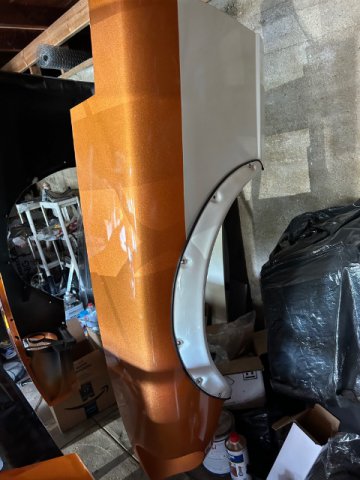
Thanks guys! Yeah, all that skim coating and block sanding… gawd damn, must have been hundreds of hours now. “Take it down to bare metal!” They said hahahah appreciate all your support got the cowl cover epoxied, primed, and underside is black. I was going to paint the top side flat black in the style of my friends A-10 (Indiana air national guard), but Greg told me “it will look like shit”. To be fair, I only listen to his aesthetic opinion 1/3 the time, but I was already on the fence with this one. Painted my front and rear polycarb black mask. masking video was me soliciting Greg’s opinion on the extent of the black mask. IMG_0726.MOV
-
240z SCCA vintage race car, restoration
AydinZ71 replied to AydinZ71's topic in S30 Series - 240z, 260z, 280z
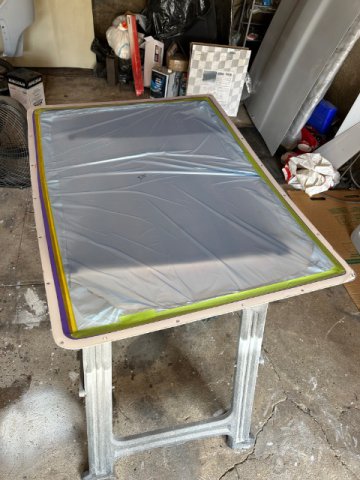
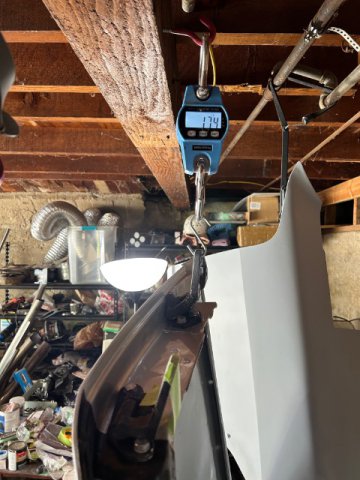
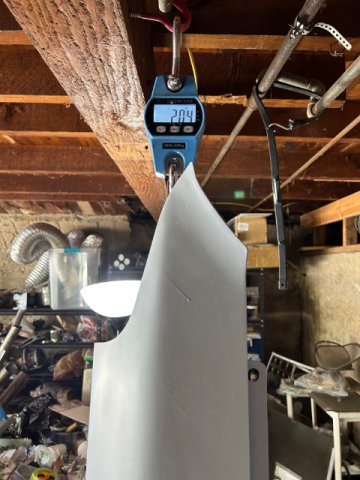
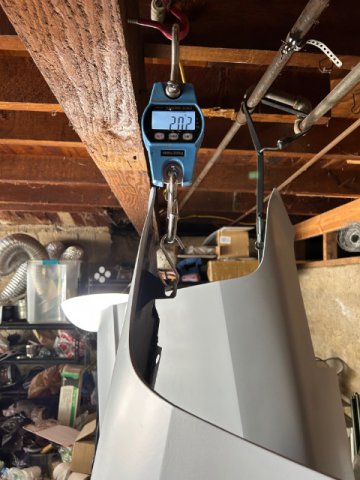
Bodywork almost done! I’m never doing this again 😂 Hopefully around a month from paint. Took some weights for curiosities sake. The fenders are within a few ounces of one another. The door weight includes the hinges (drivers side). The passenger side door is just under 14lbs now. Can’t run fiberglass doors in EP, otherwise John Washington’s 9lb fiberglass doors would have been awesome! Probably could have saved ~15lbs total by going with fiberglass fenders, but with all the custom metal work it was much easier for Me to complete in steel.
-
IMSA GTU vintage racer build
AydinZ71 replied to clarkspeed's topic in S30 Series - 240z, 260z, 280z
Congrats Clark! Do you have a detail write-up on the motor? Would love to geek-out on the specs. -
IMSA GTU vintage racer build
AydinZ71 replied to clarkspeed's topic in S30 Series - 240z, 260z, 280z
Pretty sweet Clark. Just as an FYI, Canton Racing will rebuild your unit for ~$60 (plus shipping). Pretty affordable! If you have any used oil in the gas-side of your unit, its time to rebuild. I bought a 3qt unit used and had it rebuilt last year. Apologies in advance if you are already aware of all this. OH, they also have a remote actuator cable, and even an auto-actuate servo. Honestly, i think its worth keeping the heat and mess (engine oil fittings all leak to some extent) in the engine bay.


.jpg.5cc501df401a9fc2ce64fc8427b1c40e.jpg)