AydinZ71
-
Posts
1073 -
Joined
-
Last visited
-
Days Won
27
Content Type
Profiles
Forums
Blogs
Events
Gallery
Downloads
Store
Everything posted by AydinZ71
-
240z SCCA vintage race car, restoration
AydinZ71 replied to AydinZ71's topic in S30 Series - 240z, 260z, 280z
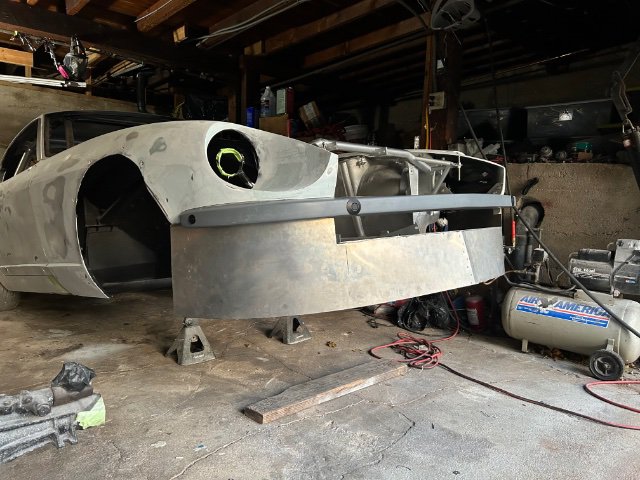
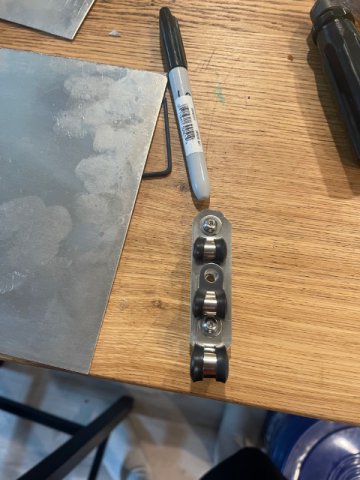
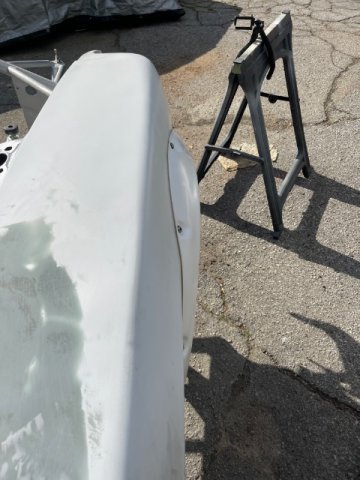
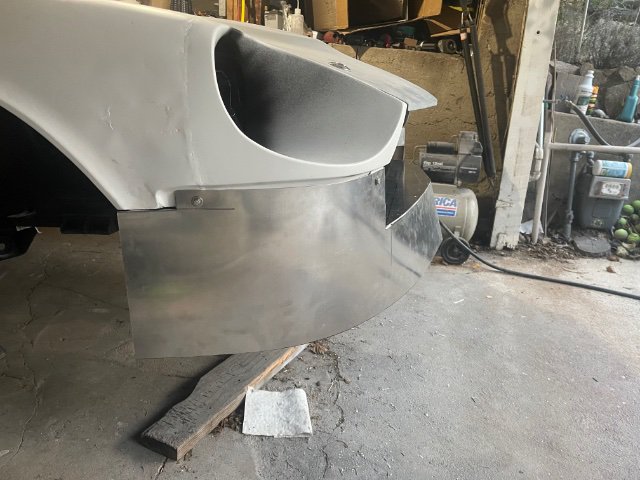
Thanks! Does kind of look like that! It is unfinished at this time, since I just wanted to get the mounting points (and qiuk-lateches) figured out. Its just a .04" sheet of 6061AL. It will get reinforcement once the wheels are back on the car, and I can contemplate ride height. -
240z SCCA vintage race car, restoration
AydinZ71 replied to AydinZ71's topic in S30 Series - 240z, 260z, 280z
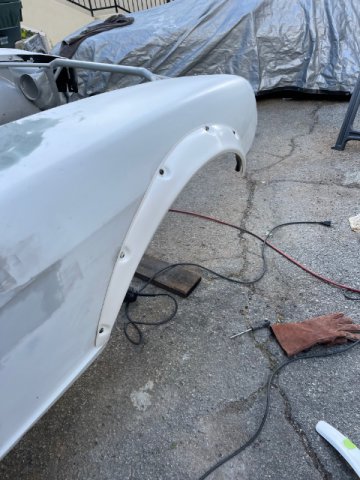
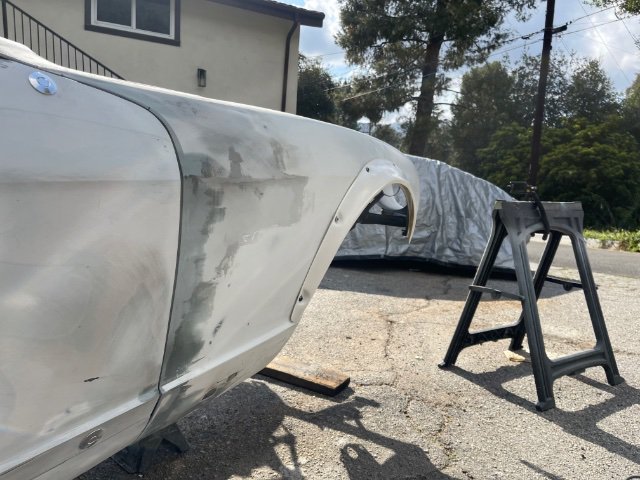
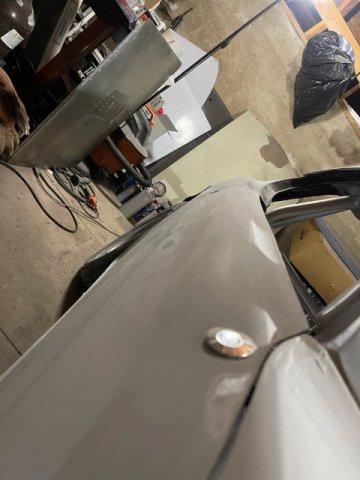
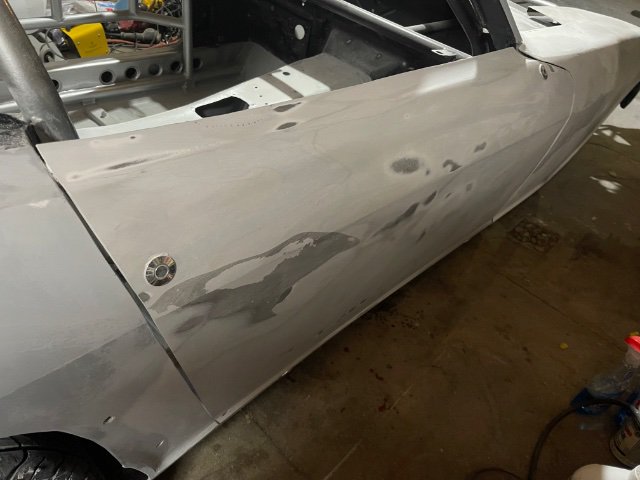
Bodywork on passenger side is all done. Panels are sealed and primered, waiting for final block sanding. also made brackets for the front bumper to pop on/off with Quik-latches.
-
240z SCCA vintage race car, restoration
AydinZ71 replied to AydinZ71's topic in S30 Series - 240z, 260z, 280z
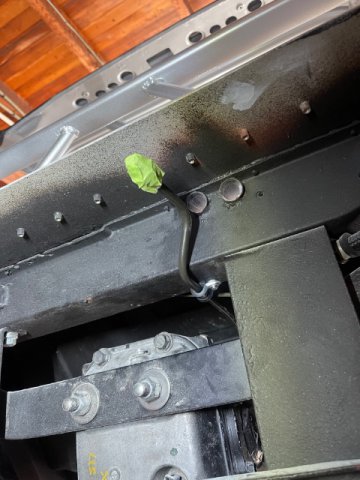
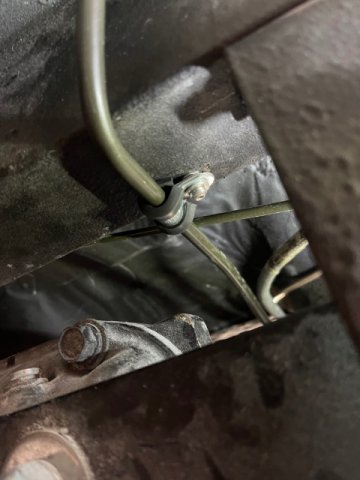
Update: air dam is unfinished (hence, flimsy) but the quick-disconnect mounting is complete so I can finish the fenders and seal them. Also finished by fuel, return, and brake lines in the tunnel. IMG_0407.MOV passenger side bodywork is done, moving over to drivers side door and fender. FullSizeRender.MOV IMG_0408.MOV
-
Kameari street piston skirt /bore contact
AydinZ71 replied to Fairlineguy's topic in Nissan L6 Forum
I believe Datsun Spirit is an distributor for Kameari machined components. I'm curious if what you show here are the same pistons I recieved from Kameari direct. They look really familiar! Appear to be shortened piston height and slipper skirt. -
Kameari street piston skirt /bore contact
AydinZ71 replied to Fairlineguy's topic in Nissan L6 Forum
Interesting! With this many folks having the same experience, that kind of rules out mistakes or incorrect clearances. How are your compression numbers? -
Kameari street piston skirt /bore contact
AydinZ71 replied to Fairlineguy's topic in Nissan L6 Forum
That is unusual. If there was something specific to the piston that would cause this, your machine shop would have been able to catch it during assembly. The piston is centered inside the bore via your rings. The piston can not contact the cylinder walls unless: 1) Piston installed is too large relative to your final bore. Machine shop would have checked that. 2) Your ring gap is incorrect, which is causing your piston to move around. 3) I have also seen skirt slap from damage due to detonation. Are you using forced induction? Did you experience anything that may indicate your engine was knocking? I have Kameari forged racing pistons in a motor I am building, but the head is not finished yet so I have not run. -
240z SCCA vintage race car, restoration
AydinZ71 replied to AydinZ71's topic in S30 Series - 240z, 260z, 280z
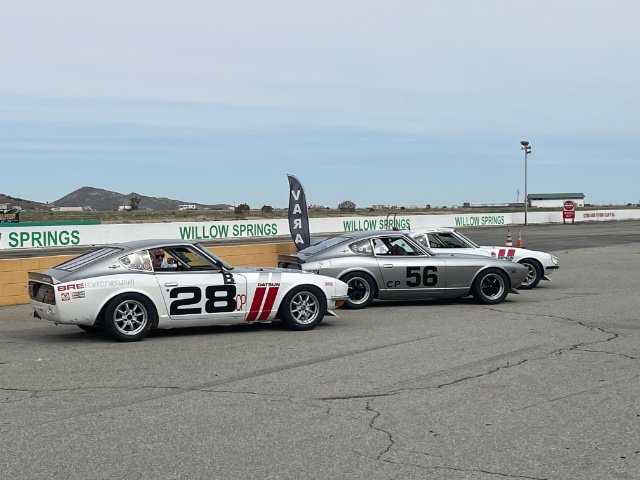
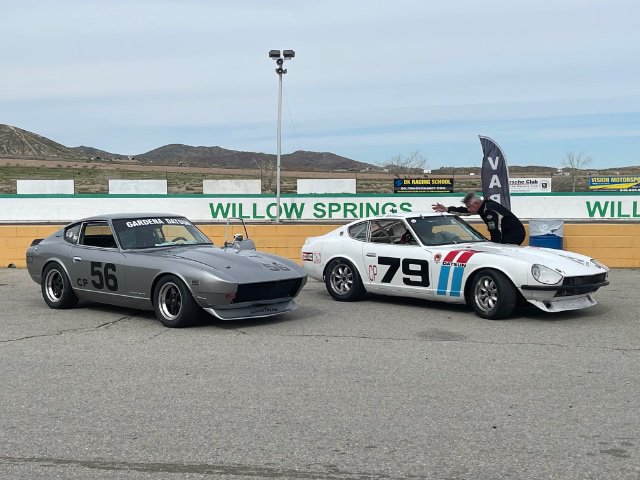
Took the kids out to the track. I gotta say, I’m really jealous of the track’s ya’ll have on the east coast. Still, was a great day out at historic Willow springs. event was VARA IMG_0328.MOV IMG_0318.MOV IMG_0315.MOV IMG_0316.MOV
-
It makes a loud whining noise, kind of like a supercharger. It can be annoying, especially for a street car (which most people buy it for). I have spoken to the designer at Kameari (Mori Kame) and he has not heard of any performance issues. It really serves two purposes: 1) Minor reduction is friction/resistance from the OEM type tensioner. The twin idler uses needle bearings. I mean, squeeezing a few drops of parasitic loss out of a race engine with listed restrictions (class requiring an L-series). 2) Main purpose is to eliminate chain slack on heavily decked heads and alleviate the need for super thick lash pads and thick tower shims. Thick lash pads add unnecessary weight to the moving parts of the head. This part is for racing applications. He sells an adjustable OEM style tensioner for street cars. I bought this for my 3.1L race motor, since I am running 11.5:1 and my N42 had quite a bit removed. Just waiting on Mr. Yoes to finish the head before final assembly. Block is ready and waiting at Mountune (here in southern california).
-
Hi all! For those of you who have not heard, our friend Greg Ira will be returning to the SCCA Run-Off's this year. In a wild twist, he will be driving Jesse Prather's own personal title-winning BMW Z3! Greg has been my mentor on my EP car restoration for the past two years, one of the best amateur drivers in the country. If you are near VIR on April 7th, come check out the race! @jhm This one's for you! I hope to make-it if I can arrange work and kids, and it would be great to see ya'll out there!
-
Ah john... now I just feel like a jerk for being a sarcastic ass, hehe ("breakthrough"). Pretty cool for a bolt-on. I steer most friends away from bolt-on's unless required by class rules, but that's kind of snobby. Always good to have options for the full range of skills and driving conditions.
-
What a design breakthrough…
-
240z SCCA vintage race car, restoration
AydinZ71 replied to AydinZ71's topic in S30 Series - 240z, 260z, 280z
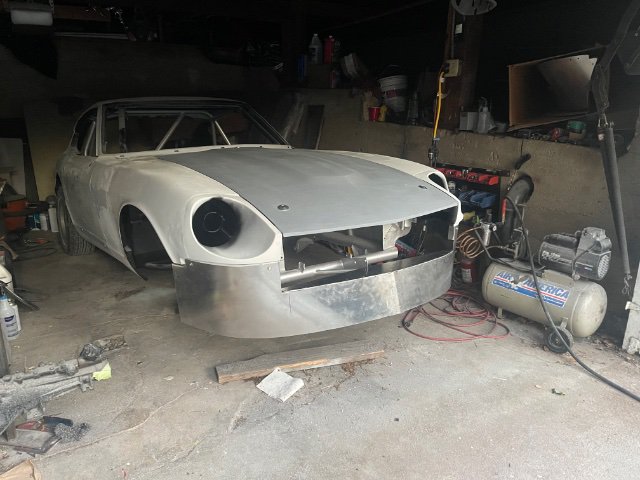
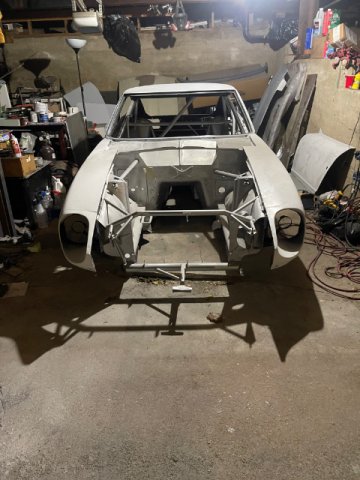
treadmill time 🤓 got the front flares on today. Can continue bodywork along passenger fender IMG_0261.MOV
-
New 280Z owner. Looking into alternative Nissan Drivetrains.
AydinZ71 replied to HusseinHolland's topic in Drivetrain
Another swap that I personally like is the K24 Honda. Yes it looks kind of silly in that big engine bay, but you will be putting the engine weight behind the front axle. Not sure if that officially constitutes a "mid" engine, but that a huge plus for road racing, autox, etc. You will also be shedding well-over 100lbs of engine weight compared to the L6 with nearly double the power (in NA form!). If you just want a street car, and plan to drive it more like a grand tourer then id go with the 6 or LS. If you want a small, light, great handling Z with more power than you would expect from a 4-banger, K24 might be for you. Only other negative I can think of is.... well... it sounds like a honda. Like all Honda's, they kinda sound like lawnmowers IMHO. -
240z SCCA vintage race car, restoration
AydinZ71 replied to AydinZ71's topic in S30 Series - 240z, 260z, 280z
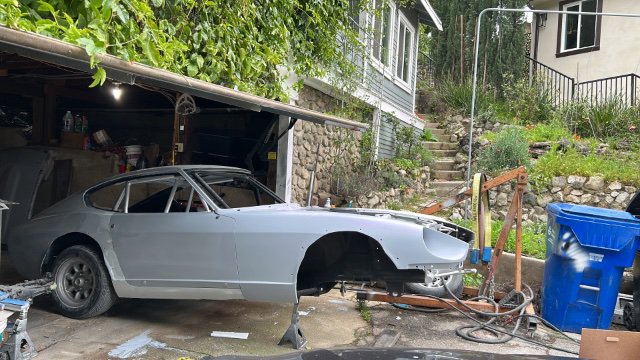
I got them from a local mechanic friend of mine who repairs and builds s130’s and some S30’s here locally. He buys a junker two three times a year and parts them out for his clients. So like most right decisions in life, it may be best to be patient. I may need to pump the brakes on my brakes… we are allowed alt. Front brakes with a 2% weight penalty. When I called willwood they told me to check the most recent GCR and sure enough, they allow alternate material non-oem calipers and rotors up front now. That opens up things considerably. I may need to wait and weight the car to see how close to 2150 I am (soaking wet with driver). My fat ass is around 190, so that’s not an easy task. If I happen to already be overweight, I may need to add little or no ballast and end up with sweet 4-pot lightweight willwoods and a decent diameter rotor up front. Then I can upsize the rears to match. honestly, it’s been raining here so much I was just trying to open-up another work path while I am unable to progress the bodywork. Hate to lose momentum. -
That first image with the rusted cylinder wall... this engine needs to be rebuilt. The machinist will need to remove material until the pitting/rust has been completely removed. Then he will match the remaining cylinders to the one they needed to remove the most material from. Depending on how much was removed, they will either use the OEM piston with a larger dia. ring, or up upsize to the next diameter piston + rings. Your valve seals will likely need to be changed too. $1000-$3000 of work and parts depending on what can be re-used. Can you clean it all up and try to run the engine? Sure...buy why. You will have poor compression, will likely burn oil, and all around be disappointing. Is this your OEM original L24? If the numbers match and you like the 2.4L, makes sense to rebuilt. Otherwise, I would toss it and find a running L28. You could get a long block for under a grand, and your SU carbs will work just find with it. Everything else is the same except displacement.
-
240z SCCA vintage race car, restoration
AydinZ71 replied to AydinZ71's topic in S30 Series - 240z, 260z, 280z
Haha! Thanks John! Unfortunately, I still have to use the 280zx front calipers Darn EP rules, but since the rears were always drums to begin with, the rules are a little more forgiving. Thanks again for the write-up! I actually bought the Skillard AL front dam because it came with an integrated splitter. After unboxing I discovered the front opening was larger (extends lower) than the type-1 air dams on the market. We can't reduce the size of the front rad opening, but I certainly would not want to make it bigger. I decided against hacking it apart, so Its now for sale With the chassis modifications I have, I didn't want to risk another misalignment so I just made it myself out of 6061 AL. Two sheets of 0.04" for the dam, and 0.08" for the top flange. I still need to design-in a way to quickly remove it (probably quik-latches) and an adjustable splitter. I'm just waiting on bodywork to finish so I can throw the front suspension on. and find a reasonable ride-height. I am pulling the car in-and-out of the garage like a wheelbarrow at the moment, and it is more convenient than wheeling it out without brakes. Filler dust gets everywhere, so reassembling the car has been put on hold. I have two front fenders and the drivers door left. -
240z SCCA vintage race car, restoration
AydinZ71 replied to AydinZ71's topic in S30 Series - 240z, 260z, 280z
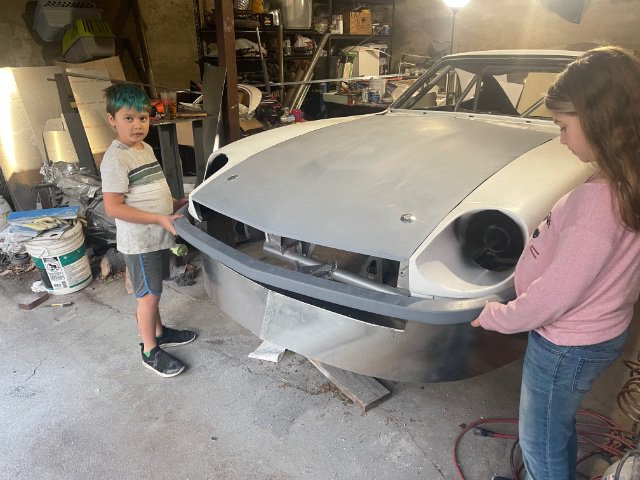
Thanks Clark! Literally the first time I have let them “help” in a long time haha. It’s usually dust, toxic paint, etc. and I don’t have PPE small enough for them 😂 -
240z SCCA vintage race car, restoration
AydinZ71 replied to AydinZ71's topic in S30 Series - 240z, 260z, 280z
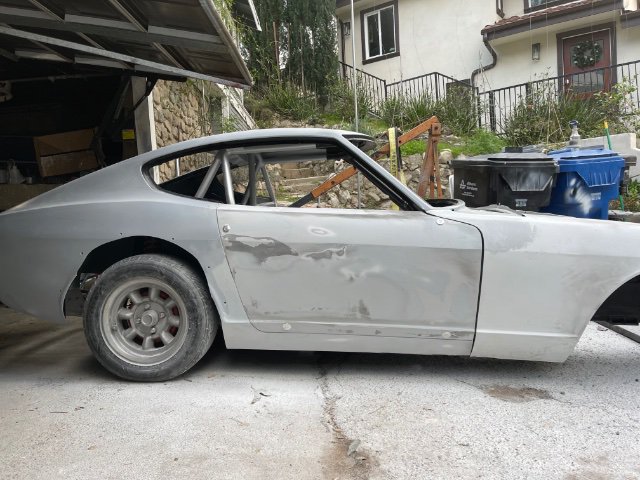
It’s been a while since I made any updates so might as well attach some pics
-
240z SCCA vintage race car, restoration
AydinZ71 replied to AydinZ71's topic in S30 Series - 240z, 260z, 280z
Thanks jon. You are a resourceful dude. Took me several tries just to confirm the critical specs on rotors. so here is the solution I have cooking: using Silvermine rear willwood 2-piston caliper brackets. They were adapted to the 11.4” Z31 rotor. Later S130 is the same hat height and width, but 10.16”. Il have to drill two new holes closer to the hub to accommodate the difference. And voila, I have a small 2-pot 1.5Lb caliper paired with the right dia. Rotor. The his combo should compliment the tiny 9.92” vented fronts. il have to take a closer look at the caliper bracket. I might save some cash by just making it myself from 1/4”-3/8” 6061. -
240z SCCA vintage race car, restoration
AydinZ71 replied to AydinZ71's topic in S30 Series - 240z, 260z, 280z
PS: Jon, how are you Johnny-on-the-spot (no pun intended) with those ZX caliper pictures? That is incredible. You must have a library of stuff at your finger tips. I forget specs constantly haha. You must be very organized -
240z SCCA vintage race car, restoration
AydinZ71 replied to AydinZ71's topic in S30 Series - 240z, 260z, 280z
Thanks Jon and CalZ, Yep, so I did more research. It appears the MSA does sell a rear kit that uses the 280zx later year rotor and a maxima caliper. That will work, but I would be losing-out on the Willwood 2-pot weight savings. Since it is sprung weight, this isnt ideal. MilkFab also makes one using the older ZX rear rotor/caliper. https://milkfab-engineering.com/shop/ols/products/s130-turbo-disk-brake-kit-datsun-240z-slash-260z-slash-280z Since the hat height on the later ZX and Z31 rotors is the same (dia different), I could buy a bracket from silvermine for example designed for the larger rotor and just re-drill holes for the smaller rotor and use a small willwood. That assumes there is enough "meat" on the bracket. If not, I'll have to fab my own. -
240z SCCA vintage race car, restoration
AydinZ71 replied to AydinZ71's topic in S30 Series - 240z, 260z, 280z
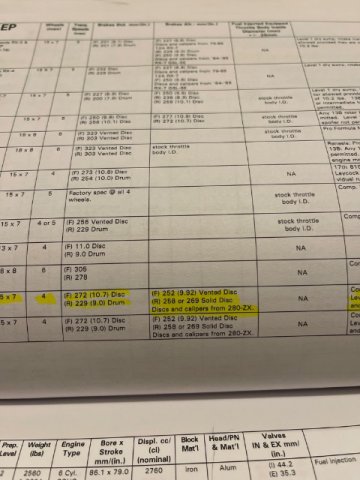
Thank you Jon! Gosh so much misinformation out there. I was told the calipers were the same for all ZX, so this is really helpful. Attached is my spec line. As you can see, I’m stuck on the 252 vented fronts and a ZX caliper, but which ZX caliper is open (so definitely will be using the later year). for the rear, because OEM was drum the EP rules are a bit looser. We are allowed to swap out drums for disks, and the spec line (attached) doesn’t limit this ability. The rear rotor has to be smaller than OEM front (272mm), and we are allowed to use alluminum calipers. Therefore, what I pick for the rear just need to balance well with the 252 vented ZX fronts so the bias (Tilton mechanical screw, seperate masters) is not too-far too the front at the get-go. ideally a 2-piston willwood rear caliper and an OEM S130 rear disk would be ideal. A kit to get the caliper on would be helpful and keep me from wasting more time on fab.
-
240z SCCA vintage race car, restoration
AydinZ71 replied to AydinZ71's topic in S30 Series - 240z, 260z, 280z
@JMortensen I would go with s130 rear brakes, especially if I can swap the caliper for a lightweight willwood unit. Unfortunately, I can’t swap the whole strut as we have to keep OEM hubs. Not really sure how anyone would know, but better safe than sorry. We have a lot more options in the rear since car never came with rear disks, but we are super limited in the front -
240z SCCA vintage race car, restoration
AydinZ71 replied to AydinZ71's topic in S30 Series - 240z, 260z, 280z
Hi all! Seeking some advice from our racer community. Clark, Jon, John, Cary, and the like. Stuck with those 9.92” (252mm) S130 vented front rotors from EP rules, and looking for a rear brake kit. Rotor must be smaller than the OEM fronts (272mm) I was going to pull the trigger on the T3 rear micro brake conversion (265mm) but Mr. EP Greg thinks the rears will be too big relative to the fronts. That would cause my bias (Tilton mechanical) to skew too far to the front making adjustment more difficult. Makes sense to me. I also don’t know what rotor T3 uses which concerns me about replacements. Any thoughts on a rear brake kit that will balance well with the teeny 252mm fronts? I see a lot of brackets and I do for converting the rear calipers to 240sx or Maxima, but not clear what the right rotor spec (car, size) w works with those. many thanks! -
IMSA GTU vintage racer build
AydinZ71 replied to clarkspeed's topic in S30 Series - 240z, 260z, 280z
I hear ya on putting bodywork on the back-burner. That was my original plan. I wanted to throw everything back on the chassis once the interior and non-body chassis was painted. Once I started doing some filler work, I realized just how much sanding and dust I had ahead of me. I could not figure out how I would manage keeping all that dust from getting everywhere, so I decided to just finish the body before proceeding with mechanical and electrical. Yeah that has been some of the stress of ordering ahead. Two bird in a bush, one in the hand (so to speak). I try to buy what I need 1-2 weeks in advance, but once I pivot directions I end up with a bunch of stuff taking up storage space. Its incredible how much room a disassembled car takes up haha.