A to Z
-
Posts
1152 -
Joined
-
Last visited
-
Days Won
52
Content Type
Profiles
Forums
Blogs
Events
Gallery
Downloads
Store
Everything posted by A to Z
-
07-01-2026 ATLAS Z UPDATE: Well in between working on my other Z, I am still working on this Z car. I went ahead and started working on getting the blue painted portions of the body ready for clear coating, and caulking the border of the carbon fiber pieces. Initially I had planned to paint on a fresh coat of factory blue before clear, but I think I may go with the patina finish that is left after smoothing out the paint and getting it ready for the next step. Using "Poppy's Patina" in a high gloss finish....2 coats.....apply and then the next day apply again for 2 coats is the plan for now. This car is meant to just have fun with. It's the project car while I have the other Z anyway. my 240Z is giving me some timing issues to contend with so I have plenty to do. Also put my water meth pump on some steel to start getting the ideas flowing. PICS:

-
06-28-2026 ATLAS Z UPDATE. The amount of work done today was hampered by work I needed to start on my 240Z, but I then made time to knock out a few things on the ATLAS Z today. The way my MAF meter sits in the piping is functional, but looks bad. I decided to take some left over 4" tubing, and cut it in half and form it to fit over that area, which will make it look like one solid piece, I will get it polished along with the last piece which is finished (I jsut need to go pick up and then drop off at the polishers). I then did the hood pin for my "window frame" hood. I am using one hood pin, and I bought it off of amazon, with the striker plate in black versus chrome. I then took the number decals I ordered for the car and lightly taped them on there to see what I think. They are supposed to be adhesive, but they have a weird clear coating over them I have to figure out. PICS:
-
06-24-20226 ATLAS Z UPDATE. Yesterday I picked up my rear spoiler, cowl and front bumper from getting wrapped in dry carbon fiber vinyl. Today I mounted them. PICS:
-
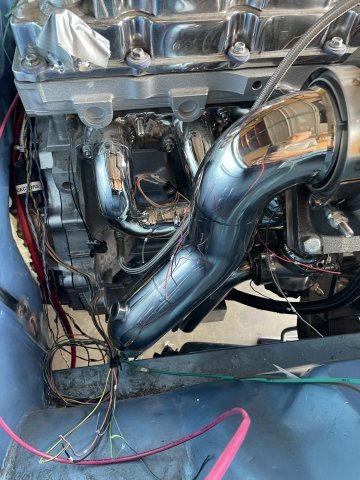
06-23-2026 ATLAS Z UPDATE. Cut and fit the 4" pipe for the intake. Using a 45 degree bend, and the 90, I cut turn/twist, cut on angles, and as you can see in the pics, trim off pie cuts to get the angles going where I want them to. This requires drawing a line where the pipes have to meet and welded in just that spot. It's exactly what I did with the other pipes. After welding, the welds are sanded down smooth and then my polisher does his part to make it look like a seamless one piece unit. I also used the new air cleaner and marked where further cutting on the hood was necessary and then cleaned up those edges. later, I will spray gloss black into the cap and use some q tips to paint the cut edge and it will blend right in. I also got the call to go pick up my 3 parts I had wrapped in black DRY carbon fiber....the cowl, rear spoiler and front bumper. PICS:
-
06-21-2026 ATLAS Z UPDATE. I started with installing my side view mirrors, and then poured in the engine oil....then decided it was time to get the R200 differential and swap pieces done and out of the way. I first had to clean up the gasket surfaces, then I installed a factory NISSAN gasket, and then filled it with 75W140 Synthetic gear oil. Then I masked off and painted the rear cover with silver engine block paint and then a coat of clear. Tthe case itself I wire wheeled clean,t hen wiped it down and gave it a coat of clear. After that, I painted up the 280Z mustache bar in gloss black and then after cleaning and wire wheeling it clean, I painted the front differential mount in gloss black as well, and then put all of it in the corner out of the way. Quite a bit of work to get it all ready for install. I will remove my existing R180 diff and then clean up the entire area like this before installing the rear end. I also have some TT3 Techno Toy Tuning axle shafts with the Porsche 930 CV joints to put in. PICS:
-
06-20-2026 ATLAS Z UPDATE. I wired the firewall forward body wiring today. I managed to get it all done except for the fans. I also installed the turn signal surrounds and upper and lower grill. In doing this, I also started the run of braided line back to the water methanol tank from the nozzle up front. The electricals for the Boost switch was also wired today into the passenger footwell of the cockpit. I don't have a horn picked out yet, but I now have wiring ready for it. PICS:
-
you cant see it well, but no, it is cut out so it clears as the hood sweeps up.
-
06-19-2026 ATLAS Z UPDATE. I picked up my gas pedal from the fab shop today. I got it home and wiped it down, masked it off and gave it a couple coats of Rustoleum 2x gloss black paint. Should be ready for install tomorrow. PICS:
-
06-18-2026 ATLAS Z UPDATE: Well, after having people tell me about the intake and issues I will have with the MAF meter, and then researching on it, I decided to just redo the intake from the MAF sensor forward. I ordered some 4" pipe, a coupling and clamps and dug in. I did a layout and then cut the hood to start the process of making additional room for a smooth long radius 90 in 4" along with a vortex air cleaner to give the MAF Meter what it needs. In just a couple hours tonight I got a good start on it.....but I will have to do a notch in the radiator support to get the pipe to where it isn't being forced up over it. I am still waiting on the Air cleaner, but the job is well under way PICS:
-
06-14-2026 ATLAS Z UPDATE: I started the day by cutting and prepping a new throttle to be welded up, keeping the angles for leverage, but removing and bends to make it straight. the one I did before did not work. It needs the bends to create leverage, and a spring mounted throttle foot pad to work correctly. the factory one is bent, so pie cuts were used to straighten it, then chopping and shortening it was required. It now heads to Wagner Fabrication to be welded up and then I will paint and install later. Then I Mounted my dual catch cans. I then mounted up my front blinkers and then went back to the catch cans....tying all the lines in, One line is black braided, and as you can see, I masked off a portion of it and painted it with silver engine block paint to help it match the others. Better than not at all! I also wiped down my forward metal dash piece and set it in then and then touched up some fittings in silver to get away from too much black. I then took my blinker surrounds that have been repaired and sitting in primer forever and sanded them up smooth with some 320 grit sandpaper, and painted them with gloss black rustoleum 2X, and then a few coats of Krylon clear. Also of note, I did cut and place a PCV valve in the breather line coming from the intake back to the catch can. So....a lot of little things today, to include tying it all up and cleand up under there. Definite steps forward today! PICS:
-
06-13-2026 ATLAS Z UPDATE. Today I finished screwing down the carbon fiber and installed the front flares. Pretty much all done. Later I will tape off both sides of each edge and lay in a coat of black pure silicone....then pull the tape off leaving straight lines and let it harden up. Then some paint correction and some clear and the body will be done! I gathered up some parts I am taking to get wrapped in dry carbon fiber (front bumper, cowl, and rear spoiler). PICS:
-
The factory 2006 GM ECU, called a "P12". Jeremy Gonyou at Lime-Swap converted my engine harness into a stand alone setup and cracked my ECU and programmed it for the turbo. By using a factory setup I retain the variable valve timing and the wireless throttle. 60lb/hr Deka fuel injectors and with an 8 psi spring in my external wastegate.....around 350-400 hp at the crank. Very mild setup.........well over 300 at the wheel, which in these cars is sufficient.
-
06-12-2026 ATLAS Z UPDATE: the MAF meter I had bought was supposed to work on my 2006 model year wiring harness.....but it didn't. So I searched and searched before figuring out that the MAF was molded in to the intake pipe. So, I found one on eBay and it arrived today. I held the other meter up and took measurements and then cut it to length, cleaned it up and then wrapped both sides with self adhesive rubber strips to fit the 4" couplings. Doesn't look near as good as the other MAF.....but I didn't have a choice. By the way, 2006 was first year for MAF meter on 4200......it changed in 2008 to a different style, so if you have an '06, dont forget to get this piece. PICS:
-
06-07-2026 ATLAS Z UPDATE: Continued progress on the engine harness wiring and installation. Starting to take shape....about 95% done. PICS:
-
06-06-2026 ATLAS Z UPDATE: I put everything to the side and worked on engine harness wiring. Not hard, just VERY time consuming. I had opened up all the wiring, and now I am custom tailor-ing it to the setup here. Making good progress. Cutting the tie wraps connectors as needed to slide under bolt heads and tighten back down and had to make 2 large ones out of aluminum to put under a couple bellhousing bolts. The idea being keeping everything off the firewall and sides. they are shaved, and everything needs to look separate and tidy. I am putting the chrome wire looms over it and making steady progress. PICS:
-
06-03-2026 ATLAS Z UPDATE: I had a few moments and decided to fit my intake screen. Another step forward
-
06-02-2026 ATLAS Z UPDATE: Well parts came in, so I was able to put together my T fitting for by boost switch and vacuum source for my Blow Off Valve (BOV). I used the tried and true 567 sealant on the threads, and then I covered the lines with some of my plasti chrome wire loom and plasti-chrome tie wraps. Not too bad, huh?
-
05-30-2026 ATLAS Z UPDATE: Continued work on the carbon skin install and got the rear flares on.....Installed the exhaust system, and then started on the intercooler pipes. PICS:
-
yeah......well all of it is an interference fit.........all the pieces are pushing against each other etc. none of it slips on. its a PITA to install, but if it doesn't come apart easy, then the pipes can't move to let the air out. I went to great pains to have no rubber elbows, just short sections of silicone. We'll see.
-
05-29-2026 ATLAS Z UPDATE: This morning, I picked up my intercooler pipes and exhaust from the polisher. I got a couple intake pieces on. PICS:
-
No Sir.
-
05-27-2026 ATLAS Z UPDATE: Today I began the process of attaching the carbon fiber skins. Long way to go. the edges will be taped off and sealed in with a layer of black caulk, then peel the tape off so it will be a thin very smooth line. PICS:
-
Forwarded it to admin page for further help.
-
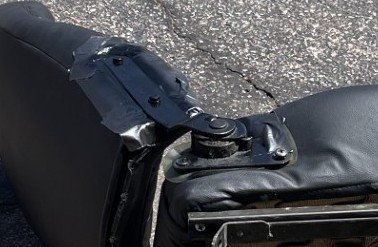
05-23-2026 ATLAS Z UPDATE: I painted the sides of the drivers seat, and then cut out the access holes for the transmission....then took some 16 ga sheet metal and cut and formed a plate to cover them. I painted it with rustoleum gloss black and screwed it down. After that I started working on a gas pedal setup. I fabbed it together and painted and installed it. I continued the work in the drivers foot well, etc. with painting, installing a new NOS dead pedal rubber cover I got from Z car Depot, and then installed the seat belt, and did some interior painting on the vinyl that goes down the side below the drivers door. I need more parts to finish what is left there, so I then went ahead and unwrapped my carbon fiber body covers I got from JP fiberglass. I used duct tape to hold them on, and then marked the top edge of them for installation later. I will use small #6 black headed screws. Busy day! PICS:
-
05-22-2026 ATLAS Z UPDATE. Today I picked up my exhasut I took in to get the last of the welds done. All nicely TIG welded. I dropped it off at J&S polishing to make it shine like chrome. PICS: