
bjhines
-
Posts
1963 -
Joined
-
Last visited
-
Days Won
4
Content Type
Profiles
Forums
Blogs
Events
Gallery
Downloads
Store
Everything posted by bjhines
-
-
-

K type R-180 spline count problem....please help!!!
bjhines replied to bjhines's topic in Drivetrain
ok.... I am not trying to be confrontational....but no...you are wrong... you should read my posts completely...not just the first 2 sentences... Bar stock turned down would not work without broaching splines as well.... you might as well have some custom CV axles made.. You need to think about the shapes and just what has to be done to get your "button" to engage the snap ring... It absolutely must be splined to get in there and lock past the snap ring.... You cannot use "bar stock" turned on a lathe to do this.... by the time you turn it down to fit down the hole... you will have no material in the grooves to contact and engage the ring...unless you cut the splines out of the side gear past the snap ring... but then what would keep the "button" from rotating when you went to put the bolt in... in fact this would allow the "button" to possibly come out and ruin your brand new differential... and besides... you must have positive engagement of the retaining bolt in order to compress the oil seal under the washer on the retaining bolt. and why in the hell would you make a "BUTTON" anyway.... Nissan or FHI already made the right buttons and installed them in all the old style 240Z rear ends... simply pop them out of old side gears and pop them into new side gears... sooo feaking simple I cannot believe I am the only one who has figured this out.... I am definitely making a trip to the JY this week... I need to find out what the spline count is on the SUBAROOO R160/180 LSD units.... if it is 25 spline then I am going to start selling my knowledge... I am REALLY surprised that no one has even attempted to do what I have just done.... I used only hand tools I could put in my 2 pockets to move parts from an old R180 to a new K-R180.... I made this changeover in less than an hour... with stock parts with NO MODIFICATIONS TO ANYTHING. NO LATHE, NO PRESS, NO GRINDING..... I am absolutely positive that this will work on any R180 with 25 spline stubs.... including later model Maximas, 200SXs, and some Subarooos. I began this morning with the intention of swapping side gears OR carriers... the side gears are different...cannot be swapped at all... swapping the carrier would have required resetting backlash and major work pressing and repressing bearings until everything was correctly set up... NO friggin way... not on a brand new factory set up rear end. It turns out that all you need is the threaded "buttons" the factory provides in the old rear ends... they pop right into the newer style side gears. -
K type R-180 spline count problem....please help!!!
bjhines replied to bjhines's topic in Drivetrain
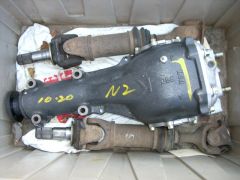
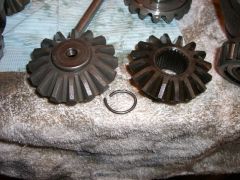
Tried that route...not goona happen.. It becomes obvious upon further inspection that the hole is all the way through... too large to tap using the existing bolt... there is no material to cut that does not have this hole... You certainly don't want to even get into making a bigger bolt fit.. But if you read my above post.. I simply transferred the threaded insert from an old set of side gears into the brand new K series side gears... And no.. you cannot switch side gears.. The gears are much thicker on the late model..no go..either way you try to swap.. gears must stay with original case.. As it turns out.. the inserts fit only a few millimeters into the sidegears... they are self broaching inserts made of a softer steel than the side gears... they popped into the new side gears and engaged the splines with a few taps from a hammer... I was worried that once the side stubs were installed and the bolt was tightened... it would cause the stub flanges to crash into the seals or worse... this is not the case... the shouldered area on the early stubs is in exactly the right place on the new K series differential... they fit against the seals at exactly the same clearance as the original fit... of course if anyone had a problem with this... they could stack washers to allow torque on the centerbolt and good sealing around the center washer.. but I had no problem... I will post pictures of the dissasembled carriers and the parts tonite....as well as the completed unit with early style stubs installed and bolted tight and sealed. -
K type R-180 spline count problem....please help!!!
bjhines replied to bjhines's topic in Drivetrain
sorry.... I did not mean to come off as unappreciative of your input... I really do appreciate all of the responses... I simply meant to emphasize... I found the easy way.. It is in the car and I made use of my original 240Z bolt in style stubs...!!!!! I dissassembled the carriers of the new and an old differential. The side gears are different dimensions... soo I could not switch gears... BUT!!!! the old style end gears had a threaded insert pressed into them to receive the axle centerbolt. I simply pounded the insert out of the old side gears and pounded it into the new side gears... minus the snap ring.. I reassembled the brand new carrier with the inserts in place and I left out the odd little thingy around the center pin that keeps the the stubs from inserting too far and destroying the outer seals. I reassembled the carrier into the diff housing and it now accepts center bolt style stubs with 4 turns of the bolt engaging threads and no bolt protrusion into the carrier parts... It is PERFECT... essentially a 1 hour project.... DONE!!!! -
Did you try other manufacturers that use this diff... Like Subaroooo.... They may have the parts you need....on the cheap too...
-
K type R-180 spline count problem....please help!!!
bjhines replied to bjhines's topic in Drivetrain
First off.... If they use a BOLT to secure the stub...the STUB WILL NOT BE LONG ENOUGH TO ENGAGE THE LOCKING RING. this is a fact... so I do not believe the 260Z stubs will get me anywhere but into the same problems. ok.... I am trying to consolodate parts in my garage into my various operational Z cars... I have a pile of good, new, and slightly used parts that I keep collecting... They are just sitting on my shelves.... seeing how my wife wants a new house... I am trying to cull the collection... the last thing I need to do is to begin collecting even more parts that I may or may not be able to use... Lets be real... there are soo few of the ONE year model 260Zs left that I could wait months to find those stubs... and there is a good chance that I will have to try a few times to actually get the correct parts... There has to be an answer in my existing parts pile... I was measuring the depth of the locking ring in the differential last nite.... It appears that the "normal" 240Z stubs are EXACTLY the right depth to just contact the locking ring when they are pushed against the seal face... This means that I can cut a slice off another stub shaft like you would slice a bannana for cereal... It cannot be very thick... but it can be at least a quarter inch thick... Then I weld that to one of the original 240Z stub shaft retaining bolts with just enough clearance/slop to allow it to go past the locking ring...ie. the slop would be equal to the thickness of the locking ring... Obviously the bolt would not be removable without grinding or cutting the splined nut/bannana slice off... but soo what... can pop the assembly in and out just like it is supposed to work. this would allow me to LOCK the side flanges in without any trouble at all... I would simply slide them in.. and then tap the end of the bolt to drive the splined bannana slice past the lock ring... Seeing how Nissan made the older and newer style stubs with similar dimensions except for the extra material for the retaining grove ... I can just add the bannana slice without racking up any time or money in machine shop time... this appears to be a very low tech.. relatively easy solution... -
K type R-180 spline count problem....please help!!!
bjhines replied to bjhines's topic in Drivetrain
I have a quick thought.... I need to go to my pile of dead and dying R180s and pull an output stub... I am absolutely positive that the "bolt in" stubs will not be long enough to engage the locking ring... Here is a thought.... tell me where this might go wrong... I take 2 sets of drive stubs out of 2 old 240Z R180s... I use the best pair as my "custom" stub flanges... Then I cut a worn spline set up to use as "splined nuts" that are welded to the center bolt in the right position to just slip past the locking ring to keep the stub flanges against the oil seals... the bolt may rattle around a little... but as long as it keeps slight tension in contact with the oil seal I would be ok...I will have to remember to chamfer the splines on both ends of the nuts soo I can get them in AND out again. then I dont have to worry about machine work..I have a steel cutoff saw, a band saw, and a freaking PILE of old R180s with plenty of extra stubs.. -
I have a brand new long nose R180 39:11 gears with a BIG K embossed on the top of the housing... it fits an '83 Maxima I think...??? I know it was for a later model car.... but I have it and I have attemped to install it in my 1972 240Z using the snap in halfshafts from a 280Z... I have come to realize that the R200 snap in style halfshafts are NOT the same as whatever was on the car this was made to fit... The 280Z halfshafts have 29 splines on the side flange. The K-R180 diff seems to accept a 25 spline shaft. The drivers side R200 splined output shaft is considerably shorter than the passenger side... the R180 seems to require the same lengnth on BOTH sides.... I figure I need to get side flanges from a 1983 Maxima??? to fit the late model R180... But can the Maxima??? side flanges be mated to 240-280Z style driveshafts..... Any help would ne greatly appreciated.. I have the day off tomorrow soo I can make a trip to the JY... I am trying to get the car ready for Sebring Jan 21st and 22nd...
-
WHy don't you post... 1. what your problems are... 2. what the mechanic did that cost XXX$ 3. Explain to us what the orientation of your Weber/Cannon dual DGAVconversion is. The way things often work out... A mechanic replaces an item on an old car... several other items had to be removed or loosened... a little while after the repair was made the car begins to malfunction again. When the customer takes it back to the shop they blame the mechanic for faulty work... The mechanic cannot be held responsible for repeated failures of old components on an old vehicle... unless you can prove he was negligent. you will never be able to prove anything with an old car you know little about. It is the mechanic's responsibility to carefully check each system associated with the repair BEFORE they begin work... as the work is performed the mechanic should make decisions as to whether additional components need to replaced... He should inform the customer of the additional repairs as they are discovered. This way everyone has covered their bases. What often happens is that mechanics avoid informing "odd" customers about the need for additional repairs... for obvious reasons...the car may be in need of a restoration, the customer has no money, the customer has no sense, etc... or they just end up doing part of the work and quitting whenever they run over the estimate... Communication is KEY!... you can only tell him where it hurts...it is up to your mechanic to fix the problem... Restoring an old car is best left to a loving owner... Carby jetting takes research and parts sources... You have an entire forum here to help you rejet your carbys... Your mechanic is dreading the time he will have to spend making phone calls and seaching the web for Weber parts sources and information on what parts to order... there is time spent waiting for parts... sometimes it takes several orders over weeks to get the right jets in hand and installed. I would assume a mechanic would rebuild the carbys and reset float levels and road test the vehicle bofore any jets were changed. I recently installed a set of Weber DCOEs... I purchased another 240Z and they were on it and running relatively well... all I did was swap them over to another 240Z I own... WOW... was that ever a job... $500 in parts alone to complete... est 16 hours labor over 4 weeks. Extras included crappy warped header.. had to pull first gasket, remove header and have it leveled and reinstall in/ex.. with extra clipped washers where the flange was ground thinner... that alone was 4 hours of BS labor. I port matched head/manifold and manifold/carbs.. I also installed a vacuum manifold to all runners... I had to replace the "soft mount" rings be cause they were 40mm in a 45mm application... the new mounts were much thinner and caused interference with the cold start housings... I had to grind the manifold in several places for clearance... this took a week because I had to order new mounts the first day I began work on the project... I fiddled with the porting while I waited on parts. The jetting took me 3 cycles of ordering parts... The new application was on a mildly prepped 2.4l... the old application was a race prepped 2.8l... the "choke"/venturis were 36mm.. WAYYYY too big for the 2.4l... I tried 30mm first because I found some used... too small... I ordered 34mm... they are just right for track but still too big for street... each time I tried new venturis I had to go through the whole process of rejetting... I now have a $400 tacklebox full of jets and venturis I am not using.... and I could never have paid for anyone to do this job... It would not be worth it... with carbs included you would be looking at $3k.. assuming you purchased used carbys for $1000 or less.
-
you have to remember that the aluminum HVAC tape has an adhesive that is not made to suvive high temperatures... It may be a fire hazard under extreme conditions...
-
Another choice, 1974 260z - Should i get it (pics)
bjhines replied to 240zV8's topic in Gen I & II Chevy V8 Tech Board
just remember to check for damage and rust in all the right places...you would do better to buy a straight, relatively rust free car for $1000 more. -
maybe I missed something... but the back side of the airbox needs to seal tightly against the underside of the hood to provide proper air flow... If air travels across the filter into the engine compartment you may actually induce slight vacuum.. or turbulent pulsing..
-
ok... I have very little personal experience with mechanics... I successfully rebuilt the manual tranny in my 1975 Toyota Corona station wagon when I was 17... With absolutely no help from my father or anyone else... just the Haynes manual. but I do have a friend who owns a shop here in Cary NC... Happy Japs... and he tells me stories about customers who defy all common sense and logic... Soo from a mechanic's perspective... a lot of customers expect more than they should from their chosen mechanic... It is very hard for a mechanic to decide exactly what needs replacement and what should be left alone on an antique car... They need to address problems as they see them... not the way the customer sees them... you would be amazed at peoples' "self diagnosis" of their cars.... for instance "It is smoking...please replace the muffler" kind of crap. The best thing for you is to find a mechanic that you can communicate with. He should listen to you.. and he needs to have confidence in your ability to self diagnose problems... only then can you expect to take it in to shop and get specific items replaced on an as needed basis. Really... if you know what the problems are as they arise... then why in the hell would you even take it to a mechanic... Diagnosis is 75% of the work.. Personally... I take my cars to the shop whenever they need Tires, inspection... or for air conditioning repair...that is it... Ohh... and Mechanics are NOT the place to get custom electrical work done... that is really asking too much... electrical work is a whole different profession... you need to find an auto electrical specialist... or a Datsun Z car specialist if you want electrical work done... automotive electrical systems are entirely different than "normal" electrical systems... for a lot of reasons.. including safety and fire concerns.
-
You will need an entire timing gasket set... it's just a few short of being an engine rebuild set...... I would order a new oilpan gasket and valve cover gasket if it is not part of the kit.... Reassembling the timing cover with the existing oilpan gasket really depends on how carefully you remove the cover in the first place... The upper suface of the cover contacts the head gasket... so be careful there too... I can assure you that an old engine is going to be more problematic... old gaskets do not survive removal... Typically older engines may warrant a rebuild using original parts... cleaning, honing, and new rings and bearings can work wonders for an old mill on the cheap... typical headwork is less than $300 using original parts with new seals and springs. Keep in mind that you may need to replace water hoses and fuel lines.. for instance the fuel rail is often in the way and must be removed.
-
remove radiator, fan, waterpump, front oilpan bolts, front cover to head bolts, all the front cover bolts, harmonic balancer, oil pump, distributor, alternator, air pump, and prolly half a dozen more things depending on the amount of factory crap still in your engine compartment... you will prolly need to loosen serveral rows of the oilpan bolts to get enough clearance to get the front cover off. Just how did the "chain skip a tooth".... ???... there is no amount of trying or wishing that will correct the problem now... you have to pull the the entire timing system and front cover apart.... You might as well install a new timing set, oil pump, drive gear, water pump, and harmonic balancer, and do yourself a favor and buy the chain tensioner that has the keeper to "keep" this from happening in the future.... again MSA is the source... I would purchase a proper chain tool from them if I were in this position.
-
ok.... For all the NON-engineers.... I can't even get auto-cad to payoff in time spent for productive results. there is always some adjustment built into any system... I tend to find what the limits of adjustment are and shoot for initial settings that give me "room to play". I used the old paperclip in the spark plug hole... I was able to see it move up and down around the TDC point... It didn't take very much effort to find a DAMN NEAR PERFECT TDC.... then I just went to a club dyno day event and spent 75$ making 5 or 6 runs to get everything dialed in. I tend to plan my car projects around our club dyno days... Cheap runs... and you can space them out over an entire day to allow major changes in between.... It only takes an hour or so to change dowel positions on the cam sprocket although I have never gained anything by advancing or retarding from initial assembly... you can change ignition timing with the engine running.... Don't get all hung up on accuracy... just make sure you have room to adjust... Cam and ignition timing are pretty easy... there are not very many settings that will work properly at all... you can bet that once you find the right setting it will be right under all driving conditions..... Tuning a set of Triple Weber DCOEs is an entirely different kind of tuning... there is NO SCIENCE to tell you the perfect settings are for your car... There is so much variability in that kind of system that it is only possible to tune them on an open road or race track... even then.. what works at one venue does not work well at another.... even a dyno is worthless when it comes to fine tuning Webers.
-
I might add.... Do not hammer the wedge in there too hard...You will bend the chain guide rails...they are just plastic and very soft sheet metal. The tensioner spring is WEAK...but if the chain slacks off...the tensioner will pop out of its bore and hang up the entire works. The wedge needs to clamp the chain enough to prevent the lower tensioner from pulling all the slack out...getting the right angle and shape to do the job is critical or you will bend something and still have it pop out... A rough cut piece of wood will leave bits in the chain and lower front cover... Buy the correct shaped chain tension tool from MSA or where ever... It will snug the chain up securely without bending the chain guide rails.
-
How much did everyone spend on their V8 Conversion?
bjhines replied to a topic in Gen I & II Chevy V8 Tech Board
I spent $5K on a track prepped 240Z with a modified L24 drivetrain... It amazes me how many new and expensive cars it will overtake... It also gets several events out of a set of slicks.. I get multiple events out of brake pads as well... Come to think...I get SEASONS out of rotors and drums... I admit... The ole 1972 pancakes and drums are crappy... But the thing stops just fine except at CMP in Kershaw SC... I see guys in Corvettes burning up consumables to the tune of $500 a DAY!!!...AND I can catch them repeatedly... The drivers always say they were conserving Tires/Brakes for the time trials.. Big cars EAT BRAKES and TIRES...there is a lot to be said for a small, lightweight sports car with a lot of power... you can drive the hell out of it all day long and still go home with treads and brakes. I am currently building another Hybrid track Z.. I have 5K invested and it still hasn't really gotten off the ground... I expect it will be one of the fastest cars at open events... and it will still be relatively easy on consumables. The cheapest car I have ever run was a 1985 Toyota MR2.... The engine had 100K miles on it when I got it.... It ran like a scalded dog and I could not kill it... I even threw the timing belt at high RPM and it survived completely unharmed... I had it fixed before the next day... The Toyota was light.. and it was cheap to run... But I did not care for the forward seating position or the weight balance.... It did not feel as planted as the Z does with similar suspension mods... worst of all... the Toyota had no room for a bigger engine. -
ok... I did not see anything pertaining to a sports car application... The thing on the website is for commercial vehicles using air brake systems... It is huge... and it is heavy when compared to a conventional rotor and caliper... It uses AIR pressure acting on a flexible diaphram... NOT HYDRAULIC FLUID!!!! The weight savings mentioned are for a comercial truck... air operated drum brake system including the axle mounted actuators and the redundant parking brake components.... this is a whole lot of huge hardware that has absolutely no relation to what we use on modern sports cars..... I mean really.... am I the only one who acually read this...or did they change the product and the website just now.
-
Drums that actually work? Anyone?
bjhines replied to a topic in Brakes, Wheels, Suspension and Chassis
ok.... something is not assembled right... OR you did not understand the function of the automatic adjuster lever.... If your E-brake cables are in good order... then the rear brakes will adjust themselves with repeated pulls of the E-brake handle.... I am still running drum brakes on my 1972 240Z track car... I have seen a LOT of people new to Z cars having difficulty with the rear drum adjustment... you need to really sit down and look at how the lever engages the cog wheel adjuster... This same lever can be "unhung" and then the adjuster can be turned with a screwdriver to loosen the shoes to allow them to come out of a worn drum. during assembly I usually leave the adjuster in its "smallest" setting... Once I have everything assembled and the wheels are torqued to specs. I repeatedly pull the E-brake handle until I can no longer hear a clicking noise from rear brakes.... this is PERFECT preloading. There is no other way to properly adjust the rear brakes... period. -
I have a 1972 with dealer installed air con... I pulled out what was left of the system.... I actually have 2 of the under dash fairings to hold the evaporator coil...
-
ok... I am a big dremel fan...but it is not appropriate for head porting... A $25 air powered die grinder with a $25 long reach carbide burr will get the metal removed quickly and in a controlled fashon... then you can use your dremel tool to smooth out the surface... although an $8 tapered roll mandrel for your air grinder will make the dremel seem absolutely useless. The thing is... once you have decided what to remove... and how you are going to approach it... you are almost done with the task... It literally takes seconds to rough cut an intake port to match a new manifold... It only takes a few minutes to smooth it out to final shape and surface... You would wear out that shiny new dremel tool before you got half the ports done... the air tool would do the entire job far faster than you could figure out what to do next. Ohh... and the most useful tool available for a dremel is a truckload of the FIBER REINFORCED CUTOFF WHEELS and a few extra mandrels for them... you can pretty much tip the box of freebie bits into the trash can...and the little red cutoff wheels go in the trash too.
-
The folks who proudly proclaim "Big American Iron" when they refer to V-8s are failing to see what kind of engine they are actually refering to... The V engines dating from the early '50s made by American car companies are "compact" designs that allowed engineers to place truly powerful engines in affordable cars... Their success was not achieved through displacement or power directly...but by the ability to fit them into relatively small vehicles. Many cannot get their heads around the fact that a stout MODERN inline 6 can reliably put down big American V-8 power.... The whole notion that there is ""no replacement for displacement"" is an old timer's quote from a bygone era... Modern technology has allowed tiny engines to produce amazing power.. This attitude about displacement fits right in there with the audiophiles who refuse to abandon the vacume tube...
-
Yokohama makes slicks that are 250/590/15 .... for 10" wide wheels.... They can be had for around $160 each.