
bjhines
-
Posts
1963 -
Joined
-
Last visited
-
Days Won
4
Content Type
Profiles
Forums
Blogs
Events
Gallery
Downloads
Store
Everything posted by bjhines
-
I hear ya.. I based the price i have been asking for a set of Hyashis on these ebay prices.... There are just too many new wheel options out there.... These "JDM" wheels are throwbacks to a time when they were not commonly imported to the US market... Now there are stores on every corner in some towns that have all sorts of knockoff wheels for all cars... Lets put it this way... I have a cool set of "JDM" wheels... but I would love to have a brand new set of more up to date lightweights.... until folks get tired of seeing "Rewinds" on every Zcar.... my JDM mesh wheels will not draw much attention...
-

brake feel is not what i want... help!
bjhines replied to olie05's topic in Brakes, Wheels, Suspension and Chassis
the pressure bleeding kits are CHEAP! like 30$....it is the same idea...garden sprayer... They use a cap to fit over your MC reservoir and feed brake fluid under slight pressure into the reservoir and through the system... They have a tube that sicks down into the cup.. so that you can fill it halfway and the bleeder will not overflow the reservoir... -
I have a set of 15x10" wheels with 5 3/16" BS.... these just clear the threaded strut tubes with short rear coilover springs... I realize that a bigger wheel will allow a little more backspacing.... but only another 1/2" or so.....
-
15x7 Konig Rewind Tire Size - Need Help
bjhines replied to Lewis Maudlin's topic in Brakes, Wheels, Suspension and Chassis
some people have trouble with fitment in the rear upper wheel arches... I run 225/50/15 Kumho/Toyo on 2 different sets of wheels... I had to roll the top portion of the rear wheel well lip... This is probably because I have pushed the wheel position out slightly with rear Camber bushings. Hoosier's DOT track tires are definitely wider than most tires... 225 Hoosier will not fit where most others barely clear.... -
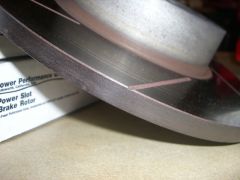 edge view of powerlsot rotor
 -
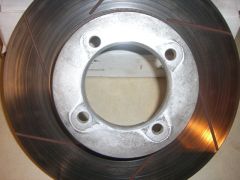 straight, uncut Powerslot rotors.. with no heat damage
 -
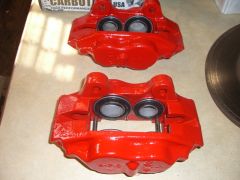 underside of rebuilt calipers
 -
 freshly rebuilt, painted 1984 Toyota 4runner calipers for stock 240, 260, 280Z disks
 -
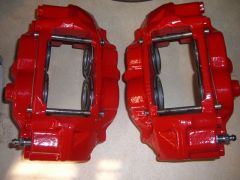
 1 pair of newly rebuilt, painted calipers 1 pair of Powerslot disks 1 pair of Brembo disks 1 set of Carbotech Panther plus XP9 race pads 2 sets of metallic street compound pads
 -
that is stout!!! and light!!! nice work... I dont have access to the machine tools to do anything like that.... But shouldnt the inside corners be radiused to prevent cracking...??? especially if it has to withstand twisting stress...
-
what wheels are those??? what distributor sells them?
-
That is some nice seam work with the wire feed welder... I have 2 S-30s that have exactly the same problem you are describing.... I fixed one of them by sand blasting the cowl area from above and welding in patches....pain in the butt... I think that the best way to get it fixed permanently is to cut a hole in the firewall right in front of the "snorkel box"... you can remove the rain cover by simply drilling the spot welds... that should provide good access.
-
My 1995 Toyota Land Cruiser does this to it's front pads...as they wear down they form a lip that overhangs the rotor....It bothered me at first... but it has never caused any problems... The brake system on my Land Cruiser is COMPLETELY STOCK... and it does this... If this problem bothers you... shave the outer portion of the pad down with a band saw...grinder... or a hack saw...
-
The factory manuals will tell you all about the sizing and proper assembly of the diff... There are several areas that have letters and number stamps... For instance.. The carrier case has letters "C" and "D" with numbers stamped near them... These are cryptic indications of the actual finished measurements of the case to the 1/100mm.... You can purchase shims from at least one manufacturer... The original shims may be reversed... or the idiot may have really buggered up the inside of the differential housing.. making accurate shimming impossible...
-
WHOA!!!!!! I would call the bank and cancell the check immeadiately... I would call the better business bureau with a nasty report... I would call a lawyer considering this is an EXPENSIVE component...beyond small claims court... He is liable for the parts he screwed up... AND... I would have gone down to his shop and lambasted him in front of his employees...or coworkers... """"""""""""""""""""""""""""""""""""""""""""""""""""""""""""""""""""""""""""""""""""""""""""""""""""" To fix your problem.... The Nissan factory manuals are the place to go for information.... They cost relatively little compared to the cost of a fully functional LSD differential. On the other hand.... The common shop information sources like "All Data" are good for some things... not so good for others... Nissan LSD IS NOT covered in the "All Data" manuals...... If you call for more information they will insist that there is no information for any of the early Nissan/Hitachi LSD units... To address what the bastard did wrong.... well.... He got up one morning and went to work as a mechanic... He should have been digging ditches or picking up garbage in the park.... Do not believe ANYTHING he has to say...He is soo clueless he does not even realize how much he doesn't know.
-
Has anyone had a similar problem to date???.... And keep in mind.... Regardless of the mounting methods used for other major components.... The problem occurs because the front of the diff is mounted rigidly and the rear of the SAME unit is mounted in a flexible manner... the differential is ROCK HARD and will not flex... soo the forces are concentrated in the relatively weak and flexible REAR CROSSMEMBER.... destroying it over time. The original mount allowed the differential to move around without stressing the crossmember..... the crossmember was never flexed because the mount did more than enough flexing... To maybe address some confusion....the load limit of the rear crossmember was never exceeded... it was just flexed to death... The reason for stiffening up the mounting locations for the entire driveline is simple.... Less windup means a quicker and more predictable reaction... it keeps the gearshift in your hand under severe loads... and it keeps parts from crashing into the chassis under hard launches and missed shifts...
-
Well.... If you want to keep the wheels tucked under the car... you will need coilovers.... This is not for looks as much as it is to keep bearing loads as close as possible to stock loading.... Most people using 10" wide wheels need short rear coilover springs to keep them from interfering with the rear tires... and short rear springs will require STIFF springs to keep them from bottoming out and binding.... Keep in mind that lowering the car 2" will require shortening the strut housings and using alternate strut cartridges... Soo... what you want to do to the car... and your intended use... DO NOT MATCH very well at all....
-
New pics of damaged 240, How would you proceed?
bjhines replied to a topic in Brakes, Wheels, Suspension and Chassis
I have a white 240Z shell that has been hit in the rear... rust free... too bad you live on the other side of the continent... You could easily cut and paste... so to speak... I would leave the damage ALONE... until you have taken it to a FRAME repair shop... they will get it straight...... then you can decide what to do about pulling the wrinkled metal or replacing it... the point is... once the car is back in square.... you can brace off an area and then cut out the damaged portions...then weld in sections from a donor car... grind seams ...add a little filler ... and there you go.... you could make it nearly impossible to tell the car was ever hit.... -
hiyashi rims any info?
bjhines replied to Turbo280Z's topic in Brakes, Wheels, Suspension and Chassis
well.... considering my future Willwoods will not allow me to use ANY of my existing wheels... I will be selling within the year.... The Hayashis..., 15 x 7 stock fit The Enkies that match the Hayashis..., 15 x 7 stock fit A set of MRT composite wheels..., 15 x 8.5 need flares..stock springs A set of Revolutions..., 15 x 10" need flares AND coilovers AND long studs plus several sets of 14" mags... all stock fit 6" wide I have no idea what they are worth individually... but the full load should get me 2 sets of 16" CCWs with a little extra cash out of my pocket. -
hey... if this stuff was easy we would all be driving Ferraris.. or our own equivalent... I simply employed a solid mount that was readily available...I used the prerequisit "poly" mustche bar mounts... and it caused a miserable failure of my rear crossmember... I really doubt that ANY mounting method using the original mustache bar would be sufficient.... Hence.... The solid mounts that are commonly sold as "upgrades" are a good way to meet god if you use them for more than just a few years...
-
ok... the extra force will come in shock torque loading in the driveshaft...but it is not the kind of binding and twisting that is damaging the crossmember... You cannot convince me that the engine and tranny mounts will degrade or fatigue simply by mounting the differential solidly...
-
cliff's idea seems to be the best I have seen... 2 tabs and a bolt...I owuld sandwich some rubber between the bolt and the bottom of the crossmember to make sure it was always under tension and could not ding the crossmember too badly... Does anyone else think that welding a large area on a piece of spring steel/mustache bar is a bad idea....???
-
I have to agree with 2126 abd Zguy36.... There is no more force applied to the engine tranny when mounting the diff solidly... Hence the telescoping AND universal jointed driveshaft... The engine/tranny and the Differential are DIVORCED... There may be a difference in "feel" because the deflection of the soft differential mount is gone... less "windup"... the drivtrain will feel more solid... but this would not add stress to the engine/tranny mounts... JohnC is correct and the solid mustache bar is a great idea... the differential front mount takes force in 2 planes...vertical...and fore and aft... fore and aft does not seem to be that big of a problem... it is the vertical force that tears things up... I am going back to a soft mount and I am adding a "strap" to hold it against the NEW crossmember under accelerating force...
-
that heat in the mechanical fuel pump is a good thought... I placed a temp probe on it after a hard session in 90 degree weather... that sucker was HOT!!!.. but it did not exceed 150 degrees... But the heat transfered to it was always a concern in the back of my mind... I have had good luck with the car's fuel system soo far as it is.... I would say that any well insulated system that is properly designed from the start will work well in a variety of conditions... A few thoughts though... I use the mechanical fuel pump as a regulator as well... just cheap, available, and already on the car....I have a holly red pump and matching regulator on a shelf... I was waiting for a reason to use them... I have no reason to change at this point. You want to place the regulator as close to the carbys as possible... you also want to minimize the effects of hose swelling/expansion... The stock fuel rail is hardline... and the pump is right next to it... Soo stock pump and rail is a great system.. as long as it is properly insulated... I used the original fiberglass/asbestos insulating wrap where the rail passes over the manifolds... I used a 260Z rail with plastic insulators between the tubes and mounting ears... you could further insulate it by modifying the mount ears to keep them from conducting heat from the bolts/head.
-
ok.... The car has Zero rust.... the failure is probably because the mustache bar is a spring...and...It is indeed mounted using poly bushings... I have 3 other Z cars... I have never seen this cracking before... It is unique to the car with the solid front diff mount... I am getting my kid to bed now...naptime is enough for me to get some better shots while she is sleeping... I am concerned that the short nose diff mounting bars will cause a cantilevered/ lever situation and do this to the unibody of the car....