Search the Community
Showing results for tags '240sx'.
-
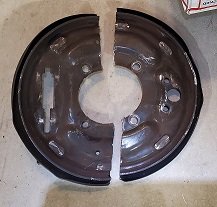
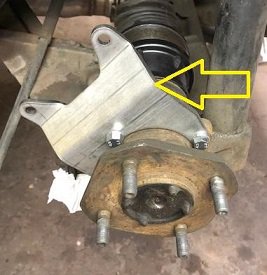
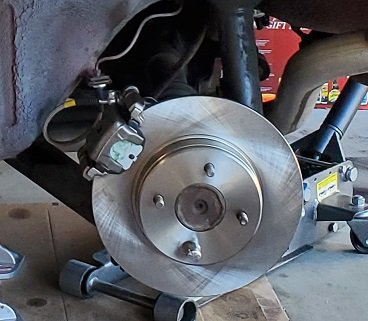
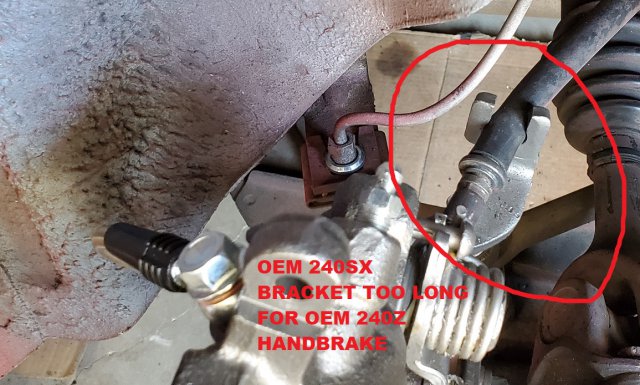
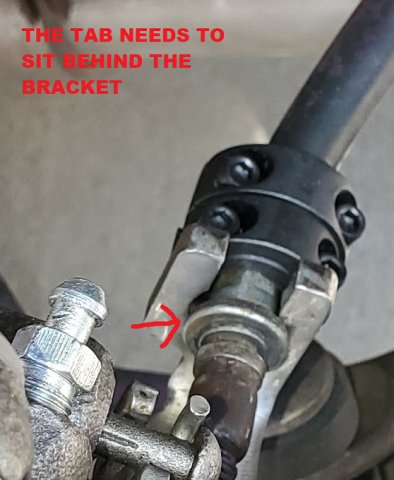
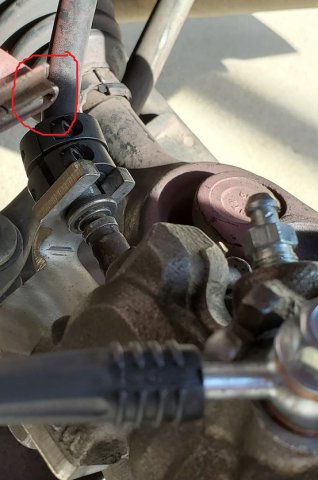
Hello HybridZ! My 240z recently seized up its drums at the track and I thought it is time to convert to a disc brake. I went with the kit from Zcardepot and ended up adding some parts of my own as well to make it work. Here is my review and headaches and pointers from installing this kit. I will go though the process and when the issues occur will be written in chronological order. GOOD POINTS WILL BE HIGHLIGHTED IN BLUE. MEH I AM NOT MAD NOR PLEASED IN GREEN. BAD POINTS WILL BE HIGHLIGHTED IN RED. 1. Removing the Stock Drums There are tons of write ups on this. I chose to cut the back plate because I will never really go back to drums, and I have had it with the drums seizing or messing up or not adjusting right, and messing up my brake points. OEM brake lines were easy to remove since I soaked them in PB. Clips were easy with pliers, and a wrench. 2. Bolting up the ZcarDepot bracket. THE GOOD There is really only one way to bolt up the bracket and Zcardepot has many photos and write ups on this part. So here is a photo from their website(no copywrite infringement intended 😊) Both the stock bolts work and the new JNC bolts that Zcardepot supplies. 3. Bolting up the Calipers Clean up the hub and slide the rotor on. Put a lug nut on and hold the rotor to the hub surface. Now the rotor spins in line with the hub surface. With the whole caliper try bolting up to the zcar bracket. THE MEH, the calipers needed to be shimmed on the driver side caliper in order to center the rotor in the middle of the caliper slot. The passenger side is okay and did not need any shims at all. I have installed willwoods on several cars and they also required shims to get the caliper and rotors inline. SOOO thinking I would rather have to shim the caliper outward than having to grind the back plate or caliper retainer. 4. Hooking up the brake hose (hose is the flexible bit, hardline is the solid metal bit) The brake hose used are some 240sx rear brake hose, I recommend a stainless braided hose. I had some 240sx braided hose sitting from my older projects so I used those instead and they are DOT, but for a 240sx. THE BAD the idiot installing the kit ME 😂 This was my problem, caused by me but you might run into a similar issue with the normal rubber hose provided. The brake hose are quite short for the application and I recommend a brake hose that is at least 15inches long end to end. The 240sx brake hose is 12 inches end to end. The good thing is the 240sx brake hose is just long enough to clear all the critical points. 5. The handbrake.... THE BAD THE PAIN THE STRUGGLE Everything was going smoothly, up until this portion of the install. Trying to get the oem handbrake to work with the 240sx calipers. There are two options now. If you have the oem 240sx handbrake brackets (rare) you will need to make an adapter plate to link the 240sx caliper handbrake hook to the 240z handbrake cable. Here is a picture from a nice man who has a page on how to install the 240sx rear brakes from way back when. http://www.zhome.com/ZCMnL/tech/Calipers/zbrakeupgrade.htm If you have the Zcardepot 240sx handbrake brackets (provided with the kit) you still need to modify a few things. I have both but I chose to go with the zcardepot handbrake bracket. On the OEM 240z handbrake there is a flat tab, that flat tab has to sit behind the flat of the caliper handbrake bracket. The Zcar depot brackets are shorter than the 240sx OEM handbrake bracket, this makes is possible to simply hook them up. BUT HERE COMES THE BAD the driver side bracket was too long and I could never get that tab behind the flat of the zcardepot handbrake bracket. The passenger side zcardepot bracket was perfect, and the 240z OEM handbrake fit perfectly. I ended up using some shaft collars on the oem handbrake to hold the handbrake tab on the driver side. 6. CONCERNS JUSTIFIED After having bolted up everything I am really concerned with a few things. 1. The bracket for the handbrake is really close to the chassis and the OEM brake hardline. 2. The handbrake cables being too close to the drive shaft. I know you can swap sides and it fixes it, but I just used a zip tie and held the oem cable to the mustache bar. As its turned out I the bracket made contact with the mountings. here is a photo of what happened when I compressed the suspension. THE SOLUTION COMES IN THE FORM OF TWO THINGS. 1. THE BRACKETS NEED TO BE PUSHED TO THE REAR OF THE CAR AND THEN BOLTED 2. BUMP STOPS NEED TO BE THERE AT LEAST 1INCH TO KEEP THE HANDBRAKE BRACKETS FROM MUNCHING YOUR BRAKE LINES. Overall, the kit works perfectly fine. There aren't any major issues that cannot be fixed by normal means. The braking is greatly improved, with much better pedal feel and heat capacity. I am running the 280zx master cylinder as well, so that helps. BRAKE balance is just as good as properly adjusted drums, I will lock up the fronts a touch earlier than the rear, but all 4 wheels will lock up with R comp tires on the car. The rear of the Z gets a few mm increase in width because the oem drums are not as thick as the rotor. The kit gets a 7.5/10. A passing grade.
- 7 replies
-
- 1
-

-
- 240z
- disc brake conversion
-
(and 3 more)
Tagged with:
-
Looking for an '89 - 98' 240sx KA24DE (FS5W71C) 5 speed transmission.
-
74 260z with r200 diff and l28et. I want to do the 240sx transmission conversion. My friend has a donor transmission but its from a dual cam ka24 240sx. Will this work or doe only the single cam 240sx transmission work. Ive read some mixed info. As long as there is no difference aside from the bellhousing then its a go. Thankyou
-
So i finally blew up my 2nd T5 transmission. This time locking it up solid while doing a 5th gear pull on the highway. So i figured now would be a great time to do the 240sx transmission swap I've seen from different articles. I referred alot to the following http://zhome.com/ZCMnL/tech/240SX5spd/transmission.htm Unfortunately this write up is for the S30 chassis, and not the S130 chassis like I have. DISCLAIMER, This swap was done on a 83' 280zx Turbo Couple. It will be slightly different on the Non-turbo, and will definitely be different on the 2+2, but only in the aspect of different driveshaft flanges and lengths. As far as the machining and transmission build aspects of this, it is exactly the same. Where it starts to differ however is once you get the transmission bolted to the engine block. I will explain all of that here. So once you've got all of your machining work done, which I chose to machine my non-turbo Z bell housing to fit the 240sx countershaft bearing size, since a bigger bearing, better load distribution, etc. etc. etc. Of course while I had it all apart, I found the center plate bearing for the countershaft was shot, so I went ahead and replaced both the main shaft and countershaft bearings in the center plate. I got lucky for $75, it only needed 1 bearing in reality, and all of the synchros were in great shape along with all of the gears as well. Once you get it all bolted back up to the motor, here is where there are some slight differences in relation to the S30 The S30 requires some cross member modification to allow the transmission to mount to it, as it is 2" longer. However on the S130, you do not need to drill any holes anywhere. Remove the 240sx transmission mount, and bolt the 280zx transmission mount to the tailshaft housing. Now bolt the rear cross member up and let the transmission down. It lines up perfectly. Next is going to be the driveshaft With this being a turbo car, the T5 output shaft spline is bigger and completely different than the 240sx and non turbo Z output shaft spline. The other thing is the turbo R200 differential flange is different from a non-turbo R200. Now you could just swap the non-turbo R200 flange and have the non-turbo drive shaft shortened, but you still run into the issue of non-replaceable U-joints, and the diameter of the non-turbo drive shaft is smaller than the turbo drive shaft. I was in a pinch at the moment, and did not have a line on a non-turbo differential flange, nor did I want to wait to get one in. So what I ended up doing was having a completely new driveshaft built. It has HD replaceable and greaseable U-joints, and is the same diameter of the turbo driveshaft, and can be lengthened or shortened with ease at any time should I ever need it. My driveshaft guy can get brand new yokes with the proper output shaft splines, and can get the proper matching differential flange as well. So now I have a completely serviceable driveshaft. If anyone else here is interested in them, I will be marketing them for direct bolt in applications with no fabrication needed, especially if you are considering this swap, this will provide the least amount of headaches. Also with my calculations, we got the driveshaft length just right So once you have the driveshaft issue solved, you can move onto shifter clearance. As you can see, since the transmission is 2" longer, it moves the shifter back quite further. It was actually hitting the top of the transmission tunnel. It also now makes the stock shift boot insulator no longer line up, as well as the shift boot trim ring. If you put the shift boot trim ring in its proper orientation, the shifter will hit it when going into 2nd, 4th, and reverse and not allow proper gear engagement. So this has to be rotated 180 degrees. For now I was able to make it fit. It is a very tight fit, but with a little bit of ingenuity, you can get it in there without having to cut or sand down anything. So to make room for the new shifter clearance, you need to remove a 1" by 4" piece of metal from the top of the shifter hole in the transmission tunnel. I also took this time to install a short throw shifter. I just bought some off-brand from ebay, and so far with about 100 miles it has taken my abuse and not given up at all. Feels great as well! The stock shifter is VERY sloppy, and has ALOT more throw than the stock Z transmission shifters. The shifter also sits a few inches higher than the stock Z shifters do, but to me, it is not enough to be bothersome, I actually thing it's a little better being higher up. So back to the shift boot insulator issue. I cut a secondary hole in the stock shift boot insulator to compensate for the offset of the new shifter. I then sourced a shift boot insulator from a 92-02 Chevy Camaro, which seemed like it would get me close enough to what I was trying to achieve. I'm sure there are better options out there, but for my time constraints, I was able to make this work quite well. For proper fitment, this shift boot insulator will require some minor modification. First off, the shifter hole needs to be expanded just slightly. The shifter hole needs to be elongated slightly, enough so that it fits seamlessly over the expanding part of the shifter. All I had to do was remove the very top ring of rubber around the hole, and it fit perfectly. This can be done with a pair of very sharp scissors, or tin snips. The other issue you will run into is the Camaro insulator is a little wider than the Z transmission tunnel This causes the carpet to bow out on the sides, and also doesn't allow the center console to seat properly over the entire thing, it will sit about an inch above the mount holes. Not pictured, but if you flip the Camaro shift boot insulator over, you will see a ridge which is what would ride in the shifter hole on the Camaro and seal against the body. This ridge is what seals against the Z trans tunnel as well, so anything protruding past that on the left and right sides, can be trimmed down. A little bit of trimming with a saw-zall or a cutting wheel will do the trick. Just trim along the sides and the carpet will now sit in a better position, and also allow the center console to sit lower and be able to bolt it down as well. Because of the new offset, and the different size shifter, you will not be able to retain the Stock Z shift knob or shift boot. They were long overdue for replacement, so I got a leather shift boot on ebay, and got a weighted shift knob with the proper thread for the 240sx shifter. Bolt it all down and go for a test drive. It doesn't sit 100% flush like factory, but it will sit flush enough to not move, creak, or look like crap. Overall I'm pretty satisfied with the results. The 240sx transmission definitely feels ALOT better than the crap T5 that I had. It is built ALOT better than what they had in the 70's and early 80's. As I said earlier in this write-up, I will be offering completely serviceable bolt in drive shafts for all swaps. Whether you are doing a turbo, non turbo, 2+2, whatever it is, I can get it made and shipped to you for $500 anywhere in the Continental US. International orders will be a case by case basis. I also will offer to build your transmission so its ready to bolt in as soon as you get it back from me. If you source me a Z bell housing, and 240sx transmission, I will get all of the machine work done, and bolt it all together if it doesn't need any hard parts starting at $600 plus shipping costs back and forth. If you need me to source the transmission and bell housing for you, and other parts, it will be $1200. I am located in Texas should anyone be interested. I'd like to make this swap as easy and bolt in as possible, given the T5's are getting very hard to find, and the non turbo 5 speeds are laughable at best when you're putting down a decent amount of power. Hope this encourages more of you all to consider and possibly go through with this swap. I wish I'd have done this years ago.
-
I've got an idea that is most likely ill advised, but I figured I would run it by those more knowledgeable than I before dismissing it completely! Anyway, let me first list what I've got (this is for a 75' S30 2+2 with an L28ET): I've got a manual 240SX 5-speed gearbox that is out and ready to be mated to my 4-speed bell housing. I've got a P90 head (which was cast with an opening for a mechanical fuel pump, despite not being intended for use with one), a camshaft with an eccentric end piece and a spare mechanical fuel pump. I've got a replacement radiator that comes from the factory with a transmission cooler (as was equipped with automatic models). See where I'm going with this? Would it be possible to pump the transmission fluid through the cooler using the mechanical fuel pump? As far as I can tell there shouldn't be any problems with this configuration, but being so deceptively simple leads me to believe I'm overlooking something obvious. Advantages would be: A.) Cooler transmission fluid. B.) The ability to constantly filter the fluid instead of relying on one small magnet catching only ferrous contaminants. C.) The simplicity of using readily available and professionally manufactured components from within the Nissan family. D.) Cost. I've got everything aside from the few fittings and lines required to connect it all. Disadvantages: A.) Not very efficient. B.) Pump not intended for the heat and viscosity associated with transmission fluid. Comments? Ideas? Suggestions?
- 11 replies
-
- 240SX
- Mechanical fuel pump
-
(and 2 more)
Tagged with:
-
So my 240z has 79 280zx master cylinder, 4-piston calipers with z31 vented rotors up front with perfomance friction pads, and rear has 240sx calipers with akebono pro-act pads and z31 rotors. My problem is the front brakes lock up too easily and I can't stop well at autocross. Has anyone tried a more aggressive autox hawk pad in the rear to help with balancing and have more friction and grab in the rear? Any experience with this? I also saw a mustang kit from silver mine motors. but these won't clear my 14" rally rims. What do you think about trying the pads, or is that a waste of time? Thanks!
-
So, I'm looking to throw these rims on my Z, but in a different color (probably FLAT black instead of gloss black. I found a place that KINDA looks like these, and they'll do them in any offset I need . . MR Wheels They are a little heavy, but they are pretty darn CHEAP for custom offset. I think the rims below are the same ones that I have linked above . . . I'm also wondering about these rims . . . they have 9 spokes which aren't the same as the one I linked to from MRW . . The reason I am looking into these is my car has a very unique rear end. I have fabbed in a 240sx (S13) rear subframe, and this pushes the track out about an inch or so on both sides. I have a set of Extra wide ZG flares, but when mounted the tires are literally already about 3mm from the fender. So, I'm trying to fit in some bigger rears (around 235 - 255) and a little wider fronts (205-215). The front is stock so I'll need to get a prett NEG offset to push them out . . . BUT i don't want it to look weird with the front having more lip then the rear... So I'll probably have to go with something like +14 and then a 10 or 15 mm spacer. If anyone has any ideas, I'm open for options. I was actually looking into a few different options, one being the WORK CR01's, in a A disk and O disk patter for the front and rear respectively. But, this would be in 15, and with 15's I'm limited to 225 MAX width for tires (at least, all the 235 or 255 that I found looked to be like 50 or 60 Height and weren't even performance tires, but more for jeeps or suvs) Your help here would be greatly appreciated. FYI . . Work config . . Front : 15x7.5 +16 with 15mm spacer Rear : 15x9 +45 with 4 - 5 mm spacer
- 2 replies
-
- Rims
- Fabrication
-
(and 1 more)
Tagged with:
